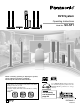
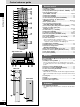
DVD System PHONES r Operating Instructions AV SYSTEM SLEEP TV VCR/AUX Model No. TV/VIDEO TUNER/BAND DVD/CD FL DISPLAY DIMMER 1 2 3 PLAY MODE MIX 2CH 4 5 6 REPEAT 7 POSITION MEMORY 8 9 >=10/ ENTER CANCEL 0 SKIP SLOW/SEARCH CH MENU TOP MENU AC IN DIRECT NAVIGATOR PLAY LIST ENTER RETURN DISPLAY TV VOL – TV VOL + VOLUME MUTING S.SRND FM MODE SETUP SFC SUBWOOFER LEVEL PL C.FOCUS CH SELECT TEST ZOOM GROUP AUDIO C.S.
Dear Customer Thank you for purchasing this product. For optimum performance and safety, please read these instructions carefully. Getting started Operations in these instructions are described mainly with the remote control, but you can do the operations on the main unit if the controls are the same. System SC-ST1 Main unit SA-ST1 Front and surround speakers SB-FS901 Center speaker SB-PC52 Active subwoofer SB-WA330 CAUTION! THIS PRODUCT UTILIZES A LASER.
Table of contents Please check and identify the supplied accessories. Use numbers indicated in parentheses when asking for replacement parts. (Only for U.S.A.) To order accessories contact 1-800-332-5368 or the website (http:// www.panasonic.com). (Only for Canada) To order accessories, call the dealer from whom you have made your purchase. 1 Remote control (EUR7623X20) 2 Batteries for remote control Getting started IMPORTANT SAFETY INSTRUCTIONS ................................4 Disc information ........
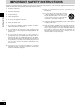
IMPORTANT SAFETY INSTRUCTIONS Getting started Read these operating instructions carefully before using the unit. Follow the safety instructions on the unit and the applicable safety instructions listed below. Keep these operating instructions handy for future reference. 1) Read these instructions. 2) Keep these instructions. 3) Heed all warnings. 4) Follow all instructions. 5) Do not use this apparatus near water. 6) Clean only with dry cloth. 7) Do not block any ventilation openings.
Disc information Disc type ■ CD-R and CD-RW discs Indication used in instructions Logo DVD-RAM RAM DVD-Audio DVD-A This unit can play CD-R/RW (audio recording disc) recorded with CD-DA, video CD, WMA or MP3. Finalize∗ the disc after recording. ■ DVD-R discs Panasonic DVD-R recorded and finalized∗ on a Panasonic DVD video recorder are played as DVD-Video on this unit. ∗A process that allows play on compatible equipment.
Control reference guide Remote control 18 AV SYSTEM TV VCR/AUX 1 SLEEP 2 20 3 1 2 3 4 5 6 7 8 9 PLAY MODE MIX 2CH 4 Getting started 19 TV/VIDEO TUNER/BAND DVD/CD FL DISPLAY DIMMER 21 REPEAT 5 6 POSITION MEMORY > =10/ENTER CANCEL 0 7 SKIP 8 SLOW/SEARCH 22 CH 9 TOP MENU MENU DIRECT NAVIGATOR PLAY LIST 10 11 23 ENTER DISPLAY 12 RETURN TV VOL 24 TV VOL VOLUME 13 MUTING 14 15 16 17 SFC SUBWOOFER LEVEL PL C.FOCUS CH SELECT TEST ZOOM GROUP AUDIO C.S.M S.
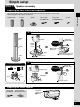
Simple setup STEP 1 Speaker assembly Preparing the front and surround speakers The speaker units, stands, and bases for the front and surround speakers are the same. Only the lengths of the cables are different. 4 Stands 4 Bases 1 2 Short cables (for FRONT L/R) 2 Long cables (for SURROUND L/R) Stand + Base Speaker unit Stand Connect the speaker cables. Confirm screw is securely fastened. Approx. 120 mm (4-3/4") Stand \ Place into groove.
Simple setup STEP 1 2 Positioning Attach the stickers to the cables Front (L) Simple setup 1 Sheet of speaker-cable stickers Surround (L) short cable long cable Approx. 50 mm (2") Approx.
Notes on speaker use Simple setup Caution ¡Use the speakers only with the recommended system. Failure to do so may lead to damage to the amplifier and/or the speakers, and may result in the risk of fire. Consult a qualified service person if damage has occurred or if you experience a sudden change in performance. ¡Do not attach these speakers to walls or ceilings. ¡You can damage your speakers and shorten their useful life if you play sound at high levels over extended periods.
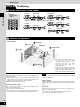
Simple setup 3 STEP Connection Simple setup 1 System Cable 1 1 AM loop antenna 1 FM indoor antenna 1 Video cable 1 AC power supply cord Subwoofer Speakers Note ¡Never short-circuit positive (+) and negative (–) speaker wires. Red ¡Be sure to connect only positive (copper) wires to positive (+) terminals and negative (silver) wires to negative (–) terminals. Copper Incorrect connection can damage the speakers.
AM loop antenna 4 Stand the antenna up on its base. Keep loose antenna cord away from other wires and cords. Click! Main unit 5 FM indoor antenna Adhesive tape Place the antenna where reception is best. Simple setup 3 Connection to your television ■ Connecting a television using the VIDEO IN terminal VIDEO OUT AM ANT FM ANT EXT LOOP 75Ω TO S UB WOO Å h Connect directly to your television.
Simple setup STEP 4 The remote control Simple setup 1 Remote control Do not; 2 Batteries ¡Insert so the poles (+ and –) match those in the remote control. ¡Do not use rechargeable type batteries. R6/LR6, AA, UM-3 3 5 PHONES r 30° 30° Aim at the sensor, avoiding obstacles, at a maximum range of 7 m (23 feet) directly in front of the unit. 2 STEP Remove if the remote control is not going to be used for a long period of time. Store in a cool, dark place.
Discs—Basic play RAM DVD-A DVD-V VCD CD WMA MP3 2 3 4 1 Preparation ¡Press [POWER 8] to turn on the unit. ¡Turn on the television and select the appropriate video input on the television to suit the connections for the unit. 1 Press [SELECTOR] to select “DVD/CD” as the source. , Each time you press the button: DVD/CD / FM / AM / TV / VCR/AUX POWER 8 g h Press [OPEN/CLOSE ;] to open the loading tray and place the disc in the tray.
Discs—Basic play When a menu appears on the television AV SYSTEM SLEEP TV DVD-A DVD-V VCD VCR/AUX Press the numbered buttons to select an item.
Frame-by-frame viewing RAM DVD-V VCD A-B repeat play RAM DVD-A DVD-V VCD CD WMA MP3 DVD-A (Motion picture parts only) You can repeat a section between points A and B within a program, title or track. Press [w] or [q]. The frame changes each time you press the button. 1 Press [DISPLAY] until the unit information screen is displayed \ page 22). (\ ¡The frames change in succession if you press and hold the button. ¡Pressing [h] also activates forward frame-by-frame.
Discs—Convenient functions 1 AV SYSTEM SLEEP TV VCR/AUX TV/VIDEO TUNER/BAND DVD/CD Example: DVD-V FL DISPLAY DIMMER PLAY MODE 1 2 3 4 5 6 7 8 9 PLAY MODE MIX 2CH REPEAT CANCEL POSITION MEMORY Numbered buttons TTL Title No. 0 SLOW/SEARCH CH TOP MENU MENU DIRECT NAVIGATOR PLAY LIST erw q ENTER CHAP PGM P: 0 > =10/ENTER CANCEL SKIP Disc operations Press the numbered buttons to select a title, chapter, group or track ( WMA MP3 then press [ENTER]).
¡“–” or “– –” is displayed instead of the language number in circumstances such as when no language is recorded on the disc. Soundtracks Subtitles DVD-A (Motion picture parts only) DVD-V (Discs with multiple subtitle languages) You can change the subtitle language and turn the subtitles on and off. RAM DVD-A DVD-V VCD (Discs with multiple soundtracks) RAM During play You can turn the subtitles on and off. Press [AUDIO].
Discs—Convenient functions RAM AV SYSTEM SLEEP TV To mark the eleventh point and beyond 1 Press [w, q] to select the marker pin icon. VCR/AUX TV/VIDEO TUNER/BAND DVD/CD FL DISPLAY DIMMER 1 2 3 4 5 6 7 8 12345678910 PLAY MODE MIX 2CH REPEAT POSITION MEMORY CANCEL 9 Numbered buttons > =10/ENTER CANCEL Note 0 SKIP SKIP ui Markers added with this unit clear when you switch the unit to standby, change the source, or open the loading tray.
WMA/MP3 and CD text navigation menus WMA MP3 CD (CD text only) Various menus help you find items you want to start play. 1 Press [TOP MENU]. Example: MP3 navigation menu Group name MENU G 1 T 1 Total 223 0 9 SELECT NUMBER SELECT No 1 2 3 4 5 6 7 8 9 10 ENTER RETURN 2 Prev SELECT ENTER RETURN Example: finding a track including the word “LOVE”. 2 Press [e, r, w, q] to select a group and press [ENTER]. The navigation menu for the group appears. To return to the navigation menu Press [RETURN].
Playing the programs or play lists on DVD-RAM Using the play list menu AV SYSTEM SLEEP TV You can play a group of scenes, a play list, created on other equipment such as a DVD video recorder. VCR/AUX TV/VIDEO TUNER/BAND DVD/CD 1 FL DISPLAY DIMMER 1 2 3 4 5 6 7 8 9 PLAY MODE MIX 2CH PLAY LIST REPEAT POSITION MEMORY Numbered buttons 0 Disc operations TOP MENU MENU DIRECT NAVIGATOR PLAY LIST DISPLAY RETURN TV VOL TV VOL SFC SUBWOOFER LEVEL PL C.
Using On-Screen Menu Icons 4 SLEEP TV TV/VIDEO TUNER/BAND DVD/CD FL DISPLAY DIMMER 1 2 3 4 5 6 7 8 9 PLAY MODE MIX 2CH REPEAT POSITION MEMORY Numbered buttons > =10/ENTER CANCEL 0 SKIP SLOW/SEARCH CH q TOP MENU MENU DIRECT NAVIGATOR PLAY LIST erw q ENTER RETURN DISPLAY RETURN TV VOL TV VOL VOLUME SFC SUBWOOFER LEVEL PL C.FOCUS CH SELECT TEST ZOOM GROUP AUDIO C.S.M S.SRND FM MODE SETUP For your reference ¡Depending on the condition of the unit (playing, stopped, etc.
Using On-Screen Menu Icons Unless otherwise indicated, select items with [w, q] and change with [e, r]. Disc information 2 1:02:37 2 q w e 128 kbps 44.1 kHz ON Page 1 Return r !1 !2 t y ui !4 [e, r] Track number in disc WMA MP3 [ENTER] [e, r] 8 [ENTER] DVD-A WMA MP3 C: Chapter number DVD-V 9 Numbered buttons / Time RAM DVD-A DVD-V Select a position to start play by specifying a time.
Picture menu RAM DVD-A DVD-V VCD Normal 0 0 OFF 0 N 4:3 Aspect RAM DVD-A DVD-V VCD q Select how to show images made for 4:3 aspect screens on a 16:9 aspect television. ¡Normal: laterally stretches images made for a 4:3 screen. ¡Auto: expands suitable 4:3 letterbox images to fill more of the screen. Other images appear in full in the center of the screen. ¡Shrink: images appear in the center of the screen. ¡Zoom: expands all images to fill the screen.
The radio Preset tuning AV SYSTEM SLEEP TV Preset channels to make selection simple. Up to 15 stations can each be set in the FM and AM bands. VCR/AUX TV/VIDEO TUNER/BAND DVD/CD FL DISPLAY DIMMER 1 2 3 4 5 6 7 8 TUNER/BAND PLAY MODE MIX 2CH REPEAT POSITION MEMORY 9 Numbered buttons > =10/ENTER CANCEL 0 SKIP ui 2 CH 1 SKIP SLOW/SEARCH CH TOP MENU MENU DIRECT NAVIGATOR PLAY LIST ENTER Radio operations 1 Tune to “FM 87.9 MHz” or \ left). “FM 87.
Sound field Dolby Pro Logic AV SYSTEM SLEEP FL DISPLAY –MIX 2CH TV VCR/AUX TV/VIDEO TUNER/BAND DVD/CD DVD/CD FL DISPLAY DIMMER 1 2 3 4 5 6 7 8 PLAY MODE MIX 2CH Software encoded with Dolby Surround can be identified with this mark (DVD, CD, Video CD, Laser Disc, Video tape). REPEAT POSITION MEMORY Dolby Pro Logic is a decoding system that was developed to get a better sense of presence from sources encoded with Dolby Surround.
Sound field Sound Field Control AV SYSTEM SLEEP TV Press [SFC] to select a setting. VCR/AUX TV/VIDEO TUNER/BAND DVD/CD FL DISPLAY DIMMER SFC 1 2 3 4 5 6 7 8 PLAY MODE MIX 2CH Each time you press the button: HEAVY: Adds punch to rock. CLEAR: Clarifies higher sounds. SOFT: For background music. DISCO: Reverberates sound to make you feel like you were in a disco. LIVE: Makes vocals more alive. HALL: Expands sound to make you feel like you were in a hall.
Sound quality Re-master—Enjoying more natural sound AV SYSTEM TV VCR/AUX RAM DVD-A DVD-V CD SLEEP TV/VIDEO TUNER/BAND DVD/CD Discs recorded with 2-channel LPCM at 44.1 kHz or 48 kHz This feature gives you a more natural sound by adding the higher frequency signals not recorded on the disc. FL DISPLAY DIMMER 1 2 3 4 5 6 7 8 PLAY MODE MIX 2CH REPEAT POSITION MEMORY WMA MP3 9 Discs recorded at 44.
Convenient functions The sleep timer AV SYSTEM SLEEP SLEEP –DIMMER TV VCR/AUX TV/VIDEO TUNER/BAND DVD/CD FL DISPLAY DIMMER 1 2 3 4 5 6 7 8 9 This timer turns the unit off after a set time. Press [SLEEP] to select the time (minutes).
Changing settings This chart shows the settings for this unit. Change the settings to suit your preferences and to suit the unit to the environment in which it is being used. These settings are retained in memory until they are changed, even if the unit is turned off. See page 30 for details on menu operation. ¡Underlined items are the factory preset. Disc Items Audio Choose the preferred audio language.
Changing settings Entering a password (Ratings) AV SYSTEM SLEEP TV VCR/AUX DVD-V TV/VIDEO TUNER/BAND DVD/CD DVD/CD FL DISPLAY DIMMER 1 2 3 4 5 6 7 8 9 PLAY MODE MIX 2CH Numbered buttons REPEAT POSITION MEMORY > =10/ENTER CANCEL CANCEL 0 SKIP SLOW/SEARCH Now, when you insert a DVD-Video that exceeds the ratings limit you set, a message appears on the television. Follow the on-screen instructions.
Language code list Abkhazian: Afar: Afrikaans: Albanian: Ameharic: Arabic: Armenian: Assamese: Aymara: Azerbaijani: Bashkir: Basque: Bengali; Bangla: Bhutani: Bihari: Breton: Bulgarian: Burmese: Byelorussian: Cambodian: Catalan: 6566 6565 6570 8381 6577 6582 7289 6583 6588 6590 6665 6985 6678 6890 6672 6682 6671 7789 6669 7577 6765 Chinese: Corsican: Croatian: Czech: Danish: Dutch: English: Esperanto: Estonian: Faroese: Fiji: Finnish: French: Frisian: Galician: Georgian: German: Greek: Greenlandic: Guaran
Operating a television or video cassette recorder You can use the remote control to operate a Panasonic television or a video cassette recorder. (Some models cannot be operated by this remote control.
Changing the remote control code AV SYSTEM SLEEP TV VCR/AUX TV VCR/AUX TV/VIDEO TUNER/BAND DVD/CD The remote control can also operate some other brands of televisions and video cassette recorders. Change the code to operate such equipment and some Panasonic products.
Glossary Decoder Linear PCM (pulse code modulation) A decoder restores the coded audio signals on DVDs to normal. This is called decoding. These are uncompressed digital signals, similar to those found on CDs. Dolby Digital Playback control (PBC) This is a method of coding digital signals developed by Dolby Laboratories. Apart from stereo (2-channel) audio, these signals can also be multi-channel audio. A large amount of audio information can be recorded on one disc using this method.
Specifications SPEAKER SECTION RMS Output Power (10 % total harmonic distortion) 1 kHz Front 40 W per channel (6 Ω) Surround 50 W per channel (6 Ω) Center 120 W (6 Ω) 100 Hz Subwoofer 200 W (4 Ω) RMS Total Output Power 500 W FTC Output Power (1.
Troubleshooting guide Before requesting service, make the below checks. If you are in doubt about some of the check points, or if the remedies indicated in the chart do not solve the problem: In the U.S.A., contact the Panasonic Customer Call Center at 1-800-211-7262, or e-mail consumerproducts@panasonic.com, or the website (http://www.panasonic.com). In Canada, contact the Panasonic Canada Inc. Customer Care Centre at 1-800-561-5505, or visit the website (www.panasonic.
Sound 7-11 13 28 – No sound. Distorted sound. ¡Check the connections. ¡Turn the volume up. ¡Turn muting off. ¡Switch off the unit, determine and correct the cause, then switch the unit on. Causes include: –Shorting (bare wires touching) of positive and negative speaker wires. –Straining of the speakers through excessive volume or power. –Using the unit in a hot environment without proper ventilation. Humming heard during play. ¡An AC power supply cord or fluorescent light is near the subwoofer.
Troubleshooting guide Unit displays The display is dark. ¡Press and hold [–DIMMER] to brighten the display. 28 “NO PLAY” ¡You inserted a disc the unit cannot play; insert one it can. ¡You inserted a blank DVD-RAM. 5 – “NO DISC” ¡You haven’t inserted a disc; insert one. ¡You haven’t inserted the disc correctly; insert it correctly. – 13 “F61” ¡Check and correct the speaker cord connections. If this does not fix the problem, there is a power supply problem. Call 1-800-211-PANA.
Listening caution EST. 1924 Selecting fine audio equipment such as the unit you’ve just purchased is only the start of your musical enjoyment. Now it’s time to consider how you can maximize the fun and excitement your equipment offers. This manufacturer and the Electronic Industries Association’s Consumer Electronics Group want you to get the most out of your equipment by playing it at a safe level.
Limited Warranty (U.S.A.) Panasonic Consumer Electronics Company, Division of Matsushita Electric Corporation of America One Panasonic Way Secaucus, New Jersey 07094 Panasonic Sales Company, Division of Matsushita Electric of Puerto Rico, Inc. Ave. 65 de Infantería, Km. 9.