Operating Instructions CD Stereo System Model No. SC-AK280 Dear Customer Thank you for purchasing this product. For optimum performance and safety, please read these instructions thoroughly before connecting, operating or adjusting this product. Please keep this manual for future reference. Supplied Accessories These operating instructions are applicable to the following system. SYSTEM MAIN UNIT SPEAKERS SC-AK280 SA-AK280 SB-AK280 Please check and identify the supplied accessories.
ESPAÑOL ESPAÑOL (Back of product) RQTX0202 ESPAÑOL ESPAÑOL ESPAÑOL Inside of product 2 RQT8043 rqtx0202-B(en).
Figure B Fuse cover Figure A Fuse (5 ampere) ESPAÑOL Figure A ESPAÑOL ESPAÑOL ESPAÑOL Caution for AC Mains Lead RQTX0202 Fuse (5 ampere) ESPAÑOL Figure B 3 RQT8043 rqtx0202-B(en).
■ Sales and Support Information RQTX0202 ESPAÑOL ESPAÑOL ESPAÑOL ESPAÑOL ESPAÑOL Customer Care Centre • For customers within the UK: 0844 844 3852 • For customers within the Republic of Ireland: 01 289 8333 • Visit our website for product information • E-mail: customer.care@panasonic.co.
Do not use high voltage power sources. This can overload the unit and cause a fire. Do not use a DC power source. Check the source carefully when setting the unit up on a ship or other places where DC is used. AC mains lead protection Ensure the AC mains lead is connected correctly and not damaged. Poor connection and lead damage can cause fire or electric shock. Do not pull, bend, or place heavy items on the lead. Grasp the plug firmly when unplugging the lead.
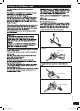
Making the connections Connect the AC mains lead only after all the other connections have been made. ESPAÑOL Antenna connections Place the antenna where reception is best. ■ FM indoor antenna ■ AM loop antenna Adhesive tape Push White Black ESPAÑOL Red Please refer to “Connecting to other external unit” on page 22 for more information on the AUX connection. Click! ESPAÑOL Stand the antenna up on its base.
Optional antenna connections ESPAÑOL Use outdoor antenna if radio reception is poor. Note: Disconnect the outdoor antenna when the unit is not in use. Do not use the outdoor antenna during a lightning storm. AM outdoor antenna FM outdoor antenna AM outdoor antenna (not included) Rear panel of this main unit FM outdoor antenna (not included) Rear panel of this main unit 5 to 12 m 75 Ω coaxial cable (not included) ESPAÑOL Push AM loop antenna (included) Use the antenna plug adaptor (included).
Preparing the remote control ESPAÑOL ESPAÑOL Use alkaline or manganese batteries. Insert so the poles (+ and –) match those in the remote control. R6/LR6, AA Aim at the remote control signal sensor (\ page 9), avoiding obstacles, at a maximum range of 7 m directly in front of the unit. Note on using the remote control • Do not mix old and new batteries. • Do not use different types of batteries at the same time. • Do not take apart or short circuit the batteries.
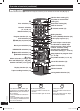
Overview of controls Main unit ESPAÑOL Refer to the numbers in parentheses for page reference. Buttons labelled such as 1 function in exactly the same way as the controls on the remote control (\ page 10). Display panel (12) 1 Standby/on switch [y/l] (8, 25) Press to switch the unit from on to standby mode or vice versa. In standby mode, the unit is still consuming a small amount of power.
Overview of controls (continued) Remote control ESPAÑOL Buttons labelled such as 1 function in exactly the same way as the controls on the main unit (\ page 9).
Basic play Search through tracks Press and hold [4 / 1] or [¡ / ¢] during play or pause to search. • During program play (\ page 12), or random play (\ see below, “Play Mode function”), you can search only within the track. 1 Press [0, OPEN/CLOSE] on the main unit to open the tray. The unit turns on, load a disc in the current tray with the label facing up. Press [0, OPEN/CLOSE] to close the tray. ESPAÑOL Discs 2 Press [6, CD] or [OK] to start play.
Discs (continued) 1-DISC RANDOM Plays one selected disc randomly. ESPAÑOL 1 DISC RND 1- ALBUM RANDOM 1-ALB RND ALL-DISC RANDOM Play all tracks in one selected album randomly. Press [5/∞, ALBUM] to select the album. • “NO TAG” is displayed if titles with tags have not been entered. • This unit can display album, track and artist name with MP3 ID3 tags (version 1.0 and 1.1). • Titles containing text data that the unit does not support cannot be displayed.
Replay the program Press [PROGRAM] then [6, CD] in the stop mode. Add to the program Repeat steps 3 to 4 in the stop mode. Repeat steps 4 to 6 in the stop mode. Check program contents Press [4 / 1] or [¡ / ¢] when “PGM” is displayed in the stop mode.
Cassette tape – Play and record ESPAÑOL The buttons described for “Cassette tape – Play and record” are mainly using the main unit unless indicated otherwise. Basic play ESPAÑOL Use normal position tapes. High position and metal position tapes can be used, but this unit will not be able to record or erase them correctly. Use normal position tapes. High position and metal position tapes can be played, but the unit will not be able to identify the characteristics of these tapes.
Press [7, –DEMO] (stop). Record on the other side of the tape Turn the cassette over and press [¶ REC, TAPE]. Erase a 1) Press [3, TAPE] and then recorded sound [7, –DEMO] (stop). 2) Insert the recorded cassette. 3) Press [¶ REC, TAPE]. You can also perform recording by pressing [¶ REC] and [TAPE] consecutively on the remote control. Erasure prevention The illustration shows how to remove the tabs to prevent recording. To record on the tape again, cover as shown.
Using the FM/AM radio ESPAÑOL Manual tuning Memory preset 1 Press [FM/AM] to select “FM” or “AM”. 2 Press [TUNE MODE] to select “MANUAL”. 3 Press [4 / 1] or [¡ / ¢] to select the 30 FM and 15 AM stations can be preset. Preparation Press [FM/AM] to select “FM” or “AM”. frequency of the required station. “ ” is displayed when a stereo FM broadcast is being received. ESPAÑOL To tune automatically Press and hold [4 / 1] or [¡ / ¢] until the frequency starts changing rapidly.
Using the timers 2 Press [4 / 1] or [¡ / ¢] to set the Setting the clock ESPAÑOL starting time. Start time This is a 24-hour clock. 1 Press [CLOCK / TIMER] to select “CLOCK”. Each time you press the button: ˚ REC Original display Play timer indicator Record timer indicator 3 Press [CLOCK / TIMER] to confirm. Press [4 / 1] or [¡ / ¢] to set the time. 4 Repeat steps 2 to 3 to set the finishing time.
Using the timers (continued) ESPAÑOL Note: • The play timer will start at the preset time with volume increasing gradually to preset level. • The record timer will start 30 seconds before the set time with the volume muted. • The timer comes on at the set time every day if the timer is on. • The unit must be in the standby mode for the timer to function. • If you turn the unit off and on again while a timer is functioning, the finish time setting will not be activated.
Using sound effects CLEAR FLAT (off) VOCAL HALL DISCO LIVE Setting Effect HEAVY Adds punch to rock SOFT For background music CLEAR Clarifies higher frequencies VOCAL Adds gloss to vocal DISCO Produces sound with the same kind of lengthy reverberations heard at a disco LIVE Makes vocals more alive HALL Adds an expansiveness to the sound to produce the atmosphere of a great concert hall FLAT No effect By main unit only Setting the BASS; Turn [BASS CONTROL] to either increase (+) or de
USB ESPAÑOL The USB connectivity enables you to connect and play MP3 tracks from USB mass storage class. Typically, USB memory devices. (Bulk only transfer) Recording from a USB mass storage device 1 Press [4 / 1 ] or [¡ / ¢] to select the desired track for recording. 2 Press [¶ REC] and [TAPE] consecutively Connecting a USB mass storage device ESPAÑOL Preparation Before connecting any USB mass storage device to the unit, ensure that the data stored therein has been backed up.
Using other optional equipments Avoid interfering with other Panasonic equipment Connecting to a portable audio equipment ESPAÑOL Note: All peripheral components and cables are sold separately. This feature enables you to enjoy music from a portable audio equipment. Other Panasonic audio or video equipment may start functioning when you operate the unit using the supplied remote control. You can operate this unit in another mode by setting the remote control operating mode to “REMOTE 2”.
Using other optional equipments (continued) ESPAÑOL Connecting to other external unit You can connect to an analogue player with a built-in phone equaliser. “LINE OUT” position Rear panel of this main unit (R) ESPAÑOL Analogue player (not included) (L) Playing or recording from an external unit 1 Press [AUX] (main unit: [MUSIC P./ AUX] to select “AUX”. 2 For listening : Proceed to step 3.
Troubleshooting guide When the unit is in standby mode, the display lights up and changes continuously. • Turn off the demo function. • If you set the clock, demo function will be turned off automatically. 8 17 No response when remote control buttons are pressed. • Check that the batteries are installed correctly. 8 Distorted sound or no sound. • Turn the volume up. • Turn off the unit, determine and correct the cause, then turn the unit on again.
Troubleshooting guide (continued) ESPAÑOL ESPAÑOL ■ Radio Page Distorted sound or noise is heard. The stereo indicator flickers or does not light. • Use an outdoor antenna. 7 A beat sound is heard. • Turn the television off or move it away from the unit. • Switch to either BP 1 or BP 2 when in AM tuner mode. — 16 A low hum is heard during AM broadcast. • Separate the antenna from other cables and cords. — No response when [¶ REC] and [TAPE] buttons are pressed consecutively.
ESPAÑOL ESPAÑOL Memory reset (Initialisation) When the following situations occur, refer to the instructions below to reset the memory: • There is no response when buttons are pressed. • You want to clear and reset the memory contents. To reset memory 1 Disconnect the AC mains lead. (Wait at least 3 minutes before proceeding to step 2.) 2 While pressing and holding down [y/I] on the main unit, reconnect the AC mains lead. “– – – – – – – – –” appears on the display panel. 3 Release [y/I].
Specifications AMPLIFIER SECTION CASSETTE DECK SECTION ESPAÑOL RMS Output power stereo mode Front Ch (both channels driven) 125 W per channel (3 Ω), 1 kHz, 10% THD Total RMS stereo mode power 250 W Track system Heads Record/playback Erasure Motor Recording system FM/AM TUNER, TERMINALS SECTION ESPAÑOL Preset station FM 30 stations AM 15 stations Frequency Modulation (FM) Frequency range 87.50 to 108.
USB Port USB Standard Media file format support MP3 (*.mp3) USB device file system FAT 12 FAT 16 FAT 32 USB port power Power supply USB 2.0 full speed AC 220 to 240 V, 50 Hz Power consumption 65 W Dimensions (WxHxD) 250 mm x 333 mm x 310 mm Mass Operating temperature range 500 mA (Max) 4.5 kg 0°C to +40°C Operating humidity range 35% to 80% RH (no condensation) Power consumption in standby mode: 0.
Panasonic Corporation Web Site: http://panasonic.net Pursuant to at the directive 2004/108/EC, article 9 (2) Panasonic Testing Centre Panasonic Marketing Europe GmbH Winsbergring 15, 22525 Hamburg, Germany rqtx0202-B(en).