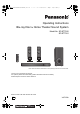
SC-BTT282&182EB-VQTVQT3Z99_mst.book 1 ページ 2012年2月8日 水曜日 午前11時8分 Operating Instructions Blu-ray DiscTM Home Theater Sound System Model No. SC-BTT282 SC-BTT182 Unless otherwise indicated, illustrations in these operating instructions are of SC-BTT282. Thank you for purchasing this product. For optimum performance and safety, please read these instructions carefully. Please keep this manual for future reference. Model number suffix “EB” denotes UK model.
SC-BTT282&182EB-VQTVQT3Z99_mst.book 2 ページ 2012年2月8日 水曜日 午前11時8分 Safety precautions WARNING Unit To reduce the risk of fire, electric shock or product damage, ≥ Do not expose this unit to rain, moisture, dripping or splashing. ≥ Do not place objects filled with liquids, such as vases, on this unit. ≥ Use only the recommended accessories. ≥ Do not remove covers. ≥ Do not repair this unit by yourself. Refer servicing to qualified service personnel. ≥ Do not let metal objects fall inside this unit.
SC-BTT282&182EB-VQTVQT3Z99_mst.book 3 ページ 2012年2月8日 水曜日 午前11時8分 Caution for AC Mains Lead For your safety, please read the following text carefully. How to replace the fuse This appliance is supplied with a moulded three pin mains plug for your safety and convenience. A 5-ampere fuse is fitted in this plug. Should the fuse need to be replaced please ensure that the replacement fuse has a rating of 5-ampere and that it is approved by ASTA or BSI to BS1362.
SC-BTT282&182EB-VQTVQT3Z99_mst.book 4 ページ 2012年2月8日 水曜日 午前11時8分 Information for Users on Collection and Disposal of Old Equipment and used Batteries These symbols on the products, packaging, and/or accompanying documents mean that used electrical and electronic products and batteries should not be mixed with general household waste.
SC-BTT282&182EB-VQTVQT3Z99_mst.book 5 ページ 2012年2月8日 水曜日 午前11時8分 Safety precautions ........................................... 2 Caution for AC Mains Lead.............................. 3 Getting started TV & Radio Package contents and accessories ................. 6 Unit and media care......................................... 7 Playable media ................................................ 8 Control reference guide ................................. 10 VIERA Link “HDAVI Control™” ...................
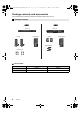
SC-BTT282&182EB-VQTVQT3Z99_mst.book 6 ページ 2012年2月8日 水曜日 午前11時8分 Package contents and accessories Getting started Check the package contents and supplied accessories before using this unit.
SC-BTT282&182EB-VQTVQT3Z99_mst.book 7 ページ 2012年2月8日 水曜日 午前11時8分 ∏ 1 Remote control (N2QAYB000728) ∏ 1 AC mains lead (K2CZ3YY00005) ∏ 1 FM indoor antenna (RSAX0002) ∏ Getting started Accessories 1 Antenna plug adaptor (K1YZ02000013) ∏ 2 Batteries for remote control ≥ Product numbers provided in these operating instructions correct as of January 2012. These may be subject to change. ≥ Do not use AC mains lead with other equipment.
SC-BTT282&182EB-VQTVQT3Z99_mst.
2012年2月8日 ∫ Discs that cannot be played by this unit ≥ DVD-RAM ≥ Super Audio CD ≥ Photo CD ≥ DVD-Audio ≥ Video CD and Super Video CD ≥ WMA discs ≥ DivX Plus HD discs ≥ HD DVD BD-Video This unit can play BD-Video discs supporting the region code “B”. Example: DVD-Video This unit can play DVD-Video discs supporting the region number “2” or “ALL”. Example: ALL 1 2 午前11時8分 ∫ Music CD Operation and sound quality of CDs that do not conform to CD-DA specifications (copy control CDs, etc.
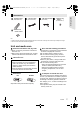
SC-BTT282&182EB-VQTVQT3Z99_mst.book 10 ページ 2012年2月8日 水曜日 午前11時8分 Control reference guide 1 2 Remote control 13 リワヱヶヵ モヷ 1 2 14 15 16 17 18 モヶュリヰ 3 4 ュリヴヤ ㄊヱㄐㄅ ヴユモンヤラ ヱロモヺ ヴレリヱ ヴユモンヤラ ヴロヰヸ ヴヵヰヱ 6 19 ヱ 20 21 リ ワヵ ユ ヶ チヮユワ ユワヶ ヱチヮ ンワ ノヶ ヰヱ ユ ラヰヮユ ヵ 9 10 11 12 ユヹリヵ ヵヰヱ 7 8 8 ヴレリヱ ヱモヶヴユ 5 3 4 5 6 7 ンユヵヶンワ 9 22 10 11 23 12 24 13 14 15 16 ∫ Using the remote control Insert so the poles (i and j) match those in the remote control.
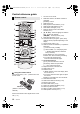
SC-BTT282&182EB-VQTVQT3Z99_mst.book 11 ページ 2012年2月8日 水曜日 午前11時8分 [BTT282] 1 2 Getting started Main unit (Front) 3 VOL OPEN/CLOSE iPod SD CARD 4 [BTT182] 5 6 2 1 7 3 8 9 10 8 9 11 VOL OPEN/CLOSE iPod SD CARD 4 1 2 3 4 5 7 Standby/on switch (Í/I) (> 19) Press to switch the unit from on to standby mode or vice versa. In standby mode, the unit is still consuming a small amount of power.
SC-BTT282&182EB-VQTVQT3Z99_mst.book 12 ページ 2012年2月8日 水曜日 午前11時8分 STEP 1: Positioning For optimum position Place the front speakers at approximately the same distance from the seating position. e.g., [BTT282] 60° A Front speakers B Subwoofer ≥ Keep your speakers at least 10 mm away from the system for proper ventilation. ≥ Placing speakers too close to floors, walls, and corners can result in excessive bass. Cover walls and windows with thick curtains.
SC-BTT282&182EB-VQTVQT3Z99_mst.book 13 ページ [BTT282] Assembling 2012年2月8日 水曜日 午前11時8分 the front speakers 1 2 Remove the bracket (A). Getting started ∫ To position speakers horizontally Detach the speaker stand. ≥ Pull out the speaker cable from the stand. 3 Attach the cushion foot (supplied) (B) on the bottom of the speaker. ≥ Place the speakers facing the inclined surface (C) toward outside.
SC-BTT282&182EB-VQTVQT3Z99_mst.book 14 ページ 2012年2月8日 水曜日 午前11時8分 STEP 3: Connections Turn off all equipment before connection and read the appropriate operating instructions. Do not connect the AC mains lead until all other connections are complete. Speaker connection ≥ Connect the speaker cables to the terminals of the same colour. ≥ Place the speaker that is connected with the speaker terminal (R) on the observers’ right, and connect with the speaker terminal (L) on the observers’ left.
SC-BTT282&182EB-VQTVQT3Z99_mst.book 15 ページ 2012年2月8日 水曜日 午前11時8分 ∫ HDMI ≥ Use the High Speed HDMI cables. Non-HDMI-compliant cables cannot be utilized. It is recommended that you use Panasonic’s HDMI cable. When outputting 1080p signal, please use HDMI cables 5.0 meters or less. Recommended part number (High Speed HDMI Cable): RP-CDHS15 (1.5 m), RP-CDHS30 (3.0 m), RP-CDHS50 (5.0 m), etc. ≥ Audio will be output through the system’s speakers when “Off” is selected in “HDMI Audio Output”.
SC-BTT282&182EB-VQTVQT3Z99_mst.book 16 ページ 2012年2月8日 水曜日 午前11時8分 [BTT282] Standard picture and better audio Optical digital audio cable (not supplied) VIDEO IN OPTICAL OUT AUDIO IN L R Video cable (not supplied) [BTT282] Standard picture and audio VIDEO IN Audio cable (not supplied) AUDIO OUT AUDIO IN L L R R Video cable (not supplied) FM antenna connection Affix this end of the antenna to a wall or pillar where the reception is best.
SC-BTT282&182EB-VQTVQT3Z99_mst.book 17 ページ 2012年2月8日 水曜日 午前11時8分 Other device connection Getting started ∫ [BTT282] When the connecting devices have an HDMI terminal e.g., AV OUT AV OUT AV IN (ARC) Set Top Box, etc. Video game, etc.
SC-BTT282&182EB-VQTVQT3Z99_mst.book 18 ページ 2012年2月8日 水曜日 午前11時8分 Connecting to the network The following services can be used when this unit is connected to broadband. ≥ Firmware can be updated (> 20) ≥ [BTT282] This unit supports Wi-Fi DirectTM and ≥ You can enjoy BD-Live (> 25) can make a wireless connection to wireless ≥ You can enjoy VIERA Connect (> 31) devices without router. You can use this ≥ You can access other devices (Home Network) (> 32) function when enjoying Home Network feature, etc.
2012年2月8日 STEP 5: Settings Easy Setting After connecting your new home theatre for the first time and pressing [Í], a screen for the basic settings will appear. Preparation Turn on the television and select the appropriate video input on the television. 水曜日 午前11時8分 there is still no change in the display, consult your dealer for advice. Select “Search for wireless network” or “WPS (PUSH button)” and press [OK], then follow the on-screen instructions and apply the settings.
SC-BTT282&182EB-VQTVQT3Z99_mst.book 20 ページ 2012年2月8日 ≥ Refer to the operating instructions of the hub or router. ≥ You can perform this setup anytime by selecting “Easy Network Setting” in the Setup menu. (> 38) ≥ You can redo these settings individually using “Network Settings”. (> 38) ≥ Do not use this unit to connect to any wireless network for which you do not have usage rights.
2012年2月8日 水曜日 午前11時8分 Inserting or removing media Enjoying TV with unit’s speakers e.g., [BTT182] 1 Connect the TV and the main unit. (> 15s16) 2 Press [EXT-IN] several times to select the appropriate external input mode. (> 22) ≥ Reduce the volume on the TV to its minimum, and then adjust the volume of the main unit. OPEN/CLOSE VOL iPod SD CARD * Selecting the type of audio * (For details > 27) ≥ When inserting a media item, ensure that it is facing the right way up.
SC-BTT282&182EB-VQTVQT3Z99_mst.book 22 ページ 2012年2月8日 水曜日 午前11時8分 HOME menu Major functions of this unit can be operated from the HOME menu. Videos/Photos/Music Play back the contents. (> 24) ≥ When multiple contents are recorded, select the types of contents or the title. Disc Preparation Turn on the television and select the appropriate video input on the television. 1 2 Press [Í] to turn on the unit. Press [OK] or [3, 4, 2, 1] to select the item. ≥ If there are any other items, repeat this step.
2012年2月8日 Multi User Mode Multi User Mode is a function that enables switching of multiple settings easily. Up to 4 people can use the unit with their own settings. The following settings can be personalized. ≥ The user icon ≥ The wallpaper of HOME menu ≥ The audio and picture settings (> 33, 36) 水曜日 午前11時8分 Smartphone used as a remote control can be registered with Register respect to each user. Smartphone ≥ Multiple users cannot be registered for one smartphone. 4 Select “Confirm” and press [OK].
SC-BTT282&182EB-VQTVQT3Z99_mst.book 24 ページ 2012年2月8日 Playback Playback 1 Insert the media. Playback starts depending on the media. 2 水曜日 午前11時8分 Skip While playing or paused, press [:] or [9]. Skip to the title, chapter or track. Select the item to play and press [OK]. Frame-by-frame Repeat this procedure if necessary. ≥ [BTT282] Signal from PAL discs is output as PAL. Signal from NTSC discs is output as “NTSC” or “PAL60”.
2012年2月8日 Enjoying 3D video and photos Preparation Connect 3D compatible TV to an HDMI AV OUT terminal of this unit using a High Speed HDMI Cable. (> 15, 17) ≥ Perform the necessary preparations for the TV. ≥ Play back following the instructions displayed on the screen. ≥ 3D Settings (> 35, 38) ≥ Please refrain from viewing 3D images if you do not feel well or are experiencing visual fatigue.
SC-BTT282&182EB-VQTVQT3Z99_mst.book 26 ページ 2012年2月8日 Using the iPod/iPhone Compatible iPod/iPhone (as of January 2012) ≥ Update your iPod/iPhone with the latest software before using this unit. ≥ Compatibility depends on the software version of your iPod/iPhone. ≥ [BTT282] iPod/iPhone compatibility assures music, video and photo playback and battery charge functions of this unit as a home theatre system.
SC-BTT282&182EB-VQTVQT3Z99_mst.book 27 ページ 2012年2月8日 [BTT182] 午前11時8分 [BTT282] Other methods of Connect the iPod/iPhone. playback To purchase a Dock Connector to USB Cable, consult your iPod/iPhone dealer. iPod/iPhone (not supplied) 1 2 Press [iPod] to select “IPOD”. 3 Press [3, 4] to select an item and press [OK]. Press [STATUS] several times to select the menus.
SC-BTT282&182EB-VQTVQT3Z99_mst.book 28 ページ 2012年2月8日 VIERA Link “HDAVI Control™” 水曜日 午前11時8分 TV & Radio What is VIERA Link “HDAVI Control”? VIERA Link “HDAVI Control” is a convenient function which will link the operations of this unit and a Panasonic TV (VIERA) under “HDAVI Control”. You can use this function by connecting the equipment with an HDMI cable. See the operating instructions for connected equipment for operational details. Preparation 1 Set “VIERA Link” to “On” (> 40).
2012年2月8日 Enjoying TV and STB with unit’s speakers You can select whether audio is output from the unit’s speakers or the TV speakers by using the TV menu settings. Switch the audio output setting of the TV to this unit’s speakers. Select the TV audio When the TV is turned on, this unit will also automatically turn on. e.g., OPTICAL OUT 水曜日 午前11時8分 Select the STB audio When the STB power is turned on, this unit and the TV will automatically turn on.
SC-BTT282&182EB-VQTVQT3Z99_mst.book 30 ページ 2012年2月8日 Listening to the Radio You can preset up to 30 channels. Preparation Make sure that the FM antenna is connected. (> 16) Presetting stations automatically 1 2 Press [RADIO] to select “FM”. Press and hold [STATUS] to select “LOWEST” or “CURRENT”. LOWEST To begin auto preset with the lowest frequency (FM87.50). CURRENT To begin auto preset with the current frequency.* * To change the frequency, refer to “Manual tuning and presetting”.
2012年2月8日 VIERA Connect allows you to access some specific websites supported by Panasonic, and enjoy internet contents such as photos, videos, etc. from VIERA Connect home screen. This unit has no full browser function and all features of websites may not be available. VIERA Connect provides a variety of selected Internet services such as the following.
SC-BTT282&182EB-VQTVQT3Z99_mst.book 32 ページ 2012年2月8日 Home Network feature Playing back contents on the DLNA server You can share photos, videos and music stored in the DLNA Certified media server (PC with Windows 7 installed, smartphone, etc.) connected to your home network, and enjoy the contents with this home theatre.
SC-BTT282&182EB-VQTVQT3Z99_mst.book 33 ページ 2012年2月8日 Option menu A variety of playback operations and settings can be performed from this menu. Available options differ depending on the playing contents and the condition of the unit. About Multi User Mode : Settings of the items with this indication are saved by the respective users registered in the HOME menu. Please refer to page 23 for details about user registration and switching. 1 Press [OPTION]. e.g.
SC-BTT282&182EB-VQTVQT3Z99_mst.book 34 ページ 2012年2月8日 ∫ Top Menu Display Top Menu. ∫ Pop-up Menu Display Pop-up Menu. ∫ Menu Display Menu. Personal Taste You can access settings to enjoy special features of this unit from this category. Refer to “Picture Settings” and “Sound Settings” (> right) for more details on each setting item. 水曜日 午前11時8分 ≥ If the video is disrupted when “Auto” is selected, select either “Video” or “Film” depending on the material to be played back.
2012年2月8日 Digital Tube Sound: This feature gives you warm sound, like that produced by a vacuum tube amplifier. Recommended setting: Digital Tube Sound 1 A crisp, delicate sound Digital Tube Sound 2 A tight, hi-fi sound Digital Tube Sound 3 A soft, rich sound Digital Tube Sound 4 A clear, powerful sound Digital Tube Sound 5 A distinctive mid-range sound Digital Tube Sound 6 A soft, enveloping sound ¾All: Equalizer You can select sound quality settings.
SC-BTT282&182EB-VQTVQT3Z99_mst.book 36 ページ 2012年2月8日 Setup menu Change the unit’s settings if necessary. The settings remain intact even if you switch the unit to standby. Some items in the Setup menu are common to the Option menu. You can get the same effect with both menus. About Multi User Mode : Settings of the items with this indication are saved by the respective users registered in the HOME menu. Please refer to page 23 for details about user registration and switching. 1 2 Press [HOME].
2012年2月8日 ∫ [BTT282] NTSC Contents Output (This works only for video output from the VIDEO OUT terminal.) Select PAL60 or NTSC output when playing NTSC discs. ∫ Still Mode Select the type of picture shown when you pause playback. Automatic Automatically selects the type of picture shown. Field Select if jittering occurs when “Automatic” is selected. Frame Select if small text or fine patterns cannot be seen clearly when “Automatic” is selected.
SC-BTT282&182EB-VQTVQT3Z99_mst.book 38 ページ 2012年2月8日 水曜日 午前11時8分 ∫ Audio Delay Synchronization between picture and sound is corrected by adjusting the delay time of the audio output. ∫ Menu Preference Choose the language for the disc menus. ∫ Speaker ∫ Subtitle Text Select a suitable item according to the language used for DivX or MKV subtitles text. ≥ This item is displayed only after playing back a file. Refer to page 41.
2012年2月8日 ¾IP Address / DNS Settings This is for checking the state of the network connection and setting the IP address and DNS-related. Press [OK] to show the respective setting. ¾Proxy Server Settings This is for checking the state of connection with the Proxy server and performing settings. Press [OK] to show the respective setting.
SC-BTT282&182EB-VQTVQT3Z99_mst.book 40 ページ 2012年2月8日 The sides are cut off so the picture fills the screen. When playing BD-Video, video is output as “4:3 Letterbox”. 4:3 Black bands 4:3 appear at the top Letterbox and bottom of the picture. When connected to a 16:9 widescreen television and playing 4:3 ratio image: 16:9 Video is displayed as a 4:3 ratio image in the centre of the screen. ¾TV System Perform the setup so it matches the TV System of the connected TV.
2012年2月8日 ∫ DivX Registration You need this registration code to purchase and play DivX Video-on-Demand (VOD) content. ∫ Default Settings This returns all values in the Setup menu and the Option menu to the default settings, except for some settings of network, ratings, remote control code, language, etc. 水曜日 午前11時8分 Enjoying sound effects from all speakers For more details on each setting, refer to “Sound Settings” on the Option menu. (> 34) Surround Effects 1 Press [SURROUND].
SC-BTT282&182EB-VQTVQT3Z99_mst.book 42 ページ 2012年2月8日 Speaker installation option Consult a qualified building contractor when attaching the speakers to a wall. Improper attachment may result in damage to the wall and speakers and personal injury. 水曜日 午前11時8分 [BTT182] Front speaker Attaching to a wall You can attach all of the speakers (except subwoofer) to a wall. ≥ The wall or pillar on which the speakers are to be attached should be capable of supporting 10 kg per screw.
2012年2月8日 Before requesting service, please perform the following checks. If the problem remains unresolved, consult your dealer for instructions. Do you have the latest firmware installed? Firmware updates may be released to correct operating irregularities that are discovered with certain movies. (> 20) The following do not indicate a problem with this unit: – Regular disc rotating sounds. – Image disturbance during search. – Image disturbance when replacing 3D discs.
SC-BTT282&182EB-VQTVQT3Z99_mst.book 44 ページ 2012年2月8日 The unit switches to standby mode. ¾ This unit will automatically turn to standby mode after 30 minutes if it is inactive. (> 22) ¾ When the time set for the sleep timer has passed, the main unit will be turned off. (> 10) ¾ One of the unit’s safety devices is activated. Press [Í/I] on the main unit to turn the unit on. The unit does not turn off. 1 Press and hold [Í/I] on the main unit for 5 seconds.
2012年2月8日 Sound No sound. Low volume. Distorted sound. Cannot hear the desired audio type. ¾ Check connections to speakers and other equipment. (> 12s18) ¾ Ensure the speaker settings for your speakers are correct. (> 41) ¾ To output audio from a device connected with an HDMI cable, set “HDMI Audio Output” to “On” in the Setup menu.
SC-BTT282&182EB-VQTVQT3Z99_mst.book 46 ページ 2012年2月8日 Radio Distorted sound or noise is heard. ¾ Adjust the position of the antenna. A beat sound is heard. ¾ Try to keep a certain amount of distance between the antenna and the TV. Noise is excessive. ¾ Change the audio to be output as monaural. Press [AUDIO] to select “MONO”. The sound becomes monaural. ≥ To cancel, press the button again or change the frequency. In normal circumstances, select “AUTO STEREO”. Network I can’t connect to the network.
2012年2月8日 On the unit’s display F99 ¾ The unit fails to operate properly. Press [Í/I] on the main unit for 3 seconds to switch the unit to standby, then switch back on. [BTT282] HDMI ONLY ¾ Some BD-Video discs can only be output with HDMI. NET ¾ While connecting to a network. No PLAY ¾ There is a viewing restriction on a BD-Video or DVD-Video. (> 39) No READ ¾ The media is dirty or badly scratched. The unit cannot play. PLEASE WAIT ¾ The unit is carrying out internal process. This is not a malfunction.
SC-BTT282&182EB-VQTVQT3Z99_mst.book 48 ページ 2012年2月8日 Specifications 水曜日 午前11時8分 SPEAKER SECTION GENERAL Woofer Power consumption: [BTT282] 89 W [BTT182] 80 W Power consumption in standby mode: Approx. 0.1 W Power supply: AC 220 V to 240 V, 50 Hz [BTT282] iPod/iPhone Connector: DC OUT 5 V 1.0 A MAX Dimensions (WkHkD): [BTT282] 430 mm k 38 mm k 279 mm [BTT182] 430 mm k 47 mm k 263 mm Mass: [BTT282] Approx. 2.7 kg [BTT182] Approx. 2.
SC-BTT282&182EB-VQTVQT3Z99_mst.book 49 ページ 2012年2月8日 JPEG “.MP3”, “.mp3” This unit supports ID3 tags, but only titles, artist names and album names can be displayed. “.JPG”, “.jpg” ≥ MOTION JPEG and Progressive JPEG is not supported. ≥ You may not be able to play back the file if you have edited the folder structure or the file name on a PC or other device. “.DIVX”, “.divx”, “.AVI”, “.avi” DivX Subtitles text file “.SRT”, “.srt”, “.SUB”, “.sub”, “.TXT”, “.txt” “.MKV”, “.
SC-BTT282&182EB-VQTVQT3Z99_mst.book 50 ページ 2012年2月8日 水曜日 午前11時8分 “AVCHD”, “AVCHD 3D”, “AVCHD Progressive” and “AVCHD 3D/Progressive” are trademarks of Panasonic Corporation and Sony Corporation. Java is a registered trademark of Oracle and/or its affiliates. Manufactured under license from Dolby Laboratories. Dolby, Pro Logic, and the double-D symbol are trademarks of Dolby Laboratories. Manufactured under license under U.S.
SC-BTT282&182EB-VQTVQT3Z99_mst.book 51 ページ 2012年2月8日 水曜日 午前11時8分 DLNA, the DLNA Logo and DLNA CERTIFIED are trademarks, service marks, or certification marks of the Digital Living Network Alliance. Windows is a trademark or a registered trademark of Microsoft Corporation in the United States and other countries. Skype, associated trade marks and logos and the “ ” logo are trade marks of Skype Limited.
SC-BTT282&182EB-VQTVQT3Z99_mst.book 52 ページ 2012年2月8日 水曜日 午前11時8分 Sales and Support Information Customer Communications Centre ≥ For customers within the UK: 0844 844 3899 ≥ For customers within Ireland: 01 289 8333 ≥ For further support on your product, please visit our website: www.panasonic.co.uk Direct Sales at Panasonic UK ≥ Order accessory and consumable items for your product with ease and confidence by phoning our Customer Communications Centre Monday–Thursday 9:00 a.m.–5:30 p.m., Friday 9:30 a.