
Operating Instructions


11
RQT8538
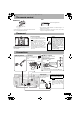
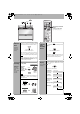
Standby/on switch [8
,
^] .............................................................. 4
Press to switch the unit from on to standby mode or vice versa.
In standby mode, the unit is still consuming a small amount of power.
The unit is in the standby condition (the [
^] indicator lights) when the
AC mains lead is connected.
The primary circuit is always “live” as long as the AC adaptor is
connected to an electrical outlet.
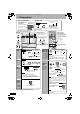
Clock/timer adjust button [CLOCK/TIMER ADJ] ......................... 9
SLEEP timer button [SLEEP]......................................................... 9
CD program/clear, FM/AM/DAB preset button [PGM/CLEAR]
....... 4, 5, 7
Play mode button [PLAY MODE] ......................................... 4, 5, 10
DAB primary/secondary select button [PRIMARY/SECONDARY]
.............. 7
AUX button [AUX] ......................................................................... 10
Tuner/band select button [TUNER/BAND].................................... 5
DAB button [DAB].......................................................................... 6
Volume buttons [VOL –, + VOL]..................................................... 4
Extra D.Bass button [EXTRA D.BASS] ......................................... 9
Sound EQ button [SOUND EQ] ..................................................... 9
Album skip, FM/AM/DAB preset channel select buttons
[2, 1 , u ALBUM i] ........................................................ 5, 7, 10
Display button [DISPLAY] .......................................................... 7, 9
Timer set/check button [TIMER SET/CHECK] .............................. 9
Numbered buttons [1–9, 0, 10] .................................................... 4
CD play/pause button [CD q/h] .................................................... 4
CD stop button [g] ......................................................................... 4
Live virtualizer button [LIVE VIRTUALIZER] ................................ 9
CD skip/search, FM/AM frequency select, DAB station tune,
time adjust buttons [u, i, –, +]................................... 4, 5, 6, 9
DAB menu buttons [MENU, –, +, ENTER] ..................................... 8
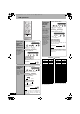
Standby indicator
When the unit is connected to the AC adaptor, this indicator lights up
in standby mode and goes out when the unit is turned on.
Remote control signal sensor
CD skip/search, FM/AM frequency select, DAB station tune,
FM/AM/DAB preset channel select buttons
[u/–, +/i ] ..... 4, 5, 6, 7
Tuning mode select button [TUNING MODE]....................... 5, 6, 7
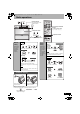
Display
Function indicators ................................................................ 4, 5, 6
The indicator lights up when each mode is chosen.
DAB/DAB auto scan button [DAB] ............................................ 6, 7
CD open/close button [; OPEN/CLOSE]...................................... 4
Display
Control guide
‰
„
‟
†
‡
•
‣
‥
…
‧
․
‱
′
″
‴
‵‶
‷
‹
‸
›
The shaded buttons, such as n, function in the same way as the buttons on
the remote control.
>
=
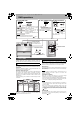
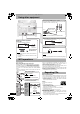
Troubleshooting guide
Before requesting service, make the following checks. If you are in doubt about any of the check points, or if the solutions indicated in the chart do not solve the problem,
consult your dealer for instructions.
No play.
• The disc isn’t correctly set.
• The disc is scratched or dirty. (Tracks skipped.)
• There is moisture on the lens. Wait about an hour
and then try again.
MP3 cannot be read.
•
You may not be able to play MP3 if you have copied a
multi-session disc that has no data between sessions.
• When creating a multi session disc, it is necessary
to close the session.
• The amount of data on the disc is too small. Set the
amount of data to greater than approximately 5 MB.
Sound is unfixed,
reversed or comes
from one speaker only.
• Check the speaker connections. (
page 3)
No sound or there is
a lot of noise.
•
Noise may occur when playing MP3 if recording quality is poor.
• Keep this unit away from mobile telephones.
• Turn the volume up.
• Switch the unit off, determine and correct the cause, then switch
the unit on. Causes include shorting of the positive and negative
speaker wires, straining of the speakers through excessive
volume or power, and using the unit in a hot environment.
Humming heard
during play.
• An AC mains lead or fluorescent light is near the cords. Keep
other appliances and cords away from this unit’s cords.
A beat sound is
heard while receiving
a radio broadcast.
• Switch the TV off or separate it from the unit.
A low hum or noise
is heard during AM
broadcasts.
• Keep the antenna away from other cables and
cords.
• Keep the AM antenna away from the unit.
The picture on the
television near the set
disappears or stripes
appear on the screen.
• The location and orientation of the antenna are
incorrect.
•
The TV antenna wire is too close to the unit. Separate
the antenna wire of the TV set from the unit.
DAB reception is
poor.
• Keep the antenna away from computers, televisions,
other cables and cords.
• Use an outdoor antenna
(
page 10).
Remote control
doesn’t work.
• Check that the batteries are inserted correctly. ( page 3)
• Replace the batteries if they are worn.
No response even
when button is
pressed.
I want to erase the
memory and reset it.
• Use the following method to initialize the settings.
1.Remove the AC adaptor.
2. While pressing [
^
/I ] on the unit, insert the AC adaptor.
3.While continuing to press and hold [ ^/I ] ,
“----------------” appears.
– –:– –
• You plugged the AC adaptor in for the first time or there was a
power failure recently. Set the time. (
page 8, 9)
– – –:– –
• The total programmed play time is more than 200 minutes.
Tracks can still be programmed and played.
PROGRAM FULL
• The number of programmed tracks is limited to 24.
No further tracks can be programmed.
NOT MP3 DISC
• A CD-ROM disc that is not CD-DA or MP3 format is
inserted. It cannot be played.
ERROR
• Incorrect operation performed. Read the instructions and try again.
NO SERVICE • The station is currently not broadcasting.
NO SIGNAL
• This station cannot be received. Check your antenna (
page 3).
DATA
• Data broadcast being received over the DAB
broadcast signal. Cannot be used on this unit.
SCRAMBLE
• The broadcast station being received cannot be
accessed (E.g. pay per use etc.).
Scan Failed.
• Stations are not receivable. Check your antenna
and try Auto scanning
(
page 3, 7).
F □□
(
□□
stands for a number.)
• Turn the unit off, disconnect the AC adaptor, and
consult your dealer.
STATION FULL
• DAB station memory is full. Use the following
method to clear station memory.
1. Press [MENU].
2. Press [–] or [+] to select “STATION CLEAR”.
3. Press [ENTER]. “OK? Push ENTER” is displayed.
4. Press [ENTER].
Station memory is erased and the unit automatically
begins Auto scanning.
SC-EN29-EB (RQT8538-1B)_1.fm 11 ページ 2005年11月30日 水曜日 午前11時52分