SC-HC397-395EGEBGN~RQT0A88-1B.book 1 ページ 2017年1月5日 木曜日 午前10時34分 Operating Instructions Compact Stereo System Model No. SC-HC397 SC-HC395 Thank you for purchasing this product. Please read these instructions carefully before using this product, and save this manual for future use. Included Installation Instructions (l 2, 19 and 20) The installation work should be done by a qualified installation specialist.
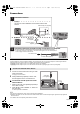
SC-HC397-395EGEBGN~RQT0A88-1B.book 2 ページ 2017年1月5日 Caution for AC Mains Lead Before use Remove the connector cover. How to replace the fuse The location of the fuse differ according to the type of AC mains plug (figures A and B). Confirm the AC mains plug fitted and follow the instructions below. Illustrations may differ from actual AC mains plug. 1. Open the fuse cover with a screwdriver. Figure A 2. Replace the fuse and close or attach the fuse cover.
SC-HC397-395EGEBGN~RQT0A88-1B.book 3 ページ 2017年1月5日 Battery ≥ Danger of explosion if battery is incorrectly replaced. Replace only with the type recommended by the manufacturer. ≥ Mishandling of batteries can cause electrolyte leakage and may cause a fire. – Remove the battery if you do not intend to use the remote control for a long period of time. Store in a cool, dark place. – Do not heat or expose to flame.
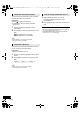
SC-HC397-395EGEBGN~RQT0A88-1B.book 4 ページ 2017年1月5日 木曜日 午前10時34分 Control reference guide Top view 1 2 Standby/on switch (Í/I) (Í) Press to switch the unit from on to standby mode or vice versa. In standby mode, the unit is still consuming a small amount of power. Select the audio source On this unit: “CD” ----------. “BLUETOOTH” ----------. “USB” : ; “AUX” ("-"-"-" “FM” ("-"-"-" (“DAB+”)* On the remote control: [ ]: “BLUETOOTH” [USB/CD]: “CD” ,.
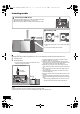
SC-HC397-395EGEBGN~RQT0A88-1B.book 5 ページ 2017年1月5日 木曜日 午前10時34分 Connections Connect the antenna. 1 [SC-HC397] This unit can receive DAB/DAB+ and FM stations with the DAB antenna. Adhesive tape (not supplied) ュモャチモワヵバ ョヮチモワヵ ヘブ Be sure to tighten the nut fully. [SC-HC395] DAB indoor antenna (supplied) ュモャチモワヵバ ョヮチモワヵ ヘブ Adhesive tape (not supplied) FM indoor antenna (supplied) Connect the AC mains lead after all other connections are completed.
SC-HC397-395EGEBGN~RQT0A88-1B.book 6 ページ 2017年1月5日 木曜日 午前10時34分 Inserting media ∫ Connecting a USB device ≥ Insert the USB device directly. Do not use any USB extension cable. ≥ Please disconnect the USB device if you finish using. ≥ Before removing the USB device, select a source other than “USB”. ∫ Inserting a CD The label side ≥ Make sure to tilt the disc so as not to touch the sliding door. ≥ Do not open the sliding door manually.
SC-HC397-395EGEBGN~RQT0A88-1B.book 7 ページ 2017年1月5日 木曜日 午前10時34分 Bluetooth® operations You can listen to the sound from the Bluetooth® audio device from this unit wirelessly. ≥ Refer to the operating instructions of the Bluetooth® device for details. ≥ If you intend to use an NFC (Near Field Communication)-compatible Bluetooth® device, proceed to “One-Touch Connection (Connecting by NFC)”.
SC-HC397-395EGEBGN~RQT0A88-1B.book 8 ページ 2017年1月5日 Bluetooth® transmission mode 1 Preparation ≥ Press [ ] to select “BLUETOOTH”. ≥ If a Bluetooth® device is already connected, disconnect it. 2 1 2 Press [3, 4] to select the mode and then press [OK]. MODE 1: Emphasis on connectivity MODE 2: Emphasis on sound quality ≥ Select “MODE 1” if the sound is interrupted. ≥ The factory default is “MODE 2”.
SC-HC397-395EGEBGN~RQT0A88-1B.book 9 ページ 2017年1月5日 Media playback controls The following marks indicate the availability of the feature. CD audio in CD-DA format and a CD that contains MP3 files (l 18) [USB]: USB devices containing MP3 files (l 18) [Bluetooth]: Connected Bluetooth® device [CD]: Preparation ≥ Turn the unit on. ≥ Insert the media or connect the Bluetooth® device. ≥ Press [USB/CD] or [ ] to select the audio source.
SC-HC397-395EGEBGN~RQT0A88-1B.book 10 ページ 2017年1月5日 [SC-HC397] Listening to DAB/DAB+ Preparation ≥ Make sure that the DAB antenna is connected. (l 5) ≥ Turn the unit on. Memorising stations To listen to DAB/DAB+ broadcasts, the available stations need to be memorised in this unit. ≥ This unit will automatically start the “DAB AUTO SCAN” and memorise the stations that are available in your region if the memory is empty. Press [RADIO/AUX] repeatedly to select “DAB+”.
SC-HC397-395EGEBGN~RQT0A88-1B.book 11 ページ 2017年1月5日 木曜日 午前10時34分 Display Press [DISPLAY] to change the display. The information will scroll through the display. Each time you press the button: Dynamic label: Information about the broadcast PTY display: Programme type Ensemble label: The name of the ensemble Frequency display: The frequency block and frequency is displayed.
SC-HC397-395EGEBGN~RQT0A88-1B.book 12 ページ 2017年1月5日 Listening to FM radio You can preset up to 30 channels. Preparation ≥ Make sure that the antenna is connected. (l 5) ≥ Turn the unit on. ≥ Press [RADIO/AUX] repeatedly to select “FM”. Select a radio broadcast. 1 2 3 Press [PLAY MENU] to select “A.PRESET”. Press [3, 4] to select “LOWEST” or “CURRENT” and then press [OK]. LOWEST: To begin auto preset with the lowest frequency (FM 87.50). CURRENT: To begin auto preset with the current frequency.* {.
SC-HC397-395EGEBGN~RQT0A88-1B.book 13 ページ 2017年1月5日 Sound adjustment Press [SOUND] repeatedly to select the effect. Press [3, 4] to select the setting and then press [OK]. “MY SOUND” (My sound) “SOUND 1”, “SOUND 2” or “SOUND 3”. (l below, “Saving the sound settings”) “PRESET EQ” (Preset Equalizer) “HEAVY” (heavy), “SOFT” (soft), “CLEAR” (clear), “VOCAL” (vocal) or “FLAT” (flat/off). ≥ The factory default is “HEAVY”. Setting the clock This is a 24-hour clock. 1 2 “ON D.BASS” or “OFF D.BASS”.
SC-HC397-395EGEBGN~RQT0A88-1B.book 14 ページ 2017年1月5日 Sleep timer Press [SETUP] repeatedly to select “SLEEP”. Press [3, 4] to set the time (in minutes) and then press [OK]. “SLEEP 30” ,. “SLEEP 60” ,. “SLEEP 90” ,. “SLEEP 120” ^------------------. “OFF” (Cancel) (------------------J ≥ The remaining time is indicated on the unit’s display except when other operations are performed. ≥ The play timer and sleep timer can be used together. The sleep timer is always the main timer on the unit.
SC-HC397-395EGEBGN~RQT0A88-1B.book 15 ページ 2017年1月5日 Changing the unit and remote control code When other Panasonic equipment responds to the supplied remote control, change the remote control code. 1 2 3 Press [USB/CD] to select “CD”. While pressing and holding [SELECTOR] on the unit, press and hold [USB/CD] on the remote control until the unit’s display shows “REMOTE 2”. Press and hold [OK] and [USB/CD] on the remote control for at least 4 seconds.
SC-HC397-395EGEBGN~RQT0A88-1B.book 16 ページ 2017年1月5日 Remote control 木曜日 午前10時34分 Bluetooth® The remote control does not work properly. Pairing cannot be completed. ≥ The battery is depleted or inserted incorrectly. (l 4) ≥ Check the Bluetooth® device condition. Disc Incorrect display or play does not start. ≥ Make sure that the disc is compatible with this unit. (l 18) ≥ There is moisture on the lens. Wait for about an hour and then try again. USB The device cannot be connected.
SC-HC397-395EGEBGN~RQT0A88-1B.book 17 ページ 2017年1月5日 “NO DISC” ≥ Insert the disc to be played (l 6). [SC-HC397] “NO MEMORY” ≥ There are no preset DAB/DAB+ stations to select. Preset some channels. (l 10) “NO PLAY” ≥ A CD that is not in CD-DA or MP3 format is inserted. It cannot be played. ≥ Examine the content. You can only play supported format. (l 18) ≥ The files in the USB device can be corrupted. Format the USB device and try again. ≥ The unit may have a problem. Turn the unit off and then on again.
SC-HC397-395EGEBGN~RQT0A88-1B.book 18 ページ 2017年1月5日 About Bluetooth® Panasonic bears no responsibility for data and/or information that is compromised during a wireless transmission. 木曜日 午前10時34分 Playable media Compatible CD ≥ A disc with the CD Logo. ∫ Frequency band used ≥ This system uses the 2.4 GHz frequency band. ∫ Certification of this device ≥ This system conforms to frequency restrictions and has received certification based on frequency laws. Thus, a wireless permit is not necessary.
SC-HC397-395EGEBGN~RQT0A88-1B.book 19 ページ 2017年1月5日 Attaching the unit to a wall (optional) This unit can be wall mounted using the supplied wall mount brackets, etc. Make sure that the wall and the screws used for securing to the wall are capable of supporting at least 33 kg. The screws and other items are not supplied as the type and size will vary with each installation. ≥ Refer to step 5 of “Wall mount instructions” for details about the required screws.
SC-HC397-395EGEBGN~RQT0A88-1B.book 20 ページ 4 2017年1月5日 Measure and mark the position of both sides of the wall mount brackets. 6 ≥ Use figures below to identify the screwing positions. 木曜日 午前10時34分 Hook the unit securely onto the wall mount brackets with both hands. ≥ Connect the antenna and the AC mains lead to the unit before hanging the unit onto the wall. (l 5) ≥ After hanging the unit, release your hands carefully to confirm the unit sits securely on the wall mount brackets.
SC-HC397-395EGEBGN~RQT0A88-1B.book 21 ページ 2017年1月5日 Specifications ∫ GENERAL Power consumption 26 W Power consumption in standby mode*1, 2 Approx. 0.2 W (When “BLUETOOTH STANDBY” is “ON”)*2 Approx. 0.3 W Power supply AC 220 V to 240 V, 50 Hz Dimensions (WkHkD) 500 mmk205 mmk92 mm Mass Approx. 2.
SC-HC397-395EGEBGN~RQT0A88-1B.book 22 ページ 2017年1月5日 木曜日 午前10時34分 Disposal of Old Equipment and Batteries Only for European Union and countries with recycling systems These symbols on the products, packaging, and/or accompanying documents mean that used electrical and electronic products and batteries must not be mixed with general household waste.
SC-HC397-395EGEBGN~RQT0A88-1B.book 23 ページ 2017年1月5日 木曜日 午前10時34分 Limited Warranty (ONLY FOR AUSTRALIA) Panasonic Warranty 1. The product is warranted for 12 months from the date of purchase. Subject to the conditions of this warranty Panasonic or its Authorised Service Centre will perform necessary service on the product without charge for parts or labour, if in the opinion of Panasonic, the product is found to be faulty within the warranty period. 2.
SC-HC397-395EGEBGN~RQT0A88-1B.book 24 ページ 2017年1月5日 木曜日 午前10時34分 For the United Kingdom and Ireland customers Sales and Support Information Customer Communications Centre ≥ For customers within the UK: 0344 844 3899 ≥ For customers within Ireland: 01 289 8333 ≥ Monday–Friday 9:00 am - 5:00 pm (Excluding public holidays). ≥ For further support on your product, please visit our website: www.panasonic.co.