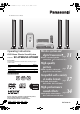
HT995 & HT995W.book Page 1 Tuesday, May 23, 2006 1:14 PM The illustration shows SC-HT995. Operating Instructions DVD Home Theater Sound System Model No. SC-HT995/SC-HT995W Region number The player plays DVD-Video marked with labels containing the region number or “ALL”. Region Number The Middle East, South Africa, Saudi Arabia and Kuwait 2 Southeast Asia and Thailand 3 Australia and N.Z.
HT995 & HT995W.book Page 2 Tuesday, May 23, 2006 1:14 PM Dear customer Thank you for purchasing this product. For optimum performance and safety, please read these instructions carefully. ≥ These operating instructions are applicable to models SC-HT995 and SC-HT995W for a variety of regions. ≥ Unless otherwise indicated, illustrations in these operating instructions are of SC-HT995.
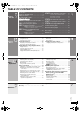
HT995 & HT995W.book Page 3 Monday, April 24, 2006 6:08 AM TABLE OF CONTENTS Getting Started Accessories . . . . . . . . . . . . . . . . . . . . . . . . . . . . . 2 Caution for AC Mains Lead. . . . . . . . . . . . . . . . . 4 Safety precautions . . . . . . . . . . . . . . . . . . . . . . . 5 About DivX VOD content . . . . . . . . . . . . . . . . . . 5 Simple Setup STEP 1 Assembling the front and surround speakers. . . 6 Speaker installation options . . . . . . . . . . . . .
HT995 & HT995W.book Page 4 Monday, April 24, 2006 6:08 AM Caution for AC Mains Lead (For Saudi Arabia and Kuwait) (“GS” area code model only) For your safety, please read the following text carefully. This appliance is supplied with a moulded three pin mains plug for your safety and convenience. A 5-ampere fuse is fitted in this plug. Should the fuse need to be replaced please ensure that the replacement fuse has a rating of 5-ampere and that it is approved by ASTA or BSI to BS1362.
HT995 & HT995W.book Page 5 Monday, April 24, 2006 6:08 AM Safety precautions Foreign matter Voltage Do not use high voltage power sources. This can overload the unit and cause a fire. Do not use a DC power source. Check the source carefully when setting the unit up on a ship or other places where DC is used. AC mains lead protection Ensure the AC mains lead is connected correctly and not damaged. Poor connection and lead damage can cause fire or electric shock.
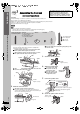
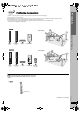
HT995 & HT995W.book Simple Setup STEP 1 Page 6 Thursday, April 27, 2006 8:17 PM The supplied stands are specially designed for attachment to Panasonic SB-FS995 front speakers, SB-FS996 surround speakers or SB-FS990 front speakers, SB-FS540 surround speakers. Use only as indicated in this setup. Assembling the front and surround speakers Preparation ≥ To prevent damage or scratches, lay down a soft cloth and perform assembly on it. ≥ For assembly, use a Phillips-head screwdriver.
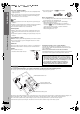
HT995 & HT995W.book Page 7 Monday, April 24, 2006 6:08 AM [HT995W] ≥ The front and surround speakers are different. – Check the label on the rear of speaker before attaching the stand (➜ page 9). – The stand with shorter cable is for the front speaker. 4 Bases 2 Front speakers and 4 Stands 2 Surround speakers ≥ 2kstands with short cable: For front speakers (with cover plate) ≥ 2kstands with long cable: For surround speakers 3 Attach the stand to the base. 1 Thread the speaker cable through the base.
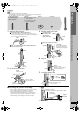
766En_p06-17.fm Page 8 Monday, April 24, 2006 6:47 AM Speaker installation options ∫ Attaching to a wall Front and surround speaker [HT995W] Simple Setup You can attach all of the speakers (except subwoofer) to a wall. ≥ The wall or pillar on which the speakers are to be attached should be capable of supporting over 15 kg ([HT995W] 10 kg) per screw. Consult a qualified building contractor when attaching the speakers to a wall. Improper attachment may result in damage to the wall and speakers.
HT995 & HT995W.book STEP 2 Page 9 Thursday, April 27, 2006 8:16 PM Positioning the speakers Simple Setup How you set up your speakers can affect the bass and the sound field. Note the following points: ≥ Place speakers on flat secure bases. ≥ Placing speakers too close to floors, walls, and corners can result in excessive bass. Cover walls and windows with thick curtains. ≥ Left and right speakers are interchangeable, but front and surround speakers are not.
HT995 & HT995W.book Page 10 Thursday, April 27, 2006 8:06 PM ≥Use only supplied speakers ≥ Do not touch the netted area of the speakers. Simple Setup Using other speakers can damage the unit, and sound quality will be negatively affected. ≥ Set the speakers up on an even surface to prevent them from falling. Take proper precautions to prevent the speakers from falling if you cannot set them up on an even surface. e.g.
HT995 & HT995W.book 8:17 PM Be careful not to cross (shortcircuit) or reverse the polarity of the speaker wires as doing so may damage the speakers. 6 4 2 SUB WOOFER SURROUND Rch FRONT Rch 5 2 FRONT Rch 3 4 SURROUND Rch 1 FRONT Lch 6 3 SURROUND Lch SUB WOOFER 5 CENTER 2 sheets of speaker cable stickers ≥ Attach the speaker-cable stickers to make connection easier.
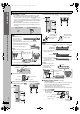
HT995 & HT995W.book STEP 4 Page 12 Thursday, April 27, 2006 8:17 PM Radio and digital transceiver connections Simple Setup AM loop antenna FM indoor antenna ≥ Using an outdoor antenna (optional) (➜ page 33). [HT995W] Digital transceiver The illustration shows SC-HT995. FM indoor antenna Affix this end of the antenna where reception is best. Click! Adhesive tape Radio and digital transceiver connections AM loop antenna Stand the antenna up on its base.
HT995 & HT995W.book 5 Thursday, April 27, 2006 8:17 PM Audio and video connections ≥ Do not connect through the video cassette recorder. Due to copy guard protection, the picture may not be displayed properly. ≥ Turn the television off before connecting, and refer to the television’s operating instructions.
8766En_p06-17.fm Page 14 Wednesday, May 31, 2006 12:02 PM Other video connections for improved picture quality S-VIDEO OUT Simple Setup Television (not included) Back of the main unit COMPONENT VIDEO OUT S-video cable (not included) S-VIDEO IN Y PB PR VIDEO OUT S-VIDEO OUT ≥Using the S-VIDEO OUT terminal The S-VIDEO OUT terminal achieves a more vivid picture than the VIDEO OUT terminal by separating the chrominance (C) and luminance (Y) signals. (Actual results depend on the television.
HT995 & HT995W.book Page 15 Monday, April 24, 2006 6:08 AM 7 Preparing the remote control Do not: Remote control Batteries 2 Insert so the poles (i and j) match those in the remote control. 3 ≥ mix old and new batteries. ≥ use different types at the same time. ≥ heat or expose to flame. ≥ take apart or short circuit. ≥ attempt to recharge alkaline or manganese batteries. ≥ use batteries if the covering has been peeled off.
HT995 & HT995W.book Page 16 Thursday, April 27, 2006 8:07 PM Control reference guide Television operations (38) See page references in parentheses. Adjust the television volume (38) Select the source DVD: DVD/CD (15), TUNER/BAND: FM/AM (32) EXT-IN: MUSIC P. (36), TV (38), AUX (38), D-IN (Digital In) ([HT995W]) (38) Turn the unit on/off (15) Change the television’s video input mode (38) ONE TOUCH PLAY Select disc’s title numbers etc.
HT995 & HT995W.book Page 17 Monday, April 24, 2006 6:08 AM Discs that can be played Operations in these instructions are described mainly with formats. Icons such as [DVD-V] show the formats. DVD-Video [DVD-V] — DVD-Audio [DVD-A] [DVD-V] ≥ [DVD-V] Some DVD-Audio discs contain DVD-Video content. To play DVD-Video content, select “Play as DVD-Video” in Other Menu (➜ page 27).
HT995 & HT995W.book Page 18 Monday, April 24, 2006 6:08 AM Basic play To display the picture from the main unit, turn on your television and change its video input mode (e.g. VIDEO 1, AV 1, etc.). ≥ To change your television’s video input mode, refer to its operating instructions. Using the main unit The illustration shows SC-HT995. 1 Turn the unit on. 3 Open the disc tray. 2 Select “DVD/CD”. 4 Load the disc.
HT995 & HT995W.book Page 19 Monday, April 24, 2006 6:08 AM If you are experiencing problems, refer to troubleshooting (➜ page 40 to 42). Using the remote control Select 1 Numbered buttons CANCEL , SKIP STOP PAUSE TOP MENU, DIRECT NAVIGATOR ENTER 2 On-screen item select — ONE TOUCH PLAY Register 6 , SLOW/SEARCH [DVD-VR] [DVD-A] [DVD-V] [VCD] [CD] e.g.
HT995 & HT995W.book Page 20 Monday, April 24, 2006 6:08 AM Convenient functions All group play [DVD-A] Press [1 PLAY]. All Group Playback Numbered buttons ONE TOUCH PLAY Press PLAY to start CANCEL Program play (up to 32 items) PLAY 1 Press the numbered buttons to select the item. ([WMA] [MP3] [JPEG] [MPEG4] [DivX] Press [ENTER] to register the selection.) e.g. [DVD-V] ENTER Program Playback Choose a title and chapter. FUNCTIONS No.
HT995 & HT995W.book Page 21 Monday, April 24, 2006 6:08 AM Playing data discs using navigation menus ∫ Using the submenu 1 While Navigation Menu is displayed Press [FUNCTIONS]. 2 Press [3, 4] to select an item and press [ENTER]. Numbered buttons Items shown differ depending on the type of disc. ONE TOUCH PLAY Multi List Tree Thumbnail Groups and contents are displayed.
HT995 & HT995W.book Page 22 Monday, April 24, 2006 6:08 AM Playing data discs using navigation menus Playing RAM and DVD-R/-RW (DVD-VR) discs Selecting a track using CD text [CD] [DVD-VR] Titles appear with CD Text disc playback. 1 ≥ Titles appear only if the titles are recorded on the disc. ≥ You cannot edit programs, playlists and disc titles. Press [TOP MENU] or [MENU]. ≥ To exit the screen, press [TOP MENU] or [MENU]. e.g. CD text CD Text 1. 2. 3. 4. 5. 6. 7.
HT995 & HT995W.book Page 23 Monday, April 24, 2006 6:08 AM Tips for making data discs ≥ When there are more than 8 groups, the eighth group onwards will be displayed on one vertical line in the menu screen. ≥ There may be differences in the display order on the menu screen and computer screen. ≥ This unit cannot play files recorded using packet write. DVD-RAM ≥ Discs must conform to UDF 2.0. DVD-R/RW ≥ Discs must conform to UDF bridge (UDF 1.02/ISO9660). ≥ This unit does not support multi-session.
HT995 & HT995W.book Page 24 Monday, April 24, 2006 6:08 AM Using on-screen menus Numbered buttons Time (Time Slip and Time Search do not work with iR/iRW discs.) To skip incrementally or decrementally (Time Slip for play only) 1 Press [ENTER] twice to show the Time Slip indicator. 2 Press [3, 4] to select the time and press [ENTER]. ≥ To change the steps more quickly, press and hold [3, 4].
HT995 & HT995W.book Page 25 Monday, April 24, 2006 6:08 AM Play Speed [DVD-A] (Motion picture part) [DVD-VR] [DVD-V] To change play speed – from “k0.6” to “k1.4” ≥ Press [1 PLAY] to return to normal play. ≥ After you change the speed – Dolby Pro Logic II and Sound Enhancement have no effect. – Audio output switches to 2-channel stereo. – Sampling frequency of 96 kHz is converted to 48 kHz. ≥ This function may not work depending on the disc’s recording. Items shown differ depending on the type of disc.
HT995 & HT995W.book Page 26 Monday, April 24, 2006 6:08 AM Using on-screen menus Other Settings ∫ Picture Menu (Continued) If you have chosen “xxx§p” (progressive) or “1080i” (interlace) (➜ page 25, “Video Output Mode” in Picture Menu), select the method of conversion for progressive output to suit the type of material. ≥ The setting will return to Auto or Auto1 when the disc tray is opened, the unit is turned off or another source is selected.
HT995 & HT995W.book Page 27 Monday, April 24, 2006 6:08 AM Other Settings Items shown differ depending on the type of disc. ∫ Display Menu [JPEG] On ,------. Off Subtitle Position 0 to s60 (in 2 unit steps) Subtitle Brightness Auto, 0 to s7 4:3 Aspect To zoom in and out manually – in 0.01-unit steps from “k1.00” to “k1.60” – in 0.02-unit steps from “k1.60” to “k2.00” – in 0.05-unit steps from “k2.00” to “k4.
HT995 & HT995W.book Page 28 Monday, April 24, 2006 6:08 AM Changing the player settings 1 Numbered buttons Press and hold to show the Setup menu. If you have not performed QUICK SETUP (➜ page 15), the QUICK SETUP screen appears. ONE TOUCH PLAY 2 Select the tab. Select Go right ENTER RETURN, SETUP 3 Select the item.
HT995 & HT995W.book Page 29 Monday, April 24, 2006 6:08 AM QUICK SETUP enables successive settings of the items in the shaded area. ∫ “Video” tab TV Aspect Choose the setting to suit your television and preference. ≥ 4:3 Pan&Scan: Regular aspect television (4:3) The sides of the widescreen picture are cut off so it fills the screen (unless prohibited by the disc). ≥ 4:3 Letterbox: Regular aspect television (4:3) Widescreen picture is shown in the letterbox style.
HT995 & HT995W.book Page 30 Monday, April 24, 2006 6:08 AM Changing the player settings QUICK SETUP enables successive settings of the items in the shaded area. ∫ “HDMI” tab RGB Range Set “HDMI Color Space (or HDMI Colour Space)” to “RGB” (➜ page 26, Picture Menu). Video Output (This setting is irrelevant when connected through the VIDEO OUT or S-VIDEO OUT terminal.) ≥ Standard ≥ Enhanced: When the black and white images are not distinct. ≥ On: When connected through the HDMI AV OUT terminal.
HT995 & HT995W.book Page 31 Monday, April 24, 2006 6:08 AM Changing the delay time of the speakers (Effective when playing multi-channel audio) (Center and surround speakers only) For optimum listening with 5.1-channel sound, all the speakers, except for the subwoofer, should be the same distance from the seating position. If you have to place the center or surround speakers closer to the seating position, adjust the delay time to make up for the difference.
HT995 & HT995W.book Page 32 Monday, April 24, 2006 6:08 AM Using the radio Selecting the preset channels TUNER/BAND Numbered buttons ONE TOUCH PLAY 1 Press [TUNER/BAND] to select “FM” or “AM”. 2 Press the numbered buttons to select the channel. ≥ To select a 2-digit number e.g. 12: [S10] ➜ [1] ➜ [2] Alternatively, press [X, W]. PRG DISC SFC TG D.MIX MONO SLP DE S A AC When a stereo FM broadcast is being received, “ST” lights in the display. ST SRD E. HDCD H.
HT995 & HT995W.book Page 33 Thursday, April 27, 2006 8:17 PM ∫ AM frequency step Main unit only [Southeast\Asia,]Thailand,[the]Middle]East,\South]Africa,]Saudi[Arabia[and[ [Kuwait[ The step is factory-set to 9-kHz, but you can change it to receive broadcasts allocated in 10-kHz steps. 1 Press [SELECTOR] to select “FM”. 2 Press and hold [SELECTOR]. After a few seconds the display changes to show the current minimum frequency. Continue to hold the button down.
HT995 & HT995W.book Page 34 Thursday, April 27, 2006 8:17 PM Using sound effects Enhancing the sound from the center speaker: Center Focus DVD This applies to discs where the dialogue is recorded in the center channel. You can make the sound of the center speaker seem like it is coming from within the television. ONE TOUCH PLAY VOLUME Press and hold [—C.FOCUS]. Each time you press and hold the button: C FOCUS ON,------.
Thursday, April 27, 2006 8:17 PM Enhancing the bass sound: H.BASS Adjusting the volume of each speaker: Speaker level adjustments You can enhance low-frequency sound so that heavy bass sound can be heard clearly, even if the acoustics of your room are not optimal. The unit automatically selects the most suitable setting according to the type of playback source. Press [-H.BASS]. ST ≥ [DVD-V] [DVD-VR] H.BASS ON (factory preset),------.H.BASS OFF SRD E. HDCD H.
HT995 & HT995W.book Page 36 Thursday, April 27, 2006 8:17 PM Using other useful functions Using headphones Main unit only EXT-IN 1 ONE TOUCH PLAY Reduce the volume and connect the headphones (not included). Headphone plug type: ‰3.5 mm stereo mini plug VOLUME The illustration shows SC-HT995. VOLUME ENTER FUNCTIONS Using other useful functions SLEEP MUTING 2 Adjust headphone volume with [VOLUME]. ≥ Audio is automatically switched to 2-channel stereo.
HT995 & HT995W.book Page 37 Monday, April 24, 2006 6:08 AM [HT995] Enjoying Karaoke 1 Turn [MIC LEVEL] to “MIN” and connect the microphone (not included). Microphone plug type: ‰6.3 mm monaural standard plug The illustration shows SC-HT995. 2 3 4 VOLUME Insert the disc and start play (➜ page 18) Adjust the main volume with [VOLUME]. Adjust the microphone volume. To turn the vocals on and off [DVD-V] 1 2 3 4 Press [FUNCTIONS] during play. Press [3, 4] to select “Audio” and press [1].
HT995 & HT995W.book Page 38 Monday, April 24, 2006 6:08 AM Operating other equipment TV , TV VOLUME TV/AV EXT-IN ONE TOUCH PLAY [HT995W] Operating the cable TV box, digital broadcasting or satellite receiver This unit can decode the surround signals received through cable TV box, digital broadcasting or satellite broadcasts. Refer to your equipment’s operating instructions for details. Only Dolby Digital and PCM can be played with this connection.
8766En_p32-48.fm Page 39 Tuesday, May 9, 2006 11:00 AM Operating both the television and the home theater system: Control with HDMI (HDAVI ControlTM) Operating both the television and the home theater system: Control with HDMI (HDAVI ControlTM) Automatic input switching When the following operation is performed the television will automatically switch the input channel and display the corresponding action.
HT995 & HT995W.book Page 40 Monday, April 24, 2006 6:08 AM Troubleshooting guide Before requesting service, make the following checks. If you are in doubt about some of the check points, or if the solutions indicated in the table do not solve the problem, consult your dealer for instructions. Power Page No power. ≥ Insert the AC mains lead securely. 14 The unit is automatically switched to standby mode. ≥ The Sleep timer was working and had reached the set time limit.
HT995 & HT995W.book Page 41 Thursday, April 27, 2006 8:18 PM Marker Page ≥ You cannot add markers with DVD-RAM or DVD-R/-RW (DVD-VR) discs. ≥ If the disc’s elapsed play time does not appear on the unit’s display, you cannot add markers. — — ≥ The end of an item becomes point B when it is reached. — Sound is distorted. ≥ Noise may occur when playing WMA. ≥ When using the HDMI output, audio may not be output from other terminals. — — Effects do not work.
HT995 & HT995W.book Page 42 Monday, April 24, 2006 6:08 AM Troubleshooting guide Progressive video There is ghosting when progressive or HDMI output is on. Pictures not in progressive output. Page ≥ This problem is caused by the editing method or material used on DVD-Video, but should be corrected if you use interlaced output. Set “Video Output Mode” in Picture Menu to “480i” or “576i”. (Alternatively, press and hold [CANCEL] to switch to “480i” or “576i”.
HT995 & HT995W.book Page 43 Monday, April 24, 2006 6:08 AM Glossary CPPM (Content Protection for Prerecorded Media) I/P/B A copy protection system used for DVD-Audio files. This unit supports CPPM. MPEG 2, the video compression standard adopted for use with DVD-Video, codes frames using these 3 picture types. I: Intra coded picture This picture has the best quality and is the best to use when adjusting the picture. P: Predictive coded picture This picture is calculated based on past I- or P-pictures.
HT995 & HT995W.
Tuesday, April 25, 2006 4:45 PM VIDEO SECTION Video system Composite video output Output level Terminal S-video output Y output level C output level PAL625/50, PAL525/60, NTSC 1 Vp-p (75 ≠) Pin jack (1 system) 1 Vp-p (75 ≠) PAL; 0.3 Vp-p (75 ≠) NTSC; 0.286 Vp-p (75 ≠) Terminal S terminal (1 system) Component video output (NTSC: 480p/480i, PAL: 576p/576i) Y output level 1 Vp-p (75 ≠) PB output level 0.7 Vp-p (75 ≠) PR output level 0.
8766En_p32-48.fm Page 46 Wednesday, May 31, 2006 12:07 PM Specifications GENERAL Power supply [HT995] [HT995W] Power consumption [HT995] Main unit [HT995W] Main unit Dimensions (WtHtD) Mass Operating temperature range Operating humidity range AC 110–127 V, 220–240 V, 50/60 Hz AC 230–240 V, 50 Hz 120 W 115 W 430 mmk60 mmk354 mm Main unit 3.35 kg r5 oC to r35 oC 5 % to 90 % RH (no condensation) Power consumption in standby mode [HT995] [HT995W] approx. 0.65 W approx. 0.
HT995 & HT995W.book Page 47 Monday, April 24, 2006 6:08 AM Manufactured under license from Dolby Laboratories. “Dolby”, “Pro Logic” and the double-D symbol are trademarks of Dolby Laboratories. “DTS” and “DTS Digital Surround” are registered trademarks of Digital Theater Systems, Inc. This product incorporates copyright protection technology that is protected by method claims of certain U.S. patents and other intellectual property rights owned by Macrovision Corporation and other rights owners.
HT995 & HT995W.book Page 48 Tuesday, May 23, 2006 1:16 PM CAUTION! THIS PRODUCT UTILIZES A LASER. USE OF CONTROLS OR ADJUSTMENTS OR PERFORMANCE OF PROCEDURES OTHER THAN THOSE SPECIFIED HEREIN MAY RESULT IN HAZARDOUS RADIATION EXPOSURE. DO NOT OPEN COVERS AND DO NOT REPAIR YOURSELF. REFER SERVICING TO QUALIFIED PERSONNEL.