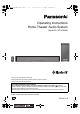
SC-HTB480EB_RQT9917-B.book 1 ページ 2014年2月27日 木曜日 午前9時46分 Operating Instructions Home Theater Audio System Model No. SC-HTB480 Thank you for purchasing this product. Please read these instructions carefully before using this product, and save this manual for future use. Included Installation Instructions The installation work should be done by a qualified installation specialist.
SC-HTB480EB_RQT9917-B.book 2 ページ 2014年2月27日 木曜日 午前9時46分 Safety precautions WARNING CAUTION Unit Unit ≥ To reduce the risk of fire, electric shock or product damage, jDo not expose this unit to rain, moisture, dripping or splashing. jDo not place objects filled with liquids, such as vases, on this unit. jUse only the recommended accessories. jDo not remove covers. jDo not repair this unit by yourself. Refer servicing to qualified service personnel.
SC-HTB480EB_RQT9917-B.book 3 ページ 2014年2月27日 木曜日 午前9時46分 (For the AC mains plug of three pins) For your safety, please read the following text carefully. This appliance is supplied with a moulded three pin mains plug for your safety and convenience. A 5-ampere fuse is fitted in this plug. Should the fuse need to be replaced please ensure that the replacement fuse has a rating of 5ampere and that it is approved by ASTA or BSI to BS1362. Check for the ASTA mark Ï or the BSI mark Ì on the body of the fuse.
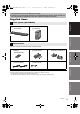
SC-HTB480EB_RQT9917-B.book 4 ページ 2014年2月27日 木曜日 午前9時46分 Table of contents Safety precautions............................................................................................ 2 Caution for AC Mains Lead.............................................................................. 3 Before use Supplied items .................................................................................................. 5 This system (SC-HTB480) ...............................................................
SC-HTB480EB_RQT9917-B.book 5 ページ 2014年2月27日 木曜日 午前9時46分 Before use ≥ The illustrations shown may differ from your unit. ≥ Operations in this operating instructions are described mainly with the remote control, but you can perform the operations on the main unit if the controls are the same. Supplied items ∏ 1 Active subwoofer (SB-HWA480) Before use ∏ 1 Main unit (speaker) (SU-HTB480) Precautions This system (SC-HTB480) Accessories Check the supplied accessories before using this system.
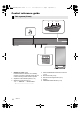
SC-HTB480EB_RQT9917-B.book 6 ページ 2014年2月27日 木曜日 午前9時46分 Control reference guide This system (Front) 1 2 3 4 5 Main unit 6 7 8 Active subwoofer 1 Standby/on switch (Í/I) Press to switch the unit from on to standby mode or vice versa. In standby mode, the unit is still consuming a small amount of power.
SC-HTB480EB_RQT9917-B.
SC-HTB480EB_RQT9917-B.book 8 ページ 2014年2月27日 木曜日 午前9時46分 Remote control ∫ Before using for the first time Remove the insulation sheet A.
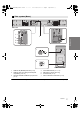
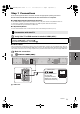
SC-HTB480EB_RQT9917-B.book 9 ページ 2014年2月27日 Step 1 Connections 木曜日 午前9時46分 Getting started ≥Turn off all equipment before connection and read the appropriate operating instructions. Do not connect the AC mains lead until all other connections are completed. ∫ HDMI (High-Definition Multimedia Interface) ≥ The HDMI connection supports VIERA Link “HDAVI Control” (> 25) when used with a compatible Panasonic TV. ≥ Use the ARC compatible High Speed HDMI Cables. Non-HDMI-compliant cables cannot be utilised.
SC-HTB480EB_RQT9917-B.book 10 ページ 2014年2月27日 木曜日 午前9時46分 [B] Not labelled “HDMI (ARC)” A HDMI IN B OPTICAL OUT AV OUT TV TV(ARC) OPTICAL DIGITAL AUDIO IN TV A HDMI cable B Optical digital audio cable ≥ When you use the optical digital audio cable, insert the tip correctly into the terminal. Connection from an HDMI compatible device You can direct the audio signal from the connected Blu-ray Disc player, DVD player, Set Top Box, etc. to this system.
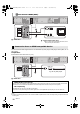
SC-HTB480EB_RQT9917-B.book 11 ページ 2014年2月27日 木曜日 午前9時46分 Connection to a 4K Ultra HD TV This system cannot pass-through the 4K content of a 4K compatible equipment to a 4K Ultra HD TV. However, you can connect the system to a 4K Ultra HD TV to enjoy the 4K content. Connect both ends to ARC compatible HDMI terminals. HDMI IN (ARC) TV HDMI IN (4K) (4K compatible) A e.g.
SC-HTB480EB_RQT9917-B.book 12 ページ 2014年2月27日 木曜日 午前9時46分 Place the infrared emitter in sight of the TV’s remote control signal sensor. ≥ For the location of the TV’s remote control signal sensor, refer to the operating instructions for the TV. Aim the TV’s remote control at this system’s remote control sensor and operate the TV. ≥ For the location of this system’s remote control signal sensor, refer to page 8. ≥ Make sure to clean the surface, where the adhesive tape is to be attached.
SC-HTB480EB_RQT9917-B.book 13 ページ 2014年2月27日 木曜日 午前9時46分 Step 2 Placement Professional installation is required. The installation should never be done by any other than a qualified installation specialist. PANASONIC DISCLAIMS ANY PROPERTY DAMAGE AND/OR SERIOUS INJURY, INCLUDING DEATH RESULTING FROM IMPROPER INSTALLATION OR INCORRECT HANDLING. ≥ Be sure to install the main unit as indicated within this operating Instructions.
SC-HTB480EB_RQT9917-B.book 14 ページ 2014年2月27日 木曜日 午前9時46分 Selecting the placement method Choose a placement method that suits you best. When placing the main unit in a rack or on a table ≥ Place the main unit on a flat and horizontal surface. Page 15 When attaching the main unit to a wall ≥ Place the main unit on a flat and vertical surface. Page 16 ∫ When placing the main unit in front of the TV The main unit may block or interfere with the TV’s various sensors (C.A.T.S.
SC-HTB480EB_RQT9917-B.book 15 ページ 2014年2月27日 木曜日 午前9時46分 When placing the main unit in a rack or on a table Additionally required accessories (commercially available) ≥Fall prevention cord ...................................................................................................................... k 2 ≥Screw eyes (to attach the fall prevention cord) .............................................................................
SC-HTB480EB_RQT9917-B.book 16 ページ 2014年2月27日 木曜日 午前9時46分 When attaching the main unit to a wall The main unit can be wall mounted using the supplied wall mount brackets, etc. Make sure that the screw used and the wall are strong enough to support the weight of at least 26 kg. The screws and other items are not supplied as the type and size will vary with each installation. ≥Refer to step 3 for details about the required screws. ≥Be sure to attach the fall prevention cord as a secondary safety measure.
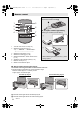
SC-HTB480EB_RQT9917-B.book 17 ページ 2014年2月27日 木曜日 午前9時46分 Attach the wall mount brackets to the main unit. Precautions Getting started A Wall mount bracket (supplied) B Screw (supplied) Drive a screw into the wall. ≥ ≥ ≥ ≥ Use the measurements indicated below to identify the screwing positions on the wall. Leave at least 100 mm of space above of the main unit to allow enough space for fitting the main unit. Position the main unit with at least 50 mm of free space to its right.
SC-HTB480EB_RQT9917-B.book 18 ページ 2014年2月27日 木曜日 午前9時46分 Fit the main unit securely onto the screw(s). DO DO NOT ≥ Move the speaker so that the screw is in this position. Secure the cord to the wall. ≥ Make sure that the slack of the cord is minimal. A Screw eye B Cord 18 RQT9917 ≥ In this position, the speaker will likely fall if moved to the left or right.
SC-HTB480EB_RQT9917-B.book 19 ページ 2014年2月27日 木曜日 午前9時46分 Step 3 Wireless connections Preparation ≥ Turn on the main unit. Press [BÍ CI]. Bluetooth® connection By using the Bluetooth® connection, you can listen to the sound from the Bluetooth® audio device from this system wirelessly. ≥ Refer to the operating instructions of the Bluetooth® device for further instruction on how to connect a Bluetooth® device.
SC-HTB480EB_RQT9917-B.book 20 ページ 2014年2月27日 One-Touch Connection (Connecting by NFC) For NFC-compatible Bluetooth® devices (AndroidTM devices) only Simply by touching an NFC (Near Field Communication)-compatible Bluetooth® device on the main unit, you can complete all preparations, from registering a Bluetooth® device to establishing a connection. Preparation ≥ Turn on the NFC feature of the device. ≥ Android device version lower than 4.
SC-HTB480EB_RQT9917-B.book 21 ページ 2014年2月27日 Using this system 木曜日 午前9時46分 Operations Preparation ∫ To adjust the volume of this system Press [i VOL j]. ≥ Turn on the active subwoofer. ≥ Turn on the TV and/or connected device. ≥ Volume range: 0 to 100 ∫ To mute the sound Press [MUTE]. ≥ While muting, “MUTE” is indicated on the display. ≥ To cancel, press the button again or adjust the volume. ≥ Muting is cancelled if the main unit is turned off.
SC-HTB480EB_RQT9917-B.book 22 ページ 2014年2月27日 3D sound This system provides a feeling that the sound and the image are as one. ≥ To change the applied effect, refer to “Sound menu”. (> right) e.g., Image of 3D sound field Dolby Virtual Speaker ® 3D surround effect Clear-mode dialog 3D sound With this effect you can enjoy a surround sound effect similar to 5.1ch.
H.BASS 3D CLR DIALOG 2014年2月27日 Enhance the harmonic bass effect. ON OFF The 3D Clear Mode Dialog feature creates a sound field similar to the sound coming from a TV screen and makes dialogues clearer. ON: 3D Surround, Clear Mode Dialog and Dolby Virtual Speaker effect OFF: Dolby Virtual Speaker effect The setting is set back to “ON” every time you turn the main unit on. DUAL AUDIO Sets the preferred audio channel mode when there are two audio modes received by this system.
SC-HTB480EB_RQT9917-B.book 24 ページ 2014年2月27日 木曜日 Setup menu LINK MODE Change the Bluetooth® connection link mode to suit the connection type. Make sure to disconnect the current connected device (“BLUETOOTH READY” is indicated on the display). MODE 1: Emphasis on connectivity. MODE 2: Emphasis on sound quality. VIERA LINK Turn on the VIERA Link function. ON OFF Select “OFF” when your HDAVI Control device does not work correctly with this system. ARC will be disabled.
SC-HTB480EB_RQT9917-B.book 25 ページ 2014年2月27日 木曜日 午前9時46分 Linked operations with the TV (VIERA Link “HDAVI ControlTM”) VIERA Link “HDAVI Control” is a convenient function that offers linked operations of this system, and a Panasonic TV (VIERA) under “HDAVI Control”. You can use this function by connecting the equipment with an HDMI cable. See the operating instructions for connected equipment for operational details. Preparation 1 Confirm that the HDMI connection has been made.
SC-HTB480EB_RQT9917-B.book 26 ページ 2014年2月27日 Troubleshooting 木曜日 午前9時46分 Reference Before requesting service, make the following checks. If you are in doubt about some of the check points, or if the solutions indicated in the following guide do not solve the problem, consult your dealer for instructions. The main unit is automatically switched to standby mode. “AUTO POWER DOWN” function is on.
2014年2月27日 The first few seconds of audio cannot be heard when using the HDMI connection. This may occur during DVD-Video chapter playback. Change the digital audio output setting on the connected device from “Bitstream” to “PCM”. When operating an HDMI compatible device of a different brand, the main unit reacts in an unwanted manner. HDAVI Control commands may use a different signal depending on the brand of the device. In this case, turn VIERA Link off.
SC-HTB480EB_RQT9917-B.book 28 ページ 2014年2月27日 There is no audio. The power of the main unit turns off automatically. (When the main unit detects a problem, a safety measure is activated and the main unit automatically switches to standby mode.) ≥ There is a problem with the amplifier. ≥ Is the volume extremely high? If so, lower the volume. ≥ Is this system placed in an extremely hot place? If so, move this system to a cooler place and wait a few moments and then try to turn it on again.
2014年2月27日 About Bluetooth® Panasonic bears no responsibility for data and/or information that is compromised during a wireless transmission. ∫ Frequency band used This system uses the 2.4 GHz frequency band. ∫ Certification of this device ≥ This system conforms to frequency restrictions and has received certification based on frequency laws. Thus, a wireless permit is not necessary. ≥ The action below are punishable by law in some countries: jTaking apart or modifying the unit.
SC-HTB480EB_RQT9917-B.book 30 ページ 2014年2月27日 木曜日 午前9時46分 Specifications AMPLIFIER SECTION RMS output power: Dolby Digital Mode Front ch (L, R ch) 60 W per channel (6 ≠), 1 kHz, 10 % THD Subwoofer ch 130 W per channel (8 ≠), 100 Hz, 10 % THD Total RMS Dolby Digital mode power 250 W TERMINAL SECTION HDAVI Control This unit supports “HDAVI Control 5” function.
SC-HTB480EB_RQT9917-B.book 31 ページ 2014年2月27日 SPEAKER SECTION Front speakers (Built-in) Full range 6.5 cm cone type k1/ch Active subwoofer Woofer 16 cm cone type k1 木曜日 午前9時46分 Bluetooth® SECTION Bluetooth® system specification Bluetooth® Ver.3.0 Wireless equipment classification Class 2 Supported profiles A2DP Operating frequency 2.4 GHz band FH-SS Operating distance 10 m Line of Sight WIRELESS SECTION Wireless module Frequency Range 2.40335 GHz to 2.47735 GHz No.
SC-HTB480EB_RQT9917-B.book 31 ページ 2014年2月27日 木曜日 午前9時46分 Sales and Support Information Customer Communications Centre ≥ For customers within the UK: 0844 844 3899 ≥ For customers within Ireland: 01 289 8333 ≥ Monday–Friday 9:00 am – 5:00 pm (Excluding public holidays). ≥ For further support on your product, please visit our website: www.panasonic.co.