TQBJ2196_en.fm Page 1 Tuesday, February 26, 2019 6:32 PM Operating Instructions Home Theater Audio System Model No. SC-HTB510 Thank you for purchasing this product. For optimum performance and safety, please read these instructions carefully. Please keep this manual for future reference. Included Installation Instructions The installation work should be done by a qualified installation specialist.
TQBJ2196_en.fm Page 2 Tuesday, February 26, 2019 6:32 PM Safety precautions WARNING! CAUTION! Unit • To reduce the risk of fire, electric shock or product damage, – Do not expose this unit to rain, moisture, dripping or splashing. – Do not place objects filled with liquids, such as vases, on this unit. – Use the recommended accessories. – Do not remove covers. – Do not repair this unit by yourself. Refer servicing to qualified service personnel.
TQBJ2196_en.fm Page 3 Tuesday, February 26, 2019 6:32 PM Caution for AC mains lead The symbols on this product (including the accessories) represent the following: (For the AC mains plug of three pins) AC For your safety, please read the following text carefully. Class II equipment (The construction of the product is double-insulated.) This appliance is supplied with a moulded three pin mains plug for your safety and convenience. A 5-ampere fuse is fitted in this plug.
TQBJ2196_en.fm Page 4 Tuesday, February 26, 2019 6:32 PM Table of contents Safety precautions . . . . . . . . . . . . . . . . . . . . . . . . . . . . . . . . . . . . . . . . . . . . . . . . . . . . . . . . . . . . . . . . . . 2 Caution for AC mains lead . . . . . . . . . . . . . . . . . . . . . . . . . . . . . . . . . . . . . . . . . . . . . . . . . . . . . . . . . . . . 3 Sales and Support Information . . . . . . . . . . . . . . . . . . . . . . . . . . . . . . . . . . . . . . . . . . . . . . . . . . . . .
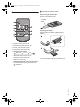
TQBJ2196_en.fm Page 5 Tuesday, February 26, 2019 6:32 PM Overview of controls This system (Front) Main unit Active subwoofer B Adjust the volume level (~17) C Select the input source HDMI (ARC) OPTICAL NET D Select the Bluetooth® device as the source To start Bluetooth® pairing, press and hold [ -PAIRING ]. E Remote control sensor Point the remote control at the remote control sensor, away from obstacles and within the operation range.
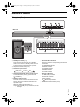
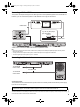
TQBJ2196_en.fm Page 6 Tuesday, February 26, 2019 6:32 PM This system (Rear) Main unit Active subwoofer A HDMI (ARC) terminal (ARC compatible) (~8, 9) B USB port (for service use only) C OPTICAL DIGITAL AUDIO IN terminal (~8) TQBJ2196 The I/D SET button is only used when the main unit is not paired with the active subwoofer.
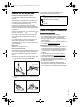
TQBJ2196_en.fm Page 7 Tuesday, February 26, 2019 6:32 PM █ Preparing the remote control Remote control Before using for the first time Remove the insulation sheet. Insulation sheet Replacing the battery Replace with a new battery (CR2025 lithium battery).
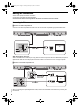
TQBJ2196_en.fm Page 8 Tuesday, February 26, 2019 6:32 PM Making the connections Switch off all equipment before connection. Components and cables are sold separately. Connect the AC mains lead only after all the other connections have been made. Connecting the TV █ Connect an ARC compatible TV Connect to the ARC compatible terminal of the TV with an ARC compatible high speed HDMI cable.
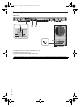
TQBJ2196_en.fm Page 9 Tuesday, February 26, 2019 6:32 PM Connecting a 4K Ultra HD TV The system cannot pass-through the 4K video signal of a 4K compatible equipment to a 4K Ultra HD TV. However, you can connect the system to a 4K Ultra HD TV to enjoy the 4K content. HDMI IN (ARC) TV HDMI IN (4K) HDMI cable* e.g., Blu-ray Disc player (4K compatible) HDMI OUT HDMI cable * Make sure to connect the HDMI cable to ARC compatible terminals.
TQBJ2196_en.fm Page 10 Tuesday, February 26, 2019 6:32 PM Placement Safety Precautions Professional installation is required. The installation should never be done by any other than a qualified installation specialist. PANASONIC DISCLAIMS ANY PROPERTY DAMAGE AND/OR SERIOUS INJURY, INCLUDING DEATH RESULTING FROM IMPROPER INSTALLATION OR INCORRECT HANDLING. • Be sure to install the main unit as indicated within this operating instructions.
TQBJ2196_en.fm Page 11 Tuesday, February 26, 2019 6:32 PM Selecting the placement method Choose a placement method that suits you best. Placing the main unit in a rack or on a table Place the main unit on a flat and horizontal surface. Page 12 Attaching the main unit to a wall Place the main unit on a flat and vertical surface. Page 13 When placing the main unit in front of the TV The main unit may block or interfere with the TV’s various sensors and the 3D Eyewear transmitter of a 3D compatible TV.
TQBJ2196_en.fm Page 12 Tuesday, February 26, 2019 6:32 PM Placing the main unit in a rack or on a table Additionally required accessories (commercially available) Fall prevention cord (x2) Screw eyes (to attach the fall prevention cord) (x2) Note: • Use commercially available screws that are capable of supporting over 24 kg. • Use a cord that is capable of supporting over 24 kg (with a diameter of about 1.5 mm). 1 Attach the cord to the main unit.
TQBJ2196_en.fm Page 13 Tuesday, February 26, 2019 6:32 PM Attaching the main unit to a wall WARNING: To prevent injury, this unit must be securely attached to the wall in accordance with the installation instructions. The main unit can be wall mounted using the supplied wall mount brackets, etc. Make sure that the screw used and the wall are strong enough to support the weight of at least 24 kg. The screws and other items are not supplied as the type and size will vary with each installation.
TQBJ2196_en.fm Page 14 Tuesday, February 26, 2019 6:32 PM 2 Attach the wall mount brackets to the main unit. Screw (supplied) Screw (supplied) Wall mount bracket (supplied) 3 Wall mount bracket (supplied) Drive the screws into the wall. • Use the measurements indicated below to identify the screwing positions on the wall. • Leave at least 100 mm of space above of the main unit to allow enough space for fitting the main unit.
TQBJ2196_en.fm Page 15 Tuesday, February 26, 2019 6:32 PM Fit the main unit securely onto the screws. DO DO NOT Move the speaker so that the screw is in this position. 5 In this position, the speaker will likely fall if moved to the left or right. Secure the cord to the wall. Make sure that the slack of the cord is minimal.
TQBJ2196_en.fm Page 16 Tuesday, February 26, 2019 6:32 PM Wireless Connections Active subwoofer wireless connection Preparation Switch on the main unit. Check that the wireless link is activated. 4 Check that the connection has completed. The “NET” indicator stops blinking and switches on. Note: • Depending on the device, you may need to switch on or off the Bluetooth® function prior to network connection. • “Panasonic HTB510” is shown if the device name is not set.
TQBJ2196_en.fm Page 17 Tuesday, February 26, 2019 6:32 PM █ Connecting a paired device Preparation If this system is connected to a Bluetooth® device, disconnect it (~below). 1 2 Press [ -PAIRING]. Select “SC-HTB510” from the Bluetooth® menu of the device. █ Disconnecting a device Press and hold [ -PAIRING] until the “ indicator blinks slowly. Basic control Preparation Switch on the TV and/or connected device. 1 2 Press [`] to switch on the system. Press [INPUT] repeatedly to select the source.
TQBJ2196_en.fm Page 18 Tuesday, February 26, 2019 6:32 PM █ To adjust the subwoofer level Press [SUBWOOFER +] or [SUBWOOFER ‒] to adjust the level. Indication Effect levels 5 Highest Advanced operations Dual audio Sets the preferred audio channel mode when there are two audio modes received by this system. Press and hold [MUTE] for a minimum of 4 seconds. 4 Audio mode 3 Indication Main (default) 2 Secondary 1 Lowest Note: By default, the subwoofer is set at level 3.
TQBJ2196_en.fm Page 19 Tuesday, February 26, 2019 6:32 PM Auto off Bluetooth® and Network standby The main unit is automatically switched off if there is no audio input and when you do not use it for approximately 20 minutes. For Australia and New Zealand Press and hold [SUBWOOFER +] for a minimum of 4 seconds to select the mode. Mode Indication On (default) Off Note: • The indicator for the selected setting blinks for 5 seconds and then exits the setting mode.
TQBJ2196_en.fm Page 20 Tuesday, February 26, 2019 6:32 PM If there is no update, these indicators blink. Firmware updates Occasionally, Panasonic may release updated firmware for this system that may add or improve the way a feature operates. These updates are available free of charge. DO NOT DISCONNECT the AC mains lead while updating the firmware. During the update process, no other operations can be performed.
TQBJ2196_en.fm Page 21 Tuesday, February 26, 2019 6:32 PM Troubleshooting Before requesting service, make the following checks. If you are in doubt about some of the check points, or if the solutions indicated do not solve the problem, consult your dealer for instructions. █ Common problems No power • After connecting the AC mains lead, wait about 10 seconds before switching on the main unit. • Disconnect the AC mains lead for 10 seconds before connect again.
TQBJ2196_en.fm Page 22 Tuesday, February 26, 2019 6:32 PM █ HDMI HDMI CEC related operations no longer function properly. • Check the setting on the connected devices. – Switch on HDMI CEC function on the connected devices. – Select this system as the speaker in the TV’s HDMI CEC menu. • When the HDMI connections are changed, after a power failure or after the AC mains lead has been removed, HDMI CEC operations may not function properly.
TQBJ2196_en.fm Page 23 Tuesday, February 26, 2019 6:32 PM Remote control code When other Panasonic equipment responds to the remote control of this system, change the remote control code for this system. Preparation • Switch off all other Panasonic products. • Switch on this system. • Aim the remote control at the remote control sensor of this system. █ To set the code to code 2 Press and hold [ -PAIRING] and [SOUND] on the remote control for a minimum of 4 seconds.
TQBJ2196_en.fm Page 24 Tuesday, February 26, 2019 6:32 PM Indicators illumination The indicators show the condition of this system. The indicator patterns illustrated below are shown during normal operational conditions. They do not refer to the indications of a problem. Indicators Description The indicator blinks for 5 seconds. • When surround is set to off. (~18) • When the setting is on (“Auto off”, “Bluetooth® standby”, “Network standby”, “Volume limitation”).
TQBJ2196_en.fm Page 25 Tuesday, February 26, 2019 6:32 PM Specifications █ General USB Port Power supply AC 220 V to 240 V, 50 Hz Power consumption Main unit 26 W Active subwoofer 20 W For Australia and New Zealand Power consumption in standby mode (approximate) Main unit When Bluetooth® and network standby is off 0.5 W When Bluetooth® and network standby is on 3.0 W Active subwoofer 0.
TQBJ2196_en.fm Page 26 Tuesday, February 26, 2019 6:32 PM Safety information for customers in the EU English Declaration of Conformity (DoC) Hereby, “Panasonic Corporation” declares that this product is in compliance with the essential requirements and other relevant provisions of Directive 2014/53/EU. Customers can download a copy of the original DoC to our RE products from our DoC Server: http://www.ptc.panasonic.
TQBJ2196_en.fm Page 27 Tuesday, February 26, 2019 6:32 PM Vrsta brezžične povezave Bluetooth® 5 GHz wireless system 2402 – 2480 MHz Največja moč (dBm EIRP) 10 dBm 5740 – 5840 MHz 10 dBm WLAN 2412 – 2472 MHz 5180 – 5320 MHz 5500 – 5700 MHz 5745 – 5825 MHz Frekvenčni pas Norsk Samsvarserklæring (DoC) “Panasonic Corporation” erklærer herved at dette produktet samsvarer med de grunnleggende kravene og andre relevante bestemmelser i direktivet 2014/53/EU.
TQBJ2196_en.fm Page 28 Tuesday, February 26, 2019 6:32 PM Eesti keel Vastavusdeklaratsioon (DoC) Käesolevaga kinnitab “Panasonic Corporation”, et see toode vastab direktiivi 2014/53/EL olulistele nõuetele ja teistele asjakohastele sätetele. Kliendid saavad koopia meie RE toodetele kehtiva originaalvastavusdeklaratsiooni koopia alla laadida meie DoC-serverist: http://www.ptc.panasonic.
TQBJ2196_en.fm Page 29 Tuesday, February 26, 2019 6:32 PM Hrvatski Deklaracija o podobnosti (DoC) Ovime „Panasonic Corporation” izjavljuje da ovaj proizvod udovoljava osnovnim zahtjevima i ostalim relevantnim odredbama Direktive 2014/53/EU. Kupci mogu preuzeti kopiju originalne DoC za naše RE proizvode s našeg DoC poslužitelja: http://www.ptc.panasonic.
TQBJ2196_en.fm Page 30 Tuesday, February 26, 2019 6:32 PM References Licenses About Bluetooth® Panasonic bears no responsibility for data and/or information that is compromised during a wireless transmission. Frequency band • This system uses the 2.4 GHz frequency band. Certification • This system conforms to the frequency restrictions and has received certification based on frequency laws. Thus, a wireless permit is not necessary.
TQBJ2196_en.fm Page 31 Tuesday, February 26, 2019 6:32 PM For Australia Panasonic Warranty 1. Subject to the conditions of this warranty Panasonic or its Authorised Service Centre will perform necessary service on the product, without charge for parts or labour, if in the opinion of Panasonic the product is found to have a manufacturing defect within one (1) year or (12 months) (the “warranty period”) from the date of purchase appearing on your purchase receipt. 2.
TQBJ2196_en.fm Page 32 Tuesday, February 26, 2019 6:32 PM █ NORSK ADVARSEL! Produkt • For å redusere faren for brann, elektrisk støt eller skade på apparatet: – Dette apparatet må ikke utsettes for regn, fuktighet, drypp eller sprut. – Ikke plasser objekter som er fylt med væske, som vaser, på apparatet. – Bruk anbefalt tilbehør. – Fjern ikke deksler. – Dette apparatet må ikke repareres på egen hånd. Overlat servicearbeider til kvalifisert servicepersonell.