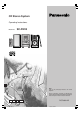
CD Stereo System Operating Instructions Model No. SC-PM10 Note: “EB” on the packaging indicates the United Kingdom. Before connecting, operating or adjusting this product, please read these instructions completely. Please keep this manual for future reference.
Dear customer Table of contents Thank you for purchasing this product. For optimum performance and safety, please read these instructions carefully. Before use Before use These operating instructions are applicable to the following system. System SC-PM10 Main unit SA-PM10 Speakers SB-PM10 Supplied accessories ................................................. Safety precautions ...................................................... Caution for AC Mains Lead .......................................
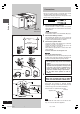
Safety precautions Please check and identify the supplied accessories. Use numbers indicated in parentheses when asking for replacement parts. AC mains lead . . . . . . . . . . . . . . . . . . . . . . . 1 pc. For the United Kingdom (VJA0733) For Australia and N.Z. (RJA0035-X) Placement Set the unit up on an even surface away from direct sunlight, high temperatures, high humidity, and excessive vibration.
Caution for AC Mains Lead (For United Kingdom) (“EB” area code model only) Before use For your safety, please read the following text carefully. This appliance is supplied with a moulded three pin mains plug for your safety and convenience. A 5-ampere fuse is fitted in this plug. Should the fuse need to be replaced please ensure that the replacement fuse has a rating of 5-ampere and that it is approved by ASTA or BSI to BS1362. Check for the ASTA mark m or the BSI mark o on the body of the fuse.
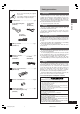
The remote control A R6, AA, UM-3 A Battery installation • Align the poles (+ and –) properly when inserting the batteries. • Do not mix old and new batteries or different types of batteries. • Do not recharge ordinary dry cell batteries. • Do not heat or disassemble the batteries. Do not allow them to contact flame or water. • Remove the batteries if the unit is not to be used for a long time. • Do not keep together with metallic objects such as necklaces. • Do not use rechargeable type batteries.
Connections • Plug the AC mains lead into a household mains socket only after all other connections have been made. • To prepare the AM loop antenna wire and speaker cords, twist the vinyl cover tip and pull off. Before use 1 2 3 1 Tape the antenna to a wall or column, in a position where radio signals are received with the least amount of interference. To household mains socket 1 For Others For Europe Connect the FM indoor antenna.
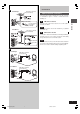
A Connections For Europe FM outdoor antenna (not included) Optional antenna connections You may need an outdoor antenna if you use this system in a mountainous region or inside a reinforced-concrete building, etc. For Others FM outdoor antenna (not included) A FM outdoor antenna Disconnect the FM indoor antenna if an FM outdoor antenna is installed. Note An outdoor antenna should be installed by a qualified technician only. B Before use (Only for the U.K.) Use the antenna plug adaptor (included).
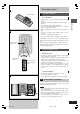
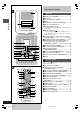
Front panel controls A PHONES 1 Before use A 1 2 3 4 5 6 7 8 Main unit Headphone jack (PHONES) ..................................... 19 Cassette lid Cassette open button (OPEN c) ............................ 15 Display Tuner/band select button (TUNER/BAND) ............. 10 2 OPEN 3 9 Ä Å Remote control signal sensor AC supply indicator (AC IN) This indicator lights when the unit is connected to the AC mains supply.
A Setting the time by remote control only This is a 24-hour clock. The example shows how to set the clock for 18:30 (6:30 pm). y] to turn the unit on. Press [y Press [CLOCK / TIMER] to display “CLOCK”. Every time you press the button: CLOCK PLAY REC Original display 3 Within 10 seconds Press [g, REW/ 4] or [f, 3 /FF] to set the time. Before use 1 2 Press and hold to change the time faster. 4 Press [CLOCK / TIMER]. The time is set and the original display is restored.
The radio: manual tuning 1 The unit comes on automatically. Every time you press the button: FM AM PLAY REC SLEEP CLOCK TIMER 1 2 3 4 5 6 7 8 9 0 10 PROGRAM/ CLEAR 2 1 CD PLAY MODE CD REC MODE 4 CD Before use Listening operations STOP VOL 2 FM MODE TUNE MODE REW SOUND VIRTUALIZER EQ MUTING MU ING PRESET 3 3 VOL FF TREBLE BASS Press [TUNE MODE] on the remote control to select the manual tuning mode. Make sure that “ PROGRAM ” is not displayed.
The radio: preset tuning A PLAY REC SLEEP CLOCK TIMER 1 2 3 4 5 6 7 8 9 0 10 PROGRAM/ CLEAR PROGRAM/ CLEAR CD PLAY PLA MODE CD REC MODE CD TUNER/ BAND TAPE APE TUNER BAND STOP VOL VOL FM MODE TUNE MODE REW SOUND PRESET VIRTUALIZER EQ MUTING MU ING BASS FF TREBLE DISPLAY DIMMER , REW/ , , /FF by remote control only There are two methods of presetting stations. Automatic presetting: All the stations the tuner can receive are preset.
CDs This unit can play CD-DA (digital audio) format audio CD-R and CD-RW that have been finalized (a process that enables CD-R/CD-RW players to play audio CD-R and CD-RW) upon completion of recording. It may not be able to play some CD-R or CD-RW due to the condition of the recording. 4 5 3 1 2 Listening operations / REW / , / FF / 3 y / I] to turn the unit on. Press [y Press [STOP L] to select the CD mode.
CDs A by remote control only PLAY REC SLEEP CL CK CLOCK TIMER 1 2 3 4 5 6 7 8 9 0 10 PROGRAM/ CLEAR CD PLAY PLA MODE CD REC MODE 2 Direct access play Direct access allows you to start normal play from a specific track to the last track on the CD. CD TAPE TUNER BAND 1 STOP VOL SOUND PRESET VIRTUALIZER TUALIZER EQ 1 BASS FF TAPE ↔ CD TREBLE DISPLAY DIMMER DISPLA Press [STOP L] to select the CD mode.
CDs 2 PLAY REC SLEEP CLOCK TIMER 1 2 3 4 5 6 7 8 9 0 10 Program play PROGRAM/ CLEAR CD PLAY PLA MODE CD PLAY MODE 3 CD REC MODE 5 1 CD TAPE APE TUNER BAND STOP VOL MUTING MU ING 1 2 BASS FF , REW/ , , /FF TREBLE DISPLAY DIMMER 3 Listening operations 4 1 2 STOP 5 PROGRAM/ CLEAR 1 2 3 4 5 6 7 8 9 0 10 (In the stop mode) Press [PROGRAM/–CLEAR]. Press the numeric button(s) to select the track you want to play in the desired sequence.
Cassette tapes 1 Press [OPEN c] insert a cassette with the tape facing in. When the button is pressed, the unit comes on automatically. Make sure the cassette is fully inserted and close the lid by hand. 2 Press [TAPE 3] to start playback. One side is played, then playback stops automatically. To play on the other side of the cassette, turn the cassette over and press [TAPE 3]. 3 Adjust the volume. To stop tape playback Press [STOP L].
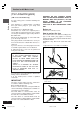
Before recording A Side A Types of tapes which can be recorded correctly Tab for side B Use normal position tapes. High position and metal position tapes can be used, but the unit will not be able to record or erase them correctly. Tab for side A To re-record Normal tape A Erasure prevention The illustration shows how to remove the tabs to prevent recording. To record on the tape again, cover as shown.
Recording CDs Normal recording • Tracks are recorded in the order in which they are found on the CD. • Tracks are cut in the middle when the end of the tape is reached. • You can record from any point on the tape. 1 2 4 Insert the cassette to be recorded on. (\ page 15) 2 3 Press [STOP L] to select the CD mode. Press [OPEN/CLOSE c] to open the CD tray. Insert the CD with label facing upward. Press [OPEN/CLOSE c] to close the CD tray. 2 4 Press [[REC/ J] to start recording.
Recording CDs A A SLEEP CLOCK TIMER 1 You can record a whole CD with the ALL-REC function. It is not necessary to rewind the cassette. Recording always begins from the beginning of the side facing up. Preparation: Insert a CD (\ page 12). PLAY REC PROGRAM/ CLEAR 2 3 4 5 6 7 8 9 CD PLAY PLA MODE 2 CD REC MODE 0 1 TAPE APE STOP VOL 1 2 10 CD TUNER BAND Press [STOP L] to select the CD mode. Press [CD REC MODE] on the remote control so “ALL-REC” is displayed.
Sound Quality SOUND VIRTUALIZER PRESET EQ A You can choose one of four types of sound quality.
Using the timers 5 PLAY REC SLEEP CL CK CLOCK TIMER 1 2 3 4 5 6 7 8 9 0 10 PROGRAM/ CLEAR CD PLAY PLA MODE 4 1 2 Using the play/record timer 2 3 2 CD REC MODE CD TAPE APE TUNER BAND Preparations • Turn the unit on and set the clock (\ page 9). • For the play timer, prepare the music source you want to listen to; cassette, CD or radio, and set the volume.
Using the timers A SLEEP A PLAY REC CL CK CLOCK TIMER PROGRAM/ CLEAR 1 2 3 4 5 6 7 8 9 0 10 CD PLAY PLA MODE CLOCK/ TIMER Using the play/record timer by remote control only CD REC MODE TAPE APE TUNER BAND STOP VOL VOL FM MODE TUNE MODE REW SOUND PRESET VIRTUALIZER EQ VIRTUALIZER MUTING MU ING FF BASS TREBLE DISPLAY DIMMER DISPLA You can enjoy other sources after you have set the timer. Turn the unit off before the timer’s start time.
Troubleshooting guide Before requesting service, make the below checks. If you can’t fix the system as described below, or if something not listed here occurs, refer to the enclosed directory to locate an Authorized Service Center convenient to you or contact your dealer. Reference pages are shown as black circled numbers . 6 Reference Listening operations Common Problems No sound. Turn the volume up. The speaker cords may be shorted.
Technical specifications CD SECTION RMS power output THD 10%, both channels driven 15 W per channel (6 Ω) PMPO power output (For South East Asia only) 150 W Output impedance Headphone 16-32 Ω Sampling frequency Decoding Beam source Wavelength Number of channels Wow and flutter Digital filter D/A converter Pickup Bølgelengde Laserstyrke Frequency range 87.50–108.00 MHz (50 kHz step) 2.0 µV (IHF) 1.
SUOMI CAUTION! VAROITUS! THIS PRODUCT UTILIZES A LASER. USE OF CONTROLS OR ADJUSTMENTS OR PERFORMANCE OF PROCEDURES OTHER THAN THOSE SPECIFIED HEREIN MAY RESULT IN HAZARDOUS RADIATION EXPOSURE. DO NOT OPEN COVERS AND DO NOT REPAIR YOURSELF. REFER SERVICING TO QUALIFIED PERSONNEL. LAITTEEN KÄYTTÄMINEN MUULLA KUIN TÄSSÄ KÄYTTÖOHJEESSA MAINITULLA TAVALLA SAATTAA ALTISTAA KÄYTTÄJÄN TURVALLISUUSLUOKAN 1 YLITTÄVÄLLE NÄKYMÄTTÖMÄLLE LASERSÄTEILYLLE.