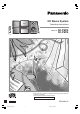
CD Stereo System Operating Instructions Model No. SC-PM18 SC-PM16 Before connecting, operating or adjusting this product, please read these instructions completely. Please keep this manual for future reference. SC-PM16 is available in the U.S.A. only. P PC RQT6683(Cov).
Dear customer Table of contents Thank you for purchasing this product. For optimum performance and safety, please read these instructions carefully. Before use These operating instructions are applicable to the following systems. System SC-PM18 SC-PM16 Main unit SA-PM18 SA-PM16 Speakers SB-PM18 SB-PM18 Before use Supplied accessories ................................................. IMPORTANT SAFETY INSTRUCTIONS ..................... Listening caution ..........................................
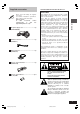
Supplied accessories THE FOLLOWING APPLIES ONLY IN THE U.S.A. AC power supply cord ...................................... 1 pc. (K2CB2CB00006) FM indoor antenna ............................................ 1 pc. (RSA0006-L) This equipment has been tested and found to comply with the limits for a Class B digital device, pursuant to Part 15 of the FCC Rules. These limits are designed to provide reasonable protection against harmful interference in a residential installation.
IMPORTANT SAFETY INSTRUCTIONS Before use Read these operating instructions carefully before using the unit. Follow the safety instructions on the unit and the applicable safety instructions listed below. Keep these operating instructions handy for future reference. 1) Read these instructions. 2) Keep these instructions. 3) Heed all warnings. 4) Follow all instructions. 5) Do not use this apparatus near water. 6) Clean only with dry cloth. 7) Do not block any ventilation openings.
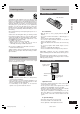
Listening caution The remote control Battery installation EST. 1924 R6, AA, UM-3 We recommend that you avoid prolonged exposure to excessive noise. Sound can be deceiving. Over time your hearing “comfort level” adapts to higher volumes of sound. So what sounds “normal” can actually be loud and harmful to your hearing. Guard against this by setting your equipment at a safe level BEFORE your hearing adapts. To establish a safe level: • Start your volume control at a low setting.
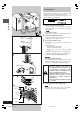
Connections • Plug the AC power supply cord into a household AC outlet only after all other connections have been made. • To prepare the AM loop antenna wire and speaker cords, twist the vinyl cover tip and pull off. 1 2 (L) Before use (R) 1 3 Tape the antenna to a wall or column, in a position where radio signals are received with the least amount of interference. Note For the best reception: An FM outdoor antenna is recommended. (\ page 7) 4 2 1 Connect the FM indoor antenna.
Connections A (1 3/16") 1 Shield braid 2 (19/32") Optional antenna connections You may need an outdoor antenna if you use this system in a mountainous region or inside a reinforced-concrete building, etc. A FM outdoor antenna Disconnect the FM indoor antenna if an FM outdoor antenna is installed. Core wire Note An outdoor antenna should be installed by a qualified technician only. B B AM outdoor antenna Connect the outdoor antenna without removing the AM loop antenna.
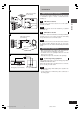
Front panel controls Before use 1 2 OPEN 3 AC IN 4 5 POWER 9 ! AUX REC " # S.SOUND EQ VOLUME 6 FF STOP REW TUNER BAND $ DEMO CD 1 7 CD TAPE CD 2 CD 3 CD 4 CD 5 CD CHECK DOWN UP OPEN/CLOSE CD CHANGE 8 % & PHONES ( ) STOP ~ + TUNER BAND , 1 2 3 4 Main unit Cassette lid Cassette open button (c OPEN) ............................ 17 AC supply indicator (AC IN) This indicator lights when the unit is connected to the AC mains supply.
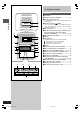
Front panel controls CLOCK SLEEP AUTO OFF TIMER DISC / : ; ~ 1 2 3 4 5 6 7 8 9 PGM 0 10 @ , CD TUNER/ BAND CLEAR TAPE AUX MUTING S.SOUND EQ PRESET EQ + [ $ VOL VOL # = > ? PLAY MODE 5 < PLAY REC REW DISPLAY FF DIMMER 6 \ ] Remote Control 4 Buttons such as function in exactly the same way as the buttons on the main unit. å ç é è ê ë í ì î ï ñ ó Sleep timer/auto off button (SLEEP, –AUTO OFF) ........................................ 21, 24 Disc button (DISC) .............
The radio: manual tuning 1 The unit comes on automatically. Every time you press the button: FM ↔ AM 3 PLAY REC CLOCK SLEEP AUTO OFF TIMER 1 4 DISC 2 3 4 5 6 7 8 9 PGM 0 10 1 2 PLAY MODE 2 Press [PLAY MODE] on the remote control to select “MANUAL”. CD CLEAR TUNER/ BAND Before use Listening operations Press [TUNER/BAND] to select “FM” or “AM”. Every time you press the button: MANUAL ↔ PRESET TAPE AUX VOL VOL MUTING FF REW S.
The radio: preset tuning PLAY REC DISC 1 2 3 4 5 6 7 8 9 PGM 0 10 By remote control only PLAYY MODE PGM CD CLEAR TUNER/ BAND TUNER/BAND TAPE AUX VOL VOL MUTING FF REW S.SOUND EQ PRESET EQ DISPLAY /REW, /FF DIMMER There are two methods of pre-setting stations. Automatic presetting: All the stations the tuner can receive are preset. Manual presetting: You can select the stations to preset and the order they are preset in. Up to 15 stations each can be set in the FM and AM bands.
CDs , DEMO STOP 2 3 1 /FF, /REW (CD 1) ~ (CD 5) This unit can play CD-DA (digital audio) format audio CD-R and CD-RW that have been finalized (a process that enables CD-R/CD-RW players to play audio CD-R and CD-RW) upon completion of recording. It may not be able to play some CD-R or CD-RW due to the condition of the recording. The unit contains five CD trays. You can simply listen to the CD on a single tray, or you can select and listen to the CD in a particular tray.
CDs Listening to a CD placed in a specific tray , DEMO CD CD CHECK 4 1 / 2 3 1 Preparation: Press [CD 2/J] and then [STOP L, –DEMO]. Selecting the desired tray number and placing a CD in it 1 2 Press [c CD CHANGE]. Within about 10 seconds Press [CD 1] – [CD 5] to open the tray and insert the CD. CD CHANGE Press [c CD CHANGE] again to close the tray. Repeat steps 1 and 2 to insert other CDs. You can load up to 5 CDs.
CDs CLOCK SLEEP AUTO UTO OFF TIMER 3 DISC 1 2 3 4 5 6 7 8 9 0 10 PGM CD TUNER/ BAND 1 CLEAR TAPE 1 5 AUX VOL VOL MUTING S.SOUND EQ PRESET EQ Listening operations 4 REW DISPLAY FF By remote control only This function makes it easier for you to select specific CDs and tracks from those loaded in the player. DIMMER CLEAR CD Listening to specific CDs and tracks (CD Play Mode function) PLAYY MODE 2 1 PLAY REC There are 4 disc/track selection modes.
CDs CLOCK SLEEP AUTO UTO OFF TIMER 1 PLAY REC DISC 1 2 3 4 5 6 7 8 9 PGM 0 10 2 3 Direct access play By remote control only PLAYY MODE PLAY MODE CD CD TUNER/ BAND CLEAR / TAPE AUX VOL VOL MUTING S.SOUND EQ PRESET EQ REW DISPLAY FF DIMMER DISPLAY Direct access allows you to start normal play from a specific track to the last track of the CD. 1 2 Press [DISC]. (within 10 seconds or so) Press [1] – [5] to select the disc you want.
CLOCK SLEEP AUTO UTO OFF TIMER 3 2 3 4 5 6 7 8 9 PGM 0 10 1 CDs PLAY REC DISC 4 5 Program play PLAYY MODE 2 1 CD TUNER/ BAND CLEAR TAPE AUX VOL VOL MUTING S.SOUND EQ PRESET EQ Listening operations 1 1 7 REW DISPLAY FF DIMMER /REW, /FF CLEAR By remote control only This function allows you to program up to 24 tracks. 1 2 3 4 5 CD 6 2 3 4 7 PGM Press [CD 2/ J] and then [L CLEAR]. Press [PGM]. Press [DISC].
Cassette tapes 1 OPEN Press [c OPEN], insert a cassette with the tape facing in. When the button is pressed, the unit comes on automatically. Make sure the cassette is fully inserted and close the lid by hand. 1 2 3 Press [TAPE 3] to start playback. Adjust the volume. STOP , DEMO 2 3 /FF, /REW One-touch play When the system is OFF and a cassette is already inserted, play starts automatically when you press [TAPE 3].
Before recording To protect tapes against further recording A Side A Types of tapes which can be recorded correctly The system automatically identifies the type of tape. Tab for side B Tab for side A To re-record Normal position tape Recording operations Listening operations Adhesive tape NORMAL POSITION/TYPE I ✓ HIGH POSITION/TYPE II ✕ METAL POSITION/TYPE IV ✕ High position and metal position tapes can be used, but the unit will not be able to record or erase them correctly.
A Recording from the radio A Preparation: Do the preparatory steps (\ page 18). 1 Tune to the required station. (\ page 10 or 11) 2 2 STOP , DEMO Press [[/ J REC] to start recording. To stop recording Press [STOP L, –DEMO]. To cut an unnecessary part while recording 1. Press [[/J REC] during the unnecessary part. The cassette deck will go into the stop mode. 2. Press [[/ J REC] to resume recording again. 2 To record on the other side of the tape Turn the tape over and press [[/ J REC].
A S.SOUND EQ Using the built-in sound quality settings By remote control only You can choose one of three types of sound quality. CLOCK SLEEP AUTO OFF TIMER PLAY REC DISC 2 3 4 5 6 7 8 9 0 10 1 PLAY MODE PGM CD TUNER/ BAND CLEAR TAPE a HEAVY: Adds punch to rock b CLEAR: Clarifies higher sounds c SOFT: For background music Press [PRESET EQ] to select a setting. Each time you press the button: AUX MUTING S.SOUND EQ PRESET EQ HEAVY VOL VOL REW S.
A Auto-off function A SLEEP AUTO OFF PLAY REC CLOCK SLEEP AUTO UTO OFF TIMER By remote control only DISC 2 3 4 5 6 7 8 9 0 10 1 PLAYY MODE PGM When CD or tape is selected as the source To save power, the unit turns off if it is left unused for 10 minutes. CD TUNER/ BAND CLEAR TAPE Note This function does not work if the source is tuner or AUX. AUX VOL VOL MUTING S.SOUND EQ PRESET EQ FF REW DISPLAY DIMMER Press and hold [–AUTO OFF].
A Setting the time A 1 CLOCK SLEEP AUTO UTO OFF TIMER PLAY REC DISC 1 2 3 4 5 6 7 8 9 PGM 0 10 2 4 PLAYY MODE 1 2 CD CLEAR TUNER/ BAND By remote control only This is a 12-hour clock. The example shows how to set the clock for 6:30 p.m.. TAPE y] to turn the unit on. Press [y Press [CLOCK / TIMER] to select “CLOCK”. Every time you press the button: CLOCK PLAY REC AUX VOL VOL MUTING FF REW S.
Using the timers CLOCK SLEEP AUTO UTO OFF TIMER 5 PLAY REC DISC 1 2 3 4 5 6 7 8 9 PGM 0 10 4 1 22 3 2 PLAYY MODE CD TUNER/ BAND CLEAR TAPE Using the play/record timer By remote control only The timer has two functions. It can be set to on at a certain time to wake you up, or it can be set to record from the radio or from the aux source. The play timer cannot be used in combination with the record timer.
Using the timers A PLAY/ REC CLOCK SLEEP AUTO UTO OFF TIMER PLAY REC DISC 2 3 4 5 6 7 8 9 0 10 1 PLAYY MODE PGM CD CLEAR TUNER/ BAND TAPE AUX VOL VOL MUTING S.SOUND EQ PRESET EQ Listening operations FF REW DISPLAY DIMMER Using the play/record timer By remote control only To check settings While the unit is on and the “rPLAY” (or “rREC”) indicator is on, press [CLOCK/TIMER] so “rPLAY” (or “rREC”) appears on the display.
Troubleshooting guide Before requesting service, make the below checks. If you are in doubt about some of the check points, or if the remedies indicated in the chart do not solve the problem: In the U.S.A., contact the Panasonic Customer Call Center at 1-800-211-7262, or e-mail consumerproducts@panasonic.com, or web site (http://www.panasonic.com). In Canada, contact Panasonic Canada Inc. Customer Care Centre at 905-624-5505, web site (www.panasonic.ca), or an authorized Servicentre closest to you.
Warranty (ONLY FOR U.S.A.) Panasonic Sales Company, Division of Matsushita Electric of Puerto Rico, Inc. Ave. 65 de Infantería, Km. 9.
Specifications AMPLIFIER SECTION SC-PM18 CD SECTION Power output 10% Total harmonic distortion 60 Hz–3 kHz, both channels driven (Low channel) 25 W per channel (6 Ω) 3 kHz–16 kHz, both channels driven (High channel) 25 W per channel (6 Ω) Total Bi-Amp power 50 W per channel Power output 10% Total harmonic distortion 1 kHz, both channels driven (Low channel) 30 W per channel (6 Ω) 8 kHz, both channels driven (High channel) 30 W per channel (6 Ω) Total Bi-Amp power 60 W per channel Input sensitivity AUX 250
Listening operations Product Service Maintenance 1. Damage requiring service —The unit should be serviced by qualified service personnel if: (a) The AC power supply cord or AC adaptor has been damaged; or (b) Objects or liquids have gotten into the unit; or (c) The unit has been exposed to rain; or (d) The unit does not operate normally or exhibits a marked change in performance; or (e) The unit has been dropped or the cabinet damaged. 2.