SC-PMX802_E_GN_TQBM0736-2_eng_fre.book 1 ページ 2023年2月9日 木曜日 Unless otherwise indicated, illustrations in these operating instructions are of SC-PMX802. Sauf indication contraire, les illustrations contenues dans ce mode d’emploi sont celles du modèle SC-PMX802.
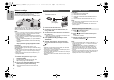
SC-PMX802_E_GN_TQBM0736-2_eng_fre.book 2 ページ 2023年2月9日 木曜日 午前10時52分 ENGLISH Safety precautions WARNING! Do the procedures with the remote control. You can also use the buttons on the main unit if they are the same. Your system and the illustrations can look differently. These operating instructions are applicable to the following system. System SC-PMX802 SA-PMX802M • To reduce the risk of fire, electric shock or product damage, - Do not expose this unit to rain, moisture, dripping or splashing.
2023年2月9日 (For the United Kingdom and Ireland) Caution for AC Mains Lead (For the AC mains plug of three pins) For your safety, please read the following text carefully. This appliance is supplied with a moulded three pin mains plug for your safety and convenience. A 5-ampere fuse is fitted in this plug. Should the fuse need to be replaced please ensure that the replacement fuse has a rating of 5-ampere and that it is approved by ASTA or BSI to BS1362.
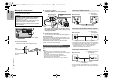
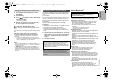
SC-PMX802_E_GN_TQBM0736-2_eng_fre.book 4 ページ ENGLISH Making the connections 2023年2月9日 2 Connect the AC mains lead only after all the other connections have been made. [PMX802M] Compatible speaker system (sold separately) Use this unit with a 2 channel speaker system. (Impedance: 3 ™ - 16 ™) • Using other speakers can damage the unit, and sound quality will be negatively affected. Refer to the operating instructions for the speaker system for details. To household mains socket 1 Connect the antenna.
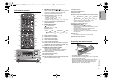
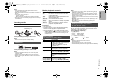
2023年2月9日 Press to switch the unit from on to standby mode or vice versa. In standby mode, the unit is still consuming a small amount of power. 9 1 2 Numeric buttons [1 to 9, 0, S10] • To select a 2-digit number Example: 16: [S10] > [1] > [6] • To select a 3-digit number Example: 124: [S10] > [S10] >[1] 10 2 12 [ ]: “BLUETOOTH” [CD/USB]: “CD” (. “USB” [RADIO, EXT-IN]: 4 DAB+ 5 14 15 8 16 17 VOLUME FAV SELECTOR PAIRING 5V 1.
SC-PMX802_E_GN_TQBM0736-2_eng_fre.book 6 ページ 2023年2月9日 ENGLISH Network settings You can stream online music services or music files from your smartphone/tablet to this system. To use these features, this system must join the same internet-connected network as the compatible device. 木曜日 午前10時52分 Wired LAN connection e.g., Broadband router, etc. LAN cable (not supplied) This system can be connected to a router using a LAN cable or built-in Wi-Fi®.
Setting the network from the setup menu 1 Press [RADIO, EXT-IN] repeatedly to select “NETWORK”. 2 3 Press [SETUP]. 4 Press [3, 4] repeatedly to select “NET SETUP” and then press [OK]. • “SETTING” is blinked. Start the “Google Home” app and follow the on-screen instructions. (As follows) ∫ Using the “Google Home” app (When using the Chromecast-enabled apps with this unit) You can set up a connection using the “Google Home” app.
SC-PMX802_E_GN_TQBM0736-2_eng_fre.book 8 ページ 2023年2月9日 ENGLISH By using the Bluetooth connection, you can listen to the sound from the Bluetooth® audio device from this system wirelessly. • Refer to the operating instructions of the Bluetooth® device for details. ® Connecting via Bluetooth® menu Preparation • Turn on the Bluetooth® feature of the device and place the device near this unit. Pairing with Bluetooth® devices 1 Press [ ] to select “BLUETOOTH”.
Note: • Some CD-R/RW cannot be played because of the condition of the recording. • MP3 files are defined as tracks and folders are defined as albums. • This system can access up to: - CD-DA: 99 tracks - MP3: 999 tracks, 255 albums (including root folder) • Recordings will not necessarily be played in the order you recorded them. Inserting media CD Label facing up 2023年2月9日 木曜日 午前10時52分 Media playback controls The following marks indicate the availability of the feature.
SC-PMX802_E_GN_TQBM0736-2_eng_fre.book 10 ページ ENGLISH Play menu [CD] [USB] 1 [CD] [USB]: Press [PLAY MENU] to select “PLAYMODE” or “REPEAT”. 2 Press [2, 1] to select the setting and then press [OK]. [CD] [USB]: PLAYMODE Press the numeric buttons to select the desired track. Do this step again to programme other tracks. [CD] (MP3), [USB] Only plays the selected MP3/AIFF/ FLAC/WAV/AAC/DSD album. • Press [3] or [4] to select the MP3/ AIFF/FLAC/WAV/AAC/DSD album. • “1”, “ ” is displayed.
To display Radio Data System text data This system can show the text data transmitted by the Radio Data System available in some areas. Press [DISPLAY] repeatedly. “PS”: Programme service “PTY”: Programme type “FREQ”: Frequency 2023年2月9日 DAB/DAB+ manual tuning 1 Press [RADIO MENU] repeatedly to select “MANUAL SCAN”. 2 Press [2, 1] to select a frequency block to scan and then press [OK]. “TUNING” is shown. • Radio Data System is available only when stereo works in reception.
ENGLISH SC-PMX802_E_GN_TQBM0736-2_eng_fre.book 12 ページ 2023年2月9日 Using the PC input You can change the input level etc. when you listen to the audio from a portable audio player etc. connected to AUX IN terminal. You can play back music on the PC with this system’s speakers by connecting a PC to the PC IN terminal on the main unit. To adjust the input level You can adjust the input level. 1 Press [SOUND] repeatedly to select “INPUT LEVEL”.
Preset EQ Press [PRESET EQ] repeatedly to select a setting. HEAVY SOFT CLEAR VOCAL FLAT Adds punch to rock For background music Clarifies higher frequencies Adds gloss to vocal Cancels the sound effect Note: • If you set Preset EQ and then adjust BASS and TREBLE, Preset EQ will be cancelled. D.BASS This function lets you enjoy a powerful bass effect. Press [D.BASS] to select “ON D.BASS” or “OFF D.BASS”. Clock and timers Setting the clock This is a 24-hour clock.
SC-PMX802_E_GN_TQBM0736-2_eng_fre.book 14 ページ 2023年2月9日 ENGLISH Preparation • Connect this system to the home network. (> 6) – Make sure that the network is connected to the Internet. 1 2 3 4 Press [SETUP]. Press [3, 4] repeatedly to select “FW UPDATE” and then press [OK]. Press [2, 1] to select “YES” and then press [OK]. • The progress is displayed as “UPD %” while updating. (“ ” stands for a number.) • When the update has finished successfully, “SUCCESS” is displayed.
Wi-Fi signal strength To check the Wi-Fi signal strength where this system is located. Preparation Connect this system to the wireless network. (> 6) 1 2 Press [RADIO, EXT-IN] repeatedly to select “NETWORK”. Press [SETUP] repeatedly to select “SIGNAL LEVEL” and then press [OK]. “LEVEL ” is indicated on the display. (“ ” stands for a number.) • Press [∫] to exit this display mode. • It is recommended to have a signal strength of “3”.
SC-PMX802_E_GN_TQBM0736-2_eng_fre.book 16 ページ TQBM0736 ENGLISH “FAIL” “DL ERROR” • Updating or setting has failed. After turning off the unit, disconnect the AC mains lead from the AC outlet, reconnect it to the outlet after about 30 seconds. Wait for about 10 seconds, then turn on the unit and redo the update. • The firmware download has failed. Press any button to exit. Please try again later. • The server cannot be found. Press any button to exit.
Specifications General Power supply AC 220 V to 240 V, 50 Hz Power consumption 43 W Dimensions (W x H x D) 211 mm x 114 mm x 267 mm Mass Approx. 2.9 kg Operating temperature range 0 °C to +40 °C Operating humidity range 35 % to 80 % RH (no condensation) Power consumption in standby mode (When “STANDBY MODE” is “OFF” and no clock display) 0.4 W (approx.) (When “STANDBY MODE” is “ON” and no clock display)*1 2.0 W (approx.
SC-PMX802_E_GN_TQBM0736-2_eng_fre.book 18 ページ ENGLISH Disposal of Old Equipment and Batteries Only for European Union and countries with recycling systems These symbols on the products, packaging, and/or accompanying documents mean that used electrical and electronic products and batteries must not be mixed with general household waste.
ページ 2023年2月9日 木曜日 午前10時52分 Google, Google Play, Google Home and Chromecast built-in are trademarks of Google LLC. The Google Assistant is not available in certain languages and countries. Use of the Works with Apple badge means that an accessory has been designed to work specifically with the technology identified in the badge and has been certified by the developer to meet Apple performance standards. Apple and AirPlay are trademarks of Apple Inc., registered in the U.S. and other countries.
SC-PMX802_E_GN_TQBM0736-2_eng_fre.book 2 ページ 2023年2月9日 木曜日 午前10時52分 Précautions de sécurité AVERTISSEMENT ! FRANÇAIS Effectuer les procédures avec la télécommande. Il est également possible d’utiliser les touches de l’appareil principal, si ce sont les mêmes. Votre appareil et les illustrations peuvent se présenter différemment. Ces instructions de fonctionnement s’appliquent au système suivant.
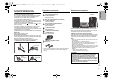
Accessoires fournis Vérifier que tous les accessoires fournis sont présents. ∏ 1 x Cordon d’alimentation secteur ∏ 1 x Télécommande (N2QAYB001265) ∏ 1 x Pile de la télécommande ∏ 1 x Antenne DAB ∏ 2023年2月9日 (Note relative au pictogramme à apposer sur les piles (pictogramme du bas) : Si ce pictogramme est combiné avec un symbole chimique, il répond également aux exigences posées par la Directive relative au produit chimique concerné.
SC-PMX802_E_GN_TQBM0736-2_eng_fre.book 4 ページ Pour effectuer les raccordements Ne branchez le cordon d’alimentation secteur que lorsque tous les autres raccordements ont été effectués. FRANÇAIS [PMX802M] Système d’enceintes compatibles (vendu séparément) Utilisez cet appareil avec un système d’enceintes 2 canaux. (Impédance : 3 ™ - 16 ™) • Utiliser d’autres enceintes peut endommager l’appareil et la qualité du son en serait affectée.
2023年2月9日 Appuyez pour mettre ou sortir l'appareil du mode veille. En mode veille, l'appareil continue de consommer une petite quantité de courant. 9 2 3 2 Touches numériques [1 à 9, 0, S10] 22 Prise pour casque ( FM 18 5V 1.5 A AUX OPT 10 Sélectionnez la station de radio ou la liste de lecture favorite (DAB/DAB+, FM, Internet Radio, Podcasts, etc.) 20 21 22 23 24 AUX ) • Type de fiche : 3,5 mm stéréo (non fourni) • Éviter toute utilisation prolongée susceptible d’endommager l’ouïe.
SC-PMX802_E_GN_TQBM0736-2_eng_fre.book 6 ページ 2023年2月9日 Configuration réseau FRANÇAIS Vous pouvez utiliser des services de musique en ligne ou écouter de la musique en flux de fichiers depuis votre smartphone/tablette vers cet appareil. Pour utiliser ces fonctionnalités, ce système doit rejoinder le même réseau connecté à Internet que l’appareil compatible. 木曜日 午前10時52分 Raccordement du réseau local filaire ex. Routeur de bande large passante, etc.
2023年2月9日 Paramétrage du réseau depuis le menu de configuration 1 Appuyez plusieurs fois sur [RADIO, EXT-IN] pour sélectionner “NETWORK”. 2 3 Appuyez sur [SETUP]. 4 Appuyez sur [3, 4] de façon répétée pour choisir “NET SETUP” puis appuyez sur [OK]. • “SETTING” clignote. Lancez l’application “Google Home” et suivez les instructions à l’écran.
SC-PMX802_E_GN_TQBM0736-2_eng_fre.book 8 ページ 2023年2月9日 En utilisant la connexion Bluetooth , vous pouvez écouter le son provenant du dispositif audio Bluetooth® à partir de ce système à distance. • Consultez le mode d'emploi du dispositif Bluetooth® pour avoir plus de détails. ® FRANÇAIS Connexion via le menu Bluetooth® Préparation • Activez la fonctionnalité Bluetooth® du dispositif et placez-le près de cet appareil.
Remarque : • Il est possible que certains CD-R/RW ne puissent pas être lus en raison de l’état de l’enregistrement. • Les fichiers MP3 sont définis en tant que plages et les dossiers sont définis en tant qu’albums. • Cet appareil peut accéder au maximum à : - CD-DA : 99 plages - MP3 : 999 pistes, 255 albums (dossier racine inclus) • Les enregistrements ne seront pas forcément lus dans l’ordre dans lequel vous les avez enregistrés.
SC-PMX802_E_GN_TQBM0736-2_eng_fre.book 10 ページ Menu lecture [CD] [USB] 1 [CD] [USB]: Appuyez sur [PLAY MENU] pour sélectionner “PLAYMODE” ou “REPEAT”. 2 Appuyez sur [2, 1] pour sélectionner le paramètre puis appuyez sur [OK]. FRANÇAIS [CD] [USB]: PLAYMODE TQBM0736 2 Appuyer sur [PGM, -DEL] en mode d’arrêt. “PROGRAM” is shown for a few seconds. Appuyer sur les touches numériques pour sélectionner la plage désirée. Répéter cette étape pour programmer d’autres plages.
Sélection d’une station préréglée Appuyez sur les touches numériques, [:] ou [9] pour sélectionner la station préréglée. • Vous pouvez également appuyer sur [:/6] ou [5/9] sur l'appareil principal lorsque “PRESET” est sélectionné comme mode de réglage*2. *2: Pour changer le mode de réglage 1 Appuyez plusieurs fois sur [RADIO MENU] pour sélectionner “TUNE MODE”. 2 Appuyez sur [2, 1] pour sélectionner “MANUAL” ou “PRESET”, puis appuyez sur [OK].
SC-PMX802_E_GN_TQBM0736-2_eng_fre.book 12 ページ 2023年2月9日 Utilisation de l'entrée PC Vous pouvez changer le niveau d'entrée etc. lorsque vous écoutez le son d'un lecteur audio portable etc. branché à la prise AUX IN. Vous pouvez lire de la musique sur le PC avec les enceintes de ce système en raccordant le PC à la prise PC IN de l'appareil principal. FRANÇAIS Pour régler le niveau d'entrée Vous pouvez régler le niveau d'entrée. 1 Appuyez plusieurs fois sur [SOUND] pour sélectionner “INPUT LEVEL”.
Égaliseur préréglé (Preset EQ) Appuyez plusieurs fois sur [PRESET EQ] pour sélectionner un paramètre. HEAVY SOFT CLEAR VOCAL FLAT Remarque : Apporte plus de dynamique aux sons rock Pour la musique de fond Clarifie les hautes fréquences Polit les vocales Annule l’effet sonore • Si vous sélectionnez Preset EQ et que vous réglez BASS et TREBLE, Preset EQ sera annulé. D.BASS Cette fonction vous permet de bénéficier d’un effet de basses puissantes. Appuyer sur [D.BASS] pour sélectionner “ON D.BASS” ou “OFF D.
SC-PMX802_E_GN_TQBM0736-2_eng_fre.book 14 ページ FRANÇAIS Remarque : • En raison des mesures prises pour résoudre les problèmes de sécurité, etc. parfois les commandes en cours (minuteries, etc.) sur ce système sont arrêtées de force et le firmware est mis à jour. Si vous ne désirez pas que le firmware soit mis à jour de force, débranchez le câble réseau ou déconnectez le réseau sans fil. • Pendant le traitement de la mise à jour, aucune autre opération ne peut être effectuée.
Force du signal Wi-Fi Pour vérifier la force du signal Wi-Fi à l'endroit où ce système est situé. Préparation Connectez ce système à un réseau sans fil. (> 6) 1 2 Appuyez plusieurs fois sur [RADIO, EXT-IN] pour sélectionner “NETWORK”. Appuyez plusieurs fois sur [SETUP] pour sélectionner “SIGNAL LEVEL” puis appuyez sur [OK]. “LEVEL ” apparait sur l'afficheur. (“ ” remplace un numéro.) • Appuyez sur [∫] pour sortir de ce mode d'affichage. • Nous vous conseillons d'avoir un signal de force “3”.
TQBM0736 FRANÇAIS SC-PMX802_E_GN_TQBM0736-2_eng_fre.book 16 34 16 ページ “F” / “F” (“ ” représente un chiffre.) • Il y a un problème avec cet appareil. Débranchez le cordon d’alimentation secteur de la prise électrique, rebranchez-le après environ 30 secondes, attendez environ 10 secondes, puis remettez en marche l’appareil. Si le problème persiste, débranchez le cordon d’alimentation secteur et consultez votre revendeur. “FAIL” “DL ERROR” • La mise à jour ou la configuration a échoué.
Réinitialisation de la mémoire (initialisation) Dans les situations suivantes, réinitialiser la mémoire : • La pression sur les touches est sans effet. • Vous désirez effacer et réinitialiser le contenu de la mémoire. 1 2 3 Débrancher le cordon d’alimentation secteur. Attendez 30 secondes avant de poursuivre avec l'étape 2. Pendant que la touche [Í/I] de l’appareil principal est maintenue enfoncée longuement, rebrancher le cordon d’alimentation secteur.
SC-PMX802_E_GN_TQBM0736-2_eng_fre.
2 ページ 2023年2月9日 木曜日 午前10時52分 Ελληνικά Δήλωση συμμόρφωσης (DoC) Lietuviškai Atitikties deklaracija (AD) Η “Panasonic Entertainment & Communication Co., Ltd.” δηλώνει ότι το προϊόν αυτό είναι συμμορφωμένο προς τις βασικές απαιτήσεις και άλλες σχετικές διατάξεις της Οδηγίας 2014/53/EΕ. Οι πελάτες μπορούν να κατεβάσουν ένα αντίγραφο του πρωτοτύπου DoC για τα RE προϊόντα μας από τον DoC server μας: http://www.ptc.panasonic.
SC-PMX802_E_GN_TQBM0736-2_eng_fre.book 3 ページ 午前10時52分 Български Декларация за съответствие (DoC) Käesolevaga kinnitab “Panasonic Entertainment & Communication Co., Ltd.”, et see toode vastab direktiivi 2014/53/ EL olulistele nõuetele ja teistele asjakohastele sätetele. Kliendid saavad koopia meie RE toodetele kehtiva originaalvastavusdeklaratsiooni koopia alla laadida meie DoC-serverist: http://www.ptc.panasonic.
SC-PMX802_E_GN_TQBM0736-2_eng_fre.book 4 ページ 2023年2月9日 Türkçe WLAN Bluetooth® Frekans bandı Maksimum güç (EIRP) 18 dBm 18 dBm 18 dBm 14 dBm 4 dBm 5,15 - 5,35 GHz bandı, aşağıdaki ülkelerde yalnızca iç mekan operasyonlarıyla sınırlıdır.
SC-PMX802_E_GN_TQBM0736-2_eng_fre.book 36 ページ 2023年2月9日 木曜日 午前10時52分 [Safety_information_for_customers_in_Norway] NORSK ADVARSEL! (Back of product) Produkt • For å redusere faren for brann, elektrisk støt eller skade på apparatet: - Dette apparatet må ikke utsettes for regn, fuktighet, drypp eller sprut. - Ikke plasser objekter som er fylt med væske, som vaser, på apparatet. - Bruk kun anbefalt tilbehør. - Fjern ikke deksler. - Dette apparatet må ikke repareres på egen hånd.