
Operating Instructions
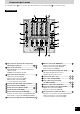


RQT7231
4
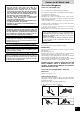
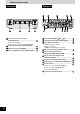
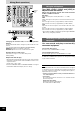
Insertion of connector
Even when the connector is per-
fectly inserted, depending on the
type of inlet used, the front part of
the connector may jut out as shown
in the drawing.
However there is no problem using
the unit.
Connector
Approx. 6 mm
Appliance inlet
Safety precautions
Placement
Set the unit up on an even surface away from direct sunlight, high
temperatures, high humidity, and excessive vibration. These conditions
can damage the cabinet and other components, thereby shortening
the unit’s service life.
Do not place heavy items on the unit.
Voltage
Do not use high voltage power sources. This can overload the
unit and cause a fire.
Do not use a DC power source. Check the source carefully when
setting the unit up on a ship or other place where DC is used.
AC mains lead protection
Ensure the AC mains lead is connected correctly and not damaged.
Poor connection and lead damage can cause fire or electric shock.
Do not pull, bend, or place heavy items on the lead.
Grasp the plug firmly when unplugging the lead. Pulling the AC
mains lead can cause electric shock.
Do not handle the plug with wet hands. This can cause electric
shock.
Foreign matter
Do not let metal objects fall inside the unit. This can cause electric
shock or malfunction.
Do not let liquids get into the unit. This can cause electric shock
or malfunction. If this occurs, immediately disconnect the unit from
the power supply and contact your dealer.
Do not spray insecticides onto or into the unit. They contain
flammable gases which can ignite if sprayed into the unit.
Service
Do not attempt to repair this unit by yourself. If sound is interrupted,
indicators fail to light, smoke appears, or any other problem that is not
covered in these operating instructions occurs, disconnect the AC
mains lead and contact your dealer or an authorized service center.
Electric shock or damage to the unit can occur if the unit is repaired,
disassembled or reconstructed by unqualified persons.
Extend operating life by disconnecting the unit from the power
source if it is not to be used for a long time.
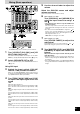
Main features
A 4 channel universal type DJ oriented DJ mixer providing new audio
performance and functional with the Technics SL-DZ1200 direct drive
digital turntable (Not included) hereinafter referred to as the digital
turntable.
Robust basic functions
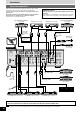
Input-output features
•12 input terminals are available, 2 for CD/LINE input, 3 for LINE
input, 3 for PHONO input, 2 for microphone input and 2 for digital
input.
•Digital output, audio recording output, monitor output, headphone
output, master 1 and 2 output, and a pro-spec engineered XLR
terminal which all function independently.
•An EFFECT SEND, EFFECT RETURN terminals have also been
added for use with an external effector.
3 Band equalizer for sound-source level
•A HIGH, MID, LOW equalizer is provided for each channel. A wide
variety of possibilities are provided for sound as the attenuation
range is set to a high -24 dB (12 dB/oct).
Robust monitor features for play
•Monitoring of the desired channel can be done quickly now that a
CUE button has been added to each channel and to the effect
function.
•Using the MONITOR MIXING control knob you can mix the master
output and the channel selected with the CUE button. Using MONO
SPLIT MODE, you can monitor master output and the selected
channel split separately into the left and right channels.
Support for an external effector
•You can turn EFFECT on and off for each channel. Select PRE or
POST connection for the effector and adjust the SEND, RETURN
level control.
Digitally controlled fader components that are robust and
functional
•A C. FADER CURVE switch has been added to the cross fader to
provide 3 new types of cross fader curve settings.
•A reverse switch has been added for each channel fader and the
cross fader.
•Through the use of an engineered VCA control, volume can be
controlled with very little loss in audio quality using the channel
fader or cross fader.
•Reliability improvements have been made to the cross fader through
the adoption of optical cross fader circuits and a highly durable 45
mm stroke fader providing smooth operation.
Providing new audio performance using the channel
fader and cross fader
Use the channel fader to control the left (L) and right (R) channels
individually
•With the PLAY MODE function the selected channels can be
separated and the L or R volume can be controlled individually
using the channel fader.
Control the FRONT and REAR output for two channel output using
master 1, 2
•By turning the SEPARATE OUT switch to on, you can separate CH1
and CH2 output to the front and CH3 and CH4 output to the rear,
providing you with new sound field performance in combination with
the feature of being able to adjust the left (L) and right (R) channels
individually.
Linked play on the connected digital turntable
Real-time start and stop control using the fader
•You start and stop the digital turntable by operating the channel
fader or cross fader when connected to a digital turntable with a
control cable.
•A maximum of 2 digital turntables can be linked digitally through 2
digital inputs.