Turntable System Operating Instructions Model No. SL-1210M5G SL-1200GLD Before connecting, operating or adjusting this product, please read these instructions completely. Please keep this manual for future reference.
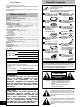
Dear customer Thank you for purchasing this product. For optimum performance and safety, please read these instructions carefully. The illustrations and photograph in this manual are of the SL1210M5G model. Table of contents Supplied accessories ................................................................... 2 IMPORTANT SAFETY INSTRUCTIONS ....................................... 3 Features .........................................................................................
IMPORTANT SAFETY INSTRUCTIONS Read these operating instructions carefully before using the unit. Follow the safety instructions on the unit and the applicable safety instructions listed below. Keep these operating instructions handy for future reference. 1) Read these instructions. 2) Keep these instructions. 3) Heed all warnings. 4) Follow all instructions. 5) Do not use this apparatus near water. 6) Clean only with dry cloth. 7) Do not block any ventilation openings.
Features Controls A masterpiece amongst turntables with a worldwide reputation. Highly accurate turntable speed maintained continuously with a quartz pitch control. •The [±16/±8] button can control a wide range between –8 % and +8 % and –16 % and +16 %. The [±16/±8] indicator LED illuminates in the dark. •The pitch can be varied throughout the range maintaining perfect accuracy. •Pitch can be instantly reset to the rated speed (33 1/3 or 45 r/min) with the reset button.
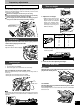
Putting the player together In order to prevent damage during shipping some of the equipment has been disassembled. Put the player together in the following order. •Do not connect the AC power supply cord until set up is complete. •Leave the dust cover off until set up and adjustments are complete. 1 1 Fit the turntable and turntable mat. Put the turntable on the center spindle and then lay the mat on top. •Be very careful when putting the turntable on the main unit.
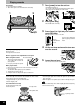
Connections and installation Connecting to an Audio Mixer (not included) •Disconnect all units from the power source before making any connections. •Reconnect the AC power supply cord after all other connections are complete. Unit Unit Installation •Install the unit on a horizontal surface protected from vibrations. •Keep this unit as far as possible from speakers. •Ensure the unit is not exposed to direct sunlight, dust, humidity, and heat from a heating appliance.
Preparatory adjustments Tone arm height Using the balance weight control Make note of the balance weight setting for your stylus cartridge, you can quickly change the stylus pressure without having to readjust the horizontal balance of the arm each time you remove and re-attach the stylus cartridge. Attach the cartridge to the tone arm you are using. Turn the balance weight control to the setting you previously used to balance the weight including cartridge.
Playing records 1 Preparation 1. Put a record on the turntable. 2. Take off the stylus cover and release the arm clamp. •The pilot lamp comes on. •33 1/3 r/min is automatically selected and the indicator lights. •Press [45] if you are playing a 45 r/min record. off 3 on 1 Turn [power] to turn the unit on. Pilot lamp Indicator lights p o w er 33 2 45 Press [start-stop]. The turntable starts revolving. start • stop 33 2 4,5 3 Press [reset] to light the pitch control green LED lamp.
Adjustments while using the unit Adjusting tone arm horizontal weight to reduce skipping when scratch playing. Pitch control Fine adjustment to the number of revolutions per minute. 1 Press [reset] to turn off the green LED light. 2 Press [±16/±8] to select the pitch. •When [±16/±8] is pressed once (up position), the [±16] pitch indicator lights on the pitch control slider. •When [±16/±8] is pressed twice (down position), the [± 8] pitch indicator lights on the pitch control slider.
Maintenance Product service Care of the parts To clean this unit, wipe with a soft, dry cloth. •Never use alcohol, paint thinner, or benzine to clean this unit. •Before using chemically treated cloth, read the instructions that came with the cloth carefully. Do not wipe the dust cover while playing a record. This can cause static electricity. This static can cause the tone arm to be attracted towards the cover. Thoroughly clean dust off the stylus and record. •Use a soft brush to clean the stylus.
Troubleshooting guide Before requesting service, make the below checks. If you are in doubt about some of the check points, or if the remedies indicated in the chart do not solve the problem: In the U.S.A., contact the Panasonic Customer Call Center at 1-800-211-7262, or the website http://www.panasonic.com/contactinfo, or the website (http://www.panasonic.com/support). In Canada, contact the Panasonic Canada Inc. Customer Care Centre at 905-624-5505, or visit the website (www.panasonic.
This manual was printed with soy based ink. Panasonic Consumer Electronics Company, Division of Panasonic Corporation of North America One Panasonic Way Secaucus, New Jersey 07094 http://www.panasonic.com 2003 Matsushita Electric Industrial Co., Ltd. Printed in Japan Panasonic Puerto Rico, Inc. Panasonic Canada Inc. Ave. 65 de Infantería, Km. 9.5 San Gabriel Industrial Park, Carolina, Puerto Rico 00985 5770 Ambler Drive Mississauga, Ontario L4W 2T3 www.panasonic.