Turntable System Operating Instructions Model No. SL-1210M5G SL-1200GLD Note: “EB” on the packaging indicates the United Kingdom. Before connecting, operating or adjusting this product, please read these instructions completely. Please keep this manual for future reference.
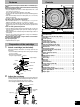
Dear customer Thank you for purchasing this product. For optimum performance and safety, please read these instructions carefully. The illustrations and photograph in this manual are of the SL1210M5G model. Table of contents Supplied accessories ................................................................... 2 Caution for AC mains lead .......................................................... 4 Safety precautions ....................................................................... 4 Features ......
SUOMI CAUTION! VAROITUS! • DO NOT INSTALL OR PLACE THIS UNIT IN A BOOKCASE, BUILT-IN CABINET OR IN ANOTHER CONFINED SPACE. ENSURE THE UNIT IS WELL VENTILATED. TO PREVENT RISK OF ELECTRIC SHOCK OR FIRE HAZARD DUE TO OVERHEATING, ENSURE THAT CURTAINS AND ANY OTHER MATERIALS DO NOT OBSTRUCT THE VENTILATION VENTS. •DO NOT OBSTRUCT THE UNIT’S VENTILATION OPENINGS WITH NEWSPAPERS, TABLECLOTHS, CURTAINS, AND SIMILAR ITEMS. •DO NOT PLACE SOURCES OF NAKED FLAMES, SUCH AS LIGHTED CANDLES, ON THE UNIT.
Caution for AC mains lead Safety precautions (For United Kingdom) Placement (“EB” area code model only) For your safety, please read the following text carefully. This appliance is supplied with a moulded three pin mains plug for your safety and convenience. A 5-ampere fuse is fitted in this plug. Should the fuse need to be replaced please ensure that the replacement fuse has a rating of 5-ampere and that it is approved by ASTA or BSI to BS1362.
Features Controls A masterpiece amongst turntables with a worldwide reputation. Highly accurate turntable speed maintained continuously with a quartz pitch control. •The [±16/±8] button can control a wide range between –8 % and +8 % and –16 % and +16 %. The [±16/±8] indicator LED illuminates in the dark. •The pitch can be varied throughout the range maintaining perfect accuracy. •Pitch can be instantly reset to the rated speed (33 1/3 or 45 r/min) with the reset button.
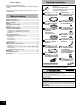
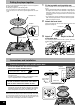
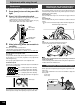
Putting the player together In order to prevent damage during shipping some of the equipment has been disassembled. Put the player together in the following order. •Do not connect the AC mains lead until set up is complete. •Leave the dust cover off until set up and adjustments are complete. 1 1 Fit the turntable and turntable mat. Put the turntable on the center spindle and then lay the mat on top. •Be very careful when putting the turntable on the main unit.
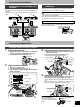
Connections and installation Connecting to an Audio Mixer (not included) •Disconnect all units from the power source before making any connections. •Reconnect the AC mains leads after all other connections are complete. Unit Unit Installation •Install the unit on a horizontal surface protected from vibrations. •Keep this unit as far as possible from speakers. •Ensure the unit is not exposed to direct sunlight, dust, humidity, and heat from a heating appliance.
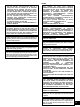
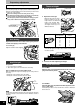
Preparatory adjustments Tone arm height Using the balance weight control Make note of the balance weight setting for your stylus cartridge, you can quickly change the stylus pressure without having to readjust the horizontal balance of the arm each time you remove and re-attach the stylus cartridge. Attach the cartridge to the tone arm you are using. Turn the balance weight control to the setting you previously used to balance the weight including cartridge.
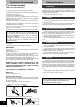
Playing records 1 Preparation 1. Put a record on the turntable. 2. Take off the stylus cover and release the arm clamp. •The pilot lamp comes on. •33 1/3 r/min is automatically selected and the indicator lights. •Press [45] if you are playing a 45 r/min record. off 3 on 1 Turn [power] to turn the unit on. Pilot lamp Indicator lights p o w er 33 2 45 Press [start-stop]. The turntable starts revolving. start • stop 33 2 4,5 3 Press [reset] to light the pitch control green LED lamp.
Adjustments while using the unit Adjusting tone arm horizontal weight to reduce skipping when scratch playing. Pitch control Fine adjustment to the number of revolutions per minute. 1 Press [reset] to turn off the green LED light. 2 Press [±16/±8] to select the pitch. •When [±16/±8] is pressed once (up position), the [±16] pitch indicator lights on the pitch control slider. •When [±16/±8] is pressed twice (down position), the [± 8] pitch indicator lights on the pitch control slider.
Maintenance Wipe the head shell terminals occasionally. Care of the parts To clean this unit, wipe with a soft, dry cloth. •Never use alcohol, paint thinner, or benzine to clean this unit. •Before using chemically treated cloth, read the instructions that came with the cloth carefully. Do not wipe the dust cover while playing a record. This can cause static electricity. This static can cause the tone arm to be attracted towards the cover. Use a soft cloth.
Matsushita Electric Industrial Co., Ltd. Web Site : http://www.panasonic.co.