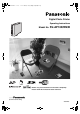
SV-AP10B.book 1 ページ 2002年9月18日 水曜日 午前8時55分 Digital Photo Printer Operating Instructions Model No. SV-AP10E/EN/B Before use, please read these instructions completely. Please retain this manual for future reference.
SV-AP10B.book 2 ページ 2002年9月18日 水曜日 午前8時55分 Information for Your Safety WARNING TO REDUCE THE RISK OF FIRE OR SHOCK HAZARD AND ANNOYING INTERFERENCE, USE ONLY THE RECOMMENDED ACCESSORIES AND DO NOT EXPOSE THIS EQUIPMENT TO RAIN OR MOISTURE. DO NOT REMOVE THE COVER (OR BACK); THERE ARE NOT USER SERVICEABLE PARTS INSIDE. REFER SERVICING TO QUALIFIED SERVICE PERSONNEL.
SV-AP10B.book 3 ページ 2002年9月18日 水曜日 午前8時55分 ENGLISH Caution for AC mains lead ª IMPORTANT (For UK Customers Only) For your safety, please read the following text carefully.
SV-AP10B.book 4 ページ 2002年9月18日 水曜日 午前8時55分 Important Information Article 5 Reverse Engineering, Decompiling or Disassembly Licensee may not reverse engineer, decompile, or disassemble the Software, except to the extent either of them is permitted under law or regulation of the country where Licensee resides. Matsushita, or its distributors will not be responsible for any defects in the Software or damage to Licensee caused by Licensee’s reverse engineering, decompiling, or disassembly of the Software.
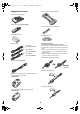
SV-AP10B.book 5 ページ 2002年9月18日 水曜日 午前8時55分 Supplied Accessories Stand for Vertical Layout (VYQ2551) Paper Cassette (VXA7522) Remote Controller (N2QADB000006) Feet for Horizontal Layout (VKA0376) AA Size Batteries (x2) CD-ROM (VFF0171) Important Information (Including optional USB Connection Cable) In order to prevent electromagnetic interference, install the Clamp Filter (supplied) on the Cable as shown in the figure.
SV-AP10B.book 6 ページ 2002年9月18日 水曜日 午前8時55分 For United Kingdom and Republic of Ireland www.panasonic.co.uk (For UK Customers Only) ≥Order accessory and consumable items for your product with ease and confidence by telephoning our Customer Care Centre Mon-Friday 9:00am-5:30pm. (Excluding public holidays.) ≥Or go on line through our Internet Accessory ordering application. ≥Most major credit and debit cards accepted.
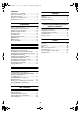
SV-AP10B.book 7 ページ 2002年9月18日 水曜日 午前8時55分 Contents Settings Information for Your Safety ................................. 2 Caution for AC mains lead .................................. 3 Important Information .......................................... 4 End User License Agreement ............................. 4 Supplied Accessories .......................................... 5 Settings..............................................................31 Setting the Layout..................................
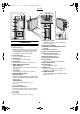
SV-AP10B.book 8 ページ 2002年9月18日 水曜日 午前8時55分 Preparation 7 15 16 8 13 1 Í 17 18 2 PRINT MENU 14 4 5 9 10 11 SET 6 ACCESS EJECT 19 PC CARD ERROR SD MEMORY CARD 3 12 DISPLAY/ CANCEL 20 21 VIDEO OUT 9 Card Access Lamp Preparation Light while the Photo Printer is making an access to the Card.
SV-AP10B.book 9 ページ 2002年9月18日 水曜日 午前8時55分 Preparation Controls and Components (Cont.) 11 MULTI (COPY) Button Press this button to select numbers of multiple screen shots of the same picture. 12 MULTI (SELECT) Button Press this button to select numbers of multiple screen shots of the different picture.
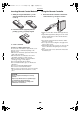
SV-AP10B.book 10 ページ 2002年9月18日 水曜日 午前8時55分 Preparation Inserting Remote Control Batteries Using the Remote Controller 1 While pressing the indentation A in the 1 Direct the remote controller to the remote control receiver A and press a button. direction indicated by the arrow, lift the cover up. A A 2 Insert the batteries (supplied) with the polarity (+ and -) correctly aligned.
SV-AP10B.book 11 ページ 2002年9月18日 水曜日 午前8時55分 Preparation Installation and Connections Installation Vertical Layout ª Installation Be sure to install the stand when selecting the Vertical layout. And the feet when selecting the Horizontal layout. Installation for Vertical Layout 1 Install the stand to the hole like a illustration. 2 Tighten the screw and fix the main unit and the stand.
SV-AP10B.book 12 ページ 2002年9月18日 水曜日 午前8時55分 Preparation Inserting a Card ª When using an SD Memory Card or a MultiMediaCard 1 Insert the card all the way into the slot. ≥The Card Access Lamp lights. [Removing the Card] 1 Push the card. 2 Remove the card. 2 ª When Using a PC Card 1 Insert CF Card all the way into 1 (PC Card Adaptor/ Product Sold Separately). 2 Insert 1 into the Photo Printer. [When Removing the Card Adaptor] 1 Press 2. 2 Remove 1.
SV-AP10B.book 13 ページ 2002年9月18日 水曜日 午前8時55分 Preparation Inserting the Ink Cassette 1 1 1 Use your finger to push in the hole with the arrow, and turn it in the direction of the arrow. Tighten any slack in 1 (Ink Film). ≥The Ink Cassette is included in the Ink Cassette/Paper Set (optional). 2 Open 2 (Ink Cassette Compartment Door), place the side that contains 3 (small hole in Ink Cassette A) up, insert the Ink Film all the way into the Ink Cassette, and close 2.
SV-AP10B.book 14 ページ 2002年9月18日 水曜日 午前8時55分 Preparation MENU Controls PRINT ERROR PRINT SET C A B B A DISPLAY/ CANCEL MENU 2 MENU Use the MENU Mode as follows. SET D D 3 DISPLAY/ CANCEL C 1:Press A to display the MENU screen. 2:Use the 21 Buttons B to switch between MENU categories and MENU contents. 3:Use the 2134 Buttons B to move within the MENU Contents. To enter your selection, press C. 4:Press C to enter your selection. 5:Press D to exit the MENU.
SV-AP10B.book 15 ページ 2002年9月18日 水曜日 午前8時55分 Basic Functions Basic Functions B D D CARD SELECT ROTATE ZOOM OUT PRINT SET Try Print PRINT ERROR MENU A SET DISPLAY/ CANCEL MENU 1 C C 7 5 BASIC DISPLAY/ CANCEL 2 3 Number Date Trim Picture FUNCTION A EFFECT Layout Owner ID OPTION 2 Vertical Layout Horizontal A ≥The explanations below are made for the Vertical layout and the Album Display setting.
SV-AP10B.book 16 ページ 2002年9月18日 水曜日 午前8時55分 Basic Functions ª Forwarding/Backwarding the Screen B PRINT SET MENU DISPLAY/ CANCEL TITLE C DATE When 13 or more images are recorded on a card, aligning 1 (blue frame) on the places indicated in the diagram to the left and pressing the button will forward/backward the screen. A COPY NUMBER DPOF/ALL SELECT PRINT after selecting the picture in the blue frame.
SV-AP10B.book 17 ページ 2002年9月18日 水曜日 午前8時55分 Basic Functions Switching the Pictures between the Album Display and the Index Display MENU Í A ALBUM ZOOM IN SET CARD SELECT ROTATE ZOOM OUT PRINT A You can make the pictures on each recorded date appear using the Album Display. DISPLAY/ CANCEL SET 1 Press A (ALBUM Button) when the pictures are displayed.
SV-AP10B.book 18 ページ 2002年9月18日 水曜日 午前8時55分 Basic Functions Printing Batches/Indexing PRINT PRINT SET ERROR A Multiple pictures can be automatically printed from a card. Furthermore, 25 frames of images on a card can be indexed and printed. MENU A SET DISPLAY/ CANCEL MENU B B DISPLAY/ CANCEL 1 Select the pictures, and mark them with A (¥). 2 Select [Batch] under [BASIC] on the MENU screen, and press A. 1 2 Select a MENU you wish to use, and press A. 1 Print a batch of all pictures.
SV-AP10B.book 19 ページ 2002年9月18日 水曜日 午前8時55分 Basic Functions Printing With a DPOF Card PRINT ERROR TITLE A DATE MENU COPY NUMBER DPOF/ALL SELECT PRINT A MULTI SET DISPLAY/ CANCEL When a DPOF card that contains pictures and print counts set with a Digital Video Camera or a Digital Camera is inserted, printing can be automatically be performed. ≥Insert a DPOF card. ≥Select the INPUT method. 1 Press A (DPOF Button) when the pictures are 1 displayed.
SV-AP10B.book 20 ページ 2002年9月18日 水曜日 午前8時55分 Basic Functions PRINT Copying/Erasing Images from a Card MENU SET A SET DISPLAY/ CANCEL MENU 1 B B DISPLAY/ CANCEL BASIC DPOF Input Batch DPOF Search Album Card FUNCTION A EFFECT Slide OPTION 2 Card Picture Title 3 Card Copy Delete A Images can be mutually copied to or erased from SD Memory/ MultiMediaCards and PC Cards. ≥Unlock the card when inserting the SD Memory Card.
SV-AP10B.book 21 ページ 2002年9月18日 水曜日 午前8時55分 Basic Functions PRINT Recording Titles onto Cards MENU SET A SET DISPLAY/ CANCEL MENU 1 1 B B ≥Unlock the card when inserting the SD Memory Card. ≥Display the created title. BASIC DPOF Input Batch DPOF Search Album Card A EFFECT Slide OPTION Card 1 Select [Card] under [BASIC] on the MENU screen, and press A. 2 Select [Title], and press A. 3 Select [Record to SD/MMC] or [Record to PC card], and press A. 4 Enter the creation date, and press A.
SV-AP10B.book 22 ページ 2002年9月18日 水曜日 午前8時55分 Basic Functions PRINT Viewing Slide Shows MENU SET A SET DISPLAY/ CANCEL MENU B B DISPLAY/ CANCEL 1 A The Photo Printer can automatically display a continuous show of selected pictures within a card. ≥To view DPOF configured pictures, insert a card with DPOF settings. ≥Select the INPUT method. ≥To view all pictures or DPOF configured pictures within a card, begin from Step 2. 1 Select the pictures, and mark them with A (¥).
SV-AP10B.book 23 ページ 2002年9月18日 水曜日 午前8時55分 Multiple Functions Multiple Functions B PRINT Printing Multiple Screen Shots of the Same Picture (MULTI FRAME MODE) SET PRINT B ERROR MENU DISPLAY/ CANCEL MENU TITLE DATE COPY SET A NUMBER DPOF/ALL SELECT PRINT A The Photo Printer can divide the screen into 2, 4, 9 or 16 sections, and print multiple screen shots of the same picture. ≥Select the INPUT method. ≥Select the picture and make the Single Display appear.
SV-AP10B.book 24 ページ 2002年9月18日 水曜日 午前8時55分 Multiple Functions D E PRINT SET DISPLAY/ CANCEL MENU TITLE A DATE D E ERROR MENU The Photo Printer can divide the screen into 2, 4, 9 or 16 sections, and print multiple screen shots of different pictures. C SET COPY NUMBER DPOF/ALL SELECT PRINT Printing Multiple Screen Shots of Different Pictures PRINT B C DISPLAY/ CANCEL MULTI A ≥Select the INPUT method. ≥Make the Index Display appear. 1 Select the pictures, and mark them with A (¥).
SV-AP10B.book 25 ページ 2002年9月18日 水曜日 午前8時55分 Multiple Functions Selecting a Large Amount of Pictures and Printing Multiple SELECT as batches 1 Select all necessary pictures in Step 1, and press E to go to the MENU screen. 2 Select [Batch] under [BASIC] on the MENU screen, and choose [Selected pictures]. ≥Ex.) Selecting [4 pictures] and 8 pictures: Selected pictures 1-4 will be printed on the first sheet, and selected pictures 5-8 will be printed on the second sheet. 3 Press D to print.
SV-AP10B.book 26 ページ 2002年9月18日 水曜日 午前8時55分 Multiple Functions C PRINT SET Creating a Personalized Picture Calendar PRINT C A D ERROR MENU SET D MENU DISPLAY/ CANCEL 1 B B DISPLAY/ CANCEL BASIC Standard Copy Select Calendar FUNCTION A EFFECT A The Photo Printer can insert a picture and create a 1-month, 2-month or 12-month personalized calendar. You can also change the colours of holidays or special days and dates. ≥Select the INPUT method.
SV-AP10B.book 27 ページ 2002年9月18日 水曜日 午前8時55分 Multiple Functions Inserting Wallpaper and Printing Í E G ALBUM ZOOM IN C G D F A CARD SELECT ROTATE ZOOM OUT PRINT SET PRINT SET F MENU 1 DISPLAY/ CANCEL B B DISPLAY/ CANCEL A ≥Select the INPUT method. (P15) 1 Select [Wallpaper] under [FUNCTION] on the MENU screen, and press A. 2 Select a wallpaper, and press A. ≥12 kinds of wallpapers are preset.
SV-AP10B.book 28 ページ 2002年9月18日 水曜日 午前8時55分 Title Functions Title Functions D PRINT D A B SET PRINT Inserting Illustrations and Printing ERROR MENU A SET B DISPLAY/ CANCEL MENU 1 C C DISPLAY/ CANCEL Illust ≥Select the INPUT method. ≥Select the picture you wish to print and make the Single Screen Display appear. 1 Select [Illust] under [EFFECT] on the MENU screen, and press A.
SV-AP10B.book 29 ページ 2002年9月18日 水曜日 午前8時55分 Title Functions Í D F ALBUM ZOOM IN Inserting Characters and Printing B C F A E CARD SELECT ROTATE ZOOM OUT PRINT SET MENU DISPLAY/ CANCEL PRINT ERROR A SET E G TITLE DATE DISPLAY/ CANCEL COPY ≥The MENU contents under [EFFECT] can be also displayed with G. ? A aA BASIC Illust Type Sepia Display 2 Insert characters. ≥Press A each time you select a character. ≥After choosing all the characters, select 1, and press A.
SV-AP10B.book 30 ページ 2002年9月18日 水曜日 午前8時55分 Title Functions B C D PRINT 1 DATE ERROR SET COPY DISPLAY/ CANCEL Illust Type Sepia Display A EFFECT OPTION Sepia A ≥Select the INPUT method. ≥Display the picture you wish to print and makes the Single Screen Display appear. 1 Select [Sepia] under [EFFECT] on the MENU screen, and press A. ≥The MENU contents under [EFFECT] can be also displayed with D. ? A aA BASIC The Photo Printer can print pictures in Sepia tone.
SV-AP10B.book 31 ページ 2002年9月18日 水曜日 午前8時55分 Settings Settings MENU DISPLAY/ CANCEL MENU TITLE DATE C B COPY Settings A ª Set Number of Prints SET NUMBER DPOF/ALL SELECT A PRINT C MULTI 1 7 5 BASIC DISPLAY/ CANCEL ≥The number of prints increases when pressing A. ≥The Photo Printer can continuously print up to 10 copies of the same image. ≥The number of pages remaining to be printed (including the currently printing page) appears in the lower left corner of the screen.
SV-AP10B.book 32 ページ 2002年9月18日 水曜日 午前8時55分 Settings ª Adjusting Print Picture Quality MENU PRINT SET A A SET DISPLAY/ CANCEL MENU 1 DISPLAY/ CANCEL 7 5 BASIC 3 Picture Trim FUNCTION A EFFECT Layout Owner ID OPTION 2 1 2 3 4 5 6 COLOUR C·BALANCE BRIGHT ≥Adjustments on the TV Screen are approximations. ≥Adjustment on the TV Screen does not affect the printing image. ≥Adjustment of [SHARP] and [AWB] does not change on the TV Screen. ≥Adjustment is not recorded on the card.
SV-AP10B.book 33 ページ 2002年9月18日 水曜日 午前8時55分 Connecting and Operating with a personal computer Connecting and Operating with a personal computer Operating environment Printer Driver can be installed in a PC/AT compatible personal computer which can run Microsoft® Windows® 98SE/Me/2000 Professional/ XP Home Edition/XP Professional.
SV-AP10B.book 34 ページ 2002年9月18日 水曜日 午前8時55分 Connecting and Operating with a personal computer Installing the Printer Driver Installing this printer driver allows the Photo Printer to be used as a fullcolour printer. For Windows XP 1 Turn on the personal computer and insert the supplied CD-ROM into the CD-ROM drive. 2 Turn on the Photo Printer. 3 Use auxiliary USB Connection Cable to connect. ≥The [Found New Hardware Wizard] screen appears. 4 Click the [Next] Button.
SV-AP10B.book 35 ページ 2002年9月18日 水曜日 午前8時55分 Connecting and Operating with a personal computer 4,6 Installing this printer driver allows the Photo Printer to be used as a fullcolour printer. For Windows Me 1 Turn on the personal computer and insert the supplied CD-ROM into the CD-ROM drive. 2 Turn on the Photo Printer. 3 Use auxiliary USB Connection Cable to connect. 5 ≥The [Add New Hardware Wizard] screen appears. ≥Depending on your PC environment, step 4 and 5 may be skipped.
SV-AP10B.book 36 ページ 2002年9月18日 水曜日 午前8時55分 Connecting and Operating with a personal computer 4,9 For Windows 98SE/2000 1 Turn on the personal computer and insert the supplied CD-ROM into the CD-ROM drive. 2 Turn on the Photo Printer. 3 Use auxiliary USB Connection Cable to connect. ≥The [Add New Hardware Wizard] screen appears. ≥Depending on your PC environment, step 4 and 8 may be skipped. If this is the case, you will proceed from step 9. 5 4 Click the [Next] Button.
SV-AP10B.book 37 ページ 2002年9月18日 水曜日 午前8時55分 Connecting and Operating with a personal computer Installing from the [Add Printer Wizard] screen. Notes for Installation When the Printer Driver is installed on your personal computer for the first time, the USB port cannot be selected in the selection stage for the port, because the USB port is not set. Note that the [Add Printer] function can be used only when the Printer Driver is re-installed or when another printer using the USB port has been installed.
SV-AP10B.book 38 ページ 2002年9月18日 水曜日 午前8時55分 Connecting and Operating with a personal computer 10 10 Click [Have Disk]. 11 Select the folder where the Printer Driver is located. ≥If the CD-ROM drive is the [D: drive], select [D:\Win2K-XP] folder. 12 Click [OK]. 13 Check that [Panasonic SV-AP10] is displayed and click [Next]. 14 Click [Next]. 11,12 ≥If the screen to select the default printer is displayed, select [Yes], if it is the default printer.
SV-AP10B.book 39 ページ 2002年9月18日 水曜日 午前8時55分 Connecting and Operating with a personal computer 6 7 For Windows 98SE/Me 1 Before installation, check that all applications have been exited. 2 Connect the printer to your personal computer with a USB cable and turn on the printer. 3 Select [Start] >> [Settings] >> [Printers]. 4 Double-click the [Add Printer] icon. 5 When the [Add Printer Wizard] is activated, click [Next]. 6 Select [Local Printer] and click [Next]. 7 Click [Have Disk].
SV-AP10B.book 40 ページ 2002年9月18日 水曜日 午前8時55分 Connecting and Operating with a personal computer 5 6,7 For Windows 2000 1 Before installation, check that all applications have been exited. 2 Connect the printer to your personal computer with a USB cable and turn ON the printer. 3 Select [Start] >> [Settings] >> [Printers]. 4 Double-click the [Add Printer] icon. 5 When the [Add Printer Wizard] is activated, click [Next].
SV-AP10B.book 41 ページ 2002年9月18日 水曜日 午前8時55分 Connecting and Operating with a personal computer 10 10 Click [Have Disk]. 11 Select the folder where the Printer Driver is located. ≥If the CD-ROM drive is the [D: drive], select [D:\Win2K-XP] folder. 12 Click [OK]. 13 Check that [Panasonic SV-AP10] is displayed and click [Next]. 14 Click [Next]. 11,12 ≥If the screen to select the default printer is displayed, select [Yes], if it is the default printer.
SV-AP10B.book 42 ページ 2002年9月18日 水曜日 午前8時55分 Connecting and Operating with a personal computer Printing from PC The operations and notes of the printer driver are explained. It is explained with [SD Viewer for Printer] in the supplied CD-ROM. To install [SD Viewer for Printer] 1 Insert the CD-ROM and double-click the [SD Viewer]. 2 Double-click the [Setup.exe]. ≥The install screen is displayed. 3 Click [Next]. 4 Read [Agreement] and click [Agree]. 5 Keep installing according to the message.
SV-AP10B.book 43 ページ 2002年9月18日 水曜日 午前8時55分 Connecting and Operating with a personal computer 1,2 For Windows XP/2000 After opening the detail setting on [Print]. 1 Set the printer name to [Panasonic SV-AP10]. ≥Select [SV-AP10] from the printing menu when using it from the other application. 2 Click [Properties]. 3 Click [Layout] tab. 4 Click [Advanced]. 3,4 After opening [Advanced Options], 5 Select the paper. 6 Select the division number. ≥When printing one picture, select [1 frame].
SV-AP10B.book 44 ページ 2002年9月18日 水曜日 午前8時55分 Connecting and Operating with a personal computer 5,6 5 Click [Device Options] tab. 6 Select the division number. ≥When printing one picture, select [1 frame]. Be sure to select [16 frames] when using 16-Pre-Cut Adhesive printing paper. 7 Finish the setting. ≥Clicking [OK] returns to the preview screen. 8 Click [Print]. 9 Click [Yes]. ≥The status monitor is displayed and printing starts.
SV-AP10B.book 45 ページ 2002年9月18日 水曜日 午前8時55分 Connecting and Operating with a personal computer Caution for Use 4 The message [USB port cannot be detected] may be displayed when you start printing. The status monitor ≥The usable USB port may not be selected. The USB port is displayed as [USB001] or [USB002]. Confirm it. Use the paper fitted to the ink cassette. When using different ink cassette from [Paper] setting, the error message is displayed.
SV-AP10B.book 46 ページ 2002年9月18日 水曜日 午前8時55分 Others ª Ink Cassette/Paper Set Notes Others ≥Use Ink Cassette/Paper Sets that bear the mark. ≥Use the Ink Cassette with the paper provided in the same box. One Ink Cassette is designed to provide enough Ink Film to print the number of sheets provided in that Ink Cassette/Paper Set. ≥Do not store the Ink Cassettes or paper under high temperatures, high humidity, or direct sunlight. Doing so could result in a deterioration of printing quality.
SV-AP10B.book 47 ページ 2002年9月18日 水曜日 午前8時55分 Others ª Before, During, and After Printing ª Notes on Handling Finished Prints ≥Do not write on the paper before printing on it. ≥Do not forcibly pull out the Ink Cassette or paper, shake the printer, or add more paper while printing is in progress. ≥Removing the Paper Cassette while printing is in progress could result in a paper jam in which the jammed paper cannot be pulled out. The jammed paper can only be removed when the Paper Cassette is inserted.
SV-AP10B.book 48 ページ 2002年9月18日 水曜日 午前8時55分 Others ª Notes on Storing Settings to the Photo Printer’s Memory ª Maintenance Notes ≥Do not use Benzene, paint thinner, or other solvents to clean the printer. Most of the printer surface is plastic. Do not use solvents such as Benzene and paint thinner to wipe the printer since they can damage the surface of the printer and cause the surface to peel. To clean the surface, wipe up any dust with a soft, dry cloth.
SV-AP10B.book 49 ページ 2002年9月18日 水曜日 午前8時55分 Others Q&A 11: What kind of paper can the Photo Printer print on? 11: The Photo Printer can print on 9 x 12 cm printing paper, 16 Pre-Cut adhesive paper and 10 x 15 cm printing paper. Do not use other types of paper, since doing so could cause paper jams or other malfunctions. Use the special Ink Cassette/Paper Set when printing.
SV-AP10B.book 50 ページ 2002年9月18日 水曜日 午前8時55分 Others Before Requesting Service 9: Paper jams occur frequently. 9-1: More than 36 sheets of paper (or 25 sheets of 9 x 12 cm printing paper) have been loaded in the Paper Cassette. 9-2: The paper is creased or curled. If the trouble persists even when the action suggested below has been taken, press the Power Button to turn off the power or disconnect and re-connect the AC Mains Lead.
SV-AP10B.book 51 ページ 2002年9月18日 水曜日 午前8時55分 Others 17: Printing data remains in the printing job of [Spool]. (Printing starts without connecting the printer.) 17: Data of the printing job is printed. (Printing starts connecting the printer.) Delete the data of the printing job if you do not need it. To delete the printing job data ≥Windows XP Select [Start] >> [Printers and Faxes]. [Printers and Faxes] may not be displayed depending on the PC used. Select the following orders.
SV-AP10B.book 52 ページ 2002年9月18日 水曜日 午前8時55分 Others ≥Paper is incorrect. Set properly. → Insert the specified printing paper correctly. Error Messages ≥This function can't be used because there is no picture on the card. → Use a card with images recorded on it. ≥Set paper. → Insert paper into the Paper Cassette. ≥This function is not available because the card can't be used. → An incompatible card is being used. Insert a card that the Photo Printer can use. ≥The temperature is too high, please wait.
SV-AP10B.book 53 ページ 2002年9月18日 水曜日 午前8時55分 Others Error Messages for Printer Driver ≥Please wait until the temperature of printer decreases. → Please wait for a while. ≥Please check a paper cassette or paper. → Insert the paper into the paper cassette and the paper cassette into this unit. ≥There is not ink. → Insert the new ink cassette. ≥A paper jam has occurred. → Remove the jammed paper and eject/insert the ink cassette. ≥Hardware Error occurred. Please abort printing. → Consult for your dealer.
SV-AP10B.
SV-AP10B.
SV-AP10B.book 56 ページ 2002年9月18日 水曜日 午前8時55分 B Printed in Japan Matsushita Electric Industrial Co., Ltd. VQT0B56 X0902Ah0( A) Web site: http://www.panasonic.co.