R Digital Photo Printer Operating Instructions Model No. SV-AP10U Before use, please read these instructions completely. Please retain this manual for continuing reference. For USA assistance. please call:1-800-211-PANA(7262) or send e-mail to:consumerproducts@panasonic.com For Canadian assistance. please call:1-800-561-5505 or visit us at www.panasonic.
Information for Your Safety Article 2 Use by a Third Party Licensee may not use, copy, modify, transfer or allow any third party, whether free of charge or not, to use, copy or modify the Software, except as expressly provided for in this Agreement. WARNING TO REDUCE THE RISK OF FIRE OR SHOCK HAZARD AND ANNOYING INTERFERENCE, USE ONLY THE RECOMMENDED ACCESSORIES AND DO NOT EXPOSE THIS EQUIPMENT TO RAIN OR MOISTURE. DO NOT REMOVE THE COVER (OR BACK); THERE ARE NO USER SERVICEABLE PARTS INSIDE.
ENGLISH Important Information FCC Note: (U.S. only) The Preheat function works so that high picture quality is maintained when the surrounding temperature is low. Therefore, even if pressing the [PRINT] button, the operation may not start for a while. (Printing starts within about 1 minute automatically.) This equipment has been tested and found to comply with the limits for a Class B digital device, pursuant to Part 15 of the FCC Rules.
Supplied Accessories Stand for Vertical Layout (VYQ2551) Paper Cassette (VXA7602) Remote Controller (N2QADB000006) Feet for Horizontal Layout (VKA0376) AA Size Batteries (x2) CD-ROM (VFF0170) Important Information (Including USB Connection Cable (not supplied)) In order to prevent electromagnetic interference, install the Clamp Filter (supplied) on the Cable as shown in the figure below.
Contents Settings Information for Your Safety ................................. 2 End User License Agreement ............................. 2 Important Information .......................................... 3 Supplied Accessories .......................................... 4 Settings..............................................................29 Setting the Layout..............................................30 Preparation Connecting and Operating with a personal computer Controls and Components........
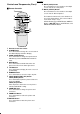
Preparation 7 15 16 8 13 1 ¦ 17 18 2 PRINT MENU 14 4 5 9 10 11 SET 6 ACCESS EJECT 19 PC CARD ERROR SD MEMORY CARD 3 12 DISPLAY/ CANCEL 20 21 VIDEO OUT 9 Card Access Lamp Preparation 10 11 Controls and Components 1 Power Lamp [¦] 2 3 4 5 6 7 8 When you turn the power on, the Power lamp turns green. When you turn the power off, the Power lamp turns red, and all images in the Photo Printer’s memory are deleted. Power Button [¦] Press to turn Photo Printer on/off.
Preparation Controls and Components (Cont.) 11 MULTI (COPY) Button Press this button to select numbers of multiple screen shots of the same picture. 12 MULTI (SELECT) Button Press this button to select numbers of multiple screen shots of different pictures. x Remote Controller 1 2 3 4 5 6 7 ¦ ALBUM ZOOM IN CARD SELECT ROTATE ZOOM OUT PRINT SET MENU DISPLAY/ CANCEL TITLE DATE COPY NUMBER DPOF/ALL SELECT PRINT The buttons below have the same functions as ones of the Photo Printer.
Preparation Inserting Remote Control Batteries Using the Remote Controller 1 While pressing the indentation in the 1 Direct the remote controller at the remote control receiver and press a button on direction indicated by the arrow, lift the cover up. the remote controller. 2 Insert the batteries (supplied) with the polarity ( and ) correctly aligned.
Preparation Insertion and Connections Insertion Vertical Layout x Insertion Be sure to insert the stand when selecting the Vertical layout and the feet when selecting the Horizontal layout. Insertion for Vertical Layout 1 Insert the stand into the holes as shown in the illustration. 2 Tighten the screw to join the main unit and the stand. Insertion for Horizontal Layout 1 Attach the feet for Horizontal Layout to the four corners of the side which does not have a vent on the main unit.
Preparation Inserting a Card x When using an SD Memory Card or a MultiMediaCard 1 Insert the card all the way into the slot. pThe Card Access Lamp lights. [Removing the Card] 1 Push the card. 2 Remove the card. x When Using a PC Card 1 Insert CF Card all the way into (PC Card Adaptor/ Product Sold Separately). 2 Insert into the Photo Printer. [When Removing the Card Adaptor] 1 Press . 2 Remove . pNever take the card out or turn off the power while the card is being accessed.
Preparation Inserting the Ink Cassette 1 1 Use your finger to push in the hole with the arrow, and turn it in the direction of the arrow. Tighten any slack in (Ink Film). pThe Ink Cassette is included in the Ink Cassette/Paper Set (optional). 2 Open (Ink Cassette Compartment Door), place the side that contains (small hole in Ink Cassette ) up, insert the Ink Film all the way into the Ink Cassette, and close .
Preparation MENU Controls PRINT ERROR PRINT SET DISPLAY/ CANCEL MENU Use the MENU Mode as follows. MENU SET DISPLAY/ CANCEL :Press to display the MENU screen. :Use the Buttons to switch between MENU categories and MENU contents. :Use the Buttons to move within the MENU Contents. To enter your selection, press . :Press to enter your selection. :Press to exit the MENU.
Basic Functions Basic Functions CARD SELECT ROTATE ZOOM OUT PRINT SET Test Print PRINT ERROR MENU SET DISPLAY/ CANCEL MENU 1 1 7 5 BASIC DISPLAY/ CANCEL 2 3 Number Date Trim Picture FUNCTION A EFFECT Layout OPTION 2 2 Vertical Layout Horizontal pThe explanations below are made for the Vertical layout and the Album Display setting. x Printing Images From a Card pMake sure that the paper, the Paper Cassette and the Ink Cassette are all inserted.
Basic Functions PRINT SET MENU DISPLAY/ CANCEL TITLE DATE COPY x Forwarding/Reversing the Screen When 13 or more images are recorded on a card, aligning (blue frame) on the places indicated in the diagram to the left and pressing the Buttons will forward/reverse the screen. NUMBER DPOF/ALL SELECT PRINT after selecting the picture in the blue frame. pIf inserting a different Ink Cassette before reprinting when using a card, re-select the image.
Basic Functions Switching the Pictures between the Album Display and the Index Display MENU ¦ ALBUM ZOOM IN SET CARD SELECT ROTATE ZOOM OUT PRINT You can display the pictures where a date has been recorded in the Album Display. DISPLAY/ CANCEL SET 1 Press (ALBUM Button) when the pictures are displayed. 1 S M 6 7 T W T F S 1 2 3 4 5 8 9 10 11 12 pThe pictures can be also switched between the Album Display and the Index Display when pressing .
Basic Functions Printing Batches/Indexing PRINT PRINT SET ERROR Multiple pictures can be automatically printed from a card. Furthermore, 25 frames of images on a card can be indexed and printed. MENU SET DISPLAY/ CANCEL MENU DISPLAY/ CANCEL pSelect the INPUT method. pIf you select all pictures, begin from Step 2. 1 Select the pictures, and mark them with (q). 2 Select [Batch] under [BASIC] on the MENU screen, and press . 1 Select a MENU you wish to use, and press .
Basic Functions Printing With a DPOF Marked Card PRINT ERROR TITLE DATE MENU COPY NUMBER DPOF/ALL SELECT PRINT MULTI SET DISPLAY/ CANCEL When a card with marked files (DPOF) that contains pictures and print counts set with a Digital Video Camera or a Digital Camera is inserted, printing can be automatically be performed. pInsert a DPOF card pSelect the INPUT method 1 Press (DPOF Button) when the pictures are 1 displayed.
Basic Functions PRINT Copying/Erasing Images from a Card MENU SET SET DISPLAY/ CANCEL MENU 1 DISPLAY/ CANCEL BASIC DPOF Input Batch DPOF Search Album Card FUNCTION A EFFECT Slide OPTION 2 Card Picture Title 3 Card Copy Delete Images can be mutually copied to or erased from SD Memory/ MultiMediaCards and PC Cards. pUnlock the card when inserting the SD Memory Card. pInsert the card to both insert locations when copying the picture.
Basic Functions PRINT Recording Titles onto Cards MENU SET SET DISPLAY/ CANCEL MENU 1 1 pUnlock the card when inserting the SD Memory Card. pDisplay the created title. BASIC DPOF Input Batch DPOF Search Album Card A EFFECT Slide OPTION Card 1 Select [Card] under [BASIC] on the MENU screen, and press . 2 Select [Title], and press . 3 Select [Record to SD/MMC] or [Record to PC card], and press . 4 Enter the creation date, and press .
Basic Functions PRINT Viewing Slide Shows MENU SET SET DISPLAY/ CANCEL MENU DISPLAY/ CANCEL 1 The Photo Printer can automatically display a continuous show of selected pictures within a card. pTo view DPOF configured pictures, insert a card with DPOF settings. pSelect the INPUT method. pTo view all pictures or DPOF configured pictures within a card, begin from Step 2. 1 Select the pictures, and mark them with (q). pTo remove a picture, select the picture and press .
Multiple Functions Multiple Functions PRINT Printing Multiple Screen Shots of the Same Picture (MULTI FRAME MODE) SET PRINT ERROR MENU DISPLAY/ CANCEL MENU DATE TITLE COPY NUMBER DPOF/ALL SELECT PRINT SET The Photo Printer can divide the screen into 2, 4, 9 or 16 sections, and print multiple screen shots of the same picture. pSelect the INPUT method. pSelect the picture and make the Single Display appear.
Multiple Functions PRINT SET DISPLAY/ CANCEL MENU TITLE DATE PRINT PRINT ERROR MENU The Photo Printer can divide the screen into 2, 4, 9 or 16 sections, and print multiple screen shots of different pictures. SET COPY NUMBER DPOF/ALL SELECT Printing Multiple Screen Shots of Different Pictures DISPLAY/ CANCEL MULTI pSelect the INPUT method. pMake the Index Display appear. 1 Select the pictures, and mark them with (q). pRepeat for the selected number of pictures.
Multiple Functions Selecting a Large Number of Pictures and Printing Multiple SELECT as batches 1 Select all necessary pictures in Step 1, and press to go to the MENU screen. 2 Select [Batch] under [BASIC] on the MENU screen, and choose [Selected pictures]. pe.g. Selecting [4 pictures] and 8 pictures: Selected pictures 1-4 will be printed on the first sheet, and selected pictures 5-8 will be printed on the second sheet. 3 Press to print. pPictures from various cards cannot be combined together.
Multiple Functions PRINT SET Creating a Personalized Picture Calendar PRINT ERROR MENU SET MENU DISPLAY/ CANCEL 1 DISPLAY/ CANCEL BASIC Standard Copy Select Calendar FUNCTION A EFFECT Wallpaper The Photo Printer can insert a picture and create a 1-month, 2-month or 12-month personalized calendar. You can also change the colors of holidays or special days and dates. pSelect the INPUT method. 1 Select [Calendar] under [FUNCTION] on the MENU screen, and press .
Multiple Functions Inserting Wallpaper and Printing ¦ ALBUM ZOOM IN CARD SELECT ROTATE ZOOM OUT PRINT SET PRINT SET MENU 1 DISPLAY/ CANCEL DISPLAY/ CANCEL pSelect the INPUT method. 1 Select [Wallpaper] under [FUNCTION] on the MENU screen, and press . 2 Select a wallpaper, and press . p12 kinds of wallpapers are preset. BASIC Standard Copy FUNCTION OPTION Select Calendar 3 Select a picture, and mark with ( ٨ ). pRepeat Step 3 to select 2 or more pictures.
Title Functions Title Functions PRINT SET PRINT Inserting Illustrations and Printing ERROR MENU SET DISPLAY/ CANCEL MENU 1 DISPLAY/ CANCEL Illust pSelect the INPUT method. pSelect the picture you wish to print and make the Single Screen Display appear. 1 Select [Illust] under [EFFECT] on the MENU screen, and press . ? A aA BASIC You can insert illustrations stored within the Photo Printer or within cards onto pictures and print.
Title Functions ¦ ALBUM ZOOM IN Inserting Characters and Printing CARD SELECT ROTATE ZOOM OUT PRINT SET MENU DISPLAY/ CANCEL PRINT SET TITLE DATE DISPLAY/ CANCEL COPY 1 Illust Type 2 Insert characters. pPress each time you select a character. pAfter choosing all the characters, select , and press . A Display OPTION 2 A B C D E K I J F G H L M N O P Q R S T U V W X Y Z @ ˜ " $ 0 1 2 3 4 ? ' / _ - 5 6 7 8 9 · .
Title Functions PRINT 1 DATE ERROR COPY DISPLAY/ CANCEL Illust Type Stamp Sepia A EFFECT Display OPTION Sepia pSelect the INPUT method. pDisplay the picture you wish to print and make the Single Screen Display appear. 1 Select [Sepia] under [EFFECT] on the MENU screen, and press . pThe MENU contents under [EFFECT] can be also displayed with . ? A aA BASIC The Photo Printer can print pictures in Sepia tone.
Settings Settings MENU DISPLAY/ CANCEL MENU TITLE DATE COPY Settings x Set Number of Prints SET NUMBER DPOF/ALL SELECT PRINT MULTI 1 7 5 BASIC DISPLAY/ CANCEL pThe number of prints increases when pressing . pThe Photo Printer can continuously print up to 10 copies of the same image. pThe number of pages remaining to be printed (including the currently printing page) appears in the lower left corner of the screen.
Settings x Adjusting Print Picture Quality MENU PRINT SET SET DISPLAY/ CANCEL MENU 1 DISPLAY/ CANCEL 7 BASIC 5 3 2 Number Date Trim Picture FUNCTION A EFFECT Layout OPTION 2 COLOR C·BALANCE BRIGHT SHARP AWB Buttons: Item Selection Buttons: Adjust Adjust the depth of the color. Adjust the color tint. Clarify dark portions. Adjust picture brightness and shade. Sharpen outline. Adjust white balance.
Connecting and Operating with a personal computer Connecting and Operating with a personal computer Operating environment Printer Driver can be installed in a PC/AT compatible personal computer which can run Microsoft® Windows® 98SE/Me/2000 Professional/ XP Home Edition/XP Professional.
Connecting and Operating with a personal computer Installing the Printer Driver Installing this printer driver allows the Photo Printer to be used as a fullcolor printer. For Windows XP 1 Turn on the personal computer and install the supplied CD-ROM into the CD-ROM drive. 2 Turn on the Photo Printer. 3 Connect the Printer to the PC using the USB connection cable. pThe [Found New Hardware Wizard] screen appears. 4 Click the [Next] Button.
Connecting and Operating with a personal computer 4,6 Installing this printer driver allows the Photo Printer to be used as a fullcolor printer. For Windows Me 1 Turn on the personal computer and install the supplied CD-ROM into the CD-ROM drive. 2 Turn on the Photo Printer. 3 Connect the Printer to the PC using the USB connection cable. 5 pThe [Add New Hardware Wizard] screen appears. pDepending on your PC environment, step 4 and 5 may be skipped. If this is the case, proceed from step 6.
Connecting and Operating with a personal computer 4,9 Installing the Printer Driver (Cont.) For Windows 98SE/2000 1 Turn on the personal computer and install the supplied CD-ROM into the CD-ROM drive. 2 Turn on the Photo Printer. 3 Connect the Printer to the PC using the USB connection cable. 5 pThe [Add New Hardware Wizard] screen appears. pDepending on your PC environment, step 4 and 8 may be skipped. If this is the case, proceed from step 9. 4 Click the [Next] Button.
Connecting and Operating with a personal computer Installing from the [Add Printer Wizard] screen. Notes for Installation When the Printer Driver is installed on your personal computer for the first time, the USB port cannot be selected in the selection stage for the port, because the USB port is not set. Note that the [Add Printer] function can be used only when the Printer Driver is re-installed or when another printer using the USB port has been installed.
Connecting and Operating with a personal computer 10 Installing the Printer Driver (Cont.) 10 Click [Have Disk]. 11 Select the folder where the Printer Driver is located. pIf the CD-ROM drive is the [D: drive], select [D:\Win2K-XP] folder. 12 Click [OK]. 13 Check that [Panasonic SV-AP10] is displayed and click [Next]. 14 Click [Next]. 11,12 pIf the screen to select default printer is displayed, select [Yes], if it is the default printer.
Connecting and Operating with a personal computer 6 7 For Windows 98SE/Me 1 Before installation, check that all applications have been exited. 2 Connect the printer to your personal computer with a USB cable and turn on the printer. 3 Select [Start] >> [Settings] >> [Printers]. 4 Double-click the [Add Printer] icon. 5 When the [Add Printer Wizard] is activated, click [Next]. 6 Select [Local Printer] and click [Next]. 7 Click [Have Disk]. 8 Select the folder where the Printer Driver is located.
Connecting and Operating with a personal computer Installing the Printer Driver (Cont.) 5 6,7 For Windows 2000 1 Before installation, check that all applications have been exited. 2 Connect the printer to your personal computer with a USB cable and turn ON the printer. 3 Select [Start] >> [Settings] >> [Printers]. 4 Double-click the [Add Printer] icon. 5 When the [Add Printer Wizard] is activated, click [Next].
Connecting and Operating with a personal computer 10 10 Click [Have Disk]. 11 Select the folder where the Printer Driver is located. pIf the CD-ROM drive is the [D: drive], select [D:\Win2K-XP] folder. 12 Click [OK]. 13 Check that [Panasonic SV-AP10] is displayed and click [Next]. 14 Click [Next]. 11,12 pIf the screen to select the default printer is displayed, select [Yes], if it is the default printer.
Connecting and Operating with a personal computer Printing from PC The operations and notes of the printer driver are explained. It is explained with [SD Viewer for Printer] in the supplied CD-ROM. To install [SD Viewer for Printer] 1 Install the CD-ROM and double-click the [SD Viewer]. 2 Double-click the [Setup.exe]. pThe install screen is displayed. 3 Click [Next]. 4 Read [Agreement] and click [Agree]. 5 Keep installing according to the message.
Connecting and Operating with a personal computer 1,2 For Windows XP/2000 After opening the detail setting on [Print]. 1 Set the printer name to [Panasonic SV-AP10]. pSelect [SV-AP10] from the printing menu when using it from the other application. 2 Click [Properties]. 3 Click [Layout] tab. 4 Click [Advanced]. 3,4 After opening [Advanced Options], 5 Select the paper. 6 Select the division number. pWhen printing one picture, select [1 frame].
Connecting and Operating with a personal computer Printing from PC (Cont.) 5,6 5 Click [Device Options] tab. 6 Select the division number. pWhen printing one picture, select [1 frame]. Be sure to select [16 frames] when using 16 Pre-Cut Adhesive printing paper. 7 Finish the setting. pClicking [OK] returns to the preview screen. 8 Click [Print]. 9 Click [Yes]. pThe status monitor is displayed and printing starts.
Connecting and Operating with a personal computer Caution for Use 4 The message [USB port cannot be detected] The status monitor may be displayed when you start printing. Use the paper fitted to the ink cassette. When using different ink cassette from [Paper] setting, the error message is displayed. pThe usable USB port may not be selected. The USB port is displayed as [USB001] or [USB002]. Confirm it.
Others x Ink Cassette/Paper Set Notes Others pUse Ink Cassette/Paper Sets that bear the mark. pUse the Ink Cassette with the paper provided in the same box. One Ink Cassette is designed to provide enough Ink Film to print the number of sheets provided in that Ink Cassette/Paper Set. pDo not store the Ink Cassettes or paper under high temperatures, high humidity, or direct sunlight. Doing so could result in a deterioration of printing quality. They may also become unusable.
Others x Before, During, and After Printing x Notes on Handling Finished Prints pDo not write on the paper before printing on it. pDo not forcibly pull out the Ink Cassette or paper, shake the printer, or add more paper while printing is in progress. pRemoving the Paper Cassette while printing is in progress could result in a paper jam in which the jammed paper cannot be pulled out. The jammed paper can only be removed when the Paper Cassette is inserted.
Others x Maintenance Notes x Notes on Storing Settings to the Photo Printer’s Memory pDo not use Benzene, paint thinner, or other solvents to clean the printer. Most of the printer surface is plastic. Do not use solvents such as Benzene and paint thinner to wipe the printer since they can damage the surface of the printer and cause the surface to peel. To clean the surface, wipe up any dust with a soft, dry cloth.
Others Q&A 11: What kind of paper can the Photo Printer print on? 11: The Photo Printer can print on 4" x 5-7/8" (100 x 148 mm) printing paper, 16 Pre-Cut adhesive paper and 4" x 6" (100 x 150 mm) printing paper. Do not use other types of paper, since doing so could cause paper jams or other malfunctions. Use the special Ink Cassette/Paper Set when printing.
Others Before Requesting Service 9: Paper jams occur frequently. 9-1: More than 36 sheets of paper (or 25 sheets of 4" x 57/8" (100 x 148 mm) printing paper) have been loaded in the Paper Cassette. 9-2: The paper is creased or curled. If trouble persists even when the action suggested below has been taken, press the Power Button to turn off the power or disconnect and re-connect the AC Power Cord.
Others 17: Printing data remains on PC. 17: Delete the data of the printing job if you do not need it. To delete the printing job data pWindows XP Select [Start] >> [Printers and Faxes]. [Printers and Faxes] may not be displayed depending on the PC used. Select the following orders. [Start] >> [Control Panel] >> [Printers and the other Hardware] >> [Printers and Faxes]. Click the printer icon twice and select [Cancel All Documents] under [Printer]. pWindows 2000 Select [Start] >> [Setting] >> [Printers].
Others Error Messages pPaper is incorrect. Set properly. 㸢 Insert the specified printing paper correctly. pThis function can't be used because there is no picture on the card. 㸢 Use a card with images recorded on it. pSet paper. 㸢 Insert paper into the Paper Cassette. pThis function is not available because the card can't be used. 㸢 An incompatible card is being used. Insert a card that the Photo Printer can use. SD/MMC/CF cards can be used. pThe temperature is too high, please wait.
Others Error Messages for Printer Driver pPlease wait until the temperature of printer decreases. 㸢 Please wait for a while. pPlease check a paper cassette or paper. 㸢 Insert the paper into the paper cassette and the paper cassette into this unit. pThere is no ink. 㸢 Insert the new ink cassette. pA paper jam has occurred. 㸢 Remove the jammed paper and eject/insert the ink cassette. pHardware Error occurred. Please abort printing. 㸢 Consult your dealer.
Others Specifications Information for Your Safety Power Supply Input Current Printing System Printing Speed Picture Memory Print Media Ink Film Printing Paper Paper Feeding System Picture Quality Number of printing pixels Number of Copies Functions Print Head Input Socket Output Socket Compatible Cards Cards Format Image Format Number of Pixels Thawing Time Compatible Personal Computers Allowable Temperature Allowable Humidity External Dimensions Weight OS Memory HDD capacity AC 120 V 50/60 Hz Duri
Others Limited Warranty (For U.S.A. Only) Panasonic Consumer Electronics Company, Division of Matsushita Electric Corporation of America One Panasonic Way Secaucus, New Jersey 07094 Panasonic Sales Company, Division of Matsushita Electric of Puerto Rico, Inc. Ave. 65 de Infantería, Km. 9.
Others Customer Services Directory (For U.S.A. Only) For Product Information, Operating Assistance, Literature Request, Dealer Locations, and all Customer Service inquires please contact: 1-800-211-PANA(7262), Monday-Friday 9am-9pm Saturday-Sunday 9am-7pm, EST. or send e-mail: consumerproducts@panasonic.com Web Site: http://www.panasonic.com You can purchase parts, accessories or locate your nearest servicenter by visiting our Web Site.
Instalación y conexiones (ESPAÑOL) Instalación x Instalación Disposición vertical Tener cuidado de instalar el sostén si se elige la disposición vertical; asimismo los pies cuando se elige la disposición horizontal. Instalación en disposición vertical 1 Instalar el sostén en el alojamiento tal como se muestra en 2 la figura. Enroscar el tornillo y sujetar la unidad principal y el sostén.
CARD SELECT ROTATE ZOOM OUT PRINT SET MENU DISPLAY/ CANCEL Impresión de prueba (ESPAÑOL) PRINT ERROR MENU SET 11 7 5 BASIC DISPLAY/ CANCEL 2 3 Number Date Trim Picture FUNCTION A EFFECT Layout Owner ID OPTION 22 Vertical Layout Horizontal x Impresión de imágenes desde la tarjeta pAsegurarse de que el papel, el casete de papel y el casete de tinta estén instalados. pIntroducir una tarjeta en la fotoimpresora. pConectar la impresora.
Panasonic Consumer Electronics Company, Division of Matsushita Electric Corporation of America One Panasonic Way, Secaucus, NJ 07094 Panasonic Sales Company (“PSC”) Division of Matsushita Electric of Puerto Rico, Inc. Ave. 65 de Infantería, Km. 9.5, San Gabriel Industrial Park, Carolina, Puerto Rico 00985 Panasonic Canada Inc.