KEYBOARD SX-KC211 ENGLISH QQTG0598A
Caution for AC Mains Lead (For AC cord type only) For your safety, please read the following text carefully. This appliance is supplied with a moulded three pin mains plug for your safety and convenience. A 5ampere fuse is fitted in this plug. Should the fuse need to be replaced please ensure that the replacement fuse has a rating of 5-ampere and that it is approved by ASTA or BSI to BS1362. Check for the ASTA mark or the BSI mark on the body of the fuse.
OWNER’S MANUAL Caution Voltage (except North America, Mexico, Europe, Australia, New Zealand, China and Russia) Be sure the voltage adjuster located on the AC adaptor is in accordance with local voltage in your area before using this unit. Use a screwdriver to set the voltage adjuster to the local voltage. WARNING: TO REDUCE THE RISK OF FIRE OR ELECTRIC SHOCK, DO NOT EXPOSE THIS PRODUCT TO RAIN OR MOISTURE. BEFORE YOU PLAY, PLEASE READ THE CAUTIONARY COPY APPEARING ON PAGE 4.
Cautions for safest use of this unit Installation location If operation seems abnormal 1. A well-ventilated place. Take care not to use this unit in a place where it will not receive sufficient ventilation, and not to permit the ventilation holes to be covered by curtains, or any similar materials. 2. Place away from direct sunlight and excessive heat from heating equipment. 3. A place where humidity, vibration and dust are minimized.
Contents Cautions for safest use of this unit . . . . . . . . . . . . . . . . . . . . . . . . . . . . . . . . . . . . . . . . 4 Controls and functions . . . . . . . . . . . . . . . . . . . . . . . . . . . . . . . . . . . . . . . . . . . . . . . . . . 6 BASIC FUNCTIONS Getting started . . . . . . . . . . . . . . . . . . . . . . . . . . . . . . . . . . . . . . . . . . . . . . . . 8 Playing . . . . . . . . . . . . . . . . . . . . . . . . . . . . . . . . . . . . . . . . . . . . . . . . . . . . . .
Controls and functions AUTO PLAY CHORD An automatically accompaniment is added to your playing merely by specifying a chord. (Refer to page 23.) BEAT MASTER A fun way to develop your sense of rhythm. (Refer to page 14.
MUSIC TRAINER The MUSIC TRAINER function incorporated in this instrument can be a helpful aid to improving your performance. Example BEAT MASTER, to develop your sense of rhythm. CHORD FINDER, to teach you how to play chords. MINUS ONE lets you practice the melody part while listening to the other song parts. The display shows a visual illustration of the keys and notes you play. Display Displays the status of your instrument and is also used for setting the various functions. (Refer to page 17.
Getting started 1 Connect the AC adaptor (included). L OUT MIDI IN FOOT SW PHONES/ LINE OUT AUX IN R (Rear panel) • Do not disconnect and connect the AC adaptor when the PLAY button is on. 2 Affix the music stand as shown. • The unit is in the standby condition when the AC adaptor is connected. The primary circuit is always “live” as long as the AC adaptor is connected to an electrical outlet.
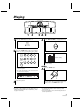
Playing 1 4 1 3 A 2 Press the PLAY button to turn it on. 4 Set the MAIN VOLUME to an appropriate level. MAIN VOLUME UP PLAY OFF/ON DOWN 2 Press the SOUND button, and use the number buttons to select a sound number (three digits). 0 MENU 1 2 • The volume setting is shown on the display. 3 VOLUME RHYTHM + CANCEL — SOUND 4 5 6 Volume setting 7 8 9 • Each graduation represents two degrees of volume change. DEMO • The list of SOUNDS is found near the right side of the panel.
Add an automatic accompaniment 2 1 4 3 1 C F G7 C C F G7 C Press the RHYTHM button, and use the number buttons to select a rhythm number (three digits). MENU RHYTHM 0 + 1 4 2 5 3 Use the TRANSPOSE/PROGRAM buttons to show “1 Finger” on the display. 3 TOUCH SUSTAIN HARMONY APC SYNCHRO 6 CHORD TRANSPOSE TEMPO VOLUME GENERAL PROGRAM CANCEL — SOUND 7 8 9 TRANSPOSE PROGRAM • The list of RHYTHMS is shown near the left end of the panel.
5 6 5 Play the chord with your left hand, and the melody with your right hand. 6 When you are finished playing the song, press the START/STOP button. C3 Chord Melody SE AU P Y/P /STO A L T P AR ST • When you play the keyboard with your left hand, the automatic accompaniment starts (SYNCHRO START). • For example, when you press a C key, an automatic accompaniment in the C major chord begins to play. C chord • The automatic accompaniment stops.
Play back the 100 Songs 3 2 1 1 Press the 100 SONGS button. 3 Press the PLAY/PAUSE (START/ STOP) button. 100 SONGS SE AU P Y/P TO PLA ART/S ST 2 Use the number buttons to select a song number (3 digits). 0 1 2 • The selected song is played back. 3 Function of each button + 4 5 6 Rewind (during stop; by measure) CANCEL — 7 8 9 • The song numbers can be found on the separate music score provided. • You can also use the TRANSPOSE/PROGRAM buttons below the display to select it.
A MINUS ONE You can mute the melody part of the playback song data and play it yourself. A Press the MINUS ONE button to turn it on. MINUS ONE • The display looks similar to the following. SONG TOUCH SUSTAIN HARMONY APC SYNCHRO MINUS ONE TRANSPOSE GENERAL CHORD TEMPO VOLUME • To cancel this mode, press the MINUS ONE button again. • When the “100 SONGS” feature is used, the settings for the sounds and rhythms etc. are initialized.
Beat Master BEAT MASTER is a fun feature that helps you develop your sense of rhythm while you enjoy playing, just like competing with a friend in a game. Think of yourself as the student, and the instrument your teacher. First, the teacher “claps” out the rhythm, and then you try to mimic it. Teacher Student Teacher Student Your rhythm lesson uses the four pad buttons. As the instrument models the rhythm, the corresponding pad indicators light.
45 12 3 1 Press the BEAT MASTER TRAINING or CHALLENGE button. 3 Press the START/STOP button. BEAT MASTER TRAINING BEAT MASTER CHALLENGE SE AU P Y/P TO PLA ART/S ST • Listen to the intro. • Select TRAINING if you are a beginner, or CHALLENGE to improve your skill. • A BGM is heard and the pad indicators light up. 2 4 The Question phrase is played. Watch the timing of the pad indicators and try to remember it. Use the TRANSPOSE/PROGRAM buttons to select a song number.
6 87 • During this time, the display looks like this: BEAT MASTER 6 The next Question phrase is then played. Continue in the same manner. 7 After the ending plays, you will see an evaluation of your performance on the display. • Your total performance is assessed as “Master!”, “Good”, “Fair” or “Practice.” • To try the same lesson again, press the START/STOP button. Or you can try an another song. 8 To turn off the BEAT MASTER, press the BEAT MASTER button that you selected in step 1.
About the display The display shows the status of this instrument, the played keys, etc., and is also used for setting the various functions. Normal display Sound number Sound name Chord name SOUND CHORD TOUCH SUSTAIN HARMONY APC SYNCHRO m TRANSPOSE 7 TEMPO GENERAL VOLUME Main volume Performance data ▲ •A Tempo mark next to the function name to the left of the display indicates that the corresponding button is ON. (In the example above, the TOUCH function is On.
Part I Sounds and effects There are 150 different sounds permanently stored in this instrument to enhance your playing enjoyment. Sound 1. Press the SOUND button. Use the number buttons to select a sound number (three digits). 0 1 2 3 + 4 5 6 CANCEL — SOUND 7 8 9 MENU RHYTHM 2. Play the keyboard. • Non-pitched (percussion) sounds are also available. • For SPLIT sounds, the sounds produced on the left and right sections of the keyboard are different.
Part I Sound and effects Sustain SUSTAIN is the gradual fading out of musical tones after the key is released. button to turn it on. • The mark next to the SUSTAIN indication on the left side of the display indicates that this effect is on. ▲ ⇒Press the SUSTAIN SUSTAIN Touch You can add dynamics to the sound by varying the keyboard touch. • The initialized setting is ON. ⇒Press the TOUCH button to turn it on.
Part I Sound and effects ⇒Adjust the key with the TRANSPOSE ∧ and ∨ buttons. Transpose illustration SOUND TOUCH SUSTAIN HARMONY APC SYNCHRO Key TRANSPOSE TEMPO VOLUME GENERAL TRANSPOSE PROGRAM • Each press of the ∧ button raises the key in semitone steps, and each press of the ∨ # button lowers the key in semitone steps (G – C – F ). • If the two buttons are pressed at the same time, the key returns to C. • When the TRANSPOSE function is active, the transpose illustration is shown on the display.
Part II Playing the rhythm There are 100 rhythms stored in the memory of this instrument. Rhythm 1. Press the RHYTHM button. Use the number buttons to select a rhythm number (three digits). 0 1 2 3 + 4 5 6 CANCEL — SOUND 7 8 9 MENU RHYTHM • Enter three digits to specify the rhythm. For example, for rhythm number 003, press 0, 0, 3. For rhythm number 030, press 0, 3, 0. • The + and – buttons can be used to increase or decrease the number.
Part II Playing the rhythm Tempo The tempo of the rhythm pattern is adjusted with the TEMPO buttons. ⇒Press the right button for a faster tempo, and the left button for a slower tempo (q=40 – 300). Tempo indication RHYTHM CHORD TOUCH SUSTAIN HARMONY APC SYNCHRO TRANSPOSE GENERAL Beat indication TEMPO VOLUME • Press both buttons at the same time to reset the tempo to the standard q=120. • The tempo is shown on the display. • The beat is indicated to the right of the displayed tempo.
Part II Playing the rhythm Auto Play Chord Simply by playing a chord on the keyboard, the AUTO PLAY CHORD function automatically plays an accompaniment pattern which matches perfectly the selected rhythm. With a real accompaniment as a background, you can concentrate on playing the melody. ⇒Choose from three ways of playing chords. One Finger (1 Finger) mode In the One Finger mode, a major chord can be played just by pressing the key for its root note.
Part II Playing the rhythm How to use the AUTO PLAY CHORD 1. Select the desired rhythm and sound(s), and set the tempo. 2. Press the AUTO PLAY CHORD button to turn it on. AUTO PLAY CHORD ▲ • The mark next to the APC indication on the left side of the display indicates that this function is on. • The display looks similar to the following. 3. Use the TRANSPOSE/PROGRAM buttons to select the chord mode (1 Finger, Fingered, Pianist).
Part II Playing the rhythm APC/SONG VOLUME You can lower the volume of the automatic accompaniment to balance it with the volume of the sounds you play. • This setting also functions for the song playback volume. ⇒Adjust the volume with the UP and DOWN buttons of the APC/SONG VOLUME (0 to 10). APC/SONG VOLUME DOWN UP • A setting of 10 is the normal volume. • After a few seconds, the display returns to the previous display.
Part II Playing the rhythm One Touch Play ONE TOUCH PLAY automatically sets the sounds, etc. that match your chosen rhythm. Just by pressing a button you can immediately perform using the automatic accompaniment. • Note that when the automatic settings are executed, the previous settings are canceled. 1. With the rhythm stopped, select a rhythm pattern. 2. Press the ONE TOUCH PLAY button. ONE TOUCH PLAY • Sounds and effects, tempo, etc.
Part II Playing the rhythm Party Pads You can insert various phrases just by pressing the pad buttons. Pad performance Select a bank You can use the four pad buttons to produce four different sound effects. Four banks have been prepared so that you can play sound effects that match the selected theme. ⇒Press PARTY PADS / BEAT MASTER 1 2 3 the PARTY PADS BANK button to select the desired bank on the display. 4 • Playback will stop if you press the same pad button again.
Part III Menu Various settings that enhance the functions of this instrument are accessed through the MENU function. Outline of the procedure 1. Press the MENU MENU RHYTHM button. 0 1 2 3 + 4 5 6 CANCEL — SOUND 12: DEMO LED [DEMO LED] ON/OFF settings for the LED lighting of the pad buttons during a SONG or DEMO performance. 13: ALL INITIAL [ALL INIT] Reset this instrument to the original settings. 3. Press the EXECUTE 7 8 9 button.
Part III Menu Setting menus Select the desired setting menu (refer to page 28), and perform the corresponding settings. PART VOLUME MENU 1. Use the TRANSPOSE/PROGRAM buttons to select the part you wish to set. • PT is the abbreviation for part and ACP for ACCOMP. • For an explanation of CHRD and R.BS, refer to page 24. 2. Use the TEMPO/PROGRAM buttons to adjust the volume (0 to 127). • Repeat these steps for each part as necessary. PART SOUND PART MIDI CHANNEL MENU 1.
Part III MIDI REALTIME COMMAND MENU Use the TRANSPOSE/PROGRAM buttons to enable or disable the transmission/reception of MIDI REALTIME COMMAND data. ON: REALTIME COMMAND (START/STOP, CONTINUE) data are transmitted/received. OFF: REALTIME COMMAND data are not transmitted/received. MASTER TUNING MENU Use the TRANSPOSE/PROGRAM buttons to adjust the tuning value (–38 – Center – +39). SPLIT POINT MENU Press the keyboard key to specify the desired split position for the automatic accompaniment.
Symptoms which appear to be signs of trouble The following changes in performance may occur in the Keyboard but do not indicate trouble. Phenomenon Sounds and effects The buttons, keys, etc. malfunction. Remedy • Turn off the PLAY button once, then turn it on again. If this procedure is not successful, turn off the PLAY button once. Then, while pressing the TEMPO ∧ and ∨ buttons at the same time, turn the PLAY button on again.
Connections Rear panel L DC IN 9V-10V AUX IN OUT IN FOOT SW MIDI MIDI OUT Used for transmitting MIDI data. Connect the other end of the MIDI cable to the MIDI IN terminal of another instrument. This terminal is used, for example, to generate sound from a connected instrument by playing this instrument. MIDI IN Used for receiving MIDI data. Connect the other end of the MIDI cable to the MIDI OUT terminal of another instrument.
Index A ALL INITIAL . . . . . . . . . . . . . . . . . . . . . . . . . . . . . . . . . APC/SONG VOLUME . . . . . . . . . . . . . . . . . . . . . . . . . . AUTO PLAY CHORD . . . . . . . . . . . . . . . . . . . . . . . . . . AUX IN . . . . . . . . . . . . . . . . . . . . . . . . . . . . . . . . . . . . . 30 25 23 32 B BEAT MASTER . . . . . . . . . . . . . . . . . . . . . . . . . . . . . . . 14 C CANCEL . . . . . . . . . . . . . . . . . . . . . . . . . . . . . . . . . . . . CHORD FINDER . . . . . . . . . . .
Specifications SX-KC211 KEYBOARD 61 KEYS (WITH INITIAL TOUCH) SOUND GENERATOR PCM MAX.
Demo Performance List Axel F Theme from the paramount Motion Picture BEVERLY HILLS COP by Harold Faltermeyer Copyritght© 1984, 1985 by Famous Music Corporation International Copyright Secured All Rights Reserved Cool Gig Technics Original 35 QQTG0598
Matsushita Electric Industrial Co., Ltd. Central P.O.