Model No. TH-43LX650K/KX TH-50LX650K/KX TH-55LX650K/KX TH-65LX650K/KX TH-75LX650K/KX Operating Instructions LED TV 43-inch model 55-inch model 50-inch model 65-inch model 75-inch model English Thank you for purchasing this Panasonic product. Please read these instructions carefully before operating this product and retain them for future reference. The images shown in this manual are for illustrative purposes only.
This equipment is a Class II or double insulated electrical appliance. It has been designed in such a way that it does not require a safety connection to electrical earth. WARNING:To reduce the risk of fire or electric shock. - This lightning flash with arrowhead symbol within an equilateral triangle is intended to alert the user to the presence of non-insulated “dangerous voltage” within the product’s enclosure that may be of sufficient magnitude to constitute a risk of electric shock.
■ Mains plug and lead Warning If you detect anything unusual, immediately remove the mains plug. ●Mains plug types vary between countries. ●This TV is designed to operate on AC 100 - 240 V, 50/60 Hz. ●Insert the mains plug fully into the socket outlet. ●Ensure that the mains plug is easily accessible. ●Disconnect the mains plug when cleaning the TV. ●Do not touch the mains plug with wet hands. ●Do not damage the mains lead. • Do not place a heavy object on the lead.
■Built-in wireless LAN Caution Safety Precautions | Setting Up the TV ● Do not use the built-in wireless LAN to connect to any wireless network (SSID*) for which you do not have usage rights. Such networks may be listed as a result of searches. However, using them may be regarded as illegal access. *SSID is a name for identifying a particular wireless network for transmission. ● Do not subject the built-in wireless LAN to high temperatures, direct sunlight or moisture.
65-inch model ● ●Base Inserting remote’s batteries Assembly screws (M5 × 25) × 4 push down the cover 75-inch model Assembly screws (M6 × 35) × 4 Setting Up the TV ● ●Base Note the correct polarity (+ or -) Note Illustrations shown may be different between models and countries. Preparation Wall mounting the TV (optional) Please contact your local Panasonic dealer to purchase the recommended wall-hanging bracket.
Connections Connecting the TV Warning ● When optional accessories such as wall brackets etc. are used, always read and follow the manufacturer installation and usage instructions. ● Do not mount the unit directly below ceiling lights (such as spotlights or halogen lights) which typically give off high heat. Doing so may warp or damage plastic cabinet parts. ● When installing wall brackets you must ensure the wall bracket is not electrically grounded to metal wall studs.
Set top box Blu-Ray Player TV Satellite dish TV HDMI 1/2/3 Set top box HDMI cable HDMI 1/2/3 Blu-Ray Player HDMI cable Speaker system TV Amplifier with speaker system AV / Game equipment ■ Using HDMI terminal Optical cable TV HDMI 1/2/3 HDMI cable Equipment ●To enjoy the sound from the external equipment in multi-channel sound (e.g. Dolby Digital 5.1ch), connect the equipment to the amplifier. For the connections, read the manuals of the equipment and amplifier.
Initial Setup When you first turn on the TV, a series of steps will popup to guide you to setup your TV. ●These steps are not necessary if the setup has been completed by your local dealer. 1 Plug the mains plug into the socket outlet and turn on the TV. It may take a few seconds before the screen is displayed. Note: If you don’t want to use your Android device to setup the TV,you will skip to Step 3.
Initial Setting Initial setup involves selecting all the settings required to be able to search for and store all the analogue channels you can receive. Make sure that the television is switched on and follow Step 1: 1 2 3 4 5 Environment Home Home Please choose your Environment Shop Shop wizard opens, which guides you through the initial setup process. Next Step 2: Step 1: Environment LAO PDR We will provide you with the local time,climate and more information.
Operating the TV Using the remote control Remote Control Functions Most of your television's functions are available via the menus that appear on the screen. The remote control supplied with your set can be used to navigate through the menus and to configure all the general settings. (On/Off button) Turns the TV on or off POWER To enter the picture mode. To enter the sleep timer.
Channel up / down MEDIA PLAYER AD Select the digital key number To enter the media player Audio description How to Pair Remote Control with the TV This is a Bluetooth remote control, and before using it, please pair it with the TV firstly.The following steps are for your reference: Step 1: Press button to enter the home page. Step 2: Press button to enter the “RC pairing”. Step 3: Follow the “Settings tips page”,Press OK and Operating the TV 0~9 together. Step 4: The screen will display “Pairing..
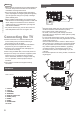
Using the TV controls 75-inch model 43/50/55/65-inch model Indicators on the TV Indicators on the TV 1 5 2 3 Operating the TV 1 Power On /Power Off The TV is off, short press the button to turn on the power. The TV is on, short press the button, the virtual button will display as shown below. 1 Channel Up Cursor Up ● Makes selections in the menu system. 2 Displays [Menu] / Source Select / Mains power On / Off switch ● Turns the TV on or standby.
Watching External Inputs 1 Connect the external equipment. (p. 6 - 7) 2 Display the [Input] menu, then select the input of the connected equipment. ATV CABLE Press OK key access. ANTENNA Select AV HDMI 1 HDMI 3 Android TV Home Note If the external equipment has an aspect adjustment function, set it to “16:9”. Using Homepage - Apps Note: This manual is for common use. Figures and illustrations in this User Manual are provided for reference only and may differ from actual product appearance.
Using the Menu Functions Using Quick Access Menu Using the Menu Functions Note: Some of the functions might be unavailable in certain sources. And for some models, certain options are not available. This section explores the menus and settings of your TV. Each menu is outlined and detailed to help you get the most from your TV. To access the menu system: 1. In TV mode, press MENU on the remote control to display the quick access list. 2.
EPG: Press OK/► to enter the Program Guide menu. ATV Favorite: CABLE Setup favorite channel list. ANTENNA Channel Diagnostic: AV Press OK/► to display some signal information on current digital channel, such as signal strength, Frequency, etc. HDMI 1 Channel Organizer: HDMI 2 This option allows you to organize channels.
Press MENU button, then select Channel and press OK to enter Digital Channel setup, press OK to select Teletext Setup. Teletext Setup: Press OK and then use▲/▼ to select preferred teletext or Decoding Page Language. Press MENU button, then select Channel and press OK to enter Digital Channel setup, press OK to select Audio Setup. Audio Setup: (1)Audio Description:Include Off and On. (2)Audio Description Mixing Level:Press OK and then use ◄/► to set Audio Description Mixing Level.
Using Media Player Media Player allows you to enjoy photo, music or video recorded on a USB Flash Memory. Document Video Photo Music Disk The picture may not appear correctly on this TV depending on the digital cameras used. Display may take some time when there are many files and folders in the USB Flash Memory. Partly degraded files might be displayed at a reduced resolution. The folder and file names may be different depending on the digital camera used.
Additional Information Auto power standby function The TV will automatically go into Standby mode in the following conditions: ●No signal is received for 15 minutes. ●[Sleep timer ] is active in the [System] menu (p. 15). Input signal that can be displayed Signal name HDMI 525 (480) / 60i, 60p 625 (576) / 50i, 50p 750 (720) / 60p, 50p 1,125 (1,080) / 60i, 50i 1,125 (1,080) / 60p, 50p, 24p 2,250 (2,160) / 60p, 50p, 24p Mark : Applicable input signal ●Signals other than above may not be displayed properly.
Troubleshooting Before requesting service or assistance, please follow these simple guides to resolve the problem. If an error message appears, follow the message’s instructions. If the problem still persists, please contact your local Panasonic dealer for assistance. Screen Red, blue, green or black spots on the screen. This is the characteristic of liquid crystal panels. The liquid crystal panel is built with very high precision technology.
Maintenance First, remove the mains plug from the socket outlet. Regular care ●Gently wipe the surface of the display panel, cabinet and pedestal by using a soft cloth. ●Wipe the mains plug with a dry cloth at regular intervals. Moisture and dust may lead to fire or electrical shock. For stubborn dirt First clean the dust on the surface. Dampen a soft cloth with clean water or diluted neutral detergent (1 part detergent to 100 parts water). Wring the cloth and wipe the surface.
Specifications Model no. 65-inch model 1460.1 x 903.0 x 290.7 mm (With Pedestal) 1460.1 x 844.4 x 84.7 mm (TV only) 43-inch model TH-43LX650K/KX 50-inch model TH-50LX650K/KX 75-inch model 1673.2 x 1035.1 x 352.4 mm (With Pedestal) 1673.2 x 967.8 x 74.3 mm (TV only) 55-inch model TH-55LX650K/KX 65-inch model TH-65LX650K/KX Mass 43-inch model 7.2 kg (With Pedestal) 7.0 kg (TV only) Power source AC 100 - 240 V, 50/60 Hz Power consumption (Rated power / Standby power) 43-inch model 90 W / 0.
Receiving systems / Band name VHF / UHF 9 Systems Systems 1 PAL B, G 2 PAL I 3 PAL D, K Aerial input Function Reception of broadcast 4 SECAM B, G 5 SECAM D, K Operating conditions Temperature 0 °C - 45 °C Humidity 20 % - 80 % RH (non-condensing) 6 PAL Playback from Special VCR’s or DVD 7 PAL 60 Hz/5.5 MHz 8 PAL 60 Hz/6.0 MHz 9 PAL 60 Hz/6.5 MHz Playback from Special Disc Players and Special VCR’s or DVD Note ●Design and Specifications are subject to change without notice.
Oss License This product incorporates the following software: (1) The software developed independently by or for Panasonic Entertainment & Communication Co., Ltd., (2) The software owned by third party and licensed to Panasonic Entertainment & Communication Co., Ltd., (3) The software licensed under the GNU General Public License, Version 2.0 (GPL V2.0), (4) The software licensed under the GNU LESSER General Public License, Version 2.1 (LGPL V2.
Information on Disposal in other Countries outside the European Union This symbol is only valid in the European Union. If you wish to discard this product, please contact your local authorities or dealer and ask for the correct method of disposal. Customer’s Record The model number and serial number of this product may be found on its rear panel.