Model No. TH-47LFT30W Operating Instructions TOUCH PANEL Edition FULL HD LCD Display English Please read these instructions before operating your set and retain them for future reference.
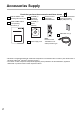
Accessories Supply Check that you have the accessories and items shown DISPLAY Edition of the operating Instructions (14) TOUCH PANEL Edition of the operating Instructions (1) CD-ROM (1) (Operating instructions) CD-ROM (1) (Driver software) Remote Control Transmitter N2QAYB000535 Batteries for the Remote Control Transmitter (R6 (UM3) Size × 2) USB cable 3 m (1) Power supply cord Note: Remote Control Transmitter is not water protection type.
Contents ■ Accessories Supply ............................................. 2 ■ Setup Procedure .................................................. 4 ■ Driver Software Installation ................................ 5 ■ Connections and Plug-Ins .................................. 7 ■ Driver Software Uninstallation ........................... 9 ■ Touch Panel Setup............................................. 10 How to Use the Driver Software.............................................
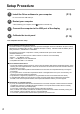
Setup Procedure 1 Install the Driver software to your computer (P. 5) Do not connect the USB cable yet. 2 Restart your computer • After restarting your computer, check appears in the task tray. 3 Connect the computer to the USB port of the display 4 Calibrate the touch panel (P. 7) (P. 15) This completes the basic setup.
Driver Software Installation Cautions • This software is driver software for Panasonic Touch Panel ZXY100 controller. Other touch panel controllers will not be supported. • Follow these operating instructions to use this software. The product may not operate if the instructions are not followed. • Do not use the product in an environment where other touch panel controller software is installed. The product may not operate correctly in such an environment.
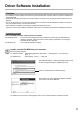
Driver Software Installation 2 Select “Panasonic. ZXY100. USB” and click “Install” at the bottom of the screen. The installation of the UPDD Driver software starts. If a security warning is displayed during the installation, click “Install” to continue. 3 When the installation is successfully finished, the screen below is displayed. Close the screen and restart the computer. • The UPDD Driver software files are saved under C:\Program Files\UPDD.
Connections and Plug-Ins 1 Activate power to the display and computer. 2 Connect the display and the computer with the USB cable. Check that the computer’s OS starts up. When connected, Plug & Play starts. Notes: • Connect the USB cable only after installing the Driver software. • Check that the USB power supply of your computer is a max. 500 mA. USB port (Rear view) USB cable Connect to the USB port on your computer.
Connections and Plug-Ins ■ Plug & Play Using Plug & Play, the display is automatically detected as a USB device when the USB cable is connected. (The operating window that appears after that differs slightly according to OS.) Plug & Play starts up according to the number of connected display. Windows Vista/7 The “Found New Hardware” window appears and the device driver is automatically installed. However, with Windows Vista, installation ends without displaying any windows.
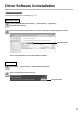
Driver Software Uninstallation Note on Uninstallation Quit the Driver software before uninstalling it. (p. 10) Windows Vista/7 1 Click on [Start] (Windows mark button) → [Control Panel] → [Programs] → [Programs and Features]. 2 Select “Universal Pointer Device Driver” from the “Uninstall or change a program” window. Click this button. Select “Uninstall/Change” to uninstall the Driver software. Windows XP 1 Select [Start] → [Control Panel] → [Add or Remove Programs].
Touch Panel Setup How to Use the Driver Software ■ Driver Software Startup The Driver software starts up automatically when the computer starts up. The touch panel works only when the touch panel and computer are connected over a USB cable. Note: The touch panel may not respond smoothly for a while after the Driver software starts up. ■ Control Panel Startup There are two ways to start up the setup panel.
Touch Panel Setup Explanation of Setup Panel Items ■ When the UPDD Driver software is started up, the UPDD console screen appears. Adjusts the touch panel controller. Specifies a touch mode of the touch panel. (p. 14) Adjusts response rate and other items of the touch panel. (Changing is not required for the current settings as they are already adjusted.) Sets the default settings of the calibration function. (Changing is not required for the settings as they are already set.
Touch Panel Setup ■ Firmware option setting “Coarse sensitivity” and “Threshold” settings for the sensor operation can be set in the Firmware options screen. Select “Hardware” from the UPDD console screen. Then select “Firmware options”. The Firmware options screen appears. Firmware options screen Closes the window without saving settings. Saves settings. Closes the window after saving settings. Displays the description (Help) of functions. Coarse sensitivity. Threshold setting.
Touch Panel Setup ■ Touch panel sensitivity and coarse sensitivity settings Response rate of the sensor can be selected with “Coarse sensitivity”. The thicker the glass thickness is set, the slower the sensor response speed is. Settings: Option 1 (1 - 3 mm), Option 2 (3 - 6 mm), Option 3 (6 - 12 mm), Option 4 (12 mm or more) Touch panel sensitivity can be changed under “Threshold”. Setting the value smaller makes the sensitivity higher. Setting the value bigger makes the sensitivity lower.
Touch Panel Setup ■ Click mode of the touch panel Touch panel can be used in the desired mouse click mode. Click mode menu “Mouse Properties” of Windows appears. Specify the click mode (touch mode). Right-click and double-click can be tested. Set to make a sound from the computer when the panel is touched or other settings. Setting: Click and drag Normal mouse operation. Drag then click Left-click action can be performed when a finger is lifted from the touch panel.
Touch Panel Setup ■ Touch panel calibration Correction is performed to align the touch position. Click “Calibrate” from the UPDD console screen. Sets the default settings of the touch position at setup. The Calibration screen appears with cross marks on the display. The first cross mark appears at the upper left corner and the subsequent mark appears at each touch. Touch the panel in order. Try to touch accurately as the calibration is performed according to the touched positions.
Before Calling for Service If you think the touch panel is broken or if it is not operating correctly, check the following before calling for service. Problem The touch panel does not respond to touch. The touch panel does not work. The touch position is out of place. The cursor poorly follows touching. 16 Check point Action to take Page Is there any device emitting strong electric wave? When the touch panel receive strong electric wave, it may become irresponsive to avoid false detection.
Before Calling for Service Problem Check point DoubleIs “Double click clicks are not support” appropriately set? recognized. The cursor jumps or points at strange positions. The setup panel settings cannot be saved. Action to take Page Set the double-click speed slower with the Mouse Settings (Mouse Properties) of Windows. ― Is there any device emitting strong electric wave around? When the touch panel receives strong electric wave, it may cause false detection.
Customer’s Record The model number and serial number of this product can be found on its rear panel. You should note this serial number in the space provided below and retain this book, plus your purchase receipt, as a permanent record of your purchase to aid in identification in the event of theft or loss, and for Warranty Service purposes.