
Operating Instructions
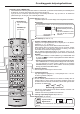

16
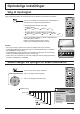
Skærmmenu vejledningen
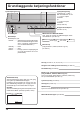
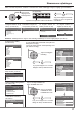
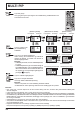
1/2Picture
Normal
Normalise
Normal
25
0
0
0
5
Brightness
Sharpness
Picture Mode
Colour
Contrast
Tint
2/2Picture
Advanced settings
White balance
Colour Management
Normal
Off
On
Advanced settings
Normal
Normalise
0
0
0
0
0
0
2.2
Off
W/B Low B
Black extension
W/B High B
W/B Low R
AGC
Gamma
Input level
W/B High R
Sound
Normal
Normalise
Normal
0
0
0
Off
Treble
0
Mid
Sound Mode
Balance
Bass
Surround
Main
Audio Out (PIP)
Normal
Normalise
Pos. /Size
0
0
0
0
V-Pos
H-Pos
V-Size
H-Size
Normal
Normalise
Pos. /Size
0
0
0
0
0
V-Pos
H-Pos
V-Size
H-Size
Clock Phase
1/2
Signal
PC
Off
Standby save
Off
Power management
Off
Auto power off
Off
OSD Language English
(
UK
)
Component/RGB-in select
RGB
Input label
Power save
Setup
2/2Setup
Screensaver
MULTI DISPLAY Setup
Set up TIMER
PRESENT TIME Setup
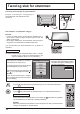
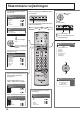
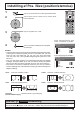
Gå til menuen til indstilling af Pos.
/Size (position/størrelse)
(se side 19)
Under indgangssignalet “RGB / PC”.
Under indgangssignalet “AV (S
Video)”, “Component” og “Digital”.
Til justeringsmenuen “Sound”
(se side 25)
Til menuen “Advanced settings”
(se side 22, 23)
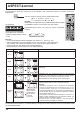
Tryk for at vælge
“On”.
Tryk for at komme ind
i menuen “Advanced
settings”.
Til justeringsmenuen “Picture”
(se side 22)
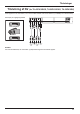
Man kan også trykke på MENUknappen
på apparatet.
Hver gang der trykkes på MENUknappen
skifte menuskærmen.
[fra apparatet]
1
Tryk for at vælge.
2
Tryk for at få adgang til hver
justeringsskærm.
1
Tryk for at
vælge.
Normal Viewing Picture Setup
Sound Pos. /Size
INPUT MENU ENTER/+/VOL
-
/
INPUT MENU ENTER/+/VOL
-
/
1
2