Information on Disposal for Users of Waste Electrical & Electronic Equipment (private households) This symbol on the products and/or accompanying documents means that used electrical and electronic products should not be mixed with general household waste. For proper treatment, recovery and recycling, please take these products to designated collection points, where they will be accepted on a free of charge basis.
Turn your own living room into a movie theatre! Experience an amazing level of multi- media excitement Contents Be Sure to Read • •• Safety Precautions ······································ 4 (Warning / Caution) Notes ··························································· 5 Maintenance ··············································· 5 Enjoy rich multi-media Camcorder Personal computer Set top box Enjoy your TV! Basic Features VCR DVD player •• • Watching TV ······························
Safety Precautions Notes Warning Caution Do not display a still picture for a long time When cleaning the TV, remove the mains plug Handling the mains plug and lead Insert the mains plug fully into the socket outlet. (If the mains plug is loose, it could generate heat and cause fire.) Ensure that the mains plug is easily accessible. Ensure the grounding pin on the mains plug is securely connected to prevent electrical shock.
Accessories / Options Standard accessories Remote Control Transmitter • N2QAYB000116 Identifying Controls Check that you have the accessories and items shown Batteries for the Clamper (2) Mains Lead Remote Control Transmitter (2) • SD CARD slot (p. 29) Function select PULL / Contrast / Brightness / Colour / •Volume Sharpness / Tint (NTSC mode) / Bass / Lift door to open Treble / Balance / Auto Setup (p.
Basic Connection External equipment and cables shown are not supplied with this TV. Please ensure that the unit is disconnected from the mains socket before attaching or disconnecting any leads. When disconnecting the mains lead, be absolutely sure to disconnect the mains plug at the socket outlet first.
Auto Setup Search and store TV channels automatically. These steps are not necessary if the setup has been completed by your local dealer. Plug the TV into mains socket and switch On 1 (Takes a few seconds to be displayed) • ■ How to use remote control You can now use the remote control to turn On the TV or turn the TV to standby mode.
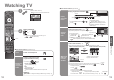
Watching TV 1 INPUT MULTI WINDOW ■ Other useful functions (Operate after Turn power on (Press for about 1 second) Mains power On / Off switch should be On.
Watching Videos and DVDs Connect the external equipment (VCRs, DVD equipment, etc.) and you can watch the input. To connect the equipment (p. 8 and p. 9) The Remote Control is capable of operating some functions of selected Panasonic external equipment. 1 INPUT OPTION SD CARD EXIT RETURN 2 3 ■ When connecting with SCART as example 2 or 3 (p. 8 and p. 9) Receives input signals automatically when playback starts Input signals are automatically identified by the SCART (pin 8) terminal.
Viewing Teletext You can enjoy teletext broadcasting, including news, weather forecasts and subtitles, if this service is provided by the broadcasters. What is FLOF (FASTEXT) mode? In FLOF mode, four differently coloured subjects are situated at the bottom of the screen. To access more information about one of these subjects, press the appropriately coloured button. This facility enables fast access to information on the subjects shown.
How to Use Menu Functions Various menus allow you to make settings for the picture, sound, and other functions. 1 ■ Overview Display the menu • Main Menu Displays the functions that can be set (varies according to the input signal) VIERA Link INPUT Picture OPTION SD CARD EXIT 2 VIERA Link Control Speaker Selection (p.
How to Use Menu Functions ■ Menu list ■ Menu list Item Menu Adjustments / Configurations (alternatives) Viewing Mode Basic picture mode (Dynamic / Normal / Cinema / Auto) Set for each input signal AV Colour System • Q-Link Settings VIERA Link Speaker Selection Controls the connected Panasonic equipment “Easy control only with VIERA remote control” (p. 33) “Speaker control” (p. 33) You can also access VIERA Link Menu directly using the VIERA Link button on the remote control.
Editing and Setting Channels The current channel settings can be changed according to your needs and reception conditions. 1 INPUT Select the channel to edit Prog. Chan. Name Sound Sys. Colour Sys.
Control Channel Audience Restore Settings You can lock specific channels and control who watches them. (When a channel is selected, a message appears; by entering the PIN number, you can watch the channel.) Resets the TV to its original condition, i.e. no channels tuned in. All settings (channels, picture, sound quality, etc.) are reset.
Input Labels Displaying PC Screen on TV For easier identification and selection of the input mode, you can label each input terminals or skip terminal that is not connected to any equipment. (To select the input mode p. 14) The screen of the PC connected to the TV can be displayed on the TV. You can also listen to PC sound with the audio cable connected. To connect PC (p.
Viewing from SD Card (Photos and Movies) ■•To open For details on SD Cards (p. 38) Photo View: The still images recorded by the digital camera can be displayed. Movie View: The moving pictures recorded by the digital video camera can be played back. 1 2 Select “Photo View” or “Movie View” EXIT 3 ■ Photo View Error display Selected photo (images that could not be loaded, etc.) ■ Movie View Recording format No.
Q-Link Functions HDMI Functions Q-Link connects the TV and VCR / DVD recorder, enables easy recording and playback. HDMI (high-definition multimedia interface) allows you to enjoy high-definition digital images and highquality sound by connecting the TV and the equipment. HDMI-compatible equipment (∗1) with an HDMI or DVI output terminal, such as a set top box or a DVD player, can be connected to the HDMI terminal using an HDMI compliant (fully wired) cable.
HDMI Functions VIERA Link “ ControlTM”∗ •• •• • You can control some functions of the connected Panasonic equipment with this TV remote control (point the remote control at the TV’s signal receiver).
External Equipment To watch satellite broadcasts To record / playback Set top box DVD Recorder / VCR RF cable or These diagrams show our recommendations for how to connect the TV to your various equipment. For other connections, consult the instructions for each piece of equipment, the table below, and the specifications (p. 43).
Technical Information Aspect Ratio Multi Window The optimum size and aspect can be chosen, and you can enjoy finer images. (p. 13) ■Auto: Auto aspect determines the best aspect ratio to use to fill your screen. It does this using a four step process to determine if the picture being viewed is a widescreen picture. If Auto aspect detects a widescreen signal it switches into the appropriate 16:9 or 14:9 widescreen mode.
Technical Information •• •• •• Cautions in handling SD Card PC connection Do not remove the card while the TV is accessing data (this can damage card or TV). Do not touch the pins on the back of the card. Do not subject the card to a high pressure or impact. Insert the card in the correct direction (otherwise, card may be damaged). Electrical interference, static electricity, or erroneous operation may damage the data or card.
FAQs Before requesting service or assistance, please follow these simple guides to resolve the problem. If problem still persists, please contact your local Panasonic dealer for assistance. Problem White spots or shadow images (noise) Screen • Check the position, direction, and connection of the aerial. Neither image nor sound is produced Is the TV in “AV mode”? Is the mains lead plugged into the socket outlet? Is the TV turned On? Check Picture Menu (p. 20) and volume.
Licence AC 220-240 V, 50 / 60 Hz Average use 561 W Standby condition 0.3 W Aspect Ratio 16:9 127 cm (diagonal) 1,106 mm (W) × 622 mm (H) 2,073,600 (1,920 (W) × 1,080 (H)) [5,760 × 1,080 dots] Woofer (Φ 80 mm) × 2 pcs, Tweeter (23 mm × 100 mm) × 2 pcs 31 W (15.5 W + 15.5 W), 10 % THD M3 (3.