
Operating instructions

32
1
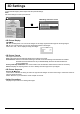
In the Picture menu, select “Memory load”.
Memory save
Memory load
Memory edit
1
select
2
access
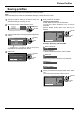
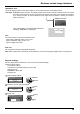
Loading profi les
Load profi les and apply the picture adjustment values to the display as follows.
Notes:
•
Loaded profi les are stored in memory according to the selected input terminal. (see page 17)
• When the settings are locked in “Extended life settings”, profi les cannot be loaded.
Picture Profi les
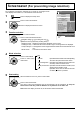
2
Select the profi le to load.
Memory load
3.
[
]
4.
[
]
MEMORY2
MEMORY3
MEMORY4
MEMORY1
2
.
[
]
1.
[ ]
1
select
2
set
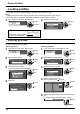
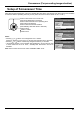
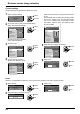
Delete or rename profi les as follows.
<Deleting profi les>
1
In the Picture menu, select “Memory edit”.
Memory save
Memory load
Memory edit
1
select
2
access
2
Select “Memory delete”.
Memory edit
Memory name change
Memory delete
1
select
2
set
3
Select the profi le to delete.
To delete all profi les, select “All delete”.
Memory delete
2.
[
]
3
.
[
]
MEMORY2
MEMORY3
All delete
4
.
[
]
MEMORY4
MEMORY1
1
.
[
]
1
select
2
set
4
Select “Ok”.
Memory delete
Cancel
Delete the ”MEMORY1” data.
Ok
1
select
2
set
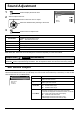
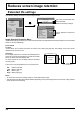
<Renaming profi les>
1
In the Picture menu, select “Memory edit”.
Memory save
Memory load
Memory edit
1
select
2
access
2
Select “Memory name change”.
Memory edit
Memory name change
Memory delete
1
select
2
set
3
Select the profi le to rename.
Memory name change
1
.
[
]
2.
[
]
3
.
[
]
4
.
[
]
MEMORY2
MEMORY3
MEMORY4
MEMORY1
1
select
2
set
4
Enter a name for the profi le.
Entering profi le names page 31
Memory name input
█
EMORY1M
Ok
ABCDEFGH I JKLM All delete
N O P Q R S T U V W X Y Z Delete
Space
abcde fgh i j k lm
nopqr s t uvwxyz
0123456789
!”#$%&’ +–/=?
_` |~<>() [ ] { } ,
@\ ˆ
.;:
Cancel
1
select
2
set
5
When you fi nished entering the profi le name, select
“Ok”.
To cancel renaming the profi le, select “Cancel”.
Ok
Cancel
1
select
2
set
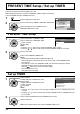
Editing profi les
PC
Memory name: MEMORY2
NANODRIFT
16:9
When profi le is being loaded,
profi le name is displayed.