
Operating Instructions

INPUT
MENU
VOL
ENTER/
+
/
-
/
10
English
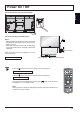
Basic Controls
MENU Screen ON / OFF
Each time the MENU button is pressed, the menu screen will switch.
Normal Viewing Picture
Sound Pos. /Size
Setup
Volume Adjustment
Volume Up “+” Down “–”
When the menu screen is displayed:
“+” : press to move the cursor up
“–” : press to move the cursor down
Remote control
sensor
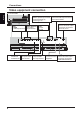
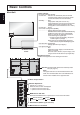
Main Power On / Off Switch
Brightness Sensor
Detects the brightness in the viewing environment.
Main Unit
Power Indicator
The Power Indicator will light.
• Power-OFF .... Indicator not illuminated (The unit will still
consume some power as long as the power
cord is still inserted into the wall outlet.)
• Standby ........ Red
Orange (When “Slot power” is set to “On”.)
Orange (Depending on the type of the function board
installed, when the power is supplied to the slot)
Orange (When “Control I/F Select” is set to “LAN”.)
• Power-ON ...... Green
• PC Power management (DPMS)
......................... Orange (With PC input signal.)
When this function is set to On, it operates under the following
conditions to turn the power on or off automatically.
When no pictures are detected for 30 or so
seconds during PC signal input:
Power is turned off (standby); the power
indicator lights up orange.
When pictures are subsequently detected:
Power is turned on; the power indicator lights up green.
• DVI-D Power management
......................... Orange (With DVI input signal.)
• No signal power off
......................... Red
Equipment power supply is turned Off when
there is no signal.
When this is set to “Enable”, the power supply of the
unit goes Off 10 minutes after the input signals stop.
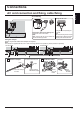
Enter / Aspect button
INPUT button (INPUT signal selection)
SLOT: Terminal board (optional accessories) insert
slot (see page 3 )
Note:
The upper side slot is for terminal board with 2-slot
width. The terminal board with 1-slot width does not
function when installed in the upper side slot.