
user manual


Menu selection
11 (E)
ENGLISH
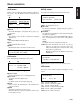
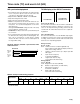
SETUP screen
[CLOCK]
<02/04/11 00:00:00>
VER screen
[VERSION]
APP Ver.1.02
APP Ver.x.xx Application
FRNT Ver.x.xx Front panel (FPGA)
PCII Ver.x.xx PCI I/F (FPGA)
UPCN Ver.x.xx Format converter (FPGA)
DVCC Ver.x.xx DVC control (FPGA)
DWNC Ver.x.xx Down-conversion
CLOCK: The unit’s internal PC clock is set. Use the [1]
(right) or [!] (left) key to move the item to be
changed, and change the numerical value using
the [#] (up) or [2] (down) key.
Operation is returned to the SETUP screen by the
CANCEL key.
BACK: Operation returns to the menu selection screen.
The version of the software program used appears on this
screen.
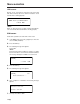
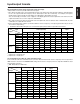
CLIP screen
12345678
DEL
1
CLR BACK
00:00:00:00
12
345
1 CLIP ID
The CLIP ID display is changed by the [#] (up) or [2]
(down) keys.
2 DUR
The duration of the clip whose CLIP ID is displayed
appears here.
3 DEL
The CLIP ID displayed will be deleted.
4 CLR
All the CLIP IDs will be cleared.
5 BACK
Operation will return to the menu selection screen.
Names of the recorded clips and their durations appear on
this screen. The clip deletion method is selected on the
screen.
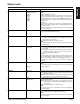
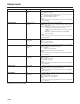
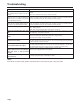
The setup menu settings are performed on this screen.
Errors and warnings are displayed on this screen.
LOG screen
11:11:11 TEMP ERR
SILNT BEEP
12
34
1
[USER-SETUP]
HD PB FMT 1080/24P
12
1 Time occurred
The time at which the error occurred appears here.
2 Error name
The name of the error appears here.
<Note>
For details, refer to the error table (page 19).
3 SILNT
This is set when the alarm beep is to be muted when an
error has occurred.
4 BEEP
The alarm sounds when an error occurs.
When the SET key is pressed, operation returns to the
menu selection screen.
Use the [1] (right) or [!] (left) keys to move the cur-
sor and select DEL, CLR or BACK.
USER: The parameters are set.
1 Menu item
The menu item display is changed using the [#] (up) or
[2] (down) key.
2 Parameter
The settings in the parameters can be selected using the
[1] (right) or [!] (left) key.
If the SET key is pressed until "COMPLETE" appears
after a setting has been selected, the setting will be
saved.
<Note>
For details, refer to the setup menu on page 13.