Bedienungsanleitung Deutsch Italiano TX-24FSW504 TX-32FSW504 TX-40FSW504 TX-43FSW504 TX-49FSW504 TX-32FSW504S TX-43FSW504S TX-49FSW504S 6 ! &7 8 9:4 3;:9< Detailliertere Anleitung siehe [eHELP] (integrierte Bedienungsanleitung). (S.
Inhaltsverzeichnis Bitte unbedingt lesen 3 "$! & ================================================= 3 "$ $ ! ( 0 $( ========================================= 9 !& + ! ? # $@ =========================================== 7 2 + ! & 4 $ ==================================== 8 3 $ ! & ( ! & ======================================11 2 "$ , ========================================================12 2 & % ( ! =============================16 !(
Wichtiger Hinweis 4 $ ! +& 5 "$ ! ! ! - "$ + & 2 ! & & @ "$! Hinweis für die Funktionen DVB/ Datensendungen/IPTV W# 2 & # ! ! (@& "$ & (( ! .
Sicherheitsmaßnahmen J( ) + $ ! ( "$ & 4 "$* !5 & 5 ( # + & # !! "$ ! $ 3 & 7 Netzstecker und Netzkabel Warnung ? $ !5 ! " 5,& "$ !5 ! " + & ! J & @$ "$ + ! ! Hinweis !5 ! " ! & !L- U "$ 4 $ ( ! HH:VH9: ;:QS: 5 3 "$ - & # ! # "$ # !5 ! " !* & !5 ! "
Warnung ! ) *! "$! + ! # J ! & # ! 5 4 $ 5 !$ +! "$* & 5 ( +,$ !5 & # # . @ "$ + "$ "$ $ ! ( 0 $( ( 7 • % + & (-+ $ & 5 "$ * ! +,0 ! 4 $& *! $ ! • @# 4 $ "$ ! & @ • & "$ 4 $ "$! ,# .
2 - "$ +& 4 ! + 5 5 ( ! 4 $ 3 2 ) *! # ! + ) *! "$ H 9 ) 5 ; ) 5 & ! - "$ 2# ! $ # % !@ & +& ! ! "$ ! 5 !*! 4 $ 5 ( "$ !5 ) *! % ! # ! "$ ! ( 4 4 $ ( ! ( !5 "$ ! "$ 0 Ventilation Vorsicht & ,& !5 6( ! O: "(<
Mitgeliefertes Zubehör Netzkabel (S. 12) 24-Zoll-Modell 32-Zoll-Modell 43-Zoll-Modell 49-Zoll-Modell Standardzubehör 40-Zoll-Modell Fernbedienung (S. 16) H]2^%::OO_: H]2^%::OHOO 6 8 H94 3;:9< 6 8 KH4 3;:9< 6 8 9:4 3;:9< Batterien (2) TS 6 8 9K4 3;:9< (S. 17) 6 8 9`4 3;:9< H]2^%::OOP_ 6 8 KH4 3;:9 < Bedienungsanleitung 6 8 9K4 3;:9 < Pan-Europäische Garantie 6 8 9`4 3;:9 < Standfuß 24-Zoll-Modell (S.
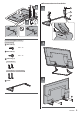
Aufstellung des Fernsehers 32-Zoll-Modell Schraube (3) K j O9 Schraube (4) 9 j O; Zusammenbau / Abnahme des Standfußes Halterung 24-Zoll-Modell Schraube (2) 9 j OH Standfuß Platte Zusammenbau des Standfußes Vorbereitungen $( ! + 0 4 $ ( - " & ! ! 4 $ ( ! ( % "$ (- "$ ! + # "$ "$ 6 " < + ( 2 # ! ! "$ + "$ + ! "$ & @0 4 $
B Zusammenbau des Standfußes 3 1 A C D 2 40-Zoll-Modell 43-Zoll-Modell 49-Zoll-Modell 2 Schraube (4) ; j O; Schraube (4) 9 j OH Halterung (2) 40-Zoll-Modell 43-Zoll-Modell 49-Zoll-Modell Platte 3 B Deutsch 9
Abnehmen des Standfußes vom Fernseher 3 3 $ ! & # !5 4 $ - " (, ( ! ! + 0 + & ( 0 7 24-Zoll-Modell 1 !+ "$ # ( 4 $ 2 ? $ ! + 0 ( 4 $ # 32-Zoll-Modell 1 ! 4 $ ( ! ( % "$ (- "$ ! + # "$ "$ + ( 2 # ! ! "$ 2 !+ "$ # ( 4 $ 3 ? $ ! + 0 ( 4 $ # 4 !+
Wandhalterungsmontage ? ( # (-+ $ 3 $ ! & "$ # !! " * '$ *$ 40-Zoll-Modell 43-Zoll-Modell 49-Zoll-Modell @"$ +, % + ! & & 3 $ ! & T," ! 4 $ 40-Zoll-Modell 43-Zoll-Modell 7 H:: (( 24-Zoll-Modell @"$ +, % + ! & & 3 # $ ! & #7 H:: (( 49-Zoll-Modell T," ! 4 $ 7 9:: (( #7 H:: (( O:: (( 6 ! "$!< Länge der Befestigungsschraube O:: (( 40-Zoll-Modell Mi
5 HDMI1 - 2 Anschlüsse (S. 13, 14) 6 Satellitenbuchse "$ ! $ 2## & & 5 &! ? !5& *! 2 "$ # & $@ "$! 5 ( + (+ & 4 $ % !! "$! # &! + !5 ! " !5 ! " 5 5 $ # & "$ . # "$ 0 ! ,+ # ( 2 "$ 0 # L- % "$ . # ! " ! ! !* & $! ! ' .
DVB-via-IP-Client-Verbindung 4 $ % ' R ! + & % ' ( ! 2 M' (- ! # & "$ ( & ! (! & 5 (-+ & (-+ $ # & 5 ( % ' ( ! ( 2 . # $ 5 ! AV-Geräte DVD-Recorder / Blu-ray-Recorder, usw. Kabelverbindung Kabel Kabel 2 . # 62#& "$ (!< 2 . # ( ! ! #& "$ (! ! & 6 < 4 .
Netzwerk Weitere Anschlüsse J( ' ! ! ! !5 5 @ ! % !# !5 (& # & + "$ 3 "$! ,# % !# !5 ! +,& "$ 5 " + ! & '$ 4 "$$* % ! ' ! ! ? & & +, . # # & $! # & "$! & !5 # & ! ! ! # ! ! ! 4 $ (S. 18) DVD-Player 6R[ [ ) *!< Kabelverbindung 6% 6 ' ! ! ? & & 2 .
' .
Anordnung der Bedienelemente Fernbedienung ! $ $ & 2 , & * ! # ! & & 7 OK % !*! & 2 $ ! & ," ! "$ 3 $ & ((- ! ( "$ + & (( (5 "$ ! 2 + + & ((! # 8 [Optionsmenü] ,$ ! [-! +, % 4 ! 9 Farbige Tasten (rot-grün-gelb-blau) 2 $ & ! 4 ! % & "$ 10 Erhöhen/Ve
Einlegen / Entfernen der Batterien \++ "$ "$5 $ 4 Wahl des Eingangsmodus 3 $ ! ," # & , "$! "$! ! [Haupt-Menü] R K & ," ! $ ! ( -!( , 5 5 & OK 6 ( , L ! (< 5 Erhöhen / Verringern der Programmplatznummer R + Q # 6 ( , L ! (< "$ 0 6 Erhöhen / Verringern der Lautstärke R Q "$! 6 ( , L ! (< 7 Netzschalter ? ( Q 2 "$ ! ) *! J( 2--
Wählen Sie die gewünschte Sprache Erstmalige automatische Einrichtung Wählen Sie [Zu Hause] % ( ! "$ ! ! ( ! "$ "$ "$ +,&# 4 $ * & ! ! ! [-! 5 "$! & 4 $ & # ! + $ # "$! "$! & +,$ ! 5 "$! & '$ 4 $ # ! ( 4 "$$* & (( % !! ! 2 "$ , 6 OH O;< $ $( ! & 6+ + "$< & "$
Betrachten von Fernsehprogrammen 1 Schalten Sie den Fernseher ein 6 < 64 # &< 5 ( !5 "$ ! & "$ ! ! 6 OP< ? &! ' + ( ! ! ( ! T % "$ ( +, & 4, ' + ( ! ,# % ! # ! & $ 6 "$ "$ ? " M % !! 5 ! M 4 ! < 2 Wählen Sie den gewünschten Modus U +,&# & - "$ ! .
Verwendung von eHELP " % "$ # & 6 $ < 3*$ ( $ O ! % "$ # & & 5 &! ! ( 4 $ ! & ! ! ! + + ! 5 4 ! !5 * ! ! 5 % & & #! 1 ? ( \++ T + 5# "$ ( 6 Zeigen Sie [eHELP] an 2 5 & , ( ? (( $ & ( ! % "$ # & 6 # & % "$ # & < [Hilfe] [eHELP] 6T !< 4 ! 4 $ - ,+ "$ "$ ? "
Gebrauch der Menüfunktionen "$ ,# + $ @ +& + '$ # !5 - 5 + "$ ! & % 4 ! (@& "$ Einstellung über Pegelsteller "$* + Y - "$ Weiterschalten zur nächsten Anzeige .
Einstellungen von Bild und Ton ändern Ton Bild 1 ' + ( ! 5 ! $ 6 "$ "$ ? " M ! & M % < ? ( ? ," !5 ! + ! ! & [Grundeinstellungen] im Bildmenü Rufen Sie die Menüanzeige auf und wählen Sie [Bild] 1 Rufen Sie die Menüanzeige auf und wählen Sie [Ton] 2 *$ Ton 2 *$ Bild ? & + ? & + 2 Wählen Sie [Modus] 2 2 *$ 2 *$ ? & + ? & + 3 Den gewünschten Bild
5 Setup-Menü Wählen Sie [Auto Setup] 2 *$ ! 5 ! ( ! "$ 2# ! (( & (-+ &# 4 ! ! $! 5 +,& & "$ ( 2# ! (( & & +,$ ! & *$ ! ! #& ! ((! 2 + ,$ . ! & & @ "$! 3 . "$ & ' + "$ ! ( & - ! .
Abstimmen und Bearbeiten von Programmen TV>IP 1 Wählen Sie TV>IP 2 Rufen Sie die Menüanzeige auf und wählen Sie [Setup] 2 *$ Setup @ ! # ! (( ! '$ # & - & (( ! , "$! .
? ( "$ Q "$ # . - ! Hinweis 3 " ( ! ( 4 . # ( 2 &( & "$ ! *$ # # ! & ((- ! RT 6) , < ! ! [Favoriten bearbeiten] DVB-Favoritenliste bearbeiten @ ! '$ # & - & (( ! 6# 5 97 4 ! O # 9< - "$ 2 + 4 ! ! ! 1.
DVB Favoritenliste bearbeiten 3*$ "$ R + ( . 4 ! ! # + ! @ 4 ! ! # # ! "$ # & ((- ! 6) , < ! Kindersicherung @ # ! ((! . * Q2 &* & - ( ? & ++ 5 # "$ * 3 & - ! . Q & & & *$ ! "$ ! & ? ( 2 $ & (( ( ' & & # 3 ! ' + ( ! $ 6 "$ "$ ? " M 4 ! M .
Ansehen von Inhalten externer Geräte "$ 0 '$ I! ) *! 6 RT < ( ! ' $ ! $( ,# &* & ,# ! & & & # @ 3 ! ' + ( ! $ 6 "$ "$ ? " M 4 $ M ? !5& *! < 1 Rufen Sie das EingangsauswahlMenü auf 2 Wählen Sie den Eingang, an den das Zusatzgerät angeschlossen ist ) *! !L- 4 ! R T " L % L " L P: L . & % L " .
Betrachten von Videotext % ! I! ! $ ! "$ ( I! + ( ! & ! $ ! 1 ' I ! & 5 &! 6 2 5 & ! U "$ ! "$ "$< J ! ! (( << 01 02 03 04 05 06 07 6T !< Q 6) , < 2 $ & , "$! $ ( # "$ 4 ## 2 ! ! 2 6) #< FLOF-Modus (FASTEXT) 6# 4 [4 ,# ! & & 642 8 << '( 4 [4 "$ $ ( # "$ ! "$ "$ 4 # ( ! % "$ (
Verwendung des Programmassistenten ) ! "$ & (( ! ! 6 "! " & (( ) )< (@& "$! '$ ? & ++ + & (( + ( ! 5 ( ( ( ! & ! $ ! & (( & (( *"$ ! # & 6 #$* & & ( < % ( !( & "$ ! 4 $ ) *! * & 3 "$ & "$ ! ! & ? ! ! "$ # (- !! & (( ! ! & # ! "$! 5 & # 2 & 3 ! ' + ( !
Aufzeichnung auf Festplatte über USB @ & ! 4 $- & (( + & "$ J % 4 !- !! + $( + "$ 2 ! # - 3 ! 5 $ ! $ 6 "$ "$ ? " M 2 +5 "$ < Vorbereitung "$ 0 J % 4 !- !! ( ! ( J % .
Zum Anhalten von [One Touch-Aufzeichnung] [Permanente Aufzeichnung] ? "$ ! + ! ! & + J % 4 !- !! + & "$ 4 # & " /PK1 & ! ! ! 6 HP< Setup Aufzeichnung ( ! 2 +5 "$ & 2 ! 2 2 $ 2 Wählen Sie die maximale Aufnahmezeit 1/2 Setup Aufzeichnung - "$ [ "$ 2 +5 "$ & O_: ! 3 ( ! 2 +5 "$ & $ ! +& 5 "$ ! ' $ ! +, ( ! 2 +5 "$ & & @ "$!
. - ! .
Verwenden des Media Players ! ( L @ 4 ! & # + ( J % 4 $ - "$ Q ( !5 ) *! +& 5 "$ ! ' $ ! ( ! ( 4 $ + + ( ! ! J % 4 !- !! +& 5 "$ ! 3 ! 5 $ ! $ 6 "$ "$ ? " M L < 2 Rufen Sie [Apps] auf, und wählen Sie [Media Player] 2 *$ ? & + 3 Wählen Sie das Gerät 2 *$ 4 ! 7 ! # ( ! & ! ( +& 5 "$ !
Kabelverbindung Heimnetzwerk verwenden (für DLNA und Internetzugang) DLNA® 4 $& *! ! 2 R ! + r 2 6 & ! & ! 2 " < ! ! & & ! ! & *! + "$! & 2 R ! + ! & 2 0 ( ! $ & ( ( !5 - # ( 3 ! 5 ( $ ( + ! & 3 2 4 ! !5 (@"$! # @! & ( !5 (& # & @ 4 ! "$
Verwenden von DLNA®-Funktionen & "$ "$! & !5 # & !5 ! & #& "$ Inhalte wiedergeben, die im Media Server gespeichert und freigegeben sind Freigeben der Inhalte dieses Fernsehers für ein anderes Gerät im Netzwerk @ ' $ ! 4 $ ,# ) *! '$ ( ( !5 & "$ ! & # 3 ! 5 $ ! $ 6 "$ "$ ? " M !5 < - "$
Häufig gestellte Fragen % ( !@ & + .
Pflege und Instandhaltung Ziehen Sie zunächst den Netzstecker aus der Netzsteckdose.
Technische Daten Ton Lautsprecherausgang 24-Zoll-Modell TV S 3 6K 3 q K 3< 32-Zoll-Modell 40-Zoll-Modell 43-Zoll-Modell Modell-Nr. 49-Zoll-Modell H: 3 6O: 3 q O: 3< 24-Zoll-Modell 7 8 H94 3;:9 32-Zoll-Modell 7 8 KH4 3;:9 8 KH4 3;:9 40-Zoll-Modell 7 8 9:4 3;:9 Kopfhörer K ; (( ! .
Empfangssysteme / Empfangsbereiche DVB-S / S2 Satellitenschüssel-Eingang % "$ 4 L- P; : & ! ! ! ! 6 )H )9 2 R6 HS9< ) R6 HS;<< Antenneneingang T " 4 Z 5# "$ V `;: 5 # H O;: 5 4 Q J 4 ZR V O : Betriebsbedingungen Temperatur DVB-C & ! . # ! 6 )H )9 2 R6 HS9< ) R6 HS;<< : R K; R Luftfeuchtigkeit H: ¯ # _: ¯ 4 "$! & ! 6 $ .
Entsorgung von Altgeräten und Batterien Nur für die Europäische Union und Länder mit Recyclingsystemen L(# + ! - " & Q % & ! ( ! # ! ! & # "$! ! "$ ! "$ ! % !! "$! & ( (, & & # , + % !! +,$ ! ! # "$! % !! 5 % $ & 2 + # ! & #5 5 ( T "L" & & (*0 & !5 "$ % ! (( & 5 !* & (( - ! 5 !5 ! "$
Istruzioni per l’uso Italiano TX-24FSW504 TX-32FSW504 TX-40FSW504 TX-43FSW504 TX-49FSW504 TX-32FSW504S TX-43FSW504S TX-49FSW504S 6 (( & 7 8 9:4 3;:9< Per istruzioni più dettagliate, consultare [eHelp] (Istruzioni per l’uso integrate). R ( ! 55 - (pag.
Indice Leggere con attenzione 2 (- ! ! ================================================= 3 " 5 - " 55 =================================== 9 2"" ============================================================ 7 ' ! 5 ! ===================================== 8 ' ! 5 ! ++ ( ! && - ! ==========11 R & ( ! ======================================================12 ' ! + " 5 " ( ===================================16 (
Avviso importante ! !! + ( 5 & ! ! ! ! !! & ! - " 6T " " - " ! M 4 5 M '(- ! 5 & < Avviso per le funzioni DVB / trasmissioni di dati / IPTV ] ! ! µ - & !! ! " + ( !¶ & ! 6 && ! & ! H:OP< 5 & ! ! ! % Q H 6 )H )9 2 R6 HS9< ) R6 HS;<< 5 & ! " % R 6 )H )9 2 R6 HS9< ) R6 HS;<< 5 & !
Precauzioni per la sicurezza " ! # ! - " " !! "$ " + ! !! ! 5 - " 5 - ! ! & ! 7 Spina e cavo di alimentazione Avvertenza Z " ! ! "" (( ! ( ! - " ( ! 5 - " ! Nota ' ! - - " ( ! 5 # ( - ] ! ! µ - & !! ! - + 5 " ´ ( ! 5 R2 HH: H9: ;:
Avvertenza " " ! - 5 ! # ' ! - ! ## " " & - ( ! ! - ! " # (# - ! ! !! (- " - " 5 Z 7 • J ( # -- ! " & ! - !! ! • J " ( # & ! ( " ! • 2 " "$ ! - & # ( # "$ ! • - 5 ! ( #
+ " - # ( " ! ´ !! " !¶ ! ! " µ - # "$ ! - & + - ! && ' Z ! " - & ! " ´ ! !! - " - "" Q - & ( ! Z "" Ventilazione Precauzioni " - 5 ++ " ! 6 ( O: "(< ! ! - ! "" "" ( " "$ - ! ## " & ! ! " - ! " " (- ! O: O: O: O: 6"(< ! " ! 5 (-
Accessori Cavo di alimentazione (pag. 12) Modello da 24” Modello da 32” Modello da 43” Modello da 49” Accessori standard Telecomando (pag. 16) H]2^%::OO_: Modello da 40” H]2^%::OHOO 6 8 H94 3;:9< 6 8 KH4 3;:9< 6 8 9:4 3;:9< 6 8 9K4 3;:9< 6 8 9`4 3;:9< Batterie (2) R6 H]2^%::OOP_ (pag. 17) 6 8 KH4 3;:9 < 6 8 9K4 3;:9 < 6 8 9`4 3;:9 < Istruzioni per l’uso Garanzia pan-europea Piedistallo Modello da 24” (pag.
Installazione del televisore Modello da 32” Vite di montaggio (3) K j O9 Vite di montaggio (4) 9 j O; Montaggio / rimozione del piedistallo Staffa Modello da 24” Vite di montaggio (2) 9 j OH Piedistallo Base Montaggio del piedistallo Operazioni preliminari ! - ! ! ´ (# && " " ! - " "$ ( ! # - ( # - ! 6" - ! "" < J! 55 ! - !! ! # - ¼ & !
B Montaggio del piedistallo 3 1 A C D 2 Modello da 40” Modello da 43” Modello da 49” Vite di montaggio (4) 2 ; j O; Vite di montaggio (4) 9 j OH Staffa (2) Modello da 40” Modello da 43” Modello da 49” Base 3 B Italiano 9
Rimozione del piedistallo dal televisore T ( - ! & ! ( Z ! 55 ! ++ ( ! && - ! - (# ! Modello da 24” 1 T ( ! ( ! && ! 2 ! "" - ! ! Modello da 32” 1 R " ! - " "$ ( ! # - ( # - ! 2 T ( ! ( ! && ! 3 ! "" - ! ! 4 T ( !
Installazione della staffa di montaggio a parete Modello da 40” Modello da 43” Modello da 49” 4 - ´ ! 5 ! ++ ( ! && - ! ! - ! ! Modello da 40” Modello da 43” 7 H:: (( # R ! !! ! " " - "Z ! ! ++ ( ! && - ! "" ( ! #7 H:: (( Modello da 49” 7 9:: (( Modello da 24” 4 - ´ ! 5 ! ++ ( ! && - ! ! - ! ! #7 H:: (( 6 ! !
5 HDMI1 - 2 Collegamenti (pag. 13, 14) 6 Terminale satellitare (pag.
Collegamento client DVB-via-IP ] ! ! µ ! ! + 5 " ! % ' - ¸ " & ! % ' " (- ! # 2 M' - " ! ( ! ( & " & " & % ' " " 2 Dispositivi AV Registratore DVD / Registratore Blu-ray, ecc.
Rete Altre connessioni ! 55 5 ' ! ! µ " (# ! ! # & - 5 ! # & & ! - ! 5 - ´ (# ! ' ! ! - " " # ! ´ (- ! 5 " ! ¶ - ( ! 55 ! (pag.
R ' HDD USB (per registrazione) 2(- + " ! " ! ( ++ J - ! J % H - " ´ J % !! & " ! - 6T " " - " ! M T & ! 5 < 2-- ""$ ! ! 6 !! "" < Cuffia + ( 5 (- ! 5 ( " ! - 6T " " - " ! M '(- ! 5 M 2 < TV 6( VIERA Link J 'O H - " ' T2 !! & " ! - 6T " " -
Identificazione dei comandi Telecomando ] ! 5 - ! ## ! !! ( + " ! 5 - 7 OK " + ( 5 " ! ( - 5 ! - 5 " - " (# " ( ! " 55 ! " 8 [Menu opzioni] '(- ! 5 (- " -5 - 55 5 "" 9 Tasti colorati (rosso-verde-giallo-blu) J! - 5 " ! 55 + 5 10 Volume Su / Giù 11 Tas
Installazione / rimozione delle batterie 4 Selezione della modalità di ingresso ( - ! ! ( ! + Z 55 ! ( !¶ ! - - [Menu principale] - ( ! - " " K " 55 ( - " - ) " - OK 6 ! ( ( < 5 Canale Su / Giù R Q ) ¼ 6 ! ( ( < 6 Volume Su / Giù R ! Q ! 6 ! ( ( < R$ 4 !! 5 - !¶ " !! 6q < Indicator
Impostazione della connessione di rete Prima sintonizzazione automatica Selezionare il paese 2 " - 5 ! 5 & ( ( 55 ( ' " 55 # (# 6 µ - # ( ( 55 1::::¦< Spuntare la modalità del segnale del televisore da sintonizzare e quindi selezionare [Avvio ATP] 7 ! 55 5 6 " " " - # < - ( ! "$ "" ! & ! ( ! " ( ! " " " - # ( ! -5 (
Visione dei programmi TV 1 Accendere il televisore 6 < o 6! " ( < 2"" ! ´ ! !! "" Q - & ( ! 6- & OP< 55 # + ( 5 # "$ ( - " " + ( 5 + 5 ( ! (- ! 5 " ! - 6T " " - " ! M && - ( M 4 5 !¶< 2 Selezionare la modalità ( !¶ 5 # - ( ( 55 ! 3 " Selezionare un canale &¼ o 5
3 Come utilizzare eHelp Selezionare l’opzione (- 7 - " ! ! 5 - ´ ! & ! ! + " - & 5 - ¼ !! & ! - " - ( & " " + 5 1 5 Visualizzare [eHelp] "" ! "$ ( ! - " ! Q " (- - " ! o [Aiuto] [eHelp] " " 5 6 - ¼ & O - & < - ´ "" ! µ & ¶ ! ! & ! ´ "" - 55 ! "$ ( ! "
Modalità di utilizzo delle funzioni dei menu ' ( ! ( " ! " + & (- ! 5 - (( & ´ ! + 5 1 Regolare usando la barra di scorrimento ! 55 50 - ! ( ! " (# ( ( 55 Selezionare la schermata successiva " 55 # (# Visualizzare il menu "" Immettere i caratteri tramite il menu di 55 + 5 "$ - (- ! ! 6 # & & < 2 Selezionare il menu immissione libera
Modifica delle impostazioni delle immagini e dell’audio Audio 1 Immagine 1 + ( 5 ! ( ! " ! - 6T " " - " ! M '(- ! 5 M '(( & < - ! ´ !! '(( & (- ! 5 - + ! [Impostazioni originali] nel menu Immagine Visualizzare il menu e selezionare [Audio] 5 Visualizzare il menu e selezionare [Immagine] Audio "" 5 Immagine 2 "" Selezionare [Modo audio] 5 2 Sel
Risintonizzazione dal menu Funzioni 5 T ! 55 ! ( ! " ( ! " " ! " ( ! ] ! + 5 µ - # ! " µ & ¶ ! ! & ! ! 55 ! ( !¶ 5 ! !! (- ! 5 ! 55 5 - " ! & " " ! ' ( ' " 55 # (# µ " - ! 55 " # "" ! ! µ ! ! " (- ! ! [Sintonia manuale] in [Menu sintonia] (menu Funzioni) !! & " !
Sintonizzazione e modifica dei canali DVB-via-IP 1 Selezionare DVB-via-IP 2 Visualizzare il menu e selezionare [Impostazione] 5 Impostazione "" 3 Selezionare [Menu sintonia DVB-via-IP] 5 ¹ - # ! 55 " " ! - - " - + ! ! " ! "" !! & " ! - 6T " " - " ! M M ! 55 5 ( + " " < 1 Selezionare la modalità 2 Visualizzare il menu e selezionare
" (# Q - ! - 5 " 6 < [Editor Preferiti] Lista dei canali DVB preferiti " ! - - " - + ! ( !! ! 6+ 97 + ! O 9< '(- ! 5 - 5 ! " - + ! - # 1R ! & ¦ # + ( 5 "$ ( ! ) o 1 5 ( 55 ! " 6 7 R " -! ! < (- 7 % % ! + ! 6 < " "
Modificare la lista dei canali preferiti DVB ´ " - + ! - ¸ ( + " ! ( ! " ! " ´ " - + ! - ! " 6 < 5 - 5 Sicurezza bambini ¹ - # # "" - ! " " Q ! ( & 2 - ( ! ´ "" & ! ] 5 " Q & # "" ! -- ( && 55 " (( !! ( ' !! & " ! - 6T "
Visione degli ingressi esterni R & " (- ! ! 6 RT "" < - 55 (( & ´ & 5 ! !! & " ! - 6T " " - " ! M M R (- ! ! < 1 Visualizzare il menu di selezione ingresso 2 Selezionare la modalità di ingresso del componente selezionato - " (- ! + 5 !¶ R " T & ! ! !! !! % L " P: !! !$ ! % L " !$ ! 71 VCR 72 J! 55 & !
Visione del Televideo ' 5 + ( 5 ! ! + ! ´ ( !! ! 1 Selezionare Televideo R ! 55 - & ´ " ! ! " ´ ( !! ! < ( - & " << 01 02 03 04 05 06 07 " !! ! "$ - ! ## " ( !! ! !! & " ! - 6T " " - " ! M M < >> 17:51 28 Feb % " 6 " ! ( ! ! [ < [ µ - ! " ( & ( ! 5
Uso della Guida TV ) ) !! " - & (( 6 )< " ! 55 "$ ( ! - & (( !! ( ! ! ( - & (( - - ( !! & 6 " ´ ( !! ! < ] "" ! - - ( ! ! ( - ! - - ¼ !! ( 55 5 ) " (- ! - ! ## "$ " ( ! 2 & " !! & " ! - 6T " " - " ! M M
Registrazione HDD USB ¹ - # & ! - & (( ! & ! J % " & ! - - "" ( ! ( !! & " ! - 6T " " - " ! M T & ! 5 < Impostazione dell’HDD USB 4 ( !! (- ! ´ J % " Z ! ! - - ! - & ! 5 ´ J % ¶ + ( !! ! ! ( + ( !! 5 ! !! ! " " ! ( " + & (- ! 5 " & ´ J % "
[Registrazione One Touch] T & ! (( ! ( ! - & (( " ! ´ J % + " "$ " " ! " ( 1PK¦ 6- & HP< Per arrestare [REW LIVE TV] Imposta registrazione T 3 ' 5 [++ Selezionare il tempo massimo di registrazione ( ( 55 1/2 Imposta registrazione ! T 3 ' " ! ! & ! ! - T 3 ' & " " ! T 3 ' ! !! " ! ! & ! ! ( ! ! ( ! " ( !
5 " ( " "" ! Programmazione timer [ 5 Q + Q ! 6 55 5 ! ( ! " < 7 -- 5 & ! " ! ( T & ! 5 & -- ! 6 - # < ] ! + 5 µ & (( 5 ! ( "$ µ " ! ! + ( 5 ) p 5 + - & (( ( + " ! ´ ( !! ! ´ ! " ! ( & " (# ( ! - ! "$ Z ! + 5 ! ¶ ++ # "Z
Uso di Media Player 3 Selezionare il dispositivo 5 L " ! - + ! ( " & ! ! ( ( + $ J % Q - ! ! - " ! ! & ! ! " Z ! ! ´ J % + ( !! ! !! & " ! - 6T " " - " ! M L < !¶ 4 ! 7 & 55 ! (( & + ! " ( & ! "" µ " & ! - ! Z ! - && ! ! !
Utilizzo della rete domestica Connessione cablata (per DLNA e servizio Internet) DLNA® ] ! ! - " ! + " 5 2 R ! + r 2 6 & ! & ! 2 " R # 5 - ! " ( " 5 ! " < µ ! "$ + " ! ´ " (- ! !! " & ! 2 R ! + ! ( ! " ! + ( 5 & ! 55 + 5 2 µ " (# ! ! ( ! " ¹ - # & !
Utilizzo delle funzionalità DLNA® + " "$ - - 5 ( ! ( " (- ! 5 ! ! ! " (- ! ! Riproduzione di contenuto in condivisione memorizzato sul server multimediale ¹ - # ( ( 55 + ! " ! ! ( " ( ! ( 2 R ! + " & ! ! ( ! " " ! ! - ¸ - 55 ! ! 1 Visualizzare [Apps] e selezionare [Media Server] Riproduzione di contenuto in condi
Domande e risposte ( "$ - 5 ! 5 & Z ! (- " ! 5 - - # ( !! & " ! - 6 -- ! M ( - ! < Il televisore non si accende 2"" ! "$ " ( ! 5 " & ! ! - " ! Il televisore passa alla “modalità Standby” !! ! + 5 ! #L ! ( ! " " ! Il telecomando non funziona o funziona a intermittenza # !! !
Manutenzione Staccare innanzitutto la spina del cavo di alimentazione dalla presa di corrente.
Dati tecnici Audio Uscita diffusore Modello da 24” TV S 3 6K 3 q K 3< Modello da 32” Modello da 40” Modello da 43” Modello n.
Sistemi di ricezione / Nome banda DVB-S / S2 Ingresso parabola satellitare 4 (( ! - 4 P; : 5 & ! ! ! 6 )H )9 2 R6 HS9< ) R6 HS;<< ) (( + Z 5 " ! `;: 5 H O;: 5 ZR V O : Ingresso antenna 4 Q J 4 Condizioni di funzionamento Temperatura : R V K; R DVB-C 5 & ! " 6 )H )9 2 R6 HS9< ) R6 HS;<< Umidità H:¯ V _:¯ T 6 5 " < LAN wireless incorporata DVB-T / T2 5 & ! ! !
Smaltimento di vecchie apparecchiature e batterie usate Solo per Unione europea e nazioni con sistemi di raccolta e smaltimento ] ! (# - !! ´ (# && Q " ( ! 5 ( "" (- & ! - !! " "$ - !! !! " !! " # !! ! ( ! ! " + ! ( ! " & " ! !! ( ! " - " " && & ! ""$ - !! # !! ! ! ( - ! & -- ! - ! "" ! "