TX ---14GV2 Colour TV---Video Combination (U.K.
WARNINGS AND PRECAUTIONS D This TV ---Video is designed to operate on 220 -- 240V, 50Hz A.C. D To prevent damage which might result in electric shock or fire, do not expose this TV ---Video to rain or excessive moisture.This TV must not be exposed to dripping or splashing water and objects filled with liquid, such as vases, must not be placed on top of or above the TV. D WARNING : HIGH VOLTAGE !!! Do not remove the rear cover as live parts are accessible when it is removed.
WELCOME Dear Panasonic Customer, Welcome to the Panasonic family of customers. We hope that you have many years of enjoyment from your new colour TV---Video combination. This is a very advanced unit; however, the Quick Start Guide will allow you to use the TV---Video as quickly as possible. You can then read the instructions completely and retain them for future reference. CONTENTS Page Accessories . . . . . . . . . . . . . . . . . . . . . . . . . . . . . . . . . . . . .
ACCESSORIES Check that you have the accessories and items shown n Operating Instruction book TQB8E3833 CRT Guarantee Remote Control Transmitter EUR51941 TX-- 14GV2 Guarantee Indoor antenna Batteries for the Remote Control Transmitter. (2 x R6 (UM3) size) INSERTING THE REMOTE CONTROL BATTERIES 1 2 Slide off the battery cover Notes: 3 Insert batteries -- note correct polarity (+ and -- ) Replace the cover D Make sure that the batteries are fitted the correct way round.
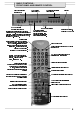
BASIC CONTROLS : FRONT PANEL AND REMOTE CONTROL Headphone socket (see page 37) RCA Audio/Video sockets (see page 37) Increases or decreases the programme position by one. When a function is already displayed, press to increase or decrease the selected function. When in Standby mode, switches TV ---Video On. Status button Press to display programme position, programme name, channel number and VCR status. If teletext is being received, time and station name are also shown. Press again to hide.
QUICK START GUIDE Connection and setting up options 1. 2. 3. If connecting the TV ---Video using an RF cable only, proceed to option 1. If connecting the TV ---Video to an external VCR using Scart and RF cables, proceed to option 2. If connecting the TV ---Video to an external VCR and a Satellite Receiver, proceed to option 3 on page 7. Option 1. Connection of TV---Video using an RF cable only RF Connection D Connect the RF cable into the TV ---Video Aerial socket ( ).
QUICK START GUIDE Option 3. Connection of TV---Video, VCR and Satellite Receiver using Scart and RF cables Scart Connections D D Connect a Scart cable from the VCR Scart socket of the Satellite Receiver to the AV2 socket of the external VCR. Connect a Scart cable from the AV1 socket of the external VCR to the AV Scart socket of the TV ---Video. RF Connections D D D Connect an RF cable to the Aerial In socket of the Satellite Receiver.
QUICK START GUIDE Quick Start Guide 1 Mains Socket Plug the TV ---Video into a mains socket and switch On. Note: D When connected to the wall outlet, with the mains socket switched on, the orange mains indicator will illuminate. 2 Programmes will appear immediately if your dealer has programmed the TV for you. If the TV has not been programmed for you then will begin. TV stations will be located, sorted into order and stored ready for use.
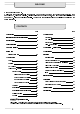
QUICK START GUIDE NAME, HOUSE NUMBER POSTCODE PIN NUMBER NAME If not, move to the NAME line. Enter and using the menu control buttons. If a 4 digit was entered above, you will be taken automatically to the line. 4 Change character. Select character position. above until NAME, HOUSE NUMBER and POSTCODE are entered. Repeat STR STR Press STR to store the details. STR Press again, when you are asked “Are you sure ?” For further information on Owner ID, see page 23.
ON SCREEN DISPLAYS This TV--Video has a comprehensive system of On Screen Display menus to access adjustments and options Contrast, Brightness, Sharpness functions Direct access to and Colour MENU Press the button, located under the remote control flap, to open the menu system. MENU Picture adjustments See page 11 See pages 29 and 30 Direct access to See page 12 See page 13 Direct access to See page 13 Aspect function. Off timer function.
MAIN MENU --- PICTURE ADJUSTMENTS MENU Open the Main Menu Move to your choice Increase or decrease levels or set options Press the MENU button to exit the menu system MENU Contrast Brightness Colour The Contrast, Brightness, Colour and Sharpness levels can be adjusted to suit your own preferences. Sharpness Tint The Tint adjustment will only appear as a menu item if you have an NTSC signal source connected to the TV ---Video and will allow adjustment of the hue.
TV SETUP --- ASPECT Aspect allows you to view widescreen programme material with the correct aspect ratio (16:9) Open the Main Menu MENU Move to TV setup Access TV setup Move to Aspect Select appropriate aspect ratio for the programme material being viewed. Select 4:3 for a standard picture or 16:9 for a widescreen picture.
TV SETUP --- OFF TIMER The Off timer allows the TV--Video to turn off after a specified period Open the Main Menu MENU Move to TV setup Access TV setup Move to Off timer Select period after which TV will turn off automatically. Each press increases the time period by 15 minutes. Press the EXIT button to exit EXIT Notes: The time remaining is displayed on screen. To cancel the Off timer, access the Off timer function again and select .
TV SETUP --- ON / OFF TIMER The On/Off timer allows the TV--Video to turn on and off at specified times Notes: CANCEL To cancel the On/Off timer, access the On/Off timer function again and press the button. The clock must be set before the On/Off timer can be used. If the clock has not been set, the Clock screen will appear. See page 25 for details.
TV SETUP --- TUNING MENU --- overview The Tuning menu allows you to tune new stations and edit current programme positions Note: The Tuning menu is not available while the VCR is playing. Open the Main Menu MENU Move to TV setup Access TV setup Move to Tuning menu Access Tuning menu Programme edit Auto setup Manual tuning Shipping condition Owner ID Accessing the Programme edit menu will allow stations to be added, swapped, named or deleted. See page 16.
TV SETUP --- TUNING MENU --- PROGRAMME EDIT The Programme edit menu allows you to edit the programme position settings Open the Main Menu MENU Move to TV setup Access TV setup Move to Tuning menu Access Tuning menu Move to Programme edit Access Programme edit Make required changes (see following sections) Press the STR button to store changes STR If you have finished in the Programme edit menu, press the EXIT button to exit EXIT 16
TV SETUP --- TUNING MENU --- PROGRAMME EDIT To delete an unwanted programme position Select the programme position to be deleted Press the Red multi function button Press the STR button to confirm If you have finished in the Programme edit menu, press the EXIT button to exit STR EXIT To swap two programme positions Select the first programme position Press the Green multi function button Select the second programme position Press the STR button to swap the programme positions STR If you have fini
TV SETUP --- TUNING MENU --- PROGRAMME EDIT To name a programme position Select the programme position to be named Move to the first character field Character field Select a character Move to the next character field Repeat until the programme name is complete. You do not have to use all the character positions.
TV SETUP --- TUNING MENU --- AUTO SETUP The Auto setup menu will allow you to automatically retune the TV--Video to your local stations. It is useful if you move to a different region. Open the Main Menu MENU Move to TV setup Access TV setup Move to Tuning menu Access Tuning menu Move to Auto setup Access Auto setup Start Auto setup process STR The TV will search for, locate and sort into order your local stations. Once this operation is completed the TV will display programme position 1.
TV SETUP --- TUNING MENU --- MANUAL TUNING Manual tuning of the programme positions is available either from the On Screen Display menu or from the front panel controls Note: Remember to select programme position 0 (VCR) if tuning to an external VCR connected using RF cables.
TUNING MENU --- MANUAL TUNING --FRONT PANEL CONTROLS Note: Remember to select the VCR programme position if tuning to an external VCR connected using RF cables. Press repeatedly until the Manual tuning option is displayed F Enter Manual tuning Press -- or + to begin searching for stations -- / v The television will begin to search for stations. When a station is found the search will pause; if it is the correct station, you can press the or buttons to continue searching.
TV SETUP --- TUNING MENU --- SHIPPING CONDITION Shipping condition allows you to reset the TV to its original condition, i.e. no channels tuned in. This is useful, for example, if you move to a different area when you will probably want the TV to tune itself to your new local stations. This can be done either through the Shipping condition menu or through the Auto setup menu.
TV SETUP --- TUNING MENU -- OWNER ID Owner ID allows you to enter a security code and address information so that in the unfortunate event of theft it will help the Police to determine the owner. If the Owner ID information was not entered after Auto setup or it is necessary to alter some of the ID information it can be re --accessed via the Tuning menu.
VCR SETUP MENU The VCR setup menu allows you to adjust the main VCR settings Open the Main Menu MENU Move to VCR setup Access VCR setup Clock The Clock menu allows you to set the date and time. See page 25. Auto repeat The Auto repeat function allows the TV ---Video to continuously replay the tape. When the end of the tape is reached, the TV ---Video will automatically rewind the tape and then restart playback. VCR Child lock The VCR Child lock prevents use of the VCR.
VCR SETUP --- CLOCK --- DATE AND TIME Notes: The Clock feature allows you to set the time and date The clock will normally be set automatically during Auto setup. However, if teletext is not clearly received the clock will not be set. Access Clock Setting the Date Move to the Date field. Date field Month field Year field The digits will be highlighted in black.
VCR OPERATION Basic controls REC (Record) Press this button to start recording. TV ---Video front panel controls TRACKING/V ---LOCK Press up or down to remove noise bars during playback, or to remove jitter when in pause mode. REW Press to rewind the tape. In Play mode, press to view the picture rapidly in reverse (Review). PLAY Press to playback the tape. FF Press to fast forward the tape. In Play mode, press to view the picture rapidly forward (Cue). STOP Press to stop the tape.
VCR INDICATORS Front panel indicators (1) (2) (1) Red: Red flashing: Green: Orange: Flashing: (2) Red: Standby mode. Remote control signal being received. Playback. Programmed recording entered or Timer Record activated. No programmed recordings entered. No tape inserted. Clock not set. Recording Status button On screen indicators Press the Status button to turn on or off the on screen VCR displays STOP TV ---Video is in Stop mode. PLAY TV Video is in Playback (or slow playback) mode.
RECORDING --- MANUAL AND ONE TOUCH RECORDING (OTR) This unit has two tuners, allowing you to watch one programme while recording another.
RECORDING --- TIMER PROGRAMME RECORDING (MANUAL ENTRY) Timer programme recording (manual entry) Timer recordings allow the TV ---Video to automatically make a recording in your absence.
RECORDING --- TIMER PROGRAMME RECORDING (MANUAL ENTRY) Move to the Stop time Hour field Set the Stop time Hours Move to the Stop time Minutes field Set the Stop time Minutes Press the STR button to Store the timer programme STR The cursor bar will move down to the next line. To enter further timer programmes, repeat the steps above When programming is complete: Press the EXIT button to return to normal viewing.
RECORDING --- VIDEO Plus+ R RECORDING VIDEO Plus+ recording Programming is now easier than ever: simply enter the PlusCode number provided in newspapers and TV listings magazines. PlusCode numbers, are numbers which are assigned to each programme. When these codes are entered and is pressed, the numbers are converted into timer recording details. STR VIDEO Plus+ R and PlusCode R are registered trademarks of Gemstar Development Corporation.
RECORDING --- DAILY / WEEKLY RECORDINGS Other recording functions Access the Timer programming screen (see page 29). Daily recordings While in the Date field, select the option. The VCR will now record at the same time each day. Day Weekly recordings While in the Date field, select Sun, Mon, Tue, Wed, Thu, Fri or Sat. The VCR will now record at the same time on the same day each week. SP/LP selection You can select SP (Standard play) or LP (Long play) for each recording.
RECORDING --- PROGRAMME DELIVERY CONTROL (PDC) PDC is a signal system transmitted by TV broadcasters to control the start and stop time of each programme. This signal is used by the TV ---Video to control the start and stop times of programmed timer recordings. PDC is particularly useful when the broadcaster changes the time for a programme from the published time; the TV ---Video’s timer recording start and stop time will be controlled by the broadcaster.
RECORDING --- INDEX Index function Index markers are electronic signals recorded onto the tape at the beginning of each recording. They can be used in conjunction with the Index function to quickly locate the beginning of a recorded program. Recorded index markers Tape Recording 1 . . . . . . . . . . . . . . . . . . . . . . . . . . Recording 2 . . . . . .
TELETEXT OPERATION D Teletext features may vary depending on the Broadcasting Companies and are only available if the channel selected is transmitting Teletext. D Pressing the MENU button whilst in Teletext operation will display the contrast function with a cyan bar, press A " to alter the setting as required. D When in Teletext mode, the volume may still be altered to the desired listening level.
TELETEXT OPERATION It is not possible to change the programme position when in News flash, Update or Sub Coded Page Access operation. HOLD TIME TEXT Hold To freeze the Teletext page when viewing multi---page information. Press again to return to automatic page update. Sub Coded Page Access When teletext information exceeds one page, it may take some time for the automatic changing of the sub---pages to reach the sub---page you require.
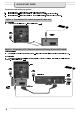
CONNECTIONS Front AV inputs and headphone socket Camcorder RCA Video cable RCA Audio cable TV/ AV The TV’s speaker will be disconnected whilst headphones are connected. TV/AV Press the button to select the AV inputs 3,5mm plug Rear AV input (SCART socket) Do not connect front and rear AV inputs simultaneously, as the sound and picture will be mixed. Do not connect a computer with TTL (5V) output to this TV-- Video. Connectors and cables shown are not supplied.
TROUBLESHOOTING General problems Symptoms Multiple images, normal sound No colour, normal sound Coloured patches, normal sound Snowy picture, noisy sound Picture interference, noisy sound Poor or distorted picture, weak or no sound Normal picture, no sound No picture, no sound Remote control does not work There is no picture when in AV mode VCR related problems Symptoms The cassette is ejected immediately after insertion Normal recording mode cannot be started Tape is ejected when attempting to record o
SPECIFICATIONS TX-- 14GV2 Power Source Power Consumption Standby Consumption Picture Tube Visible Diagonal Audio Output 220 --- 240V 50Hz a.c. 59W 5W 34 cm 1.5W x 2 Music Power Dimensions Weight (Kg) Receiving Systems/ Band name Aerial -- Rear Headphones -- Front AV -- Rear AV -- Front Tape format Tape speed TV system Record / playback time Fast forward / rewind time Video recording system Audio track Modulation system 400 mm 386 mm 367.5 mm H W D PAL I PAL 525/60 M.
www.panasonic.co.uk (for UK customers only) S S S S S Order accessory and consumable items for your product with ease and confidence by telephoning our Customer Care Centre Mon---Friday 9:00am ---5:30pm. (Excluding public holidays) Or go on line through our Internet Accessory ordering application. Most major credit and debit cards accepted All enquiries, transactions and distribution facilities are provided directly by Panasonic UK Ltd.