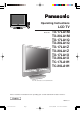
Operating Instructions 1 2 3 4 5 6 7 8 9 C 0 LCD TV Model No. TX-17LA1M TX-20LA1M TX-17LA1Q TX-20LA1Q TX-17LA1Z TX-20LA1Z TX-17LA1X TX-20LA1X TC-17LA1H TC-20LA1H LCD TV shown above is model TX-20LA1. Please read these instructions before operating your set and retain them for future reference. English TQBC0673-1 tx_17LA1_eng_673_1 Page 1 03.10.29, 5:46 PM Adobe PageMaker 6.
Dear Panasonic Customer Welcome to the Panasonic family of customers. We hope that you will have many years of enjoyment from your new LCD TV. To obtain maximum benefit from your set, please read these Instructions before making any adjustments, and retain them for future reference. Retain your purchase receipt also, and note down the model number and serial number of your set in the space provided on the rear cover of these instructions. Table of Contents Warnings and Precautions .........................
Warnings and Precautions • This TV set is designed to operate on DC 15V. • To prevent damage which might result in electric shock or fire, do not expose this TV set to rain or excessive moisture. This TV must not be exposed to dripping or splashing water, and objects filled with liquid, such as vases, must not be placed on top of or above the TV. • Turn the power “Off” before connecting other electrical equipment. • Ask your sales outlet to install the aerial. • DO NOT use this unit near water.
Warnings and Precautions • Cabinet and LCD panel care Remove the mains plug from the wall socket. The cabinet and LCD panel can be cleaned with a soft cloth moistened with mild detergent and water. Do not use solutions containing benzol or petroleum. • Place in a safe location. • DO NOT jolt the unit. • When ambient temperature is cool, the picture may take a short time to reach normal brightness, but this is not a malfunction. (After brief moment, the picture will have normal brightness.
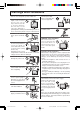
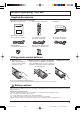
Before Operating This Set Supplied Accessories Check the accessories before installations. • Operating Instruction book • Remote Control Transmitter • AC Adaptor PICTURE SOUND SET UP TV/AV TV/TEXT F.P.
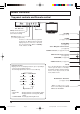
Before Operating This Set Antenna cover removal and fitting TX-17LA1, TC-17LA1 Removal 1 2 1. Grasp the cover at the bottom end and initially remove by pulling slightly toward yourself. 2. Slowly pull out in the downward direction. Fitting TX-20LA1, TC-20LA1 Removal 1 2 1. Grasp the opening and initially pull the cover slightly towards yourself to disengage the claws (at 2 points on both the left and right). 2. Slowly pull out in the downward direction. Fitting 1.
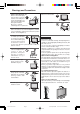
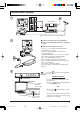
Quick Start Guide 1 S - VIDEO VIDEO S - VIDEO VIDEO VIDEO L L AUDIO AUDIO R R AV1 IN MONITOR OUT COMPONENT VIDEO INPUT Y VIDEO MONO P L B VIDEO MONO MONO L L AUDIO AUDIO R R AV1 IN MONITOR OUT SET TOP BOX AUDIO P R R AV2 IN COMPONENT VIDEO INPUT Y OR VIDEO MONO P L B AUDIO P VCR / DVD recorder R R AV2 IN OR DC IN 15V Plug in aerial and connect ancillary equipment 2 1 Connect the mains lead to the AC Adaptor. 2 Connect the AC Adaptor DC plug to the DC IN socket.
Connections How to connect the input terminals Connects VCRs and other peripheral equipment • S-Video socket information AV1 S-Video 4 pin socket S - VIDEO VIDEO VIDEO MONO L L AUDIO AUDIO R R Chrominance in Luminance in Chrominance earth Luminance earth COMPONENT VIDEO INPUT Y VIDEO MONO P L B AUDIO P R R AV2 IN Connect the S-VIDEO or VIDEO terminal.
Connections Connecting Headphones / Earphones Connect headphones / earphones as follows. (M3 plug) (Not supplied) Notes: • The volume level of the headphones can be adjusted by selecting “HEADPHONE VOL.” from the SOUND. • Additional equipment and cables shown are not supplied with this TV set. 9 tx_17LA1_eng_673_1 Page 9 03.10.29, 5:46 PM Adobe PageMaker 6.
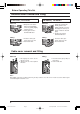
Basic controls Top panel controls and Remote control STR F TV/AV MAINS Power On / Off switch TV/AV switch STR (Normalisation store) Used to store tuning and other function settings PICTURE (see page 18, 19) Function selection (see on this page below) SOUND (see page 19, 20) Increases or decreases the programme position by one. When a function is already displayed, press to increase or decrease the selected function.
Basic controls Power (Stand-by) Note: The TV set must first be plugged into the wall It is also possible to turn the TV set on from STANDBY outlet and turned on at the TV ON / Stand-by mode by pressing the “Direct Programme Number button on the top panel. Selection” Buttons (0-9) and the “Programme Number Press this button to turn the TV set On from Up or Down” Button, either on the top panel or on the Standby mode, press it again to turn the TV set Remote Control. OFF to Standby mode.
Using the On Screen Displays Many features available on this TV can be accessed via the On Screen Display menu system. Use the remote control as shown below to access and adjust features as desired. Press to move the cursor up and down on the menu. Press to access menus, adjust levels or to select from a range of options. STR Press to store settings after adjustments have been made or options have been set. TV/AV Press to exit the menu system and return to the normal viewing screen.
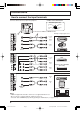
SETUP MENU The setup menu provides access to various advanced features and also to the Tuning menu. Press to display the setup menu screen. 2 Press to select the menu to adjust. SETUP MENU TELETEXT OFF TIMER WAKE UP TIMER CH COLOUR SET CHILD LOCK BLUE BACK VCR/GAME SET UP 1 Example: TX-17LA1M, TX-20LA1M FASTEXT OFF OFF OFF ON OFF Press to adjust the desired setting. TV/AV Press at any time to go back to watching TV. Notes: • TX-17LA1Q, TX-20LA1Q do not have the “TEXT SELECT”, “LANGUAGE” functions.
TUNING MENU Channel Selection Select the most easily viewed channel selection method. 2ch 4ch 6ch 8ch 10ch 12ch 14ch 16ch 18ch 20ch POSITION SELECT Example Programme Number Channel Display Received Channel 1 2 3 4 5 6 7 8 9 10 2 4 6 8 10 12 14 16 18 20 2 4 6 8 10 12 14 16 18 20 When the Channel Selection is on POSITION, and AUTO TUNE is performed, the unit memorises the channels Tuned in order from Programme No.1. Press the button 1 to view channel 2. Press the button 2 to view channel 4.
TUNING MENU SET UP 1 Press to display the SETUP MENU. 2 Press to select the TUNING MENU. Press to access the TUNING MENU screen. 3 Press to select the menu to adjust. SETUP MENU FASTEXT TELETEXT OFF OFF TIMER OFF WAKE UP TIMER CH COLOUR SET OFF CHILD LOCK ON BLUE BACK SETUP OFFMENU VCR/GAME ON COMB FILTER ENGLISH TEXT SELECT ACCESS TUNING MENU LANGUAGE ENGLISH Press to adjust option or access chosen menu. TV/AV Press at any time to go back to watching TV.
TUNING MENU AUTO TUNE Before AUTO TUNE, set the “CH SELECT” and “SYS SELECT”. Follow the step on the previous page to display the TUNING MENU screen. 1 CH SELECT SYS SELECT AUTO TUNE MANUAL TUNE SOUND SYS COLOUR SYS FINE TUNE SKIP Press to select AUTO TUNE. Press to access AUTO TUNE. Notes: • If you proceed with the next step all tuning data will be erased (all stations and their programme positions stored in your TV's memory will be wiped out so that the new settings can be stored).
TUNING MENU MANUAL TUNE Before MANUAL TUNE, set the “CH SELECT” and “SYS SELECT”. Follow the step on page 15 to display the TUNING MENU screen. 1 TUNING MENU Press to access MANUAL TUNE. 2 DIRECT ASIA/M. EAST CH SELECT SYS SELECT AUTO TUNE MANUAL TUNE SOUND SYS COLOUR SYS FINE TUNE SKIP Press to select MANUAL TUNE. ACCESS 5.5MHz AUTO OFF Press to select the desired Programme Number. 2 CH 2 Press to search the higher or lower channel. STR 3 When the desired station is found, press to store.
PICTURE Example: TX-17LA1M, TX-20LA1M PICTURE 1 Press to display the PICTURE screen. 2 PICTURE Press to select the menu to adjust. Adjust the desired level by looking at the picture behind the menu. MENU mode will be memorized for each TV, AV1 and AV2 mode. DYNAMIC STANDARD PICTURE MENU BACKLIGHT CONTRAST BRIGHTNESS COLOUR SHARPNESS C.TEMP CINEMA MENU Function DYNAMIC Displays a bright screen with maximum contrast. STANDARD Displays standard image. CINEMA Ideal for movies in the dark room.
PICTURE / SOUND AI (Artificial Intelligence) Automatically analyses the incoming picture and processes it to give improved contrast and optimum depth of field. ON P-NR OFF Reduces unwanted picture noise. PICTURE AI P-NR MPEG NR PICTURE AI P-NR MPEG NR MPEG NR Reduces MPEG noise. This function is effective in reducing the digital block noise when viewing DVD, VCD or digital broadcasting. The effect will be changed based on the scene and image.
SOUND VOLUME, BASS, TREBLE, BALANCE, HEADPHONE VOL. Item Effect SOUND Function Volume Less More Adjusts output volume. Bass Less More Adjusts lower deeper sounds. Treble Less More Adjusts higher sharper sounds. Balance Left SP Right SP Headphone volume Less More SURROUND MENU VOLUME BASS TREBLE BALANCE HEADPHONE VOL. SURROUND Adjusts Headphone volume. SOUND MENU VOLUME BASS TREBLE BALANCE HEADPHONE VOL. SURROUND OFF Switching is also possible by pressing the button.
ASPECT Controls The TV will allow you to enjoy viewing the picture at its optimum size and aspect. ASPECT ASPECT button The aspect mode changes each time the ASPECT button is pressed. 16:9 TV mode : 4:3 AV mode : 4:3 16 : 9 AUTO Note: TX-17LA1Q, TX-20LA1Q do not have the AUTO mode. Mode Picture 4:3 will display a 4:3 picture at its standard 4:3 size and can be selected if you wish to view in this format.
Advanced Remote Control Operation TELETEXT • Teletext features may vary depending on the Broadcasting Companies and is only available if the channel selected is transmitting Teletext. • Pressing the Picture button whilst in Teletext operation will display the contrast function PICTURE with a cyan bar, press SOUND TV/AV F.P. INDEX HOLD 1 2 3 4 5 6 to alter the setting as required.
Advanced Remote Control Operation It is not possible to change the programme position when in News flash, Update or Sub Coded Page Access operation. 1 2 3 4 5 6 7 8 9 Red Green Yellow Blue STR 0 Hold HOLD to hold the Teletext page when viewing multi-page information. Press Press again to return to automatic page update. HOLD Blue List Store In List mode the four page numbers can be altered (programme positions 1 25 only).
Advanced Remote Control Operation SET UP Blue 1 2 3 4 5 6 7 8 9 0 Sub Coded Page Access When Teletext information exceeds more than one page, it may take some time for the automatic changing of the sub pages to reach the sub page you require. It is possible to enter your required sub page and continue watching the normal programme until the correct sub page is found. Select the required page number using buttons 0 - 9.
Advanced Remote Control Operation Manufacturer setting Remote Control Operation is possible for the VCR’s and DVD’s of the various manufacturers. After completion of setting, execute the various operations after pressing the VCR/DVD selection switch. 1 Press to select VCR or DVD. 2 While pressing the VCR / DVD Power button, press the manufacturer code (enter the two digit code), and press the VCR / DVD Stop button. PICTURE SOUND SET UP TV/AV TV/TEXT F.P.
Channel Allocation SYS SELECT CH DISPLAY 0 1 2 3 4 5 6 7 CHINA HK/UK – 1 2 – – – – – – – – – – – – – – – – – – 21 11 12 13 14 15 16 12 13 19 20 21 22 23 24 ASIA/M.EAST NZ/INDONES AUSTRALIA E.
Troubleshooting If there is a problem with your LCD TV please refer to the table below to determine the symptoms, then carry out the suggested check. If this does not solve the problem, please contact your local Panasonic dealer, quoting the model number and serial number (both found on the rear of the TV).
Specifications Power Source Power Consumption LCD Screen Size Sound Speaker Audio Output Headphones Receiving Systems/ Band name Receiving Channels Aerial - Rear Operating Conditions Connection Terminals AV1 AV2 MONITOR OUT Dimensions (W × H × D) Including TV Stand TV Set Only Mass (Weight) TX-17LA1M, TX-17LA1Q, TX-17LA1Z, TX-17LA1X, TC-17LA1H AC 100 - 240 V, 50 / 60 Hz Average use : 56 W Stand-by condition : 1.8 W TV set DC 15 V, 3.2 A max.