Operating Instructions Digital LCD TV TX---32LXD60 TX---26LXD60 TX---23LXD60 Please read these instructions before operating your set and retain them for future reference. (U.K.
WELCOME Dear Panasonic Customer, Welcome to the Panasonic family of customers. We hope that you have many years of enjoyment from your new digital LCD television. This is a very advanced television; however, the Quick Start Guide will allow you to use the TV as quickly as possible. You can then read the instructions completely and retain them for future reference.
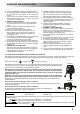
WARNINGS AND PRECAUTIONS D This TV set is designed to operate on 220--240V, 50Hz A.C. D To prevent damage which might result in electric shock or fire, do not expose this LCD television to rain or excessive moisture. This TV must not be exposed to dripping or splashing water and objects filled with liquid, such as vases, must not be placed on top of or above the TV. D WARNING : HIGH VOLTAGE !!! Do not remove the rear cover as live parts are accessible when it is removed.
ACCESSORIES Check that you have the accessories and items shown Operating Instruction book Customer Survey n 1 Year Guarantee Registration Clamper (TX---26LXD60, TX---32LXD60 only) Remote Control Transmitter (EUR 7651050A) Pan European Guarantee Card Batteries for the Remote Control Transmitter.
INSTALLATION Please use the apparatus only with the stands supplied or with the appropriate wall mount kits. Receiver Location Locate for comfortable viewing. Avoid placing where sunlight or other bright light (including reflections) will fall on the screen. Use of some types of fluorescent lighting can reduce remote control transmitter range. Adequate ventilation is essential to prevent internal component failure. Keep away from areas of excessive heat or moisture.
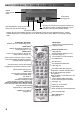
BASIC CONTROLS: TOP PANEL AND REMOTE CONTROL MAINS Power On/Off switch TV/AV switch (see page 44) STR (Normalisation store) Used to store tuning and other function settings Increases or decreases the programme position by one.
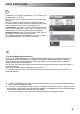
QUICK START GUIDE Connection and setting up options 1. If connecting the TV using an RF cable only, proceed to option 1. 2. If connecting the TV using SCART and RF cables, proceed to option 2. 1 Connection of TV using an RF cable only Connect the RF cable into the TV Aerial socket 2 TV Aerial Input Socket Connection of TV and VCR (DVD/R) using SCART and RF cables SCART connections The VCR (DVD/R) can be connected to the TV using a SCART cable if you are using a SCART equipped VCR (DVD/R).
QUICK START GUIDE 3 Connection of TV,VCR (DVD/R) and Satellite Receiver using SCART and RF cables Scart Connections S Fully wired SCART cables should be used for all the SCART connections. S The AV2 SCART of the VCR (DVD/R) must be connected to the VCR socket of the Satellite Receiver S The TV SCART socket of the Satellite Receiver must be connected to the AV1 SCART socket of the TV. RF Connections S Connect an RF cable to the Aerial In socket of the Satellite Receiver.
QUICK START GUIDE 4 Programmes will appear immediately if your dealer has programmed the TV for you. If the TV has not been programmed for you then Auto setup will begin. The TV will search for DVB stations and Analogue stations: TV stations will be located, sorted into order and stored ready for use. Stations are sorted into the following order: S DVB Stations: Are sorted by their logical channel number sent by the broadcasters, which can be grouped into a favourite channels list by using Profile Edit.
QUICK START GUIDE 6 Owner ID As an added feature, this TV has the option of adding a security code (Owner ID) and personal details into its memory, so that in the unfortunate event of theft it will help the Police to trace the owner. Using the numeric buttons, 0 to 9 on your remote control, enter your own 4 digit Owner ID PIN NUMBER. If a 4 digit PIN NUMBER was entered above, you will be taken automatically to the NAME line. If not, using the left or right cursor buttons move to the NAME line.
ANALOGUE PROGRAMME GUIDE The analogue programme guide shows programme list. To view a list of the stations that have been found, press the GUIDE button on the remote control GUIDE In this guide, use the cursor buttons to move the cursor bar around the list Use the programme change button to step through the guide page by page Select Select Confirm Exit Page -Page + Pres the OK button to view the selected programme The Guide can be cleared from the screen using the EXIT or GUIDE button.
TV Guide---Electronic Programme Guide (EPG) (DVB mode) The DVB TV Guide displays the current programmes being transmitted, and forthcoming programmes on each DVB channel, up to about one week ahead (If broadcasters transmit the programmes information). Press the GUIDE button. Choose from Landscape or Portrait display style by pressing the GUIDE button repeatedly. Press the Red button to move the EPG listing to the previous day. Press the Green button to move the EPG listing to next day.
TV Guide---Electronic Programme Guide (EPG) (DVB mode) In DVB mode Information banner will appear when changing channel, or pressing the (Information) button. The banner gives the user information about the channel and programme currently being viewed. The banner will time out and dissapear from the screen after a set time period, this time period can be set in the DVB System Setup menu. See page 30. S Press the left or right cursor button while banner is displayed to switch between Now and Next.
ASPECT CONTROLS The widescreen TV will allow you to enjoy viewing the picture at its optimum size and aspect, including widescreen ‘cinema format’ pictures. Press the ASPECT button repeatedly to move through the seven aspect options: Auto Aspect, 16:9, 14:9, 4:3, Zoom1, Zoom2 and Zoom3. OR Press the ASPECT button then use the RED or GREEN buttons to move in either direction through the seven aspect options. ASPECT WIDE Auto Aspect Auto Aspect determines the best aspect ratio to use to fill your screen.
ASPECT CONTROLS 16:9 16:9 16:9 will display a true 16:9 (anamorphic) picture with no aspect distortions. 16:9 14:9 14:9 14:9 will display a 14:9 letterbox or 4:3 picture with no aspect distortions. 14:9 4:3 4:3 4:3 will display a 4:3 picture at its standard 4:3 size with no aspect distortions.
ASPECT CONTROLS Zoom1 Zoom1 Zoom1 will display 16:9 letterbox or 4:3 pictures with no aspect distortions Zoom1 Zoom2 Zoom2 Zoom2 will display 16:9 anamorphic letterbox pictures as a full screen display with no aspect distortions Zoom2 Zoom3 Zoom3 Zoom3 will display 21:9 letterbox pictures as a full screen display with no aspect distortions Zoom3 16
USING THE ON SCREEN DISPLAYS This TV has a comprehensive system of On Screen Display menus to access adjustments and options Menu Title Sub--menus Main menu Picture menu Sound menu Setup menu Instructions Select Access Exit Return Picture menu Viewing mode Contrast Brightness Colour Sharpness Colour balance P--NR Dynamic Indicator for options Selection bar Normal Off Some selections, for example, Contrast, Brightness, Colour and Sharpness will allow you to increase or decrease their level.
PICTURE MENU This menu allows you to make adjustments to the picture quality.
SOUND MENU The Sound menu will allow you to set your personal preferences for all aspects of sound quality. MENU Open the Main menu Sound menu Bass Treble Balance Headphone volume NICAM Mode Ambience Move to Sound menu Access Sound menu Off Music Off Move to your choice Select Adjust Increase or decrease levels or set options Exit Return Press the EXIT button to exit the menu system EXIT Bass Bass adjustment will emphasise the lower, deeper frequencies and can be increased or decreased.
SETUP MENU The Setup menu provides access to various advanced features and also to the Tuning menu.
TUNING MENU---(Analogue mode) The Tuning menu provides access to manual, automatic and fine tuning menus.
TUNING MENU -- PROGRAMME EDIT The Programme edit menu allows you to edit the programme position settings. Open the Main menu MENU 5 CH44 Move to Setup menu Tuning menu Programme edit Auto setup Manual tuning Access Setup menu Access Select Access Store Exit Return Move to Tuning menu Access Tuning menu Move to Programme edit menu Programme edit Access Programme edit menu Make required changes (see sections below) Prog. Chan.
TUNING MENU -- PROGRAMME EDIT To add a programme position Choose the programme position where the new programme is to be inserted Press the Green button Programme edit Prog. Chan.
TUNING MENU -- PROGRAMME EDIT To lock a programme position to prevent access Choose the programme position Move to the lock column Choose between lock on or lock off Programme edit Prog. Chan. Name Lock 1: 2: 3: 4: 5: CH41 - XYZ Off Off Off Off Off Lock Off / On Select option Store Exit Return To copy programme information to a compatible VCR (DVD/R) connected to AV1 or AV2 Move to the Prog. column Press the Blue button on the remote control Programme data will now be sent to the VCR (DVD/R).
TUNING MENU -- AUTO SETUP (Analogue mode) The Auto setup menu will allow you to automatically retune the TV to your local stations. It is useful if you move to a different region.
TUNING MENU -- MANUAL TUNING (Analogue mode) Manual tuning of the Programme positions is available either from the On Screen Display menu or from the top panel controls.
TUNING MENU -- MANUAL TUNING (Analogue mode) Manual tuning Press the F button (Control panel) until “Tuning mode” is reached Press the -- or + button to access Tuning mode Press the TV/AV button to move between “Change programme” or “Search” Press the -- or + button to change programme position, start search.
SETUP MENU -- OWNER I.D. Owner I.D. allows you to enter a security code and address information so that in the unfortunate event of theft it will help the Police to determine the owner. If the Owner I.D. information was not entered after Auto setup or it is necessary to alter some of the I.D. information it can be re--accessed via the Setup menu (In both Analogue and DVB modes). Open the Main menu MENU Setup menu Move to Setup menu Access Setup menu Move to Owner I.D. Access Owner I.D. If the Owner I.
SETUP MENU -- SHIPPING CONDITION Shipping condition allows you to reset the TV to its original condition, i.e. no channels tuned in. This is useful, for example, if you move to a different area when you will probably want the TV to tune itself to your new local stations. The Shipping condition menu will reset all data, except Owner I.D.
DVB Setup Menu---overview (DVB mode) The DVB Setup menu provides access to various advanced features and also to the DVB Tuning menu. MENU In DVB mode Press the MENU button. Setup menu Q--Link Control with HDMI AV1 out AV2 out Off timer Power on preference DVB Setup Menu Owner ID Shipping condition Move to Setup menu. Access Setup menu. Move to DVB Setup Menu. AV1 On Monitor DVB Off AV Access Select Access Access DVB Setup Menu.
Timer programming menu (DVB mode) For an external recording device to record DVB programmes, the integrated DVB system must be active to provide the signal. The Timer programming menu allows you to choose programmes that you wish to record. At the correct time, the DVB system will switch on and tune to the correct station (even if the TV is in standby mode).
Timer programming menu (DVB mode) Daily and Weekly Timer Programmes While in the Date field of the DVB Timer Programming menu, you can select various options to determine how often a recording should be made. Press the down cursor button repeatedly to access the following options: Daily Su-- Sa The recording device will record at the same time every day. Daily Mo -- Sa The recording device will record at the same time each day from Monday to Saturday.
Profile Edit menu (DVB mode) The Profile Edit menu allows you to select your favourite programme positions and display them as a list in the TV Guide or Information banner, to allow quick and easy access to the programs you watch most often. In DVB mode Press the MENU button. MENU Move to Setup menu. Access Setup menu. Move to DVB Setup Menu. Access DVB Setup Menu. Move to Profile Edit. Access Profile Edit.
Child Lock menu (DVB mode) You may wish to lock a DVB programme channel to prevent access to it. Note: The data of the PIN number and locked channel will be erased by operating the Shipping condition. In DVB mode Press the MENU button. Move to Setup menu. Access Setup menu. Move to DVB Setup Menu. Access DVB Setup Menu. Move to Child Lock Access Child Lock. When entering Child Lock menu for the first time, new PIN number setting screen is displayed. Create a 4---digit password.
DVB Tuning Menu (DVB mode) DVB Tuning Menu provides access to DVB Tuning features. In DVB mode MENU Press the MENU button. Move to Setup menu. Access Setup menu. Move to DVB Setup Menu. condition Access DVB Setup Menu. Move to DVB Tuning Menu. Access DVB Tuning Menu. Move to menu option Adjust chosen option or access chosen menu Press the EXIT button at any time to go back to watching TV.
DVB System Setup (DVB mode) The DVB System Setup menu provides access to DVB specific options. In DVB mode MENU Press the MENU button. Move to Setup menu. Access Setup menu. Move to DVB Setup Menu. Access DVB Setup Menu. Move to DVB System Setup Access DVB System Setup Move to menu option Adjust chosen option or access chosen menu Press the EXIT button at any time to go back to watching TV.
Common Interface Module menu (DVB mode) The Common Interface Module menu provides access to software contained on Common Interface (CI) Modules. These can be inserted in the “CI” slot located at the rear of the TV. IMPORTANT NOTES: SSwitch off the TV using the front panel switch before inserting or removing a module. SIf you are installing a TV software update, please follow the dedicated instructions supplied with the module. SInsert / remove a module straight to the CI slot.
System Update menu (DVB mode) From time to time new versions of software will become available Auto Update Search in Standby (Overnight) During the night time, this TV will automatically search for any new available software being broadcast. If a new software version is found, the unit will automatically download and install this new version. At the end of this process the unit will reset. Auto Update Search in Standby will occur at 03:00 or 05:00 every day. In DVB mode Press the MENU button.
Q--LINK Q-- Link allows the television to communicate with a compatible VCR or DVD Recorder. For Q--Link communication to work, the TV must be connected to a recording device with the “Q--Link”, “NEXTVIEWLINK”, “DATA LOGIC”, “Easy Link”, “Megalogic” or “SMARTLINK” logo using a “fully wired” Scart cable between the AV2 socket of the television and the appropriate socket on your VCR, and the AV1 socket of the television and the appropriate socket on your DVD Recorder.
VCR / DVD/R OPERATION The Remote Control is capable of operating some functions of selected Panasonic VCRs and DVD (Digital Versatile Disc) equipment. Some VCR and DVD equipment have different functions, so to ensure compatibility please refer to the equipment’s instruction book or consult your dealer for details. Standby Press to switch the VCR or DVD/R to standby mode. Press again to switch back on. VCR / DVD switch VCR DVD Use this switch to select whether controls operate DVD equipment or your VCR.
TELETEXT OPERATION (Analogue Mode) D Teletext features may vary depending on the Broadcasting Companies and is only available if the channel selected is transmitting Teletext. D Pressing the Menu button whilst in Teletext operation will display the contrast function with a cyan bar, press A " to alter the setting as required. Pressing the Picture button whilst in Teletext operation will display special function options at the bottom of the screen.
TELETEXT OPERATION (Analogue Mode) It is not possible to change the programme position when in News flash, Update or Sub Coded Page Access operation. Display Cancel (Update Display) Press the MENU button to display special functions, followed by the Yellow button to view the TV picture whilst searching for a Teletext page. When found, the screen will display the page number at the top left. Press the Yellow button to view the page. Press TEXT again to return to normal TV operation.
TELETEXT OPERATION (DVB Mode) DVB teletext services DVB teletext services differ greatly from analogue teletext. When you switch to a DVB teletext service, the images you see can contain graphics and text, laid out and controlled in a manner decided by the broadcaster.
CONNECTIONS (AV) It is possible to connect a variety of additional equipment to this TV. The following pages detail how to connect external equipment to the rear and side of the TV. Once your equipment is connected, use the following procedure to view the input: Press the TV/AV menu button Whilst the on screen selector keys are displayed, select the page by pressing the Red or Blue button and then press coloured buttons to select the AV source you wish to view.
CONNECTIONS (AV) Rear sockets Side connections Audio input to L/R sockets AV1: AV2: VCR Q---Link COMPATIBLE VCR SET TOP BOX DVD PLAYER DVD RECORDER CAMCORDER VCR / S---VIDEO VCR Q---Link COMPATIBLE VCR SET TOP BOX DVD PLAYER DVD RECORDER Q---Link COMPATIBLE DVD RECORDER GAME CONSOLE / COMPUTER(RGB) Q---Link COMPATIBLE DVD RECORDER CAMCORDER / S---VIDEO GAME CONSOLE / COMPUTER(RGB) CAMCORDER R --- L V S---V Video input to V socket 2 x RCA Audio cables Video input to S--Video socket RCA Video cab
HDMI Functions Control with HDMI “HDAVI Control” Enjoy additional HDMI Inter--Operability with Panasonic products which have ”HDAVI Control” function. HDMI connections to some Panasonic equipment (Panasonic DVD Recorder DIGA) allow you to enjoy easy playback, power on link or power off link. HDMI (High Definition Multi media Interface) is the first all--digital consumer electronics A/V interface that supports uncompressed standard. The HDMI terminal supports both video and audio information.
CONNECTIONS (HDMI) S If the external device has DVI output only, use a DVI to HDMI adapter cable to connect to the HDMI1 terminal only. S Connect the audio cables to the AUDIO IN terminals when using a DVI to HDMI adapter cable. (Use only a fully compliant HDMI cable (fully wired). Select the audio setting in HDMI input. See page 19 NOTES If adding new equipment or reconnecting equipment or changing setup, using the TV/AV button on the remote control to select the correct connection (i.e. HDMI1 or HDMI2).
CONNECTIONS Applicable input signal for Component (Y, Pb, Pr) and HDMI (“O” indicates available) Vertical frequency (kHz) Signal name Horizontal frequency (kHz) 525 (480) / 60i 15.73 525 (480) / 60p 31.47 625 (576) / 50i 15.63 50.00 625 (576) / 50p 31.25 50.00 45.00 60.00 750 (720) / 60p HDMI Component 59.94/60 O O 59.94/60 O O O O O O O O 750 (720) / 50p 37.50 50.00 O O 1,125 (1,080) / 60i 33.75 60.00 O O 1,125 (1,080) / 50i 28.13 50.
TROUBLESHOOTING Symptoms Picture Checks Sound Snowy Picture Noisy Sound Aerial location, direction or connection. Multiple Images Normal Sound Aerial location, direction or connection Interference Normal Picture Noisy Sound Electrical appliances Cars / Motorcycles Switch on P---NR in Picture menu to reduce picture noise Volume level No Sound Sound mute switched on No Picture No Sound TV set to AV mode Not plugged into A.C.
DVB TROUBLESHOOTING Some problems will only occur when viewing DVB channels. Due to the different techniques involved in digital reception, DVB signal quality can be poor even if you appear to have a strong signal when viewing analogue programmes. The DVB system requires a good quality signal to provide the best picture. When viewing analogue pictures, interference such as signal reflection from nearby buildings or mountains causes ‘ghosting’, but still provides a viewable picture.
FREQUENTLY ASKED QUESTIONS Problem S C R E E N Chaotic image, noisy Actions Set ”P---NR” in the Picture menu (to remove noise). (p. 18) Check nearby electrical products (car, motorcycle,fluorescent lamp).
ON SCREEN MESSAGES On Screen Messages Actions / Meanings All tuning data will be erased ”Shipping condition” will erase all tuning data. Are you sure? Confirm that this is the correct operation Bad Signal The signal is weak. Check the aerial. Are you sure you want to delete this timer ? Confirm that this is the correct operation Press OK to delete timer Press Exit to return DOWNLOAD IN PROGRESS PLEASE WAIT Q---Link channel download is in progress.
ON SCREEN MESSAGES On Screen Messages Actions / Meanings Please check aerial or local Please follow the message. DVB service availability. If it still fails, consult your local Panasonic dealer. Press OK to start Auto Setup Please check settings and connections on HDMI Communication error with Control on HDMI function devices. (p. 46) No stations found Please insert the aerial No analogue signal can be found in Auto setup. Please wait. A function is in progress.
FOR YOUR GUIDANCE Service: Before requesting service for this LCD TV, please refer to the troubleshooting guide on previous page to determine the symptoms. To obtain service please contact your local Panasonic dealer quoting the model number and serial number (both are located at the rear of the LCD TV). SPECIFICATIONS TX--32LXD60 Power Source TX--26LXD60 220 -- 240V A.C., 50 Hz Average use : 153 W Standby condition : 1W (Without DVB recording) 10W (TV + DVB system set to record Timer programmes).
SPECIFICATIONS TX--23LXD60 Power Source Power Consumption LCD 220 -- 240V A.C., 50 Hz Average use : 100 W Standby condition : 0,8W (Without DVB recording) 10W (TV + DVB system set to record Timer programmes). Wide XGA (1,366 x 768 pixels) 16:9 aspect ratio LCD panel Screen Size (Visible diagonal) 58 cmV Audio output 2x3W Headphones M3 (3,5 mm) Jack x 1 Receiving Systems/ Band name Aerial -- Rear Operating Conditions Teletext pages Connections Rear AV -- Side panel PAL I PAL 525/60 DVB M.
Sales and Support Information Customer Care Centre S For customers within the UK: 08705 357357. S For customers within the Republic of Ireland: 01 289 8333. S Visit our website for product information S E---mail: customer.care@panasonic.co.uk Direct Sales at Panasonic UK S Order accessory and consumable items for your product with ease and confidence by phoning our Customer Care Centre Monday---Thursday 9:00am---5:30pm, Friday 9:30am --- 5:30pm (Excluding public holidays).