Operating Instructions TX--32DTX40 Colour Television with Integrated Digital Terrestrial Decoder (U.K.
WELCOME Dear Panasonic Customer, We hope that you have many years of enjoyment from your new TV. The Quick Start Guide section at the beginning of this instruction book will allow you to use the TV as quickly as possible. We recommend that you then read the complete instruction book, and keep it to refer to as you explore the range of advanced features that this TV offers. This TV has a low power consumption making it very cost effective to run.
WARNINGS AND PRECAUTIONS D This TV set is designed to operate on 220--240V, 50Hz A.C. D Batteries, packaging and old equipment should not be disposed of as domestic waste, but in accordance with the applicable regulations. D Ensure that the mains plug is easily accessible at all times. The On/Off switch on this model does not fully disconnect the TV from the mains supply. Remove the mains plug from the wall socket when the TV set is not used for a prolonged period of time.
ACCESSORIES Check that you have the accessories and items shown Operating Instruction book TQB8E4062 VS ---32PXM (Video cabinet) Remote Control Transmitter EUR7636010 TV Guarantee Batteries for the Remote Control Transmitter.
REMOTE CONTROL (Standby On / Off) Standby On/Off switch Switches TV On or Off standby. Switches DVB system on or off standby if tuner lock is not set. Mode --- Switch between viewing DVB and Analogue modes. Guide --- Displays the DVB TV Guide (see page 30). (Cursor buttons) TV/AV --- Switch between viewing TV or AV input (see page 9). Cursor buttons to make selections and adjustments. OK button to confirm selections and choices.
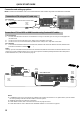
QUICK START GUIDE Connection and setting up options Note:-- Please ensure that the unit is not connected to the mains before any leads are attached or removed. TV Connection of TV using an RF cable only RF Connection D Connect the RF cable into the TV Aerial socket ( Mains Socket ).
QUICK START GUIDE 1 Ensure that the VCR or DVD Recorder is in Standby mode. Plug the TV into mains socket and switch ON. 2 Mains Socket Programmes will appear immediately if your dealer has programmed the TV for you. If the TV has not been programmed for you then Auto setup will begin. First, the TV will search for analogue stations: When the search for analogue stations is complete, the TV will continue to search for DVB stations.
QUICK START GUIDE 4 Owner ID As an added feature, this TV has the option of adding a security code (Owner ID) and personal details into its memory, so that in the unfortunate event of theft it will help the Police to trace the owner. Using the numeric buttons, 0 to 9 on your remote control (1), enter required 4 digit Owner ID PIN NUMBER. (1) (2) (3) (4) Enter NAME, HOUSE NUMBER and POSTCODE. If a 4 digit PIN NUMBER was entered above, you will be taken automatically to the NAME line.
QUICK START GUIDE 6 Slight tilting of the picture may be noticeable or coloured patches may sometimes appear at the corners of the screen (colour purity). The Geomagnetic Correction feature can be used to eliminate them, if necessary: First, ensure the Auto setup and Q ---Link download procedures are complete. The screen should not be showing any On ---Screen Display menus. Open the flap on the television’s front panel.
USING THE ON SCREEN DISPLAYS This TV has a comprehensive system of On Screen Display (OSD) menus to access adjustments and options Press the Menu button (1) to access the Main menu (1) (2) The up and down CURSOR buttons (2) are used to move the cursor up and down the PICTURE, SOUND and SET UP menus. The left and right CURSOR (3) or OK (4) buttons are used to access the menus.
ASPECT CONTROLS The widescreen TV will allow you to enjoy viewing the picture at its optimum size and aspect, including widescreen ‘cinema format’ pictures. Press the ASPECT button (1) repeatedly to move through the seven aspect options: Panasonic Auto, 16:9, 14:9, 4:3, Zoom1, Zoom2 and Zoom3. OR Press the ASPECT button (1) then use the Red (2) or Green (3) buttons to move in either direction through the seven aspect options.
ASPECT CONTROLS 16:9 will display a true 16:9 (anamorphic) picture with no aspect distortions. 16:9 14:9 will display a 14:9 letterbox or 4:3 picture with no aspect distortions. 14:9 4:3 will display a 4:3 picture at its standard 4:3 size with no aspect distortions. 4:3 Zoom1 will display 16:9 letterbox or 4:3 pictures with no aspect distortions. Zoom1 Zoom2 will display 16:9 anamorphic letterbox pictures as a full screen display with no aspect distortions.
MULTI WINDOW Press the MULTI WINDOW button (1), repeatedly, whilst the on screen selector keys are on screen, to move between the picture and picture feature, picture in picture feature or picture out of picture (4:3 aspect mode only) and normal viewing. The on screen selector keys (corresponding to the four coloured buttons on the remote control (2)) that appear for the features clear after a few seconds.
PICTURE MENU Using the Menu button (1), open the Main Menu. Access the Picture menu. Move to your choice (2). Increase or decrease levels or set options (3). Press the EXIT button (4) to exit the Picture menu. (Depending upon your signal source, some options may not be available). (1) (2) Viewing mode (3) (4) The Viewing mode menu allows you to select three different screen settings --Dynamic, Normal and Cinema.
SOUND MENU Using the Menu button (1), open the Main Menu. Access the Sound menu. Move to your choice (2). Increase or decrease levels or set options (3). Press the EXIT button (4) to exit the Sound menu. (1) (2) (3) (4) (5) Bass Bass adjustment will emphasise the lower, deeper frequencies and can be increased or decreased. Treble Treble adjustment will emphasise the sharper, higher frequencies and can be increased or decreased.
SETUP MENU The Setup menu provides access to various advanced features and also to the Tuning menu Using the Menu button (1), open the Main Menu. Access the Setup menu. Move to your choice (2). Increase or decrease levels, set options or access further menus (3). Press the EXIT button (4) to exit the Setup menu. (1) (2) (3) (4) Setup menu in DVB Mode The DVB Timer programming menu allows you to enter DVB programme times at which the DVB tuner must switch Timer Programming on, ready for recording .
ANALOGUE TUNING MENU -- overview In Analogue mode Using the Menu button (1), open the Main Menu. Access the Setup menu. Move to Tuning menu (2). Access Tuning menu (3). Move to your choice (2). Access further menus (3). Press the EXIT button to exit (4). (1) (2) (3) (4) Programme edit Accessing the Programme edit menu will allow stations to be moved, added, deleted, named or locked. See page 18. Auto setup Auto setup allows you to clear all current analogue tuning data, and scan for new services.
ANALOGUE TUNING MENU -- PROGRAMME EDIT The Programme edit menu allows you to edit the analogue programme position settings Using the Menu button (1), open the Main Menu. Access the Setup menu. Move to Tuning menu (2). Access Tuning menu (3). Move to Programme edit menu (2). Access Programme edit menu (3). Make required changes (see sections below). Press OK button (4) to store changes. If you have finished in the Programme edit menu, press the EXIT button (5) to return to normal viewing.
ANALOGUE TUNING MENU -- PROGRAMME EDIT To move a programme to another position Choose the programme position to be moved (1). Press the Yellow button (2) on remote control. Choose the new position (1). Press the Yellow button (2) again to confirm. Press the OK button (3) to store your changes. If you have finished in the Programme edit menu, press the EXIT button (4) to return to normal viewing. (1) (2) (3) (4) To rename a programme position Choose the programme position (1).
DVB AUTO SETUP (1) (2) (3) (4) DVB MODE Using the Menu button (1), open the Main Menu. Access the Setup menu. Move to DVB Auto Setup (2). Access DVB Auto Setup (3). Press OK to start DVB Auto Setup (4). The TV will search for, locate and sort into order your local stations. If a compatible recording device is connected via the AV sockets, programme data will be sent to the device via Q--Link (see page 31). Once this operation is completed, the TV will display programme position 1.
ANALOGUE TUNING MENU -- MANUAL TUNING To add an analogue programme position Using the Menu button (1), open the Main Menu. Access the Setup menu. Move to Analogue Tuning menu (2). Access Analogue Tuning menu (3). Move to Manual tuning (2). Access Manual tuning (3). Press the left or right cursor buttons repeatedly until the required station is found (3). Press OK to store the programme position (4). Press Setup to return to the Tuning menu (1).
ANALOGUE TUNING MENU -- OWNER I.D. Owner I.D. allows you to enter a security code and address information so that in the unfortunate event of theft it will help the Police to determine the owner. If the Owner I.D. information was not entered after Auto setup or it is necessary to alter some of the I.D. information it can be re--accessed via the Tuning menu. ANALOGUE MODE Using the Menu button (1), open the Main Menu. Access the Setup menu. Move to Analogue Tuning menu (2). Access Analogue Tuning menu (3).
MANUAL TUNING --- FRONT PANEL CONTROLS Manual tuning of the analogue programme positions is available from the front panel controls The Front panel controls are located under the flap on the front of the TV. (1) (2) F - /v 1 (3) Select an existing analogue programme position. Press the F button (1) repeatedly until “Tuning mode” is reached. Press the -- or + button (2) or (3) to access Manual tuning (Front panel). Press --- or + (2) or (3), to begin searching for stations.
DVB SYSTEM SETUP The DVB setup menu provides access to DVB specific options. Note: If DVB transmissions cannot be received clearly, the DVB setup menu may not be available. Using the Menu button (1), open the Main Menu. Access the Setup menu. Move to DVB Setup Menu (2). Access DVB Setup Menu (3). Move to your choice (2). Set options or access further menus (3). Press the OK button (5) to store your settings. Press the EXIT button (4) to return to normal viewing.
COMMON INTERFACE MODULE MENU The Common Interface Module menu provides access to software contained on Common Interface (CI) Modules. These can be inserted in the “CI” slot located at the rear of the TV. IMPORTANT NOTES: Switch off the TV using the front panel switch before inserting or removing a module. If you are installing a TV software update, please follow the dedicated instructions supplied with the module.
FAVOURITES SETUP MENU The Favourites setup menu allows you to select your favourite programme positions and display them as a list in the TV Guide, to allow quick and easy access to the programs you watch most often. Using the Menu button (1), open the Main Menu. Access the Setup menu. Move to DVB System Setup (2). Access DVB System Setup menu (3). Move to Favourites Setup menu (2). Access Favourites Setup menu (3). Move to the programme position which you wish to set as a favourite (2).
SYSTEM UPDATE MENU The System Update menu allows the DVB system to check that it has the latest software. If newer software is available, it can be downloaded. Using the Menu button (1), open the Main Menu. Access the Setup menu. Move to DVB System Setup Menu (2). Access DVB System Setup Menu (3). Move to System Update (2). Access System Update (3). The System Update Menu will appear. (1) (2) (3) (4) (5) The DVB system will now begin to search for new software --- this will take a few seconds.
DVB TIMER PROGRAMMING MENU For an external recording device to record DVB programmes, the integrated DVB system must be active to provide the signal. The Timer programming menu allows you to choose programmes that you wish to record. At the correct time, the DVB system will switch on and tune to the correct station (even if the TV is in standby mode).
DVB TIMER PROGRAMMING MENU Daily and Weekly Timer Programmes While in the Date field of the DVB Timer Programming menu, you can select various options to determine how often a recording should be made. Press the down cursor button repeatedly to access the following options: Daily Su ---Sa The recording device will record at the same time every day. Daily Mo---Sa The recording device will record at the same time each day from Monday to Saturday.
TV GUIDE The DVB TV Guide displays the current programmes being transmitted, and forthcoming programmes on each DVB channel, up to seven days ahead. Press the Guide button (1). Three separate guides can be accessed by pressing the Guide button repeatedly (1). Choose from ‘Category’, ‘Favourites list’ and ‘Type’. The Favourites list can be customised using the DVB setup menu (see page 26). After a few moments the DVB TV Guide will be displayed.
Q--LINK Q--Link allows the television to communicate with a compatible VCR or DVD Recorder. For Q--Link communication to work, the TV must be connected to a recording device with the “Q--Link”, “NEXTVIEWLINK”, “DATA LOGIC”, “Easy Link”, “Megalogic” or “SMARTLINK” logo using a “fully wired” Scart cable between the AV2 socket of the television and the appropriate socket on your VCR or DVD Recorder.
VCR / DVD RECORDER INSTALLATION Your new TV is supplied with programme position ‘0’ set to receive an RF signal from your VCR or DVD Recorder, although a Scart connection is preferable if the device is so equipped. However, if for some reason your VCR or DVD Recorder is tuned to a different RF channel then you will not receive any picture or sound from your device on programme position ‘0’ of the TV.
TELETEXT OPERATION D Teletext features may vary depending on the Broadcasting Companies and is only available if the channel selected is transmitting teletext. D Pressing the Menu button whilst in teletext operation will display special function options at the bottom of the screen D When in teletext mode, the volume may still be altered to the desired listening level.
TELETEXT OPERATION It is not possible to change the programme position when in News flash, Update or Sub Coded Page Access operation. Update Display (Display Cancel) Press the Menu button (1) to display special functions, followed by the Yellow button (2) to view the TV picture whilst searching for a teletext page. When found, the screen will display the page number at the top left. Press the Yellow button (2) to view the page. Press TV/TEXT (3) to return to normal TV operation.
TELETEXT OPERATION DVB teletext services DVB teletext services differ greatly from analogue teletext. When you switch to a DVB teletext service, the images you see can contain graphics and text, laid out and controlled in a manner decided by the broadcaster.
AUDIO / VIDEO CONNECTIONS Front AV3 4 Pin S---Video, RCA Audio / Video and Headphones Sockets Front Connections Press and release to open Output from Headphone socket S---V Video input to S ---V S ---Video socket Video input to V socket Audio input to L/R sockets 2 x RCA Audio Cables RCA Video Cable 3.5mm Stereo Plug CAMCORDER STEREO HEADPHONES with 3.5mm Plug Note : Additional equipment and cables shown are not supplied with this TV set.
AUDIO / VIDEO CONNECTIONS Rear AV1/AV2(S)/AV4(S) 21 Pin Scart, Modem and RCA Audio Out Terminals Rear connections Additional equipment can be connected at the rear of the TV via three 21 pin Scart sockets, AV1 / AV2(S) / AV4(S).
GENERAL TROUBLESHOOTING Symptoms Picture Checks Sound Snowy Picture Noisy Sound Aerial location, direction or connection. Multiple Images Normal Sound Aerial location, direction or connection. Interference Normal Picture Noisy Sound No Sound Electrical appliances. Cars / Motorcycles. Fluorescent lights. Switch on P ---NR in Picture menu to reduce picture noise. Volume level. Sound mute switched on. No Picture No Sound TV set to AV mode. Not plugged into A.C. outlet. Not switched on.
DVB TROUBLESHOOTING Some problems will only occur when viewing DVB channels. Due to the different techniques involved in digital reception, DVB signal quality can be poor even if you appear to have a strong signal when viewing analogue programmes. The DVB system requires a good quality signal to provide the best picture. When viewing analogue pictures, interference such as signal reflection from nearby buildings or mountains causes ‘ghosting’, but still provides a viewable picture.
FOR YOUR GUIDANCE H Service H Last Position Memory Before requesting service, please refer to the troubleshooting guide on pages 38 and 39 to determine the symptoms. To obtain service please contact your local Panasonic dealer quoting the model number and serial number (both are located at the rear of the TV). Certain functions have a last position memory, i.e. the setting at the time of switch--off will be the setting used when the receiver is switched on again.
UNITED KINGDOM / IRELAND PANASONIC TECHNICS GUARANTEE CONDITIONS OF GUARANTEE This guarantee is in addition to and does not in any way affect any statutory or other rights of consumer purchasers.
Sales and Support Information Customer Care Centre S S S S For UK customers: 08705 357357. For Republic of Ireland customers: 01 289 8333. Visit our website for product information www.panasonic.co.uk. E ---mail: customer.care@panasonic.co.uk. Direct Sales at Panasonic UK S S S S S S Order accessory and consumable items for your product with ease and confidence by telephoning our Customer Care Centre Mon ---Friday 9:00am ---5:30pm (Excluding public holidays).