Operating Instructions LED TV English Model No. TX-24G310B TX-32G310B (image: TX-32G310B) Thank you for purchasing this Panasonic product. Please read these instructions carefully before operating this product and retain them for future reference. Please carefully read the “Safety Precautions” of this manual before use. The images shown in this manual are for illustrative purposes only.
Table of Contents Licence Licence............................................................... 2 Even if no special notation has been made of company or product trademarks, these trademarks have been fully respected. Important Notice................................................ 3 Safety Precautions............................................ 3 Accessories....................................................... 6 Installing the TV.................................................
Important Notice Safety Precautions Notice for DVB / Data broadcasting To help avoid risk of electrical shock, fire, damage or injury, please follow the warnings and cautions below: This TV is designed to meet the standards (as of August, 2017) of digital services. ● Not all the features are available depending on the country, area, broadcaster, service provider and network environment. ● Compatibility with future services is not guaranteed.
● Insert the mains plug fully into the mains socket. ● To turn Off the apparatus completely, you must pull the mains plug out of the mains socket. Consequently, the mains plug should be easily accessible at all times. ● Disconnect the mains plug when cleaning the TV. ● Do not touch the mains plug with wet hands. ● Do not damage the mains lead. •• Do not place a heavy object on the lead. •• Do not place the lead near a high temperature object. •• Do not pull on the lead.
Warning Stability Hazard A television set may fall, causing serious personal injury or death. Many injuries, particularly to children, can be avoided by taking simple precautions such as: •• ALWAYS use cabinets or stands or mounting methods recommended by the manufacturer of the television set. •• ALWAYS use furniture that can safely support the television set. •• ALWAYS ensure the television set is not overhanging the edge of the supporting furniture.
■■Moving the TV Caution Before moving the TV, disconnect all cables. ● At least two people are required to move the TV. ■■When not in use for a long time Caution This TV will still consume some power even in the Off mode, as long as the mains plug is still connected to a live mains socket. ● Remove the mains plug from the wall socket when the TV is not in use for a prolonged period of time.
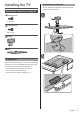
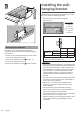
Installing the TV Assembling / Removing the pedestal Assembly screw Assembling the pedestal ● Do not assemble the pedestal by any method other than those specified below. 1 C TP4 x 12 (3) D Assembly screw A TP4 x 12 (2) Bracket Base 2 Preparations Take out the pedestal and the TV from the packing case and put the TV onto a work table with the screen panel down on the clean and soft cloth (blanket, etc.) ● Use a flat and firm table bigger than the TV. ● Do not hold the screen panel part.
3 B Installing the wallhanging bracket Please contact your local Panasonic dealer to purchase the recommended wall-hanging bracket. ● Holes for wall-hanging bracket installation Rear of the TV 24-inch model a: 100 mm a b: 200 mm 32-inch model b a: 100 mm b: 100 mm (View from the side) L Removing the pedestal Be sure to remove the pedestal in the following procedures when you use the wall-hanging bracket or repack the TV. 1.
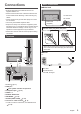
Connections Basic connections ■■Mains lead ● External equipment and cables shown are not supplied with this TV. ● Please ensure that the unit is disconnected from the mains socket before attaching or disconnecting any cables. ● Check the terminal type and cable plugs are correct for connection. ● Use a fully wired HDMI compliant cable. ● Keep the TV away from electronic equipment (video equipment, etc.
AV devices Other connections ■■DVD Recorder, etc. ■■DVD Player TV (RGB/CVBS) TV Cable DVD Player HDMI cable ■■Amplifier (listening with external speakers) RF cable ● Use HDMI 1 to connect the TV to an amplifier which has ARC (Audio Return Channel) function. DVD Recorder, etc. Terrestrial aerial If connecting to an amplifier without ARC function, use DIGITAL AUDIO. ■■Set top box ● To enjoy multi-channel sound from external equipment (e.g. Dolby Digital 5.
■■Common Interface ● Unplug the power cord before inserting or removing the CI module. ● If a smart card and a CI module come as a set, first insert the CI module, then insert the smart card into the CI module. ● Insert or remove the CI module completely in the correct direction as shown. ● Normally encrypted channels will appear. (Viewable channels and their features depend on the CI module.
9 Volume Up / Down ● Press to adjust the volume level. Indicator / Control panel 10 Numeric buttons ● Changes channel and teletext pages. Front ● Sets characters. ● When in Standby mode, switches TV on. 11 STILL ● Freeze screen. 12 Input mode selection ● TV - switches to DVB-C / DVB-T / Analogue. ● AV - opens or closes the Sources menu - the list of connected devices. 13 TV Guide ● Displays Electronic Programme Guide. Bottom 3 1 Power LED 14 Subtitles ● Displays subtitles.
First time Auto Setup Auto Setup is now complete and the TV is ready for viewing. When the TV is turned on for the first time, it will automatically search for available TV channels and give options to set up the TV. ● These steps are not necessary if the setup has been completed by your local dealer. ● Please complete connections (p. 11 - 13) and settings (if necessary) of the connected equipment before starting Auto Setup.
Watching TV 1 Turn power on TV can be turned on based on the power status. ● Red LED: Use remote control to turn on the TV. (TV) ● Both LEDs off: Use the power key at the bottom of the TV to turn on. (Remote Control) ● For LED status, refer to 2 Select the source 3 Select a channel (p. 12) up down or ● To select a channel position with digit numbers, e.g.
How to Use Menu Functions ● To return to the previous screen ● To change menu pages 1 Display the menu up down ● Displays the functions that can be set (varies according to the input signal). ■■Choose from among alternatives Setup Picture Panasonic TV Channels Game Of Thones Viewing Mode 2 Select the menu Custom Dynamic Natural Normal Cinema 11:30 - 13:30 Summers span decades. Winters can last a lifetime. And the struggle for the Iron Throne has begun...
■■Enter characters by free input menu You can enter names or numbers freely for some items. Menu Overview User input abc ABC 1 2 3 4 6 7 8 9 0 [ q w e r t y u i o p ] a s d f 5 g h j k l ; : z x c v b n m , . ‘ ? \ ! _ / @ 123+/;www Enter Cancel Backspace Home menu 1 Display the menu 1 Set characters one by one select set 2 Store ● Displays the functions that can be set (varies according to the input signal).
Changing Picture and Sound settings Picture 1 Display the menu and select [Settings] select access 2 Select [Picture] select access 3 Select the item to adjust select access Viewing Mode You can select your favourite mode for each input. ■■[Custom]: Adjusts each picture menu item manually to suit your favourite picture quality. ■■[Dynamic]: Improves contrast and sharpness for viewing in a bright room. ■■[Natural]: Improves natural picture quality.
● To reset the current [Viewing Mode] to the default settings [Factory settings] in [General settings] (Settings Menu) Sound 1 Display the menu and select [Settings] Selects surround sound settings. ■■[Headphones volume]: Adjusts the volume of headphones. ■■[TV placement]: Selects the TV position. ■■Advanced sound settings Selects advanced sound settings.
Retuning from Setup Menu Automatically retunes the channels received in the area. ● This function is available if channel tuning is already performed. ● Only the selected mode is retuned. All the previous tuning settings are erased. ● Child Lock PIN number is required to retune locked channels.
Channel Options Channels List While watching a programme, you can set some options. You can create your favourite channel lists, skip unwanted channels, etc. 1 Select the mode 2 Open options select 1 Select the mode 2 Select [Channels] select access ■■Subtitles To switch [Subtitles on] or [Subtitles off]. Alternatively you can select [Automatic].
4 Use navigation keys to select a character, then press OK select set 5 Select [Done] when complete the editing ● Follow the on-screen instructions Create or Edit Favourites Channel List ■■Create Favourites Channel List Create your favourite channel lists from various broadcasters (up to 4: [Favourite]1 to 4). 1 Display option menu Lock / Unlock channel To prevent children from watching a channel, you can lock a channel. To watch a locked channel, you must enter the 4 digit Child Lock PIN code first.
Child Lock You can lock specific channels to restrict access to them. When the locked channel is selected, a message appears. Enter the PIN number to watch. 1 Display the menu and select [Settings] access 2 Select [Child lock] select access 1 Enter the PIN number (4 digits) ● Enter the PIN number twice at first setting. ● Make a note of the PIN number in case you forget it.
Watching External Inputs Viewing Teletext Connect the external equipment (VCR, DVD, etc.) and you can watch through the input. ● For details, refer to page 9 “Connections”. The features may vary depending on the broadcaster. 1 Display the input selection menu 1 Switch to Teletext Sources Antenna TV Teletext services are the text information provided by the broadcaster. Viewing Teletext ● Displays the index page (content varies depending on the broadcaster).
Using TV Guide ■■To set reminder TV Guide - Electronic Programme Guide (EPG) provides an on-screen listing of the programmes currently broadcast and the forthcoming broadcasts over the next seven days (depending on the broadcaster). ● When this TV is turned on for the first time, or the TV is switched off for more than a week, it may take some time before TV Guide is completely shown.
Using Media Player Easy List View: USB device Media Player allows you to enjoy photo, video or music stored on the USB Flash Memory / USB HDD. Media Still pictures / moving pictures stored with digital cameras are displayed. Mix Folder View: Videos Photos Music picture_1.jpg select All files grouped by folder are displayed. ■■To insert or remove the USB Flash Memory Ensure alignment is straight and complete when inserting or removing.
Setup menu 1 Display the menu and select [Settings] select access Panasonic TV Channels Sources Utilities Settings Select to view the list of settings, offered in this TV. 2 Select the item and press OK to access select access Setup Picture Sound Eco settings General settings Region and Language Universal access Child lock Network Antenna/Cable installation Update software ● To return to the previous screen Eco settings ■■[Energy saving] Set energy saving level.
■■[CAM Operator Profile] ■■Correct clock manually ■■[CAM Profile Name] ■■[Sleep timer] To switch on operator profile for CI+/CAM for easy channel installation and updates. When CAM operator profile is set to enable, select to display the profile name of the connected CAM card. Reset TV Settings and Reinstall TV ■■[Factory settings] Reset all settings value to original TV settings. ■■[Reinstall TV] Redo full TV installation and set TV status back to the first time you switch on.
Software Software Version ■■[Current software info] 1 Display the menu and select [Settings] select access View the current TV software version and information. ■■[View software update history] View the software update history. ● The availability of viewing software update history is depends on your country with OAD. Open Source Software Panasonic TV Channels Sources Utilities Settings Select to view the list of settings, offered in this TV.
FAQs Before requesting service or assistance, please follow these simple guides to solve the problem. The TV does not switch on ● Check the mains lead is plugged into the TV and the mains socket. ● Check the LED light status. (p. 14) The TV goes into Standby mode ● Auto power standby function is activated. The remote control does not work or is intermittent ● Are the batteries installed correctly? (p. 12) ● Has the TV been switched on? ● The batteries may be running low. Replace them with new ones.
Maintenance Specifications First, remove the mains plug from the mains socket. ■■TV Display panel, Cabinet, Pedestal Regular care: Gently wipe the surface of the display panel, cabinet, or pedestal by using a soft cloth to remove dirt or fingerprints. For stubborn dirt: (1) First clean the dust from the surface. (2) Dampen a soft cloth with clean water or diluted neutral detergent (1 part detergent to 100 parts water). (3) Wring out the cloth firmly.
Card slot Common Interface slot (complies with CI Plus) × 1 USB DC 5 V, Max. 500 mA [Hi-Speed USB (USB 2.0)] Aerial input VHF / UHF Operating conditions Temperature 0 °C - 35 °C Humidity DIGITAL AUDIO output 20 % - 80 % RH (non-condensing) PCM / Dolby Digital, Fibre optic NETWORK RJ45 (for Freeview) Receiving systems / Band name DVB-C Digital cable services (MPEG2, MPEG4AVC(H.264) and MPEG HEVC(H.265)) Note ● Design and Specifications are subject to change without notice.
Disposal of Old Equipment and Batteries Only for European Union and countries with recycling systems These symbols on the products, packaging, and/or accompanying documents mean that used electrical and electronic products and batteries must not be mixed with general household waste. For proper treatment, recovery and recycling of old products and used batteries, please take them to applicable collection points in accordance with your national legislation.