OK 1 2 3 4 5 6 7 8 9 C 0 Operating Instructions Wide LCD TV N PULL TV Model No. TX-26LX50F TX-32LX50F The illustration shown is an image. Please read these instructions before operating your set and retain them for future reference.
Welcome Dear Panasonic Customer, We hope that you have many years of enjoyment from your new TV. The Quick Start Guide section at the beginning of this instruction book will allow you to use the TV as quickly as possible. We recommend that you then read the complete instruction book, and keep it to refer to as you explore the range of advanced features that this LCD TV offers. Contents Accessories ................................................................ 2 Warnings and Precautions ..................
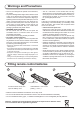
Warnings and Precautions • This TV set is designed to operate on AC 220-240 V, 50 / 60 Hz. • To prevent damage which might result in electric shock or fire, do not expose this TV set to rain or excessive moisture. This TV must not be exposed to dripping or splashing water and objects filled with liquid, such as vases, must not be placed on top of or above the TV. • Keep unneeded small parts and other objects out of the reach of small children. These objects can be accidentally swallowed.
Cable cover removal and fitting Removal 1. Push down hooks and pull the cover slightly towards yourself to disengage the claws (at 3 points). 2. Slowly pull out in the downward direction. Fitting 1. Insert the claws (at 3 points) at the bottom end. 2. Push until it clicks. Note: To avoid interference appearing on the screen, do not bundle the RF cable and mains lead together. How to open the front cover PULL PULL Raise the lower part of the door labeled “PULL”.
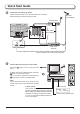
Quick Start Guide 1 Connection and setting up options Please ensure that the unit is disconnected from the mains before attaching or disconnecting any leads. RF cable (Not supplied) SET TOP BOX AV1 AV2 AV4 COMPONENT L Y R AUDIO Scart cables (Not supplied) PB RGB VIDEO VIDEO S-VIDEO RGB VIDEO S-VIDEO PR VIDEO RF cable (Not supplied) VCR / DVD Recorder OR Plug in aerial and connect ancillary equipment. 2 Connect the mains plug to the wall socket. Press the [ set on.
Quick Start Guide 3 Select your country. For Belgium, Switzerland and E.Eu, select the desired language. If you wish to perform manual tuning, press the Green button. See page 16. Land Green Press the Red button to start Auto Setup. Deutschland Österreich France Italia España Portugal Nederland Danmark Sverige Norge Suomi Belgien Schweiz ELLADA Polska Česká republika Magyarország E.Eu Start ATP OK Suchlauf Abbruch Red Auto setup will begin, your stations will be located and stored.
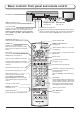
Basic controls: front panel and remote control On / Off switch STR (Normalization store) Used to store tuning and other function settings. F (Function select) Displays the On Screen Display functions, use repeatedly to select from the available functions Volume, Contrast, Brightness, Colour, Sharpness, Tint (in NTSC mode), Bass, Treble, Balance and Tuning mode. Headphones jack AV3 terminals (see page 24) (see page 24) TV/AV button (see page 24) Increases or decreases the programme position by one.
Using the On Screen Displays Many features available on this TV can be accessed via the On Screen Display menu system. Use the remote control as shown below to access and adjust features as desired. The MENU button is used to open the main menus and also to return to the previous menu. MENU OK The up and down cursor buttons are used to move the cursor and select menus. The left and right cursor buttons are used to access menus, adjust levels or to select from a range of options.
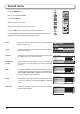
Picture menu Press the MENU button. MENU Move to choose Picture menu. OK Access Picture menu. Move to choose menu option. Adjust chosen option or access chosen menu. Press the EXIT button at any time to go back to watching TV. 1 2 3 4 5 6 7 8 9 C 0 N EXIT TV Viewing mode The Viewing mode menu allows you to select four different screen settings - Dynamic, Normal, Cinema and Auto.
Sound menu Press the MENU button. MENU Move to choose Sound menu. OK Access Sound menu. Move to choose menu option. Adjust chosen option or access chosen menu. Press the EXIT button at any time to go back to watching TV. 1 2 3 4 5 6 7 8 9 C 0 N EXIT TV Press the OK button after having adjusted some features to store the new settings as the default (replacing the factory setting). Bass Increase or decrease level to enhance or minimise lower, deeper sound output.
Setup menu Press the MENU button. MENU Move to choose Setup menu. OK Access Setup menu. Move to choose menu option. Adjust chosen option or access chosen menu. Press the EXIT button at any time to go back to watching TV. 1 2 3 4 5 6 7 8 9 C 0 N EXIT TV Q-Link Allows you to select which AV terminal is to be used for data communication between this TV and a compatible recording device. Choose from Off, AV2 and AV4. See page 17.
Tuning menu – overview Press the MENU button. MENU Move to choose Setup menu. OK Access Setup menu. Move to choose Tuning menu. 1 2 3 4 5 6 7 8 9 C 0 Access Tuning menu. Move to choose menu option. N Adjust chosen option or access chosen menu. TV Press the EXIT button at any time to go back to watching TV. Press the OK button after having adjusted some features to store the new settings as the default (replacing the factory setting).
Tuning menu – Programme edit MENU Press the MENU button. Move to choose Setup menu. OK Access Setup menu. Move to choose Tuning menu. 1 2 3 4 5 6 7 8 9 C 0 Access Tuning menu. Move to choose Programme edit. N Access Programme edit. TV Move to choose programme position (e.g., Prog. 3). Make required change, e.g., moving a programme channel (see the relevant procedure below). EXIT Press the EXIT button at any time to go back to watching TV.
Tuning menu – Programme edit Renaming a programme channel Move to the Name column. Programme edit Prog. 1 2 3 4 5 Choose the new character. The box at the bottom of the screen shows the character currently selected. : : : : : Chan. Name Lock Sys CH44 CH51 CH41 CH47 CH37 XYZ FTP 123 456 Off Off Off Off Off SC1 SC1 SC1 SC1 SC1 ABCDEFGHIJKLMNOPQRST UVWXYZ+-. 0123456789 Move to the next character position. Continue until renaming is done. Press the OK button to store the new name.
Tuning menu – Auto setup Auto setup automatically retunes your TV. This feature is useful if, e.g., you move house and wish to retune your TV to receive the local stations. MENU Press the MENU button. OK Move to choose Setup menu. Access Setup menu. Move to choose Tuning menu. Access Tuning menu. 1 2 3 4 5 6 7 8 9 C 0 N Move to choose Auto setup. Access Auto setup. Press to confirm start.
Tuning menu – Manual tuning It is possible to retune individual programme positions: MENU Press the MENU button. OK Move to choose Setup menu. Access Setup menu. Move to choose Tuning menu. 1 2 3 4 5 6 7 8 9 C 0 Access Tuning menu. N Move to choose Manual tuning. Access Manual tuning. TV Select the programme position to be tuned. 1 CH12 Press repeatedly until required station is found. Manual tuning When the desired station is found, press the OK button to store.
Q-Link Q-Link allows the television to communicate with a compatible VCR or DVD Recorder. For Q-Link communication to work, the TV must be connected to a recording device with the “Q-Link”, “NEXTVIEWLINK”, “DATA LOGIC”, “Easy Link”, “Megalogic” or “SMARTLINK” logo using a “fully wired” Scart cable between the AV2 / AV4 terminal of the television and the appropriate terminal on your VCR or DVD Recorder.
Aspect Controls The Widescreen TV will allow you to enjoy viewing the picture at its optimum size and aspect, including widescreen cinema format pictures. Press the ASPECT button repeatedly to move through the eight aspect options: ASPECT OK Panasonic Auto, 16:9, 14:9, Just, 4:3, Zoom1, Zoom2 and Zoom3 OR Press the ASPECT button. Whilst the on screen selector keys are displayed, use the Red or Green buttons to move in either direction through the eight aspect options.
Aspect Controls 16 : 9 16 : 9 16:9 will display a true 16:9 (anamorphic) picture with no aspect distortions. 16 : 9 14 : 9 14 : 9 14:9 will display a 14:9 picture at its standard 14:9 size without any stretching. 14 : 9 Just Just Use Just when you wish to expand a 4:3 picture to fill the whole screen (rather than watching a programme with black stripes down the left and right sides of the picture).
VCR / DVD operation The Remote Control is capable of operating some functions of selected Panasonic VCRs and DVD (Digital Versatile Disc) equipment. Some VCR and DVD equipment have different functions, so to ensure compatibility please refer to the equipment’s instruction book or consult your dealer for details. Standby Press to switch the VCR, DVD or DVD recorder to Standby mode. Press again to switch back on.
Teletext operation • Teletext features may vary depending on the Broadcasting Companies and is only available if the channel selected is transmitting Teletext. • Pressing the MENU button whilst in Teletext operation will display the contrast function with a cyan bar, press the left and right cursor buttons to alter the setting as required. • Pressing the MENU button whilst in Teletext operation will display special function options at the bottom of the screen.
Teletext operation It is not possible to change the programme position when in News flash, Update or Sub Coded Page Access operation. Blue 1 2 3 4 5 6 8 9 7 OK F.P. 0 VCR MENU Yellow Favourite Page (F.P.) Stores a favourite page in memory for instant recall. To store such a page, the TV must be in List mode, and the programme position must be from 1 - 25. Press the Blue button, select the page number, then press and hold the OK button. The page number is now stored. Press F.P.
Teletext operation MENU Blue Alternatively, if you know which sub page you require, press the MENU button (to display special functions) followed by the Blue button; T**** will be displayed where the page number is normally found. Enter desired sub page number before the T**** disappears. e.g., to select page 6 enter 0, 0, 0 and 6. Press the Yellow button to view the TV picture whilst waiting for more sub pages to be found. The sub pages found will be displayed across the top of the screen.
Audio / Video connections It is possible to connect a variety of additional equipment to this TV. The following pages detail how to connect external equipment to the front and rear of the TV. Once your equipment is connected, use the following procedure to view the input: TV/AV Press the TV/AV button. Whilst the on screen selector keys are displayed, select the page by pressing the Red or Blue button and then press coloured buttons to select the AV source you wish to view.
Audio / Video connections To bundle the cables with the clamper To tighten: To loosen: Pull Keep the Pull knob pressed. Note: Do not put the RF cable and the mains lead together to avoid noise.
Troubleshooting If there is a problem with your TV please refer to the table below to determine the symptoms, then carry out the suggested check. If this does not solve the problem, please contact your local Panasonic dealer, quoting the model number and serial number (both found on the rear of the TV).
Maintenance To clean this set, wipe with a soft, dry cloth. Neutral If the surfaces are extremely dirty, use a soft cloth dipped in soap-and-water solution or a detergent weak detergent solution. • Use eyeglass cleaner to remove stubborn dirt from the LCD. • Never use alcohol, paint thinner or benzine to clean this set. • Before using chemically treated cloth, read the instructions that came with the cloth carefully. • Do not wipe the LCD with water. Wipe the cabinet with a soft cloth.
Specifications Power Source Power Consumption LCD Screen Size Sound Speaker Audio Output Headphones Scanning format Receiving Systems / Band name Aerial - Rear Operating Conditions Connection Terminals AV1 (Scart connecter) AV2 (Scart connecter) AV3 VIDEO S-VIDEO AUDIO L - R AV4 (Scart connecter) COMPONENT VIDEO AUDIO L - R Output AUDIO L - R Dimensions ( W × H × D ) Including TV Stand TV Set Only Weight TX-26LX50F AC 220-240 V, 50 / 60 Hz Average use : 126 W Standby condition : 0.