
Operating instructions


6
7
Quick Start Guide
TV
F TV AV
PULL
OPTION
MULTI WINDOW
SD CARD
EXIT
ASPECT
RETURN
INPUT
DIRECT TV REC
F.P.
AV
SD CARD
Identifying ControlsAccessories / Options
•
Identifying Controls
•
Accessories / Options
Batteries for the Remote
Control Transmitter
(2)
•
R6 (UM3)
Clamper
Remote Control
Transmitter
•
N2QAYB000116
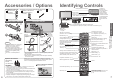
Standard accessories
Check that you have the accessories and items shown
Operating Instructions
Pan European Guarantee Card
Installing remote’s batteries
1
Pull
open
Hook
2
Note the correct
polarity (+ or -)
Close
Caution
•
Incorrect installation may cause battery
leakage and corrosion, resulting in
damage to the remote control.
•
Do not mix old and new batteries.
•
Do not mix different battery types (such
as alkaline and manganese batteries).
•
Do not use rechargeable (Ni-Cd)
batteries.
•
Do not burn or breakup batteries.
Using the clamper
Optional accessories
Wall-hanging
bracket
TY-WK32LR2W
WARNING!
•
Failure to use a Panasonic bracket or choosing to mount the unit
yourself will be done at the risk of the consumer.
Any damage resulting from not having a professional installer mount
your unit will void your warranty.
•
Always be sure to ask a qualifi ed technician to carry out set-up.
Incorrect fi tting may cause equipment to fall, resulting in injury and
product damage.
•
Do not mount the unit directly below ceiling lights (such as
spotlights, fl oodlights or halogen lights) which typically give off high
heat. Doing so may warp or damage plastic cabinet parts.
How to remove the TV Stand
Remove four screws.
Rear of the TV
Please contact your nearest Panasonic dealer to purchase the
recommended wall-hanging bracket. For additional details, please
refer to the wall-hanging bracket installation manual.
•
Do not bundle the RF cable and mains lead together (could cause
distorted image).
•
Fix cables with clampers as necessary.
•
When using the optional accessory, follow the option’s assembly
manual to fi x cables.
Increases or
decreases the
programme position
by one. When a
function is already
displayed, press to
increase or decrease
the selected function.
When in Standby
mode, switches TV
On.
Mains power On / Off switch
Lift door to open
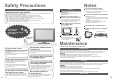
C.A.T.S. (Contrast Automatic Tracking System) sensor
(senses brightness to adjust picture quality in “Auto” Mode in Picture Menu) (p. 20)
Remote control
signal receiver
Changes the
input mode
Function select
•
Volume / Contrast / Brightness / Colour /
Sharpness / Tint (NTSC mode) / Bass /
Treble / Balance / Auto Setup (p. 22)
Cursor buttons to make selections and
adjustments
Power LED
•
Standby: red
On: green
SD CARD slot (p. 29)
Standby On / Off switch
(Switches TV On or Off standby)
Sound mute On / Off
Multi window
(p. 13)
Selects programmes in sequence
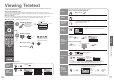
Teletext (p. 16)
OK button to confi rm selections and choices
Press after selecting programme positions to
quickly change programme.
VCR / DVD operations (p. 15)
Volume
Programme Information (p. 13)
Teletext Index (p. 17)
Coloured buttons used for the
selection, navigation and operation of
various functions
EXIT (Returns to TV screen)
DIRECT TV Recording
To immediately record programme in VCR /
DVD recorder with Q-Link connection
(p. 30)
Programme / channel change buttons (0-9)
and Teletext page buttons.
(p. 12 and p. 16)
When in Standby mode, switches TV On.
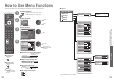
Access VIERA Link Menu (p. 33)
Changes aspect ratio (p. 13)
Option menu
Sets the preferred settings of viewing
and sound options easily (p. 12)
Main Menu
Press to access VIERA Link, Picture,
Sound and Setup menus (p. 18)
Viewing a favourite teletext channel (p. 17)
Surround (p. 20)
Changes the input mode
TV -
changes TV mode
(p. 14)
AV - changes AV input mode (p. 14)
Viewing SD Card (p. 28)
Returns to the previous menu
Still picture (p. 12)
Teletext Hold (p. 17)
HDMI3 terminal
To tighten:
Keep the
knob pressed
Rear of the TV
To loosen:
Clamper
(Standard accessory)
Clamper
that bundle
mains lead
Bundle the
cables:
Hook the
clamper:
Tight
Lock