WELCOME Dear Panasonic Customer, Welcome to the Panasonic family of customers. We hope that you have many years of enjoyment from your new color television. This is a very advanced television; however, the Quick Start Guide will allow you to use the TV as quickly as possible. You can then read the instructions completely and retain them for future reference. Warnings and Precautions .. .
WARNINGS AND PRECAUTIONS The On/Off switch on this model does not fully disconnect the TV iron the mains supply. Remove the mains plug from the wall socket when the TV set js not used for a prolonged e This TV set is designed o operate on 220 240V, 50Hz prevent damage which might result in electric shack or period of time. fire, do not expose this TV set to rain or excessive moisture, P ime. This TV must not be exposed to dripping or splashing water .
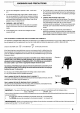
'ACCESSORIES L J e Check that you have the accessories and items shown | H‘ Operating Instruction book Remote Control Transmitter } Batteries for the Remote Control TQBBE3096 EURS11210 i Transmitter, (UMB) size) CRT Guarantee Questionnaire VS~32PK {Video cabins) » (Video cabinet) Slice off the battery cover insert batteries note correct polarity Replace the cover {+ and -} Notes: ® Make sure that the batteries are fitted the correct way round. * Do not mix old batteries with new batteries.
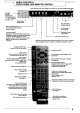
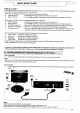
BASIC CONTROLS : FRONT PANEL AND REMOTE CONTROL Red fight indicates Standby mode. Use Standby switch, buttons to switch TV On — MAINS Power On/Off switch STR (Normalization store) Used to store tuning and other function settings F (Function select) Displays the On Screen Display functions, use repeatedly to select from the available extinctions — Volume, Contrast, Brightness, Co lour, Press here arid pane flap to expose TV controls, front AV3 and headphone terminals.
QUICK START GUIDE g Connection and setting up options 1. ff connecting the TV using an AF cable only, process to option 1. 2. If connecting the TV using Cart and RF cables, proceed 1o option 2. 3. If connecting the TV to a Q-Link {or Q-Link compatible} VOR, proceed 1o option 3 on page 7. 4.
QUICK START GUIDE N : What is Q-Link ? Q-Link allows direct communication between the TV and a Q-Link (or G-Link compatible} VCR, this will enable features such as downloading of tuning information from the TV to the VCR.
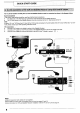
T QUICK START GUIDE For Q-Link 1o function correctly the TV, VCR and Satellite Receiver must be connected as shown in the diagram below. Cart Connections “Fully wired” Cart cables should be used for all of the Cart connections. ® The AV2 Cart of the VCR must be connected to the VCR socket of the Satellite Receiver.
QUICK START GUIDE Programmed will appear immediately if your dealer /4 Ensure that the VCR is in Standby mode. has programmed the TV for you. f10 N Switch ON your Satellite Receiver; to ensure —_ It the TV has not been programmed for you then Auto reliable tuning select either SKY ONE or SKY setup will begin. TV stations will be located, sorted into NEWS. order and stored ready for use. Plug the TV into mains socket and switch ON.
'5) NS Notes QUICK START GUIDE TV to VCR Download It & "Q-Link”, “NEXTVIEWLINK” or compatible VCR has been connected to the AV2 socket before starting Step 1, programmer information will be downloaded to the VOR. Downloaded tuning information will match the television’s. Nat all VCR support this download of program ma information, some may require to be started manually.
\‘k Quick START GUIDE Slight tilting of the picture may be noticeable or colored patches may sometimes appear at the corners of the screen (color purity). The Geomagnetic Correction feature can be used to eliminate them, if necessary: First, ensure the Auto setup and Q Link download procedures are complete.
USING THE ON SCREEN DISPLAYS This TV has a comprehensive system of On Screen Display menus to access adjustments and options o 2 23R Menu Title B e gfi%finflujz’ . B gnG Sub-menus iRy Tel oio? Bai Some selections, for example, Contrast, Brightness, Co lour and Sharpies will allow you to increase or decrease their label. Some selections, jor example, Ofttimes, allow a change of setting to be made. Some selections, for example Turing emus, will lad to 3 further menu.
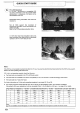
ASPECT CONTROLS \2 The widescreen TV will allow you to enjoy viewing the picture at its maximum size, including widescreen ‘cinema format’ pictures. Note: Just mode is not available when viewing an RGB source, Press the ASPECT button to move through the ASPECT six aspect options: Panasonic Auto, 4:3, Zoom, a 18:9 (Full), 14:9 and Just Panasonic Auto determines the best aspect ratio to use to display the picture you are viewing.
ASPECT:CONTROLS 4:3 will display a 4:3 picture at its standard 4.3 size without any elongation, Zoom mode magnifies the central section of the picture. The picture can be moved and enlarged vertically using the colored keys. The former adjustment is useful for viewing any sub—titles which may appear outside the picture. The on screen selector keys that appear for some aspect functions will clear after a few seconds.
ASPECT CONTROLS L , 18:9 (Full) will display the picture at its maximum size but with slight elongation, 14:9 will display the picture at s maximum size without any elongation. Just mode will display a 4:3 picture at maximum size but with aspect correction applied to the center of the screen so congregationalist only apparent at the left and right edges of the screen, The size of the picture will depend on the original signal.
PICTURE MENU PICTURE Open the Picture menu Novae to your choice increase or decrease labels or set options LATVIA Press the TV/AV bunion to exit the Picture menu The Contrast, Brightness, Co lour and Sharpness|evelscanbeadjustedtosuit your own preferences. The Maladjustment will only appear as amenity item if you have an SCENT signal source connected 1o the TV and will allow adjustment of the hue. Co lour balance TheColourbalancesettingallowsyou OO to set the overall color tone of the picture.
SOUND MENU SOUND Open the Sound menu o Move to your choice “ increase or decrease levels or set options UL LATVIA NICK ode, Ambiance Press the TV/AV bunion 1o exit the Send menu The Volume adjustment sets the overall output volume, Bass adjustment will emphasis the dower, deeper frequencies and can be increased or decreased.
SETUP. MENU The Setup menu provides access to various advanced features and also to the Tuning menu SET UP Open the Setup menu Move to your choice Increase or decrease levels, set options or access further menus é¢ TV/AV Press the TV/AV button to exit ‘ the Setup menu Teletext The Teletextoptionallowsyoutochoose Yo between FASTEST or LIST mode. See page 33. Off i Off timer will switch the TV off within a timer presentiment which you can choose from 90O COLLOQ between 0to %0 minutes in 16 minute intervals.
\. Open the Setup menu Move to Tuning menu Access Tuning menu Move to your choice increase or decrease feels, set options or access truther menus TUNING MENU overview SET UP b Thea TV/AV Press the TV/AV button to exit Programmer “edit TR Toad ) Manual ~tuning Decoder (AV2) 0O shipping cognition Owner ID Accessing the Programmer edit menu will allow stations to be moved, added, deleted, named or locked. See page 20. The Auto setup menu allows you to automatically re tune the TV. See page 24.