English Model No. TX-39A400B TX-42A400B TX-50A400B Operating Instructions LCD Television Thank you for purchasing this Panasonic product. Please read these instructions carefully before operating this product and retain them for future reference. The images shown in this manual are for illustrative purposes only.
Even if no special notation has been made of company or product trademarks, these trademarks have been fully respected. DVB and the DVB logos are trademarks of the DVB Project. HDMI, the HDMI Logo, and High-Definition Multimedia Interface are trademarks or registered trademarks of HDMI Licensing LLC in the United States and other countries. Manufactured under license from Dolby Laboratories. Dolby and the double-D symbol are trademarks of Dolby Laboratories. For DTS patents, see http://patents.dts.
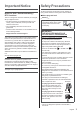
Important Notice Notice for DVB / Data broadcasting / IPTV functions This TV is designed to meet the standards (as of August, 2013) of digital services. Not all the features are available depending on the country, area, broadcaster, service provider and network environment. The compatibility with future services is not guaranteed. Check the latest information on the available services at the following website. http://panasonic.
Insert the mains plug fully into the socket outlet. Ensure that the mains plug is easily accessible. Disconnect the mains plug when cleaning the TV. Do not touch the mains plug with wet hands. Do not damage the mains lead. • Do not place a heavy object on the lead. • Do not place the lead near a high temperature object. • Do not pull on the lead. Hold onto the mains plug body when disconnecting the plug. • Do not move the TV with the lead plugged into a socket outlet.
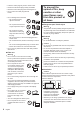
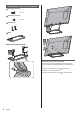
Moving the TV Caution Accessories Before moving the TV, disconnect all cables. Move the TV with at least two people. Support as shown to avoid injury by the TV tipping or falling. When not in use for a long time Remote Control (p. 10) N2QAYB000816 or N2QAYB000975 Pedestal (p. 6) Caution This TV will still consume some power even in the Off mode, as long as the mains plug is still connected to a live socket outlet.
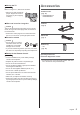
Assembling / Removing the pedestal Assembly screw (4) M5 × 15 Assembly screw (4) M4 × 12 Bracket (2) 2 Base 3 Assembling the pedestal B A 1 C D Removing the pedestal from the TV Be sure to remove the pedestal in the following way when using the wall-hanging bracket or repacking the TV. 1 Remove the assembly screws from the TV. 2 Lift the TV from the pedestal. 3 Remove the assembly screws 6 English from the bracket.
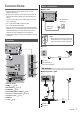
Connections Basic connections Mains lead External equipment and cables shown are not supplied with this TV. Please ensure that the unit is disconnected from the mains socket before attaching or disconnecting any cables. Check the terminal type and cable plugs are correct when connecting. Use a fully wired HDMI compliant cable. AC 220-240 V 50 / 60 Hz Use a fully wired SCART cable. Keep the TV away from electronic equipment (video equipment, etc.
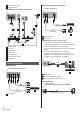
DVD Recorder / VCR Terrestrial aerial Camcorder / Game equipment (VIDEO equipment) DVD Recorder (VCR) / Set top box TV TV (Viewing) (Listening) Game equipment Camcorder Amplifier (to listen with speakers) Use HDMI2 for connecting an amplifier. This connection is applicable when using an amplifier that has ARC (Audio Return Channel) function. SCART cable As for an amplifier without ARC function, use DIGITAL AUDIO.
Common Interface Turn the TV off with Mains Power On / Off switch whenever inserting or removing the CI module. If a smart card and a CI module come as a set, first insert the CI module, then insert the smart card into the CI module. Insert or remove the CI module completely in the correct direction as shown. Normally encrypted channels will appear. (The viewable channels and its features depend on the CI module.
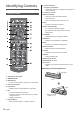
Identifying Controls Remote Control 8 Coloured buttons (red-green-yellow-blue) Used for the selection, navigation and operation of various functions. 9 Volume Up / Down 10 Numeric buttons Changes channel and teletext pages. Sets characters. When in Standby mode, switches TV on. 11 Still Freezes / unfreezes the picture. 12 Input mode selection TV - switches to DVB / Analogue. AV - switches to AV input mode from Input Selection list. 13 TV Guide Displays Electronic Programme Guide.
First time Auto Setup Indicator / Control panel 1 2 3 4 5 6 7 Rear side of the TV Automatically sets up the TV and searches for available TV channels when the TV is turned on for the first time. These steps are not necessary if the setup has been completed by your local dealer. Please complete connections (p. 7 - 9) and settings (if necessary) of the connected equipment before starting Auto Setup. For details of settings for the connected equipment, read the manual of the equipment.
Auto Setup is now complete and your TV is ready for viewing. If tuning has failed, check the connection of the RF cable, and then follow the on-screen instructions. To retune all channels [Automatic Channel Search] (p. 21) To initialise all settings [Shipping Condition] (p. 21) Watching TV 1 Turn power on (TV) or (Remote Control) Mains power On / Off switch should be on. (p. 10) 2 Select the mode 3 Select a channel up down or To select 2 or more-digit channel position number, e.g.
To confirm another tuned channel name Note Aspect is fixed to [16:9] when [Viewing Mode] is set to [Game] in the Picture Menu. Aspect cannot be changed in teletext service. To watch the channel listed in the banner Information banner Display Information banner Also appears when changing a channel.
Viewing Text Service will have to press the TEXT button again when the download is complete. Teletext services are the text information provided by the broadcasters. While navigating text services, you will find there is a short delay when moving between pages while the page downloads. There is often a prompt shown on the page (for example “Loading”) to let you know that this is happening. The features may vary depending on the broadcasters.
STILL (Hold) Stop automatic updating (If you wish to hold the current page without updating) Press again to resume. FULL / TOP / BOTTOM (green) (TOP) (BOTTOM) Normal (FULL) View sub page View sub page (Only when Teletext is more than one page) The number of sub pages varies depending on the broadcasters (up to 79 pages). It may take some time for searching, during which time you can watch TV.
Watching External Inputs Connect the external equipment (VCRs, DVD equipment, etc.) and you can watch through the input. 1 Turn the TV on When connecting with SCART or HDMI Receives input signals automatically when playback starts. If input mode is not switched automatically and Perform Check the setup of the equipment.
Using Menu Functions Picture Viewing Mode Selects your favourite picture mode for each input. [Dynamic]: Improves contrast and sharpness for viewing in a bright room. 1 2 Display the menu [Normal]: Normal use for viewing in a normal lighting condition. [Cinema]: Improves the performance of contrast, black and colour reproduction for watching movies in a darkened room. Select the menu [True Cinema]: Reproduces the original image quality precisely without any revision.
Colour Matrix Selects the suitable colour parameter for SD (Standard definition) or HD (High definition) signal. This function is available with 480p or 576p input signal from COMPONENT or HDMI terminal. AV Colour System Selects optional colour system based on video signals. For AV input 16:9 Overscan Selects the screen area displaying the image for 16:9 aspect. [On]: Enlarges the image to hide the edge of the image. [Off]: Displays the image in the original size.
SPDIF Selection SPDIF: A standard audio transfer file format Selects the initial setting for digital audio output signal from DIGITAL AUDIO and HDMI2 (ARC function) terminals. [Auto]: Dolby Digital Plus, Dolby Digital and HE-AAC multi-channel are output as Dolby Digital Bitstream. MPEG is output as PCM. DTS is output as DTS for video contents of Media Player. [PCM]: Digital output signal is fixed to PCM.
Time Zone Adjusts the time data. The time data will be corrected based on GMT. Sorts channels. (p. 22) Channel List Edit Edits channels. (p. 22) Clear block Clears the channel lists. (p. 22) Auto Standby Automatically turns the TV to Standby mode for energy saving when no operation is performed for 4 hours. [Off] / [2 hours] / [4 hours] Automatic input switching with the connected equipment affects this function and time-count will be reset.
System Menu Shipping Condition Resets all settings to the original condition. Common Interface Sets to watch encrypted channels, etc. (p. 12) System Update Downloads new software to this TV. (p. 23) Tuning and Editing Channels You can retune channels or make your favourite channel lists, skip unwanted channels, etc. Software License Displays the software licence information. System Information Displays the system information of this TV.
2 Swap Check DVB signal condition DVB-T Signal Condition Channel Signal Level Signal Condition Bit Error Rate 22 0 0 0.00E-06 These bars show the maximum signal value of the selected channel. Ɣ To change page (page up) (red) Ɣ To change page (page down) Editing channels (green) Favourites Edit Ɣ To select Create your favourite channel lists from various broadcasters.
Child Lock You can lock specific channels / AV input terminals and control who watches them. When the locked channel / input is selected, a message appears. Enter the PIN number to watch. [Setup] [Child Lock] A new version of software may be released for download to enhance the performance or operations of the TV. Download may take a few hours. During software download and update, DO NOT switch off the TV. 1 Enter the PIN number (4 digits) Enter the PIN number twice at first setting.
Using Media Player Media Player allows you to enjoy photo, video or music recorded on a USB Flash Memory. Photo mode: To change the contents While the thumbnail is displayed, display the contents selection (blue) Photo mode Digital photo data will be displayed. Example: Thumbnail - [All photos] Music mode: Media Player Digital music data will be played back. Photo All photos Movie mode: Digital video data will be played back. Supported file format “Supported file format in Media Player” (p.
Note To change aspect Picture quality may become lower depending on the slideshow settings. Picture setting may not work depending on the slideshow settings. Video Setup Video Setup Menu Music mode Repeat Example: Thumbnail - [Folder view] Media Player Music Folder view Playback repeat within the selected file (depending on the content). My Music_1 My Music_2 My Music_3 Play Select Play Folder EXIT RETURN USB 2.
Technical Information Note Aspect Control Signal Programmes usually contain an “Aspect Control Signal” (Widescreen signal, Control signal through SCART / HDMI terminal). In [Auto] mode, aspect mode will appear in the top left of the screen if a Widescreen signal (WSS) or a Control signal through SCART (pin8) / HDMI terminal is found. The aspect will switch to the appropriate ratio.
Video AVI (.avi) Music MP3 (.mp3) Video codec: H.264 BP/MP/HP, MPEG1, MPEG2, MPEG4 SP/ASP, VC-1, Windows Media Video Ver. 9 AAC (.m4a) Audio codec: AAC, Dolby Digital, Dolby Digital Plus, DTS core, HE-AAC, LPCM, MPEG Audio, MP3, WMA Some subtitles or chapter functions may not be available. WMA Pro and WMA Lossless are not supported. MKV (.mkv) Video codec: H.
FAQs Before requesting service or assistance, please follow these simple guides to solve the problem. When an error message appears, follow the message’s instructions. If the problem still persists, contact your local Panasonic dealer or the authorised service centre. Block noise, frozen or disappearing image occurs in DVB mode / White spots or shadow image (ghosting) occurs in Analogue mode / Some channels cannot be tuned Check the position, direction and connection of the aerial.
The LCD panel moves slightly and clattered sound is heard when it is pushed with a finger There is a little gap around the panel to prevent damage to the panel. This is not a malfunction. Overcurrent error message appears The connected USB device might cause this error. Remove the device and turn the TV to standby mode with Standby On / Off switch, then turn it on again. Check foreign objects are not inside the USB port. Check you can get Freeview HD in your area.
Specifications AV2 input (COMPONENT / VIDEO) VIDEO RCA PIN Type × 1 TV 1.0 V[p-p] (75 :) Model Name AUDIO L - R RCA PIN Type × 2 39-inch model : TX-39A400B 0.5 V[rms] 42-inch model : TX-42A400B 50-inch model : TX-50A400B Dimensions (W × H × D) Y 1.0 V[p-p] (including synchronisation) PB, PR 39-inch model ±0.
M.NTSC Rear of the TV Playback from M.
Information for Users on Collection and Disposal of Old Equipment and used Batteries These symbols on the products, packaging, and/or accompanying documents mean that used electrical and electronic products and batteries should not be mixed with general household waste. For proper treatment, recovery and recycling of old products and used batteries, please take them to applicable collection points, in accordance with your national legislation and the Directives 2002/96/EC and 2006/66/EC.