Model No. English TX-40DX600B TX-49DX600B TX-55DX600B Operating Instructions LED TV For more detailed instructions, please refer to [eHELP] (Built-in Operating Instructions). ● How to use [eHELP] (p. 17) Thank you for purchasing this Panasonic product. Please read these instructions carefully before operating this product and retain them for future reference. Please carefully read the “Safety Precautions” of this manual before use. The images shown in this manual are for illustrative purposes only.
● For information about the trademarks, refer to [eHELP] (Support > Licence). The illustration for TX-49DX600B is used in this manual unless otherwise mentioned. Illustrations shown may be different depending on the model.
Important Notice Notice for DVB / Data broadcasting / IPTV functions This TV is designed to meet the standards (as of August, 2015) of digital services. ● Not all the features are available depending on the country, area, broadcaster, service provider and network environment. ● Compatibility with future services is not guaranteed.
● This TV is designed to operate on AC 220-240 V, 50 / 60 Hz. ● Insert the mains plug fully into the mains socket. ● To turn Off the apparatus completely, you must pull the mains plug out of the mains socket. Consequently, the mains plug should be easily accessible at all times. ● Disconnect the mains plug when cleaning the TV. ● Do not touch the mains plug with wet hands. ● Do not damage the mains lead. •• Do not place a heavy object on the lead. •• Do not place the lead near a high temperature object.
■■Suffocation / Choking Hazard Warning ● The packaging of this product may cause suffocation, and some of the parts are small and may present a choking hazard to young children. Keep these parts out of reach of young children. ■■Pedestal Warning ● Do not disassemble or modify the pedestal. Caution ● Do not use any pedestal other than the one provided with this TV. ● Do not use the pedestal if it becomes warped or physically damaged. If this occurs, contact your nearest Panasonic dealer immediately.
■■Excessive volume LED TV Caution ● Do not expose your ears to excessive volume from the headphones. Irreversible damage can be caused. ● If you hear a drumming noise in your ears, turn down the volume or temporarily stop using the headphones. ■■Battery for the Remote Control Caution ● Incorrect installation may cause battery leakage, corrosion and explosion. ● Replace only with the same or equivalent type. ● Do not mix old and new batteries.
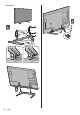
Accessories Standard accessories Remote Control Assembling / Removing the pedestal Assembly screw (4) M5 × 10 Assembly screw (4) (p. 14) ● N2QAYB001009 M4 × 12 Bracket (2) Pedestal (p. 7) Base Mains lead (p. 10) Batteries (2) ● R6 (p. 15) Assembling the pedestal ● Select a method to assemble the pedestal from the following 2 styles. ● Do not assemble the pedestal by any method other than those specified below.
■■ 3 1 A C D 2 8 English B
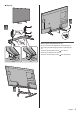
■■ 3 1 B A C D Removing the pedestal from the TV Be sure to remove the pedestal in the following way when using the wall-hanging bracket or repacking the TV. 1 Remove the assembly screws from the TV. 2 Pull out the pedestal from the TV. 3 Remove the assembly screws from the bracket.
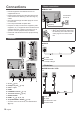
Connections Basic connections ■■Mains lead ● External equipment and cables shown are not supplied with this TV. ● Please ensure that the unit is disconnected from the mains socket before attaching or disconnecting any cables. ● Check the terminal type and cable plugs are correct for connection. ● Use a fully wired HDMI compliant cable. ● Keep the TV away from electronic equipment (video equipment, etc.
■■Satellite receiver Connections for 4K compatible equipment TV TV HDMI cable 4K compatible equipment ● Connect the 4K compatible equipment to HDMI terminal using a 4K compatible cable and you can watch content in 4K format. ● The valid 4K format varies depending on the HDMI terminal. For information about the valid format, refer to [eHELP] (Watching > 4K resolution > Valid 4K format).
■■Amplifier (listening with external speakers) Other connections ● Use HDMI2 to connect the TV to an amplifier which has ARC (Audio Return Channel) function. ■■DVD Player (COMPONENT equipment) If connecting to an amplifier without ARC function, use DIGITAL AUDIO. TV (Viewing) (Listening) ● To enjoy multi-channel sound from external equipment (e.g. Dolby Digital 5.1ch), connect the equipment to the amplifier. For information about the connections, read the manuals of the equipment and amplifier.
■■Common Interface ● Turn the TV off with Mains Power On / Off switch whenever inserting or removing the CI module. ● If a smart card and a CI module come as a set, first insert the CI module, then insert the smart card into the CI module. ● Insert or remove the CI module completely in the correct direction as shown. ● Normally encrypted channels will appear. (Viewable channels and their features depend on the CI module.
Identifying Controls Remote Control 8 [Option Menu] ● Easy optional setting for viewing, sound, etc. 9 Coloured buttons (red-green-yellow-blue) ● Used for the selection, navigation and operation of various functions. 10 Volume Up / Down 11 Numeric buttons ● Changes channel and teletext pages. ● Sets characters. ● When in Standby mode, switches TV on. 12 [eHELP] ● Displays [eHELP] (Built-in Operating Instructions). 13 Input mode selection ● TV - switches to DVB / Analogue mode.
■■Installing / Removing batteries Pull open Hook Indicator / Control panel ● When pressing 4, 5, 6 buttons, the control panel guide appears on the right side of the screen for 3 seconds to highlight which button has been pressed. 4 5 Close 6 Note the correct polarity (+ or -) 1 7 2 3 Rear side of the TV 1 Remote control signal receiver ● Do not place any objects between the TV remote control signal receiver and remote control.
First time Auto Setup If tuning has failed check the RF cable, and the network connection, and then follow the on-screen instructions. When the TV is turned on for the first time, it will automatically search for available TV channels and give options to set up the TV. ● These steps are not necessary if the setup has been completed by your local dealer. ● Please complete connections (p. 10 - 13) and settings (if necessary) of the connected equipment before starting Auto Setup.
Watching TV How to Use eHELP 1 [eHELP] is the detailed operating instructions built into the TV, and gives a more detailed explanation for a better understanding of the operation of each feature. Turn power on (TV) or (Remote Control) ● Mains power On / Off switch should be on. (p. 15) Displays information bar on the edge of screen for several seconds. ● For information about the operation and settings, refer to [eHELP].
FAQs Before requesting service or assistance, please follow these simple guides to solve the problem. ● For details, refer to [eHELP] (Support > FAQs). The TV does not switch on ● Check the mains lead is plugged into the TV and the mains socket. ● The fuse in the mains plug may have blown. Replace it with one of an identical rating. (p. 3) The TV goes into Standby mode ● Auto power standby function is activated. The remote control does not work or is intermittent ● Are the batteries installed correctly? (p.
Maintenance Specifications First, remove the mains plug from the mains socket. ■■TV Display panel, Cabinet, Pedestal Regular care: Gently wipe the surface of the display panel, cabinet, or pedestal by using a soft cloth to remove dirt or fingerprints. For stubborn dirt: (1) First clean the dust from the surface. (2) Dampen a soft cloth with clean water or diluted neutral detergent (1 part detergent to 100 parts water). (3) Wring out the cloth firmly.
Connection terminals AV input (COMPONENT / VIDEO) VIDEO RCA PIN Type × 1 1.0 V[p-p] (75 Ω) AUDIO L - R RCA PIN Type × 2 0.5 V[rms] Y 1.0 V[p-p] (including synchronisation) PB/CB, PR/CR PAL 525/60 Playback of NTSC tape from some PAL Video recorders (VCR) or NTSC disc playback from DVD player and recorder M.NTSC Playback from M.NTSC Video recorders (VCR) NTSC (AV input only) Playback from NTSC Video recorders (VCR) Aerial input ±0.
■■When using the wall-hanging bracket Please contact your local Panasonic dealer to purchase the recommended wall-hanging bracket.
Disposal of Old Equipment and Batteries Only for European Union and countries with recycling systems These symbols on the products, packaging, and/or accompanying documents mean that used electrical and electronic products and batteries must not be mixed with general household waste. For proper treatment, recovery and recycling of old products and used batteries, please take them to applicable collection points in accordance with your national legislation.