Operating Instructions LED TV English Nederlands Model No. TX-40GX700E TX-50GX700E TX-58GX700E TX-65GX700E TX-40GX710E TX-50GX710E TX-58GX710E TX-65GX710E (image: TX-50GX700E) For more detailed instructions, please refer to [eHELP] (Built-in Operating Instructions). How to use [eHELP] (p. 20) Thank you for purchasing this Panasonic product. Please read these instructions carefully before operating this product and retain them for future reference.
The terms HDMI and HDMI High-Definition Multimedia Interface, and the HDMI Logo are trademarks or registered trademarks of HDMI Licensing Administrator, Inc. in the United States and other countries. Manufactured under license from Dolby Laboratories. Dolby, Dolby Audio, and the double-D symbol are trademarks of Dolby Laboratories. DVB and the DVB logos are trademarks of the DVB Project. x.v.Colour™ is a trademark. DiSEqC™ is a trademark of EUTELSAT.
Important Notice Notice for DVB / Data broadcasting / IPTV functions This TV is designed to meet the standards (as of August, 2018) of DVB-T / T2 (MPEG2, MPEG4AVC(H.264) and MPEG HEVC(H.265)) digital terrestrial services, DVB-C (MPEG2, MPEG4AVC(H.264) and MPEG HEVC(H.265)) digital cable services and DVB-S (MPEG2, MPEG4-AVC(H.264) and MPEG HEVC(H.265)) digital satellite services. Consult your local dealer for availability of DVB-T / T2 or DVB-S services in your area.
Safety Precautions This mark indicates the product operates on AC voltage. To help avoid risk of electrical shock, fire, damage or injury, please follow the warnings and cautions below: Mains plug and lead This mark indicates a Class II or double insulated electrical appliance wherein the product does not require a safety connection to electrical earth (ground). Transport only in upright position. Warning If you detect anything unusual, immediately remove the mains plug.
Do not expose the TV to rain or excessive moisture. This TV must not be exposed to dripping or splashing water and objects filled with liquid, such as vases, must not be placed on top of or above the TV. Do not insert foreign objects into the TV through the air vents. If the TV is used in an area where insects may easily enter the TV. It is possible for insects to enter the TV, such as small flies, spiders, ants, etc.
Built-in wireless LAN Moving the TV Caution Caution Do not use the built-in wireless LAN to connect to any wireless network (SSID*) for which you do not have usage rights. Such networks may be listed as a result of searches. However, using them may be regarded as illegal access. *SSID is a name for identifying a particular wireless network for transmission. Do not subject the built-in wireless LAN to high temperatures, direct sunlight or moisture.
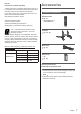
LED TV Accessories Declaration of Conformity (DoC) “Hereby, Panasonic Corporation declares that this TV is in compliance with the essential requirements and other relevant provisions of the Directive 2014/53/EU.” If you want to get a copy of the original DoC of this TV, please visit the following website: Remote Control http://www.ptc.panasonic.eu/doc Authorized Representative: Panasonic Testing Centre Panasonic Marketing Europe GmbH Winsbergring 15, D-22525 Hamburg, Germany 5.15 – 5.
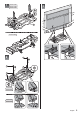
Installing the TV Cushioning material 40-inch model Assembling / Removing the pedestal Assembly screw (4) M5 × 12 50-inch model 58-inch model 65-inch model Assembly screw (4) M4 × 12 Bracket Preparations Bracket Make sure to assemble the pedestal before taking out the TV from the carton. Do not dispose the cushioning material which is also used for removing the pedestal when using the wallhanging bracket or repacking the TV.
1 50-inch model 50-inch 3 58-inch model model 58-inch 65-inch model model 65-inch G 40-inch 40-inch model model G 2 A A C E D F 40-inch 40-inch model model 50-inch model model 50-inch 58-inch 58-inch model model 65-inch model model 65-inch English 9
4 B 5 Note When lifting the TV, support the TV as shown. Do not hold the screen part strongly as shown. Lift the TV with the protective sheet attached. Do not place the TV temporarily on the floor or desk with TV screen facing down. Note Remove the protective sheet and the protective film from TV after installing the pedestal. Removing the pedestal from the TV Be sure to remove the pedestal in the following way when using the wall-hanging bracket or repacking the TV.
Installing the wallhanging bracket Take care when fixing wall brackets to the wall. Always ensure that there are no electrical cables or pipes in the wall before hanging bracket. To prevent fall and injury, remove the TV from its fixed wall position when it is no longer in use. Please contact your local Panasonic dealer to purchase the recommended wall-hanging bracket.
10 USB 2 port This symbol indicates DC operation. Connections 11 AV IN (COMPONENT / VIDEO) External equipment and cables shown are not supplied with this TV. Please ensure that the unit is disconnected from the mains socket before attaching or disconnecting any cables. Check the terminal type and cable plugs are correct for connection. Use a fully wired HDMI compliant cable. Please use a High Speed HDMI cable when connecting for high resolution pictures.
AV devices Network DVD Recorder / Blu-ray Recorder, etc. TV A broadband network environment is required to be able to use internet services. If you do not have any broadband network services, please consult your retailer for assistance. Prepare the internet environment for wired connection or wireless connection. Setup of the network connection will start when first (p. 19) using the TV.
Connections for 4K / HDR compatible equipment TV Other connections DVD Player (COMPONENT equipment) TV (Listening) HDMI cable 4K / HDR compatible equipment To watch high-definition 4K more accurately or HDR content, connect the 4K / HDR compatible equipment to HDMI1 or 2 terminal. Connect the 4K compatible equipment to HDMI terminal using a 4K compatible cable and you can watch content in 4K format. Supporting HDR does not increase the peak brightness capabilities of the TV panel.
Amplifier (listening with external speakers) Headphones To enjoy multi-channel sound from external equipment (e.g. Dolby Digital 5.1ch), connect the equipment to the amplifier. For information about the connections, read the manuals of the equipment and amplifier. For information about the volume settings, refer to [eHELP] (Search by Purpose > Settings > Audio). TV TV (3.5 mm stereo mini plug) Common Interface HDMI cable Amplifier with speaker system External equipment (DVD Player, etc.
Media Player Select “Filter” options to filter the files as per the content type (Photo / Video / Music) 1 Display the option menu with [OPTION]. 2 Select “Filter” and press [OK] to access. 3 Select “Photo / Video / Music” and press [OK] to set. Cable arrangement Fixing the cables Fix cables as necessary. When using the optional accessory, follow the option’s assembly manual to fix cables.
Identifying Controls Remote Control 7 OK Confirms selections and choices. Press after selecting channel positions to quickly change channel. Displays channel list. 8 [Option Menu] Easy optional setting for viewing, sound, etc. 9 Coloured buttons (red-green-yellow-blue) Used for the selection, navigation and operation of various functions. 10 Volume Up / Down 11 Numeric buttons Changes channel and teletext pages. Sets characters.
Installing / Removing batteries Pull open 4 Channel Up / Down Cursor Up / Down (when in the menu system) 5 Volume Up / Down Cursor Left / Right (when in the menu system) 6 Mains power On / Off switch Use to switch the mains power. Hook To turn Off the apparatus completely, you must pull the mains plug out of the mains socket.
First time Auto Setup When the TV is turned on for the first time, it will automatically search for available TV channels and give options to set up the TV. These steps are not necessary if the setup has been completed by your local dealer. Please complete connections (p. 12 - 16) and settings (if necessary) of the connected equipment before starting Auto Setup. For information about the settings for the connected equipment, read the manual of the equipment.
Watching TV How to Use eHELP 1 [eHELP] is the detailed operating instructions built into the TV, and gives a more detailed explanation for a better understanding of the operation of each feature. Turn power on (TV) or 1 Display [eHELP] 2 Select the menu Remote Control) Mains power On / Off switch should be on. (p. 18) 2 Select the mode Selectable modes vary depending on the channels stored.
To open the reference screen ( ) To check the features of this TV Search by Purpose > Read first > Features English 21
FAQs Before requesting service or assistance, please follow these simple guides to solve the problem. For details, refer to [eHELP] (Support > FAQs). The TV does not switch on Check the mains lead is plugged into the TV and the mains socket. The TV goes into Standby mode Auto power standby function is activated. The remote control does not work or is intermittent Are the batteries installed correctly? (p. 18) Has the TV been switched on? The batteries may be running low.
Maintenance Specifications First, remove the mains plug from the mains socket. TV Display panel, Cabinet, Pedestal Regular care: Gently wipe the surface of the display panel, cabinet, or pedestal by using a soft cloth to remove dirt or fingerprints. For stubborn dirt: (1) First clean the dust from the surface. (2) Dampen a soft cloth with clean water or diluted neutral detergent (1 part detergent to 100 parts water). (3) Wring out the cloth firmly.
Connection terminals AV input (COMPONENT / VIDEO) VIDEO PAL B, G, H, I SECAM B, G SECAM L, L’ Pin jack × 1 VHF E2 - E12 1.0 V[p-p] (75 :) VHF A - H (ITALY) AUDIO L - R CATV (S01 - S05) Pin jack × 2 CATV S11 - S20 (U1 - U10) 0.5 V[rms] VHF H1 - H2 (ITALY) UHF E21 - E69 Y 1.0 V[p-p] (including synchronisation) PB/CB, PR/CR CATV S1 - S10 (M1 - M10) CATV S21 - S41 (Hyperband) ±0.
*: The frequency and channel differ depending on the country. Note Design and Specifications are subject to change without notice. Mass and Dimensions shown are approximate. For information about the power consumption, display resolution, etc., refer to Product fiche. For information about the open source software, refer to [eHELP] (Search by Purpose > Read first > Before use > Licence).
Disposal of Old Equipment and Batteries Only for European Union and countries with recycling systems These symbols on the products, packaging, and/or accompanying documents mean that used electrical and electronic products and batteries must not be mixed with general household waste. For proper treatment, recovery and recycling of old products and used batteries, please take them to applicable collection points in accordance with your national legislation.
Gebruiksaanwijzing Led-tv Nederlands Modelnr. TX-40GX700E TX-50GX700E TX-58GX700E TX-65GX700E TX-40GX710E TX-50GX710E TX-58GX710E TX-65GX710E (afbeelding: TX-50GX700E) Raadpleeg [eHELP] voor gedetailleerde instructies. (ingebouwde bedieningsinstructies) Gebruik van [eHELP] (p. 20) Hartelijk dank voor de aankoop van dit Panasonic-product. Lees deze instructies aandachtig voordat u het product gebruikt en bewaar ze zodat u ze later opnieuw kunt raadplegen.
De begrippen HDMI, HDMI High-Definition Multimedia Interface en het HDMI-logo zijn handelsmerken of geregistreerde handelsmerken van HDMI Licensing Administrator, Inc. in de Verenigde Staten en andere landen. Geproduceerd onder licentie van Dolby Laboratories. Dolby, Dolby Audio en het dubbele-D-symbool zijn handelsmerken van Dolby Laboratories. DVB en de DVB-logo’s zijn handelsmerken van het DVB Project. x.v.Colour™ is een handelsmerk. DiSEqC™ is een handelsmerk van EUTELSAT.
Belangrijke kennisgeving Kennisgeving over DVB/datatransmissie/ IPTV-functies Deze tv is ontworpen om te voldoen aan de normen (stand augustus 2018) van DVB-T/T2 (MPEG2, MPEG4-AVC(H.264) en MPEG HEVC(H.265)) digitale aardse services, DVB-C (MPEG2, MPEG4AVC(H.264) en MPEG HEVC(H.265)) digitale kabelservices en DVB-S (MPEG2, MPEG4AVC(H.264) en MPEG HEVC(H.265)) digitale satellietservices. Raadpleeg uw lokale dealer voor de beschikbaarheid van DVB-T-/T2- of DVB-S-services in uw gebied.
persoonlijke en niet-commerciële doeleinden en/of werd verkregen via een videoleverancier die een licentie heeft om AVC-video te leveren. Er is geen licentie verleend, ook niet impliciet, voor enig ander gebruik. Veiligheidsmaatregelen Ga voor meer informatie naar MPEG LA, LLC. Volg onderstaande waarschuwingen en voorzorgsmaatregelen om het risico op een elektrische schok, brand, schade of letsel te helpen vermijden. Zie http://www.mpegla.com.
Voorzichtig zijn Waarschuwing Verwijder de afdekplaten van de tv niet en breng geen wijzigingen aan de tv aan, anders kunt u in contact komen met onderdelen die onder spanning staan en loopt u risico op een elektrische schok. Er bevinden zich geen door de gebruiker repareerbare onderdelen aan de binnenkant. Stel de tv niet bloot aan regen of hoge vochtigheid. De tv mag niet blootgesteld worden aan druppelend of spattend water.
De standaard niet gebruiken als deze verbogen, gebarsten of anderszins beschadigd is. Neem in dat geval zo spoedig mogelijk contact op met uw Panasonic dealer. Let er tijdens de montage op dat alle schroeven goed zijn vastgedraaid. Let op dat de tv geen schokken krijgt tijdens de installatie van de standaard. Zorg dat kinderen niet op de standaard klimmen. Gebruik minstens twee personen om de tv op de standaard te installeren en ervan te verwijderen.
Batterij voor de afstandsbediening Let op Accessoires Batterijen kunnen lekken, roesten en exploderen als ze verkeerd geïnstalleerd worden. Vervang de batterij alleen door hetzelfde of een vergelijkbaar type. Gebruik geen oude en nieuwe batterijen door elkaar. Afstandsbediening Gebruik geen verschillende batterijtypen door elkaar, bijvoorbeeld alkaline- en mangaanbatterijen. Gebruik geen oplaadbare batterijen (Ni-Cd enz.). (p.
De tv installeren Dempingsmateriaal 40 inch-model De standaard monteren/verwijderen Montageschroef (4) M5 × 12 50 inch-model 58 inch-model 65 inch-model Montageschroef (4) M4 × 12 Steun Voorbereidingen Steun Zorg ervoor dat u de standaard in elkaar heeft gezet voordat u de tv uit de doos haalt. Gooi het dempingsmateriaal niet weg, want het wordt ook gebruikt voor het verwijderen van de standaard wanneer u de muurbevestigingssteun gebruikt of de tv opnieuw inpakt.
1 50-inch model 50 inch-model 3 58-inch model 58 inch-model 65-inch model 65 inch-model G 40 inch-model 40-inch model G 2 A A C E D F 40 inch-model 40-inch model 50-inch model 50 inch-model 58 inch-model 58-inch model 65-inch model 65 inch-model Nederlands 9
4 B 5 Opmerking Bij het optillen van de tv, ondersteun de tv zoals wordt weergegeven. Houd het schermonderdeel niet stevig vast zoals wordt weergegeven. Til de tv op met het beschermblad bevestigd. Plaats de tv niet tijdelijk op de vloer of het bureau met het tv-scherm naar beneden gericht. Opmerking Verwijder de beschermfolie en de beschermende film van de tv na installatie van de standaard.
De muurbevestigingssteun monteren Neemt contact op met uw plaatselijke Panasonicdealer als u de aanbevolen muurbevestigingssteun wilt aanschaffen. Wees voorzichtig als u muurbevestigingssteunen aan de muur bevestigt. Controleer altijd of er geen elektrische kabels of buizen door de muur lopen voordat u de steun ophangt. Als de tv een langere periode niet wordt gebruikt, demonteer deze dan van de vaste muurbevestiging om vallen en verwonding te voorkomen.
Verbindingen 9 HDMI3 De afgebeelde externe apparatuur en kabels worden niet bij de tv meegeleverd. Zorg ervoor dat de stekker van de tv niet in het stopcontact zit als u kabels aansluit of loskoppelt. Controleer of u de juiste aansluitingen en connectoren gebruikt voor de verbinding. Gebruik een HDMI-kabel met volledige bedrading. Gelieve een High Speed HDMI-kabel te gebruiken wanneer u verbinding maakt voor foto’s in hoge resolutie.
geïnstalleerd. Raadpleeg ook de maatschappijen van de satellietzenders die u ontvangt voor details. Netwerk Voor gebruik van internetdiensten is een breedbandnetwerk vereist. Raadpleeg uw leverancier voor hulp als u geen breedbandnetwerkservices hebt. Zorg dat de internetomgeving gereed is voor het aansluiten van een bekabelde of draadloze verbinding. Het instellen van de netwerkverbinding start bij het eerste gebruik van de tv. (p. 19) AV-apparaten Dvd-speler/Blu-ray-speler enz.
Aansluitingen voor 4K/HDR-compatibele apparatuur TV Andere verbindingen Dvd-speler (COMPONENT-apparatuur) TV (Luisteren) HDMI-kabel 4K/HDR-compatibele apparatuur Om beelden in high-definition 4K of HDR-inhoud accurater weer te geven, verbind de 4K/HDRcompatibele apparatuur met HDMI1- of 2-aansluiting. Sluit met een 4K-compatibele kabel de 4K-compatibele apparatuur aan op een HDMIaansluiting, en u kunt naar content van 4K-formaat kijken.
Versterker (luisteren met externe luidsprekers) Hoofdtelefoon Als u wilt genieten van meerkanaals geluid van een extern apparaat (bijvoorbeeld Dolby Digital 5.1-kanaals), sluit u het apparaat aan op de versterker. Raadpleeg de handleiding van het apparaat en de versterker voor informatie over de aansluitingen. Voor informatie over de volume-instellingen raadpleegt u [eHELP] (Zoeken op doel > Instelling > Audio).
Mediaspeler Selecteer “Filteren”-opties om de bestanden te filteren op content-type (Foto / Video / Muziek) 1 Geef het optiemenu weer met [OPTION]. 2 Selecteer “Filteren” en druk op [OK] om te openen. 3 Selecteer “Foto / Video / Muziek” en druk op [OK] om het in te stellen. Kabels organiseren De kabels bevestigen Bevestig de kabels als nodig. Volg bij gebruik van optionele accessoires de handleiding bij de accessoire voor informatie over het bevestigen van kabels.
Bedieningsonderdelen 7 OK Bevestigt selecties en keuzes. Schakelt over naar de geselecteerde kanaalpositie. Geeft de kanalenlijst weer. Afstandsbediening 8 [Menu Opties] Eenvoudige optionele instellingen voor weergave, geluid enz. 9 Gekleurde toetsen (rood, groen, geel, blauw) Voor selectie, navigatie en de bediening van verschillende functies. 10 Volume omhoog/omlaag 11 Cijfertoetsen Overschakelen naar een ander kanaal of een andere teletekstpagina. Tekst invoeren.
De batterijen plaatsen/verwijderen Opentrekken Haakje 3 Selectie ingangsmodus Druk zo vaak als nodig om de gewenste stand te selecteren. [Hoofdmenu] Ongeveer 3 seconden ingedrukt houden om het hoofdmenu weer te geven. OK (in menu’s) 4 Kanaal omhoog/omlaag Cursor omhoog/omlaag (in menu’s) Sluiten 6 Hoofdschakelaar Hiermee zet u de tv aan of uit. Plaats de batterijen op de juiste manier (+ of -) Om het apparaat volledig uit te schakelen, moet u het netsnoer uit het stopcontact halen.
Automatisch instellen bij het eerste gebruik Wanneer de tv voor het eerst wordt aangezet, zoekt hij automatisch naar beschikbare tv-kanalen en verschijnen opties om de tv in te stellen. U mag deze stappen overslaan als uw dealer de tv al heeft ingesteld. Voltooi alle verbindingen (p. 12 - 16) en instellingen (indien nodig) van de externe apparatuur voordat u de automatische instelling uitvoert. Raadpleeg de handleiding van het aangesloten apparaat voor informatie over de instellingen ervan.
Tv kijken 1 Schakel de tv in (TV) of eHELP gebruiken [eHELP] is de naam van de gedetailleerde, ingebouwde bedieningsinstructies van de tv. Hier vindt u gedetailleerde uitleg over de bediening van de verschillende functies. 1 Geef [eHELP] weer 2 Selecteer het menu Afstandsbediening) De hoofdschakelaar moet aan staan. (p. 18) 2 Selecteer de stand De selecteerbare standen zijn afhankelijk van de opgeslagen kanalen.
Het referentiescherm openen ( ) De functies van deze tv bekijken Zoeken op doel > Lees dit eerst > Functies Nederlands 21
Veelgestelde vragen Probeer eerst het probleem op te lossen aan de hand van de volgende eenvoudige richtlijnen voordat u hulp inroept. Raadpleeg [eHELP] (Ondersteuning > Veelgestelde vragen) voor details. De tv gaat niet aan Controleer of de stekker van het netsnoer in de tv en in het stopcontact zit. De tv schakelt over naar de standby-stand De automatische standby-functie is geactiveerd. De afstandsbediening werkt niet of slechts af en toe Zijn de batterijen op de juiste manier geplaatst? (p.
Onderhoud Specificaties Verwijder eerst de stekker van het netsnoer uit het stopcontact. TV Beeldscherm, Behuizing, Standaard Regelmatig onderhoud: Veeg de buitenkant van het beeldscherm, de behuizing of de standaard voorzichtig af met een zachte doek om vuil of vingerafdrukken te verwijderen. Voor hardnekkig vuil: (1) Verwijder eerst het stof van de buitenkant. (2) Bevochtig een zachte doek met schoon water of een opgelost neutraal schoonmaakproduct (1 deel schoonmaakproduct op 100 delen water).
Aansluitingen AV-ingang (COMPONENT / VIDEO) VIDEO PAL B, G, H, I SECAM B, G SECAM L, L’ Verbindingsplug × 1 VHF E2 - E12 1,0 V[p-p] (75 :) VHF A - H (ITALIË) AUDIO L - R CATV (S01 - S05) Verbindingsplug × 2 CATV S11 - S20 (U1 - U10) 0,5 V[rms] VHF H1 - H2 (ITALIË) UHF E21 - E69 Y 1,0 V[p-p] (inclusief synchronisatie) PB/CB, PR/CR CATV S1 - S10 (M1 - M10) CATV S21 - S41 (Hyperband) ±0,35 V[p-p] PAL D, K HDMI 1 / 2 / 3-ingang SECAM D, K TYPE A-aansluitingen VHF R1 - R2 HDMI 1 / 3: 4K, Conten
*: Frequenties en kanalen verschillen naargelang het land. Opmerking Ontwerp en specificaties kunnen zonder voorafgaande kennisgeving worden gewijzigd. Gewicht en afmetingen bij benadering. Raadpleeg de productfiche voor informatie over het energieverbruik, de schermresolutie enz. Raadpleeg [eHELP] (Zoeken op doel > Lees dit eerst > Voordat u het product gebruikt > Licentie) voor informatie over de openbronsoftware.
Verwijdering van oude apparatuur en batterijen. Alleen voor de Europese Unie en landen met recycle systemen. Deze symbolen op de producten, verpakkingen en/of begeleidende documenten betekenen dat gebruikte elektrische en elektronische producten en batterijen niet samen mogen worden weggegooid met de rest van het huishoudelijk afval.
Manual de utilizare LED TV Model nr.
` "$ "$ ' " $ "$ "$ $ ' ' < <`<` `=
< & = = ; >?@J J" ? ^ \ } '`¡` ^" <& " <&¢' ^ £¢ " <& < ^ £| ' ^" <& " <&¢' ^ £¢ " <& < ^ £| ' ^" <& " <&¢' ^ £¢ " <& < ^ £| '`¡` '
^! # ¡ ^ ' ¡ $ LLC.
; |
' \ ' $ $ \
@ & ; " ^ ^ '
" ? ^ & ; Model de 40 inci { J & _ { { !$ "| ¬ _ Model de 50 inci Model de 58 inci Model de 65 inci { { !$ "¢ ¬ Suport Suport \ \ Model de 40 inci
1 50-inch Model demodel 50 inci 3 58-inch Model demodel 58 inci 65-inch Model demodel 65 inci G Model de model 40 inci 40-inch G 2 A A C E D F Model de model 40 inci 40-inch 50-inch Model de model 50 inci Model de model 58 inci 58-inch 65-inch Model de model 65 inci = \
4 B 5 { ; ' \ = { ; > & # ' \
Instalarea suportului de prindere pe perete " '
10 @ ' { = ; >+% + 11 ? "< !+ ^ << J ?"> $ !&% $ < ' "$ "$
> & # ? >?> J & } @ % ` $ ¥ \ !&% $ + & { ` + { " $ = "$
+ & & & { J> ` >?> ^ " <` ` ^ "$ < ¢¯¡= ¢¯ = ¢¯ ¡ = "$ ¢¯ "$ ¢¯ ¢¯ = `
& = ^ ^ | + ` `= ^ ` ` ^ ¦ | " "$ <
^ ! # ^ ¡ ¡ " 1 `$ ' ! # ¯ 3 ! ¡ ¡ " # ¯ | { ; { \ 16 = \
< = <`${ Identificarea elementelor de ^ &; @ ! ` {
' J # ' # # ` ' & ; & " ; & % J { ^´ ' " J 3 4 5 6 1 2 & # { ;
$ ^!}}}}# ` ^ ' £
? # & ? 1 ; # Modul de utilizare `= ^` 1 = ` | ` ¡ ^ ' 3 ' ; " ; ;
^ ^ = \ '
{ = `= ^ # & ` # } ` & ' ^ \ ~
^ } ; ` > & # % = ` piedestalul | & \ & ^ " \ ^ \ ^ }} ^¦ \ ^
~ @ \ " Conectori " ? !+ ^ << J ?"> $ + ^ @ \ + ^ ~ ~ ?"> " ¬ < ' < } ' ^~| : ' ^$`$ >" ~ ` ^} ' }| " ¬ ` ' } ^ ' } } | ' ^$`$ < ' <£µ Y } ' ^ \ P@J+@ RJ+R ` ' } ^" ' "} ` ' ¢ ^ ¸ } ¦| ' ~ > " >^" J ' J + ^ > `$ = ' = "$ ¡ ¦_ ¢¯ `
*_ { ; ¥ ' `= ^ = \ '
> & ` & ` { > & & ` & ; ¡