Operating Instructions LED TV English Model No. TX-43GXX939 TX-49GXX939 TX-55GXX939 (image: TX-55GXX939) For more detailed instructions, please refer to [eHELP] (Built-in Operating Instructions). How to use [eHELP] (p. 23) Thank you for purchasing this Panasonic product. Please read these instructions carefully before operating this product and retain them for future reference. Please carefully read the “Safety Precautions” of this manual before use.
The terms HDMI and HDMI High-Definition Multimedia Interface, and the HDMI Logo are trademarks or registered trademarks of HDMI Licensing Administrator, Inc. in the United States and other countries. Dolby, Dolby Vision, Dolby Atmos, Dolby Audio, and the double-D symbol are trademarks of Dolby Laboratories. Manufactured under license from Dolby Laboratories. Confidential unpublished works. Copyright © 2013-2015 Dolby Laboratories. All rights reserved.
Important Notice Notice for DVB / Data broadcasting / IPTV functions This TV is designed to meet the standards (as of August, 2018) of DVB-T / T2 (MPEG2, MPEG4AVC(H.264) and MPEG HEVC(H.265)) digital terrestrial services, DVB-C (MPEG2, MPEG4AVC(H.264) and MPEG HEVC(H.265)) digital cable services and DVB-S (MPEG2, MPEG4-AVC(H.264) and MPEG HEVC(H.265)) digital satellite services. Consult your local dealer for availability of DVB-T / T2 or DVB-S services in your area.
This mark indicates the product operates on AC voltage. Safety Precautions To help avoid risk of electrical shock, fire, damage or injury, please follow the warnings and cautions below: This mark indicates a Class II or double insulated electrical appliance wherein the product does not require a safety connection to electrical earth (ground). Transport only in upright position. Mains plug and lead Warning If you detect anything unusual, immediately remove the mains plug.
Do not expose the TV to rain or excessive moisture. This TV must not be exposed to dripping or splashing water and objects filled with liquid, such as vases, must not be placed on top of or above the TV. Do not insert foreign objects into the TV through the air vents. If the TV is used in an area where insects may easily enter the TV. It is possible for insects to enter the TV, such as small flies, spiders, ants, etc.
Suffocation / Choking Hazard Warning The packaging of this product may cause suffocation, and some of the parts are small and may present a choking hazard to young children. Keep these parts out of reach of young children. Pedestal Warning Do not disassemble or modify the pedestal. Caution Do not use any pedestal other than the one provided with this TV. Do not use the pedestal if it becomes warped or physically damaged. If this occurs, contact your nearest Panasonic dealer immediately.
Moving the TV Caution Before moving the TV, disconnect all cables. At least two people are required to move the TV to prevent injury that may be caused by the tipping or falling of TV. LED TV Declaration of Conformity (DoC) “Hereby, Panasonic Corporation declares that this TV is in compliance with the essential requirements and other relevant provisions of the Directive 2014/53/EU.” If you want to get a copy of the original DoC of this TV, please visit the following website: http://www.ptc.panasonic.
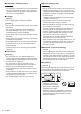
Accessories Standard accessories Remote Control (p. 20) N2QAYA000152 Installing the TV Assembling / Removing the pedestal 43-inch model Assembly screw (10) 49-inch model 55-inch model Assembly screw (4) M4 × 12 Assembly screw (2) M5 × 15 Pedestal (p. 8) 43-inch model 49-inch model 55-inch model Cable tie (p. 18) Main bracket Bracket Pole Mains lead (p. 14) Support bracket Batteries (2) R03 Base (p.
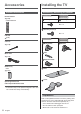
Assembling the pedestal 3 Make sure that all screws are securely tightened.
5 7 G 6 B 8 10 English
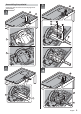
49-inch model 55-inch model 1 3 A C B 4 G 2 F English 11
Installing the wallhanging bracket 5 Please contact your local Panasonic dealer to purchase the recommended wall-hanging bracket.
Connections 49-inch model 55-inch model External equipment and cables shown are not supplied with this TV. Please ensure that the unit is disconnected from the mains socket before attaching or disconnecting any cables. Check the terminal type and cable plugs are correct for connection. Use a fully wired HDMI compliant cable. Cable cover Keep the TV away from electronic equipment (video equipment, etc.
Dual Tuner (Single Cable System) Basic connections TV Mains lead AC 220-240 V 50 / 60 Hz Mains lead (supplied) Satellite cable with Single Cable router Satellite dish Insert the mains plug firmly into place. When disconnecting the mains lead, be absolutely sure to disconnect the mains plug from the mains socket first.
DVB-via-IP client connection This TV has DVB-via-IP client function and can connect to DVB-via-IP server or SAT>IP compatible servers to receive broadcast streaming. It is recommended to connect to DVB-via-IP server with a LAN cable. AV devices DVD Recorder / Blu-ray Recorder, etc. TV Wired connection TV Cable Cable LAN cable (Shielded) Use Shielded Twist Pair (STP) LAN cable. DVB-via-IP server RF cable RF cable HDMI cable Terrestrial aerial DVD Recorder / Blu-ray Recorder, etc.
Wireless connection Other connections DVD Player Internet environment (COMPONENT equipment) TV Built-in wireless LAN (Rear of the TV) (Listening) Access point Connections for 4K / HDR compatible equipment (Viewing) TV Audio cable (Shielded) HDMI cable Component video cable (Shielded) 4K / HDR compatible equipment DVD Player Connect the 4K compatible equipment to HDMI terminal using a 4K compatible cable and you can watch content in 4K format.
Common Interface TV Turn the TV off with Mains Power On / Off switch whenever inserting or removing the CI module. If a smart card and a CI module come as a set, first insert the CI module, then insert the smart card into the CI module. Insert or remove the CI module completely in the correct direction as shown. Normally encrypted channels will appear. (Viewable channels and their features depend on the CI module.
Attaching the cable cover / terminal cover Cable arrangement Fix the cables using the cable clamp, cable tie, etc. and then attach the terminal cover to the TV. Fixing the cables using the cable tie Do not apply load to the cable cover / terminal cover. Be careful not to nip the cables between the TV and the cable cover / terminal cover. When using USB 2 port, USB 3 port, HDMI3 terminal or DIGITAL AUDIO, you cannot attach the cable cover. Keep the removed cable cover for future use.
49-inch model 55-inch model English 19
Identifying Controls 6 OK Confirms selections and choices. Press after selecting channel positions to quickly change channel. Remote Control 7 [Option Menu] Easy optional setting for viewing, sound, etc. 8 Netflix Accesses NETFLIX service directly. A broadband network environment is required in order to fully use this function. This service may be stopped or changed without notice.
26 Operations for contents, connected equipment, etc. Installing / Removing batteries Pull open Indicator / Control panel When pressing 4, 5, 6 buttons, the control panel guide appears on the right side of the screen for 3 seconds to highlight which button has been pressed. 4 5 Hook 6 7 1 2,3 Close Rear side of the TV 1 Power LED Note the correct polarity (+ or -) Red: Standby Green: On Depending on the ambient brightness, adjusts the brightness of LED to easy-to-view levels automatically.
First time Auto Setup When the TV is turned on for the first time, it will automatically search for available TV channels and give options to set up the TV. These steps are not necessary if the setup has been completed by your local dealer. Please complete connections (p. 13 - 18) and settings (if necessary) of the connected equipment before starting Auto Setup. For information about the settings for the connected equipment, read the manual of the equipment.
Watching TV How to Use eHELP 1 [eHELP] is the detailed operating instructions built into the TV, and gives a more detailed explanation for a better understanding of the operation of each feature. Turn power on (TV) 1 or (Remote Control) Mains power On / Off switch should be on. (p. 21) 2 or Select the mode TV Selection DVB-S DVB-C DVB-T DVB-via-IP Analogue Selectable modes vary depending on the channels stored.
To scroll the description (if more than 1 page) While the description is highlighted To open the reference screen ( ) To display the menu related to the description (only for some descriptions) (red) To check the features of this TV Search by Purpose > Read first > Features 24 English
How to Use Menu Functions Various menu items allow you to make settings for the picture, sound, and other functions. 1 Sharpness Moved change store Go to the next screen Child Lock Display the menu Displays the functions that can be set (varies according to the input signal). 2 Adjust using the slide bar access Enter characters by free input menu You can enter names or numbers freely for some items.
Changing Picture and Sound settings The following items can be adjusted and stored for each mode. [Backlight] / [Contrast] / [Brightness] / [Colour] / [Tint] / [Sharpness] / [Colour Temperature] / [Vivid Colour] / [Colour Remaster] / [Rec.
This function is effective only for the sound from TV speakers. For information about the other items, refer to [eHELP] (Search by Purpose > Settings > Sound). To reset the current [Mode] to the default settings [Reset to Defaults] in the Sound Menu Retuning from Setup Menu Automatically retunes the channels received in the area. This function is available if channel tuning is already performed. Only the selected mode is retuned. All the previous tuning settings are erased.
5 DVB-via-IP Select [Auto Setup] select 1 Select DVB-via-IP 2 Display the menu and select [Setup] access 6 Set [Search Mode] / [Scan Mode] After settings, select [Start scan]. 7 select Setup A confirmation screen is displayed and press the OK button to start Auto Setup (Settings are made automatically) access 3 When the operation is completed, the channel at the lowest position will be displayed.
Tuning and Editing Channels You can retune channels, create your favourite channel lists, skip unwanted channels, etc. For details, refer to [eHELP] (Search by Purpose > Watching > Tuning and editing channels). 1 [Channel List Editor] For information about [Channel List] (Analogue), refer to [eHELP] (Search by Purpose > Watching > Tuning and editing channels > Channel List Editor). Edit DVB channels You can edit the list of All DVB Channels by adding / deleting and moving channels.
To add consecutive channels to the list at once (if available) make the channel block add (yellow) To change the category of [Channels Found] (blue) 2 Store 2 Add it to the favourites list Example: DVB-S DVB-S Favourites Editor Sorting 123... 1 BBC One Wales DIY SOS 1 2 3 4 5 6 7 8 All DVB-S Channels Das Erste HD ZDF HD RTL Television SAT.
[Update Channel List] By updating the DVB channel list, you can add new channels, delete removed channels or change channel names and positions automatically. The channel list is updated while keeping your settings in [Favourites Editor], [Channel List], [Child Lock], etc. Depending on the signal condition, the update may not work properly. Multi Window Displays two windows at once for viewing the TV programmes or external input (AV / COMPONENT / HDMI) as shown below (example).
Child Lock You can lock specific channels / AV input terminals to restrict access to them. Watching External Inputs When the locked channel / input is selected, a message appears. Enter the PIN number to watch. For details, refer to [eHELP] (Search by Purpose > Functions > Child Lock). Connect the external equipment (VCR, DVD, etc.) and you can watch through the input. For details, refer to [eHELP] (Search by Purpose > Watching > External equipment).
Type of the equipment, features Code DVD Recorder, DVD Player, Blu-ray Disc Player 70 Player theatre, Blu-ray Disc theatre 71 VCR 72 Using in USB HDD Recording, Media Player, in-house streaming or VIERA Link (default) 73 Viewing Teletext Teletext services are the text information provided by the broadcaster. The features may vary depending on the broadcaster. For details, refer to [eHELP] (Search by Purpose > Watching > Teletext).
Using TV Guide Viewing Teletext 1 Switch to Teletext Displays the index page (content varies depending on the broadcaster). Sub page number << 01 02 03 04 05 06 07 >> 17:51 28 Feb Time / date TV Guide - Electronic Programme Guide (EPG) provides an on-screen listing of the programmes currently broadcast and the forthcoming broadcasts over the next seven days (depending on the broadcaster).
To watch the programme USB HDD Recording 1 Select the current programme select access The current programme is displayed on the top left of the screen. 2 Select [View] Preparation select watch To use [Timer Programming] or [Signal Supported (p.
3 Select the USB HDD for recording and start setup To operate [REW LIVE TV] USB Device Setup Product This recording may not start if another recording is in progress, TV signal condition is bad or there are no images displayed. Name To pause select To search backward (up to 90 minutes) start setup Follow the on-screen instructions. After pausing or searching backward, the following buttons are available for operation.
[Signal Supported Recording] (if available) This function is Timer Programming which is controlled by information from the TV Guide; if programme start and end times are changed by the broadcaster, the timer event will follow the change. Note that this function only works reliably if correct information is received from broadcasters. Timer Programming This function allows you to select programmes that you want to record to the USB HDD.
Using Media Player Media Player allows you to enjoy photo, video or music recorded on the USB Flash Memory, and content recorded with this TV to the formatted USB HDD. For details, refer to [eHELP] (Search by Purpose > Media Player). Easy List View: Still pictures / moving pictures recorded with digital cameras are displayed. 3 Select the device (USB Flash Memory / USB HDD) select access 4 Select the content Contents Select Mix Folder View: All files grouped by folder are displayed.
Using Home Network Network settings Ensure the connections are completed before starting network setup. Home network To use in-house streaming, you need a home network environment and you can operate the features without a broadband network environment. For details, refer to [eHELP] (Search by Purpose > Network).
Playback of sharing content on this TV with the DMC (Digital Media Controller) network equipment You can enjoy content stored in the media server by controlling with the DMC network equipment connected to your home network. For details, refer to [eHELP] (Search by Purpose > Network). Sharing the content of this TV with another piece of network equipment You can enjoy the content of this TV with another network equipment connected to your home network.
FAQs Before requesting service or assistance, please follow these simple guides to solve the problem. For details, refer to [eHELP] (Support > FAQs). The TV does not switch on Check the mains lead is plugged into the TV and the mains socket. The TV goes into Standby mode Auto power standby function is activated. The remote control does not work or is intermittent Are the batteries installed correctly? (p. 21) Parts of the TV become hot Parts of the TV may become hot.
Maintenance Specifications First, remove the mains plug from the mains socket. TV Display panel, Cabinet, Pedestal Regular care: Gently wipe the surface of the display panel, cabinet, or pedestal by using a soft cloth to remove dirt or fingerprints. For stubborn dirt: (1) First clean the dust from the surface. (2) Dampen a soft cloth with clean water or diluted neutral detergent (1 part detergent to 100 parts water). (3) Wring out the cloth firmly.
Connection terminals AV input (COMPONENT / VIDEO) VIDEO PAL B, G, H, I SECAM B, G SECAM L, L’ Pin jack × 1 VHF E2 - E12 1.0 V[p-p] (75 :) VHF A - H (ITALY) AUDIO L - R CATV (S01 - S05) Pin jack × 2 CATV S11 - S20 (U1 - U10) 0.5 V[rms] VHF H1 - H2 (ITALY) UHF E21 - E69 Y 1.0 V[p-p] (including synchronisation) PB/CB, PR/CR CATV S1 - S10 (M1 - M10) CATV S21 - S41 (Hyperband) ±0.
Bluetooth wireless technology*2 Standard Compliance Bluetooth 4.2 Frequency Range 2.402 GHz - 2.480 GHz *1: The frequency and channel differ depending on the country. *2: Not all the Bluetooth compatible devices are available with this TV. Up to 5 devices can be used simultaneously. Note Design and Specifications are subject to change without notice. Mass and Dimensions shown are approximate. For information about the power consumption, display resolution, etc., refer to Product Information Sheet.
Disposal of Old Equipment and Batteries Only for European Union and countries with recycling systems These symbols on the products, packaging, and/or accompanying documents mean that used electrical and electronic products and batteries must not be mixed with general household waste. For proper treatment, recovery and recycling of old products and used batteries, please take them to applicable collection points in accordance with your national legislation.
} { TX-43GXX939 TX-49GXX939 TX-55GXX939 !"#$% & ' * +; { } ${ & ; <=+ " $ & ' = @ ' $ = ` $ { '| ` } \$ $ "$ $ & ^ " $ & '= @ ' $ = \$ $ } $ { ~ $ @ $ }
¨ ¶¸ ¶¸ ¹º» ¼ ¶½¾¼ ¿À ¸ ¼Á»  $ ¶¸ } ^$ $ } $ } $ } ¶¸ ¹ ÃÀ¿ ¼Á ¼ Á= ¸ } ` Ä$ $ ` ` $ ` § } ¾ÅÆ= ¾ÅÆ Ç = ¾ÅÆ Ã¼¿ = ¾ÅÆ Ã½À } } ' ' } ' } ^$ $ } ¾ÅÆ Å Á ¼ Á } & ¾ÅÆ Å Á ¼ Á ¦ & { } $ ¤}$ } È ¥É¢¥É¢ ¾ÅÆ Å Á ¼ Á } ¨ $ }' } $
Z ? \ ^ \ _ \ `{| } * * J ' * } ~$ * $ & $ } $} \ $ $ ^ } $ ¥É¢´ $ $ & ¦ }` ` @ Dz Ó ¥ ¶ ¥ ¶ «ÃÇÊ ¥Ô« ¶ ÇÊ ¥Ô= & ¦ }` { ` @ Ç²Ê ¶ ¥ ¶ «ÃÇÊ ¥Ô« ¶ ÇÊ ¥Ô= $ @ & ¦ }` $ }` @ Dz¯ ¶ ¥ ¶ «ÃÇÊ ¥Ô« ¶ ÇÊ ¥Ô {$ '$ { } $ } $
Ñ } } $ $ {^ $ ' $} @ $ ${ | } {& }$ ` ` }= ' $} ^ ` } $ | $} $ $} ^ $ $ § @ "$ \ = $ } $ $ | = $ @ \ $ } $ $ ^` }= } @ $ ' \ ${ $ | $ | { } ^ $ ' $} $ $} $ $} ${ ^ ' $} ^
? ^ ? § '$ | } $ } $ & ^ $ } $ $ { = } $ } \ } @ $ $ \ $ = ` @ = " $ \ $ ` $ $ } $ $ '= $ ^ ` @ } { } $ § } '$ $ } } ' $} ^ @ \ ' } @ $ § $ } { ${ = @ @ ${= } § $ } '$ $ } ^ ^ $ ^ }
@ Z } ' * \ * * ^ ? § } } ' $ @ $ } $ | ^= $ $ $ $ } ${ ` $ { $ = ` \ ' $ $ Ü $ "$ $ $ = \$ $ { ` $ ' ^ ^ ? * ^ ? § '$ $ } } $ } $ & ^ ^ ? {
$ $ = \$ } $ & $} $ $ $ = $ $ } = | ^ { ^ } $ & ^ § } $ $ = { $ $ } $= ${$ { $ = \$ } $ & $} $ } @ ' \ $ $ } } = $ @ \{$ $ $ \ } $ $} @ ' } $ & ^ \ * J ^ ? @ \ ${ $ } = $ $ ${ } @ $ } $
^ ? > ^ ? ' * & ; <+ Ý¥àÃáÃÉÉÉ¢¥ * * J > } * { «ã > * &+ { «ã { ã > * ¶« ä ¢¥ > * &<+ ¶ ä ¢ ^ * & ; + \ & ; + { «ã @ * { «ã { ã & ; + @ &<+ âÉ & @ * ; <+
{$ $ @ = \$ & ${ ${ $ } 3 > * ¡ $ {= \$ } } $ @ $ $ { «ã 1 A C C A 2 D C D E ' 9
5 7 G 6 B 8 '
{ «ã 1 { ã 3 A C B 4 G 2 F '
* ' 5 } $ |$ ' = @ ' $ = '$ { $ £$} $ $ ¬ { $ } { «ã { «ã ¥ÉÉ Å Å ¥ÉÉ Å ÉÉ } § '$ $ $ } ` } ' ' \ \ \ < \\ } ` * { «ã { «ã { ã $ | G < $ $ \ } $ } 3
^ { «ã { ã @ } | } $ } ^$ "$ $ } $ ^` ' $ {= @ ' $ = } $ = \$ $ $ $ $ } ' $ ¡ $ {= \$ |$ ' Û ` $ } ^\ { '$ ${^ " } ' ¶¸ } $ ' { $ $ = \$ $ } ` @ {| $ " $ } } } $ } ¦
* @ * &@ ; \ + ¨ } ¥¥ÉÚ¥«É $ É Ó ÔÉ ª& Ä $ }` $ } $ $ } © ? * * * J \; $ | $ $ { \ $ $ |$ { ^ } $ $ } ' $ ª $ }' { | $ $ \ $ } $ @ ¨ } ¨ } µ { § $ Ñ Ç²Ê= Dz= } $
^ `{| J~$ Õ$ $ $ } $ ¦ & ^ $ Dz\ ¸ @ $ ^\ ${ } Dz\ ¸ } = } $ ¯ÃÒ¸ = \ `= } ` } ` $ } ' \ ` ^\ } Dz\ ¸ $ } ${ {^ { ' $ ^ * §{ * * * `{` } * | ®¯° ; ; ¨ } * ¨ } { { ' $ " } ' {
{ { ' $ " } ' { '$ { ¯ " } ^ } $ ^ ^\ { ' $ ' `{` * ' * } }` Êæ¶ æÝÝ ¨ } $ $ @ $ } } ' { ' $ ¬ { $ } ¨ \ | } $ $ ^ * ? * ± } !`¥ ¨ } ¤ { " $ ' } Ç } ' { " } '
@ ¨ } { ¶¸ ¡ $ { $ ' } | } Ç } $ { $ { '$ Û ¶¸¥= \$ ^\ ${ $ } $ ^= ^ ¦ & ^ ÃâÊ ¦ & ^ $ ^\ $ ^ ¦ & { '$ Û ¸¸Ã øæ ÃâÊ ¨ } _ @ ' $ ʸ } ^\ '$ $ } {^ ^\ $ } ^\ Ó } ^\ $ } $ $ $ { ʸ $ } ^$ }
* } J \ @ ' J ¬ ¦ '$ {^ ¦ $ '= { ' $ @ $ = $ $ } $ | Û $ } ´ \ ? § } '$ { ' | Ó | Û {$ } $ { = \$ @ ${ @ $ } { ' | ' Ó | ' Û { } ¯² $ ¥= ¯² $ = Û ¶¸ ¸¸Ã øæ $ } { ' | }
{ «ã { ã '
@J \ \ \ * µ* & J ? ' + { ^$ } = } & } \ ¦ & ¡ _ \ £$ @ $ ¦ & ^ ± ^ ' * $} @ $ } § @ $ } & ' }= \$ $ ${ \ % ¡ $ { $ } $ ' $ = ¦ ¶«· £ \ } $ ' $ } Ýê¸ Ñ &
< !" £$ @ $ ª } ' " Ñ \ ' ¦ & $ $ { ¦ & Ò £ $ { \ $ ${ Ò Ö & < Z £$ @ $ " $ << §$$£ £$ @ $ ^ } * @ $ «= = Ô } ' $ " } ^$ $ & } = } @ $ ^ 4 \ @ 5 @ ' <= > £$ @ $ $ $ 6 < ^ * }
$ Ñ { } } | ` } ` } µ$ ${ } $ @ = } $ } @ ${ & } { } $ \ { $ } ª* * \ J * } } ^\ $ } }$ $ \ } $ $ ` $ } ` } $ $ ${ $ } ' $ Ñ ' $} "$ ` $ } @ = $ } } | $ @ ' $ = } $
^ \ * J Z ¨ } J * !"#$ í "$ $ { $ & " $ & = $ } } $ } = $ $ Û @ ' ¦ & = $} \| ^ @ {$ $ & } ^\ $ { } ^\ Ó } ^\ $ } $ @ ${ } ^\ & ; <+ < Z ? \ Z Z `{|£ `{| `{| `{| J~$ ª ' * Ñ $ } @ $ \ ^$ } } $ $ `
} $ µ$ } ${ ' " Ó Ñ $ ¢ $ & } µ$ $ ${ } Ñ $ @ ^= $ ^ $ { $ ` ' µ$ ${ ¦ & ` $ } ¦ & Ò £ $ { Ö & < ' \ $ ${ Ò
J * _ \ \ $ ^ } ^$ } ${ $ ' @ = } ` ¦ & ' @ © } $ ` ^ \ J \ £$ @ ^$ ¦ & = $ @ $ } ${ $ \ ^$ } } $ $ }` \ J µ $ ${ } $ $ ' $ Z* \* * \ \ J* ' ** < Z \ @ $ } }} $ ` $ } } * ^
Ñ @ @ @ $ ^ $ J\ J ? J* } $ Ó $ $ Ó ë ${ Ó ç} $ Ó $ }' ¦ Ó µ $ ${ Ó ç} $ } $ $ Ó ë ' &} $ Ó $ &} $ Ó $ &} $ â ¥É¥É Ó ¤}$ } $ Ó Ñ $\ } $ Ó § $ ' $ â Ó Ä } Ó $ ¶ Ó $ | Ó $ Ñ Ó ¸ ¼¾¾ ¹ ¼ êÁ ¿ ÊÁ ¼ Ó µ $ } @ @ J \ *
@ { } $ { Õ } ' $ } ^ ¬} } $ $ } § \ $ $ \ $ $ $ Õ } ' $ '$ \ $ $ Ñ ¦ & $ $ $ { }} } \ $ } Ñ \ ¦ & ` $ ` '$ { ¦ & Ò § $ ' Ò ¬} Ñ $ @ } $ ' \ ^ * * % * \ * ^ J \ * ¤}$ $ \ $ ' }= ` }
3 ¡ $ } $ ݲ $ $ ¸Ý ¢ Ó ¸Ý ¥ } ` '$ @ $^ 4 ` $ 6 @ ? * ? ; © ?\ ± J * $ ' } ^$ }$ $ \ ' J * J \ ? J ; 5 Z ª* % `{| J~$ } Z $ 6 * ? \ % } ? \ * % } $ } ' } $ § \ ${
© * * @ $ $ ${ = ${ ` }= $ ${ @ $ Ñ \ ' ¦ & $ $ { ¦ & Ò $ Ò § $ ' $ } Z *% Ñ \ ' ¦ & } ¤ }'= $ $ { ¦ & Ò $ Ò § $ ' $ } Ò $ } $ $ } '
Ñ } } ` } ' $ $ ð $ ¬ } } $ $ } $ { ' Ñ } } { ` }= @ ` ' $ $ ð $ = '