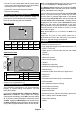
OPERATING INSTRUCTIONS TX-43JX600B / TX-43JX600BZ / TX-43JX610B TX-50JX600B / TX-50JX600BZ / TX-50JX610B TX-55JX600B / TX-55JX600BZ / TX-55JX610B TX-58JX600B / TX-58JX600BZ / TX-58JX610B TX-65JX600B / TX-65JX600BZ / TX-65JX610B LED TV e-MANUAL You can find instructions for your TV’s features in the E-Manual. To access the E-Manual, enter Settings menu, select Manuals and press OK. For quick access press Home/Menu button and then Info button.
HDMI Signal Compatibility...................................... 27 Contents Safety Information.................................................... 2 Markings on the Product.......................................... 2 Maintenance............................................................. 4 Display panel, Cabinet, Pedestal............................. 4 Mains plug................................................................ 4 Assembling / Removing the pedestal.......................
• Do not place any heat sources such as electric heaters, radiators, etc. near the TV set. Safety Information • Do not place the TV on the floor or inclined surfaces. CAUTION • To avoid danger of suffocation, keep plastic bags out of the reach of babies, children and domestic animals. RISK OF ELECTRIC SHOCK DO NOT OPEN CAUTION: TO REDUCE THE RISK OF ELECTRIC SHOCK DO NOT REMOVE COVER (OR BACK). NO USER-SERVICEABLE PARTS INSIDE. REFER SERVICING TO QUALIFIED SERVICE PERSONNEL.
WARNING • Do not ingest the battery, Chemical Burn Hazard. • This product or the accessories supplied with the product may contain a coin/button cell battery. If the coin/button cell battery is swallowed, it can cause severe internal burns in just 2 hours and can lead to death. • Keep new and used batteries away from children. • If the battery compartment does not close securely, stop using the product and keep it away from children.
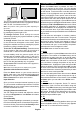
Maintenance Assembling / Removing the pedestal First, remove the mains plug from the mains socket. Display panel, Cabinet, Pedestal Regular care: Preparations Take out the pedestal(s) and the TV from the packing case and put the TV onto a work table with the screen panel down on the clean and soft cloth (blanket, etc.) Gently wipe the surface of the display panel, cabinet, or pedestal by using a soft cloth to remove dirt or fingerprints. • Use a flat and firm table bigger than the TV.
• Put the TV onto a work table with the screen panel down on the clean and soft cloth. Leave the stand(s) protruding over the edge of the surface. • Unsrew the screws that fixing the stand(s). • Remove the stand(s). When using the wall-hanging bracket Please contact your local Panasonic dealer to purchase the recommended wall-hanging bracket.
Ultra HD (UHD) Accessories Included TV supports Ultra HD (Ultra High Definition - also known as 4K) which provides resolution of 3840 x 2160 (4K:2K). It equals 4 times the resolution of Full HD TV by doubling the pixel count of the Full HD TV both horizontally and vertically. Ultra HD content is supported via native and market applications, HDMI, USB input(s) and over DVB-T2 and DVB-S2 broadcasts.
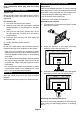
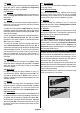
TV Control & Operation Using Main TV Menu This TV has a joystick as shown in the above drawing. It allows you to control the Volume / Programme / Source and Turn Off - On functions of the TV. Note: The position of the joystick may differ depending on the model. To change volume: Increase or decrease the volume by pushing the joystick right or left. To change channel: Scroll through the stored channels by pushing the joystick forwards or pulling it towards yourself.
3.2. Guide 3.9. Accessibility You can access the electronic programme guide menu using this option. Refer to Electronic Programme Guide section for more information. You can access the accessibility settings menu directly using this option. 3.3. Channels You can access the privacy settings menu directly using this option. This option may not be available depending on the model of your TV and the selected country during the first time installation process.
Power Connection Licence Notification IMPORTANT: The TV set is designed to operate on a 220-240V AC, 50 Hz supply. After unpacking, allow the TV set to reach the ambient room temperature before you connect the set to the mains. The terms HDMI, HDMI High-Definition Multimedia Interface, and the HDMI Logo are trademarks or registered trademarks of HDMI Licensing Administrator, Inc.
Disposal of Old Equipment and Batteries Sales and Support Information Only for European Union and countries with recycling systems Customer Communication Centre These symbols on the products, packaging, and/or accompanying documents mean that used electrical and electronic products and batteries must not be mixed with general household waste. • For customers within Ireland: 01289 8333 • For customers within the UK: 0344 844 3899 • Monday - Friday 9:00am - 5:00pm, (Excluding public holidays).
Specification TV Broadcasting PAL BG/I/DK SECAM BG/DK Receiving Channels VHF (BAND I/III) - UHF (BAND U) - HYPERBAND Digital Reception Fully integrated digital terrestrial-cable-satellite TV (DVB-T-C-S) (DVB-T2, DVB-S2 compliant) Number of Preset Channels 11 000 Channel Indicator On Screen Display RF Aerial Input 75 Ohm (unbalanced) Operating Voltage 220-240V AC, 50Hz. Audio A2 Stereo+Nicam Stereo Headphone 3.
Wireless LAN Transmitter Specifications Notice Frequency Ranges Max Output Power 2400 - 2483.5 MHz (CH1 - CH13) < 100 mW 5150 - 5250 MHz (CH36 - CH48) < 200 mW 5250 - 5350 MHz (CH52 - CH64) < 200 mW 5470 - 5725 MHz (CH100 CH140) < 200 mW DVB / Data broadcasting / IPTV functions • This TV is designed to meet the standards (as of March, 2021) of DVB-T / T2 (MPEG2, MPEG4AVC(H.264) and HEVC(H.265)) digital terrestrial services, DVB-C (MPEG2, MPEG4-AVC(H.264) and HEVC(H.
Remote Control 1 25 2 G 1 3 5 6 Standby: Switches On / Off the TV 2. Info: Displays information about on-screen content, shows hidden information (reveal - in TXT mode) 3. Guide: Displays the electronic programme guide 4. Home: Displays TV menu 5. Directional buttons: Helps navigate menus, content, etc. and displays the subpages in TXT mode when pressed Right or Left 6. OK: Confirms user selections, holds the page (in TXT mode), views Channels menu (DTV mode) 7.
Connections Connector Type Cables Device HDMI Connection (side&back) SPDIF SPDIF (Optical Out) Connection (back) HEADPHONE Headphone Connection (back) USB Connection (side) CI Connection (side) LAN Ethernet Connection (back) CAM module When using the wall mounting kit (available from a third party in the market, if not supplied), we recommend that you plug all your cables into the back of the TV before mounting on the wall. Insert or remove the CI module only when the TV is SWITCHED OFF.
Switching On/Off To Switch the TV On Connect the power cord to a power source such as a wall socket (220-240V AC, 50 Hz). To switch on the TV from standby • Press the Standby button, Programme +/- or a numeric button on the remote control. • Press the centre of the joystick on the TV in or push it up/down. To switch on the TV from hard standby • Press the centre of the joystick on the TV in. To switch the TV into standby Press the Standby button on the remote control, the TV will switch into standby mode.
checkbox next to the selected option will be checked. To turn the search option off clear the checkbox by pressing OK, Left or Right directional button after moving the focus on the desired broadcast type option. Digital Aerial: If D. Aerial broadcast search option is turned on, the TV will search for digital terrestrial broadcasts after other initial settings are completed. Digital Cable: If D.
Note: When viewing media files the Media Browser menu can only display a maximum of 1000 media files per folder. Media Browser You can play back music and movie files and display photo files stored on a USB storage device by connecting it to your TV. Connect a USB storage device to one of the USB inputs located on the side of the TV. After connecting a USB storage device to your TV Sources menu will be displayed on the screen. Select the related USB input option from this menu and press OK.
frequencies or amount of data that is being transferred at a time. Higher bandwidth translates into a higher amount of data that can be transferred. Higher bandwidth also means that digital audio signal doesn’t have to be compressed and is much more detailed, rich, and vibrant. When eARC is enabled from the sound menu, TV first tries to establish eARC link. If eARC is supported by the connected device, the output turns into eARC mode and the “eARC” indicator can be observed on the connected device’s OSD.
Settings Menu Content Picture Menu Content You can change the picture mode to suit your preference or requirements. Picture mode can be set to one of these options: Cinema, Game, Sports, Dynamic and Natural. Note: Available options may differ depending on the input source. Mode Dolby Vision Modes: If Dolby Vision content is detected Dolby Vision Dark and Dolby Vision Bright picture mode options will be available instead of Cinema and Natural modes.
Colour Tuner Gamut Mapping Opens colour tuner settings. Set the Colour Tuner as Enabled to adjust the Hue, Colour and Brightness values manually. You can use this option to set the range of colours displayed on your TV screen. When set as On, colours are set according to the source signal. When set as Off, the TV’s maximum colour capacity is used by default (recommended option). Note: This option may not be available depending on the TV model and its features.
Headphone Balance Reset Sets headphone volume. This option will not be available if the Sound Output option is set as Lineout. Please ensure before using headphones that the headphone volume is set to a low level, to prevent damage to your hearing. Sets sound balance. This feature will be activated if Sound Output option is set as TV or Headphone Only. Balance item adjusts the balance level of the TV speakers and headphones together. Resets some of the sound settings to factory defaults.
System Menu Content Displays accessibility options of the TV. Some options will not be available if no channels are installed. Increase the contrast of the menu options and texts to make them easier to read. White High Contrast Text, Yellow Text and Off options will be available. Enables any special feature sent from the broadcaster. Hard of Hearing A narration track will be played for the blind or visually impaired audience. Press OK to see all available Audio Description menu options.
Sources Edit the names, enable or disable selected source options. There are also Regular and Enhanced options available for HDMI sources. These options are affecting the colour settings of the selected HDMI source. To be able to watch 4K or HDR/HLG images from an HDMI source related source setting should be set as Enhanced if the connected device is compatible with HDMI 2.0 and subsequent versions. Set as Regular if the connected device is HDMI 1.4 compatible.
Sign Out Google Assistant More Menu Timeout Standby Mode LED You can use this option to sign out. If you sign out Works With Alexa feature will be disabled. Starts the setup process to enable your TV to work with Google Assistant devices. Highlight Start and press OK. If the setup is priorly completed Sign Out option will be available. If you sign out Google Assistant feature will be disabled. Refer to Google Assistant section for more information. Displays other setting options of the TV.
maturity level is disabled, prohibits access to the broadcast. General TV Operation Using the Channel List The TV sorts all stored stations in the channel list. You can edit this channel list, set favourites or set active stations to be listed by using the Channels menu options. Press the OK button to open the channel list. You can filter the listed channels or make advanced changes in the current list using the Filter and Edit tab options. Highlight the tab you want and press OK to see available options.
programme guide matching the selected genre will be highlighted. Guide Search: Displays searching options. Using these options, you can search the programme guide database in accordance with the selected criteria. Matching results will be listed. Now: Displays current event of the highlighted channel. Zoom: Highlight and press OK to see events in a wider time interval. Now/Next Schedule In this layout option, only the current and next events of the listed channels will be displayed.
will be displayed, press OK button to complete software upgrade process and restart TV. • The batteries maybe inserted incorrectly. Refer to the section “Inserting the Batteries into the Remote”. 3 AM search and upgrade mode No signal on an input source Your TV will search for new upgrades at 3:00 o’clock if Automatic scanning option is set to Enabled and if the TV is connected to an aerial signal or to the Internet.
Supported File Formats for USB Mode Video File Formats Format File Extension .mpg/.mpeg/.dat/ .vob .ts/.trp/.m2ts .avi .mp4/.m4a/.m4v/ .mov/. qt/.3gp/.3g2/ .3gpp .mkv .flv .asf/.wmv .webm Video Codec Audio MPEG1/2, H.264, VC1 MPEG1/2, H.264, VC1, HEVC/H.265 MPEG1/2, MPEG4, H.264, MJPEG MPEG1/2, H.263, MPEG4, H.264, HEVC/H.265, AV1 MPEG 1/2, MPEG4, H.264, HEVC/H.265, AV1 Sorenson Spark, MPEG4, H.
Supported DVI Resolutions When connecting devices to your TV’s connectors by using DVI converter cable (DVI to HDMI cable - not supplied), you can refer to the following resolution information.
Internet Speed Test Connectivity Highlight Internet Speed Test and press the OK button. TV will check the internet connection bandwidth and display the result when complete. Wired Connectivity To Connect to a Wired Network • You must have a modem/router connected to an active broadband connection. • Connect your TV to your modem/router via an Ethernet cable. There is a LAN port at the rear (back) of your TV. 1 Advanced Settings Highlight Advanced Settings and press the OK button.
other WLAN 11b appliances. The standard values of the transmission speed are the theoretical maximum values for the wireless standards. They are not the actual speeds of data transmission. The location where the transmission is most effective differs depending on the usage environment. The TV supports 802.11 a, b, g & n type modems. It is highly recommended that you should use the IEEE 802.11n communication protocol in order to avoid any possible problems while watching videos.
may be collected and used according to terms and conditions etc. For details of terms of service / privacy policy, refer to [HOME] Settings>System>Privacy>Privacy Settings Customer’s personal information may be recorded on this TV by broadcasting organisation or application provider. Before repairing, transferring or discarding this TV, erase all the information recorded on this TV according to the following procedure.
each time when you connect to the internet. This is a precaution against unauthorised access. Since your TV has its own MAC address, your internet service provider cannot validate the MAC address of your TV. For this reason, your TV cannot connect to the internet. Contact your internet service provider and request information on how to connect a different device, such as your TV, to the internet. It is also possible that the connection may not be available due to a firewall problem.
Catch-up content can also be accessed and played back directly from the TV Guide. Refer to the section Electronic Programme Guide for more information. Accessible TV Guide The Freeview Play Accessible TV Guide makes it simpler for you to find the shows you love that meet your accessibility needs. Learn more at freeview. co.uk/555. The guide can be accessed as described below. • Available at Channel 555. Enter 555 using the numeric buttons on your remote while watching TV.
green, yellow, blue, may be defined for some other functions, e.g. shortcuts). If you switch to another channel while an HbbTV application is active (either in red button icon mode or full UI mode), the following scenarios can occur. • The application can continue running. (*) The Microphone Box can be purchased separately if not supplied with the TV. For more information contact your local dealer or retail outlet where you bought your TV. • The application can be terminated.
If you skip the setup wizard after the first time installation you can use the Works With Alexa option in the Settings>System>Voice Assistant menu to carry out the setup later manually. On the first screen you will be informed about the feature. Highlight Start and press OK to proceed. • An authentication code will be created and displayed on the screen. Use your computer or any other device with internet access to go to the internet address (URL) shown on the screen.
• You will be asked to determine a name for your TV on the next screen, called ‘Friendly Name’(FN). A ‘Friendly Name’ is a name that reminds you of your TV, such as ‘Living Room TV’, ‘Kitchen TV’, ‘Dining Room TV’, etc. Choose an easy-to-say name. When you are done, highlight OK and press OK • An authentication code will be created and displayed on the screen.
Important Instruction For your own safety read following instruction carefully before attempting to connect this unit to the mains supply. MAINS (AC) OPERATION The wires in the mains lead are coloured in accordance with the following code : 1 4 2 3 1. Green&Yellow (Earth) (if there is earth cable) 2. Blue (Neutral) 3. Brown (Live) 4.