Model No. English TX-40CS620E TX-50CS620E TX-55CS620E TX-65CS620E Nederlands Operating Instructions LCD Television For more detailed instructions, please refer to [eHELP] (Built-in Operating Instructions). How to use [eHELP] (p. 16) Thank you for purchasing this Panasonic product. Please read these instructions carefully before operating this product and retain them for future reference. Please carefully read the “Safety Precautions” of this manual before use.
For information about the trademarks, refer to [eHELP] (Support > Licence).
Important Notice Notice for DVB / Data broadcasting / IPTV functions This TV is designed to meet the standards (as of August, 2014) of DVB-T / T2 (MPEG2 and MPEG4AVC(H.264)) digital terrestrial services, DVB-C (MPEG2 and MPEG4-AVC(H.264)) digital cable services. Consult your local dealer for availability of DVB-T / T2 services in your area. Consult your cable service provider for availability of DVB-C services with this TV.
Do not insert foreign objects into the TV through the air vents. Do not use an unapproved pedestal / mounting equipment. Be sure to ask your local Panasonic dealer to perform the setup or installation of approved wall-hanging brackets. Do not apply any strong force or impact to the display panel. Ensure that children do not climb on the TV. Do not place the TV on sloping or unstable surfaces, and ensure that the TV does not hang over the edge of the base.
Ventilation should not be impeded by covering the ventilation openings with items such as newspapers, tablecloths and curtains. Whether you are using a pedestal or not, always ensure the vents at the bottom of the TV are not blocked and there is sufficient space to enable adequate ventilation. If you want to get a copy of the original DoC of this TV, please visit the following website: http://www.doc.panasonic.
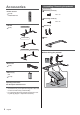
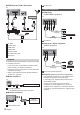
Accessories Assembling / Removing the pedestal 40-inch model Assembly screw (4) Remote Control (p. 12) N2QAYB001010 M5 × 10 Assembly screw (4) M4 × 12 Pedestal Bracket (2) 40-inch model (p. 6) Base 50-inch model 55-inch model 65-inch model Assembling the pedestal A 1 Mains lead (p. 9) Batteries (2) R6 (p. 13) Operating Instructions Pan European Guarantee Card Accessories may not be placed all together. Take care not to throw them away unintentionally.
Base 50-inch model 55-inch model 65-inch model 2 Assembling the pedestal A 1 C D 3 B 50-inch model 55-inch model 65-inch model Assembly screw (4) M5 × 15 Assembly screw (4) M4 × 12 Bracket (2) 2 English 7
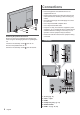
Connections 3 B Removing the pedestal from the TV Be sure to remove the pedestal in the following way when using the wall-hanging bracket or repacking the TV. 1 Remove the assembly screws External equipment and cables shown are not supplied with this TV. Please ensure that the unit is disconnected from the mains socket before attaching or disconnecting any cables. Check the terminal type and cable plugs are correct for connection. Use a fully wired HDMI compliant cable.
7 AV1 (SCART) (p. 9, 10) RF cable (p. 10) 8 ETHERNET Terrestrial aerial 9 Terrestrial / cable terminal (p. 9) 10 AV2 (COMPONENT / VIDEO) Satellite dish (p. 10, 10) Wireless connection Basic connections Cable Mains lead AC 220-240 V 50 / 60 Hz Built-in wireless LAN Access point Mains lead (supplied) DVB-via-IP server RF cable Insert the mains plug firmly into place.
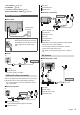
DVD Recorder (VCR) / Set top box Access point TV Other connections DVD Player (COMPONENT equipment) Cable TV (Viewing) (Listening) DVD Player Camcorder / Game equipment RF cable (VIDEO equipment) SCART cable TV HDMI cable Satellite dish Terrestrial aerial DVD Recorder / VCR Set top box Network A broadband network environment is required to be able to use internet services. If you do not have any broadband network services, please consult your retailer for assistance.
VIERA Link TV Use HDMI1 - 3 for VIERA Link connection. For details, refer to [eHELP] (Functions > VIERA Link “HDAVI Control™”). HDMI cable Amplifier with speaker system External equipment (DVD Player, etc.
Identifying Controls Displays channel list. 8 [Option Menu] Easy optional setting for viewing, sound, etc. 9 Coloured buttons Remote Control (red-green-yellow-blue) Used for the selection, navigation and operation of various functions. 10 Volume Up / Down 11 Numeric buttons Changes channel and teletext pages. Sets characters. When in Standby mode, switches TV on. 12 [eHELP] Displays [eHELP] (Built-in Operating Instructions).
Installing / Removing batteries Pull open 6 Volume Up / Down Cursor Left / Right (when in the menu system) 7 Mains power On / Off switch Use to switch the mains power. Hook Close Note the correct polarity (+ or -) Indicator / Control panel When pressing 4, 5, 6 buttons, the control panel guide appears on the right side of the screen for 3 seconds to highlight which button has been pressed.
First time Auto Setup Tick the TV signal mode to tune, and then select [Start Auto Setup] : tune (search for the available channels) When the TV is turned on for the first time, it will automatically search for available TV channels and give options to set up the TV. These steps are not necessary if the setup has been completed by your local dealer. Please complete connections (p. 8 - 11) and settings (if necessary) of the connected equipment before starting Auto Setup.
Operation Selectable modes vary depending on the channels stored. 3 Turn power on Select a channel up down (TV) or or (Remote Control) Mains power On / Off switch should be on. (p. 13) The last viewed [Home Screen] is displayed. To select a channel position with 2 or more-digit, e.g. 399 Example: [TV Home Screen] To access each feature Access [APPS List] and select a feature Example: [APPS List] Example: Selected content screen APPS is the applications (features) of the TV.
How to Use eHELP [eHELP] is the detailed operating instructions built into the TV, and gives a more detailed explanation for a better understanding of the operation of each feature. 1 Display [eHELP] or [Help] [eHELP] If the [eHELP] has been accessed previously since the TV was turned on, the confirmation screen is displayed to select whether to go to the [First page] or to the [Last viewed page].
FAQs Before requesting service or assistance, please follow these simple guides to solve the problem. For details, refer to [eHELP] (Support > FAQs). When pushed with a finger, the display panel moves slightly and makes a noise There is a little gap around the panel to prevent damage to the panel. This is not a malfunction. The TV does not switch on Check the mains lead is plugged into the TV and the mains socket. The TV goes into Standby mode Auto power standby function is activated.
Maintenance Specifications First, remove the mains plug from the mains socket. TV Display panel, Cabinet, Pedestal Model No. 40-inch model : TX-40CS620E 50-inch model : TX-50CS620E Regular care: 55-inch model : TX-55CS620E Gently wipe the surface of the display panel, cabinet, or pedestal by using a soft cloth to remove dirt or fingerprints. 65-inch model : TX-65CS620E For stubborn dirt: (1) First clean the dust from the surface.
Connection terminals AV1 input / output SCART (Audio/Video in, Audio/Video out, RGB in) CATV (S01 - S05) CATV S11 - S20 (U1 - U10) VHF H1 - H2 (ITALY) UHF E21 - E69 AV2 input (COMPONENT / VIDEO) VIDEO CATV S1 - S10 (M1 - M10) CATV S21 - S41 (Hyperband) RCA PIN Type × 1 1.0 V[p-p] (75 :) AUDIO L - R PAL D, K SECAM D, K RCA PIN Type × 2 VHF R1 - R2 0.5 V[rms] VHF R3 - R5 VHF R6 - R12 Y 1.0 V[p-p] (including synchronisation) UHF E21 - E69 PB/CB, PR/CR ±0.
For information about the open source software, refer to [eHELP] (Support > Licence). This equipment complies with the EMC standards listed below. EN55032, EN55020, EN55024, EN61000-3-2, EN61000-3-3 When using the wall-hanging bracket Please contact your local Panasonic dealer to purchase the recommended wall-hanging bracket.
Disposal of Old Equipment and Batteries Only for European Union and countries with recycling systems These symbols on the products, packaging, and/or accompanying documents mean that used electrical and electronic products and batteries must not be mixed with general household waste. For proper treatment, recovery and recycling of old products and batteries, please take them to applicable collection points in accordance with your national legislation.
Modelnr. Nederlands TX-40CS620E TX-50CS620E TX-55CS620E TX-65CS620E Gebruiksaanwijzing LCD-televisie Raadpleeg de [eHELP] (ingebouwde bedieningsinstructies) voor gedetailleerde instructies. Gebruik van de [eHELP] (p. 16) Hartelijk dank voor de aankoop van dit Panasonic-product. Lees deze instructies aandachtig voordat u het product gebruikt en bewaar ze zodat u ze later opnieuw kunt raadplegen. Lees vóór gebruik aandachtig het gedeelte “Veiligheidsmaatregelen” in deze handleiding.
Raadpleeg de [eHELP] voor informatie over de handelsmerken (Ondersteuning > Licentie).
Belangrijke kennisgeving Kennisgeving over DVB/datatransmissie/ IPTV-functies Deze tv is ontworpen om te voldoen aan de normen (vanaf augustus 2014) voor DVB-T/T2 (MPEG2 en MPEG4-AVC(H.264)) digitale terrestrische services en DVB-C (MPEG2 en MPEG4-AVC(H.264)) digitale kabelservices. Raadpleeg uw lokale dealer voor de beschikbaarheid van DVB-T-/T2-services in uw gebied. Raadpleeg uw kabelprovider voor de beschikbaarheid van DVB-C-services met deze tv.
Stel de tv niet bloot aan regen of hoge vochtigheid. De tv mag niet blootgesteld worden aan druppelend of spattend water. Plaats geen voorwerpen gevuld met vloeistof, zoals vazen, op de tv of erboven. Laat geen vreemde voorwerpen in de tv komen door de ventilatiegaten. Gebruik geen standaard of montage-uitrusting die niet is goedgekeurd. Vraag uw Panasonic-dealer om de instellingen of installatie uit te voeren van een goedgekeurde muurbevestigingssteun.
Ventilatie Let op Laat voldoende ruimte vrij rond de tv zodat overtollige warmte kan worden afgevoerd; de levensduur van sommige elektronische componenten wordt verkort als ze te heet worden. Minimale afstand: 10 10 Stel batterijen niet bloot aan extreme warmte, zoals zonlicht, vuur of dergelijke. Gooi gebruikte batterijen weg volgens de voorschriften voor afvalverwijdering.
Accessoires De standaard monteren/verwijderen 40 inch-model Montageschroef (4) Afstandsbediening (p. 12) N2QAYB001010 M5 × 10 Montageschroef (4) M4 × 12 Standaard Steun (2) 40 inch-model (p. 6) Steunplaat 50 inch-model 55 inch-model 65 inch-model De standaard monteren A 1 Netsnoer (p. 9) Batterijen (2) R6 (p. 13) Gebruiksaanwijzing Europese Garantie De accessoires mogen niet allemaal samen worden geplaatst. Zorg dat u ze niet per ongeluk weggooit.
Steunplaat 50 inch-model 55 inch-model 65 inch-model 2 De standaard monteren A 1 C D 3 B 50 inch-model 55 inch-model 65 inch-model Montageschroef (4) M5 × 15 Montageschroef (4) M4 × 12 Steun (2) 2 Nederlands 7
Verbindingen 3 B De standaard van de tv verwijderen Verwijder de standaard op de volgende manier wanneer u de muurbevestigingssteun gebruikt of de tv opnieuw inpakt. 1 Verwijder de montageschroeven De afgebeelde externe apparatuur en kabels worden niet bij de tv meegeleverd. Zorg ervoor dat de stekker van de tv niet in het stopcontact zit als u kabels aansluit of loskoppelt. Controleer of u de juiste aansluitingen en connectoren gebruikt voor de verbinding.
7 AV1 (SCART) 8 ETHERNET Gebruik een afgeschermde dubbeldraadse (getwist paar, STP) LAN-kabel. (p. 9, 10) (p. 10) 9 Aardse ingang/kabelingang (p. 9) 10 AV2 (COMPONENT/VIDEO) (p. 10) DVB-via-IP-server RF-kabel Aardse antenne Satellietschotel Basisaansluitingen Draadloze verbinding Netsnoer Kabel 220-240 V wisselstroom 50/60 Hz Netsnoer (meegeleverd) Ingebouwde draadloze LAN-adapter Steek de stekker van het netsnoer stevig op zijn plaats.
dvd-recorder (VCR) / Settopbox Ingebouwde draadloze LAN-adapter TV Toegangspunt Andere verbindingen dvd-speler Kabel (COMPONENT-apparatuur) TV (Kijken) (Luisteren) dvd-speler RF-kabel Camcorder / Spelsysteem SCART-kabel (VIDEO-apparatuur) HDMI-kabel TV Satellietschotel Aardse antenne dvd-recorder / VCR Settopbox Netwerk Voor gebruik van internetdiensten is een breedbandnetwerk vereist. Raadpleeg uw leverancier voor hulp als u geen breedbandnetwerkservices hebt.
VIERA Link TV Gebruik HDMI1 - 3 voor VIERA Link-verbinding. Raadpleeg de [eHELP] voor details (Functies > VIERA Link “HDAVI Control™”). HDMI-kabel Versterker met luidsprekersysteem Externe apparatuur (DVD-speler, enz.) Hoofdtelefoon Het volume [Hoofdtel.
Bedieningsonderdelen 8 [Menu Opties] _ ^ ^ " ^ 9 Gekleurde toetsen Afstandsbediening (rood, groen, geel, blauw) ` ^ { ^ ^ 10 Volume omhoog/omlaag 11 Cijfertoetsen ^ ^ | ^ " ^ #{} 12 [eHELP] | $ !_~'= ^ @ { { \ 13 Selectie ingangsmodus ` ^
De batterijen plaatsen/verwijderen 5 Kanaal omhoog/omlaag @ \ 6 Volume omhoog/omlaag @ \ 7 Hoofdschakelaar ! " ^ ! < * ' { < < @ #\ Indicator/Bedieningspaneel & ^ ^ 4 5 6 7 1 2 3 & " < ^
Automatisch instellen bij het eerste gebruik Stel de netwerkverbinding in Selecteer uw land & < ^ ^ @ \ Vink het tv-signaal aan waarop u wilt afstellen en selecteer [Start auto set-up] @{ { " \ ^ ^ " " < { { ^# ^ < ^ "
_ { { ^# ^ [Voeg TV-signaal toe] in [Afstemmenu] (menu Instellingen) & " { [Fabrieksinstellingen] in [Systeemmenu] (menu Instellingen) Bediening Schakel de tv in @ `\ @& { \ | @ \ ! { $ = ^ ` { $ `# = ` { * $ = ! $
| { " < < ^ 3 Selecteer een kanaal Gebruik eHELP $ !_~'= ^ { { ^ ^ ! ^ ^ { ^ ^ 1 Geef [eHELP] weer _ < { { <^ { [Help] [eHELP] Toegang tot de functies Open [APPS-lijst] en selecteer de gewenste functie ` { $&''*# < =
Veelgestelde vragen Probeer eerst het probleem op te lossen aan de hand van de volgende eenvoudige richtlijnen voordat u hulp inroept. Raadpleeg de [eHELP] voor details (Ondersteuning > Veelgestelde vragen). Onderdelen van de tv worden warm Onderdelen van de tv kunnen heet worden. Deze temperatuurverhoging vormt geen probleem voor de prestaties en de kwaliteit. Als u met uw vinger op het beeldscherm drukt, beweegt hij een beetje en maakt hij geluid.
Onderhoud Specificaties Verwijder eerst de stekker van het netsnoer uit het stopcontact. TV Beeldscherm, Behuizing, Standaard Modelnr. 40 inch-model : TX-40CS620E 50 inch-model : TX-50CS620E Regelmatig onderhoud: 55 inch-model : TX-55CS620E Veeg de buitenkant van het beeldscherm, de behuizing of de standaard voorzichtig af met een zachte doek om vuil of vingerafdrukken te verwijderen. 65 inch-model : TX-65CS620E Voor hardnekkig vuil: (1) Verwijder eerst het stof van de buitenkant.
Aansluitingen AV1-ingang/uitgang SCART (audio/video in, audio/video out, RGB in) VHF A - H (ITALIË) CATV (S01 - S05) CATV S11 - S20 (U1 - U10) VHF H1 - H2 (ITALIË) AV2-ingang (COMPONENT/VIDEO) VIDEO RCA PIN-type × 1 UHF E21 - E69 CATV S1 - S10 (M1 - M10) CATV S21 - S41 (Hyperband) 1,0 V[p-p] (75 :) AUDIO L - R RCA PIN-type × 2 0,5 V[rms] PAL D, K SECAM D, K VHF R1 - R2 VHF R3 - R5 Y 1,0 V[p-p] (inclusief synchronisatie) PB/CB, PR/CR VHF R6 - R12 UHF E21 - E69 ±0,35 V[p-p] PAL 525/60 HDMI 1 / 2 / 3-i
Raadpleeg de [eHELP] voor informatie over de openbronsoftware (Ondersteuning > Licentie). Dit apparaat voldoet aan de volgende EMC-normen. EN55032, EN55020, EN55024, EN61000-3-2, EN61000-3-3 Bij gebruik van de muurbevestigingssteun Neemt contact op met uw plaatselijke Panasonicdealer als u de aanbevolen muurbevestigingssteun wilt aanschaffen.
Het ontdoen van oude apparatuur en batterijen. Enkel voor de Europese Unie en landen met recycle systemen. Deze symbolen op de producten, verpakkingen en/of begeleidende documenten betekenen dat gebruikte elektrische en elektronische producten en batterijen niet samen mogen worden weggegooid met de rest van het huishoudelijk afval.
+;<=>?*@=J +;\=>?*@=J +;\\>?*@=J +;*\>?*@=J Manual de utilizare Televizor cu ecran LCD !" # $% ` " $ &£ = !&% '*$ ' ` ¡ " ^ ¢
' ^ $ &£ = @& ~ \ Cuprins > ¥¥¥¥¥¥¥¥¥¥¥¥¥¥¥¥¥¥¥¥¥¥¥¥¥¥¥¥¥¥¥¥¥¥¥¥¥¥¥¥¥¥¥¥¥¥¥¥¥¥¥ 3 ¥¥¥¥¥¥¥¥¥¥¥¥¥¥¥¥¥¥¥¥¥¥¥¥¥¥¥¥¥¥¥¥¥¥¥¥¥¥¥¥¥¥¥¥¥¥ 3 " & & ¥¥¥¥¥¥¥¥¥¥¥¥¥¥¥¥¥¥¥¥¥¥¥¥¥¥¥¥¥¥¥¥¥¥¥¥¥¥¥¥¥¥¥¥¥¥¥¥¥¥¥¥¥¥¥¥¥¥¥¥ 6 ¥¥¥¥¥¥¥¥¥¥¥¥¥¥¥¥¥¥¥¥¥¥¥¥¥¥¥¥¥¥¥¥¥¥¥¥¥¥¥¥¥¥¥¥¥¥¥¥¥¥¥¥¥¥¥¥¥¥¥ 8 ¥¥¥¥¥¥¥¥¥¥¥¥¥¥¥¥¥¥¥¥¥12 * ¥¥¥¥¥¥¥¥¥¥¥¥¥¥¥¥¥
^ & _ _ `{|} }" { ' { ^ ^ ^ ^ < & ^ " @ ¤ ¦\ ^ |` # ¦ @'_ ¦ '_ #&`@! ¦\\ ^ { |` # @'_ ¦ '_ #&`@! ¦\\ {
^ " ^ ^ ^ " ^ " { ^ " ^ " { { ' " {
{ ~ < ^ " ^ " ^ | { ^ & #^ { " * { ¤ " ^ {
Accesorii } & Model de 40 inci !<$ !&% '@$ ¦¨&© ª !<$ ª ¦ Model de 40 inci ? & !@$ !&% *$ Model de 50 inci | # Model de 55 inci Model de 65 inci & A 1 > !&% $ | !@$ !&% '$ Manual de utilizare ;J & & ^ & #^ '
| # Model de 50 inci Model de 55 inci Model de 65 inci 2 & A 1 C D 3 B Model de 50 inci Model de 55 inci Model de 65 inci !<$ ª !<$ ª ¦ ? & !@$ 2 ¤ 7
> 3 B ` & # & #^ ¤ " { ^ " _ { ^ " ^ " & #^ " { ' ^
* `"' ; @ !&% '=$ * ^ |` ^ ' {' !?> $ !&% '=$ { J J ^J !&% '=$ & } !&% $ & { '= {@ !> ^J^ }{"`J $ !&% '=$ > > # > > & ¦¦#¦ ` !" ~& ' { @ " \ * ^ |` ^ ' { " & # % & & ¤ {
`{` !{> $ } ` ~& ^ " ' > `{` @ ' _ \ ^ " @` " \ @& \ ' } |`| { > { *& } J ~ & & @ ` |_ \ { !| ^ " & { & |`| ` | ' " ^ ^ { | ^ ^ { ^
VIERA Link ^ " " !| # ` _& ~ ' $ &£ = @ ` _& ~ ¢!|&` \ { !| & " _ @|`| } \ > ' ^ { ? ' ^ ^ ? _ # ? ^ " @ \ " _ ^ " {
Identificarea elementelor de 6 APPS & " $~ &''*= @ \ 7 OK ' " & " & * ^ " 9 Butoane colorate ! ; ; ; $ ^ " ^ 10 > } 11 Butoane numerice * {
" } ¤ \ > } < @ ¤ ^ \ * > } ¤ @ ¤ ^ \ | & } & " ¡ & @ #\ " } ¤ {
? ? ? ¡ ^ ^ ' @¢ ^ \ ~ ^ " ^ ` { ^ " ^ " & { " " ' ` "
' ? ! ? $ ' ` { ¤ " { ! ? $ ' " > & ! ? $ & # @ `\ @ \ { " @ \ * " $_ = ^ " " _ $_ `
{ ^ " 3 ? Modul de utilizare eAJUTOR $ &£ = " " ^ " " " { < 1 _ ' ¦ _ ?
_ ¡ ^ " ^ { ' $ &£ = @& ¡ { ^ \ # & ` { ^ " " # _ ' ^ " ^ { & " ^ { ^ &
` ~ & # % J _ & # % Model de 40 inci : #*¦_ Model de 50 inci : #*¦_ & Model de 55 inci : #*¦_ ³ " ¤ Model de 65 inci : #*¦_ & ` ! $ Model d
`! & # ! @ &~ &\ > & ` @* # *\ " } {' SCART @ ^ ^ \ & ` * # *¦ @ # \ `! ! # !¦ @ &~ &\ ! _¦ # _ & ` * # * @ # \ " {@ !> ^J^ }{"`J $ & ` *¦ # * @! { \ {"`J ' & ª ` `$ # = @² :\ ?J> ` `" ; ' & ª ¦ `! # ¦ `$ = `! # `! # ¦ Y ! _¦ # _ `$ # = @ "¤ " \ PB}>B R}>R \@\}*= ´ `$ # =
' ^ " ' ^ # $ &£ = @& ~ \ & _ < _ ¦ _ ¦ _ ¦ _ ##¦ _ ## > # & & & & & ` ^ { ' "
` & ~ & ~ ` & J & & & { { < { " { < { ' " ^ { " ^ <