Operating Instructions LED TV English Model No. TX-40HX800B TX-50HX800B TX-58HX800B TX-65HX800B TX-40HX800BZ TX-50HX800BZ TX-58HX800BZ TX-65HX800BZ TX-40HX820B TX-50HX820B TX-58HX820B TX-65HX820B (image: TX-50HX820B) For more detailed instructions, please refer to [eHELP] (Built-in Operating Instructions). How to use [eHELP] (p. 21) Thank you for purchasing this Panasonic product. Please read these instructions carefully before operating this product and retain them for future reference.
The terms HDMI and HDMI High-Definition Multimedia Interface, and the HDMI Logo are trademarks or registered trademarks of HDMI Licensing Administrator, Inc. in the United States and other countries. Dolby, Dolby Vision, Dolby Atmos, Dolby Audio, and the double-D symbol are trademarks of Dolby Laboratories. Manufactured under license from Dolby Laboratories. Confidential unpublished works. Copyright © 2012-2019 Dolby Laboratories. All rights reserved.
Important Notice Customer information may be collected by provider via application provided by third parties on this TV or website. Please confirm the terms and conditions etc. of provider in advance. • Panasonic will not be held responsible for collecting Notice for DVB / Data broadcasting / IPTV functions This TV is designed to meet the standards (as of August, 2019) of digital services.
Safety Precautions This TV is designed to operate on AC 220-240 V, 50 / 60 Hz. Insert the mains plug fully into the mains socket. To help avoid risk of electrical shock, fire, damage or injury, please follow the warnings and cautions below: To turn Off the apparatus completely, you must pull the mains plug out of the mains socket. Consequently, the mains plug should be easily accessible at all times. Mains plug and lead Disconnect the mains plug when cleaning the TV.
If the TV is used in an environment where there is dust or smoke. It is possible for dust/smoke particles to enter the TV through the air vents during normal operation which can become trapped inside the unit. This may cause overheating, malfunction, deterioration in picture quality, etc. Do not use an unapproved pedestal / mounting equipment. Be sure to ask your local Panasonic dealer to perform the setup or installation of approved wall-hanging brackets.
Built-in wireless LAN Moving the TV Caution Caution Do not use the built-in wireless LAN to connect to any wireless network (SSID*) for which you do not have usage rights. Such networks may be listed as a result of searches. However, using them may be regarded as illegal access. *SSID is a name for identifying a particular wireless network for transmission. Do not subject the built-in wireless LAN to high temperatures, direct sunlight or moisture.
LED TV Declaration of Conformity (DoC) “Hereby, Panasonic Corporation declares that this TV is in compliance with the essential requirements and other relevant provisions of the Directive 2014/53/EU.” If you want to get a copy of the original DoC of this TV, please visit the following website: http://www.ptc.panasonic.eu/compliance-documents Authorized Representative: Panasonic Testing Centre Panasonic Marketing Europe GmbH Winsbergring 15, D-22525 Hamburg, Germany 5.15 – 5.
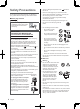
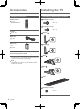
Accessories Standard accessories Remote Control Installing the TV Assembling / Removing the pedestal Assembly screw (4) (p. 17) M5 × 12 N2QAYB001246 Assembly screw (4) M4 × 12 Pedestal (p. 8 - 11) Bracket Mains lead (p. 13) Batteries (2) R6 Bracket (p. 18) Operating Instructions Production Registration Leaflet Base Accessories may not be placed all together. Take care not to throw them away unintentionally. Note Illustrations shown above may be different between models and countries.
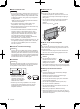
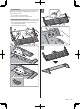
Preparations Make sure to assemble the pedestal before taking out the TV from the carton. Do not hold the screen panel part. 2 H Make sure not to scratch or break the TV. Assembling the pedestal Do not assemble the pedestal by any method other than those specified below. Cable arrangement (p.
A 4 A C D 5 Note When lifting the TV, support the TV as shown above. Do not hold the screen part strongly as shown above. Lift the TV with the protective sheet attached. Do not place the TV temporarily on the floor or desk.
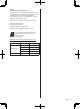
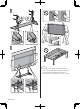
Installing the wallhanging bracket 6 Please contact your local Panasonic dealer to purchase the recommended wall-hanging bracket.
To prevent fall and injury, remove the TV from its fixed wall position when it is no longer in use. Connections External equipment and cables shown are not supplied with this TV. Please ensure that the unit is disconnected from the mains socket before attaching or disconnecting any cables. Check the terminal type and cable plugs are correct for connection. Use a fully wired HDMI compliant cable. Please use a High Speed HDMI cable when connecting for high resolution pictures.
Terminals Basic connections Mains lead 1 AC 220-240 V 50 / 60 Hz 2 7 8 Mains lead (supplied) 3 4 Insert the mains plug firmly into place. When disconnecting the mains lead, be absolutely sure to disconnect the mains plug from the mains socket first. 5 6 Aerial TV 9 1 CI slot 10 (p. 16) 2 Headphone / Subwoofer jack 3 HDMI1 - 2 (p. 15) (p. 13, 14, 15) 4 USB 1 port This symbol indicates DC operation. 5 ETHERNET terminal 6 Terrestrial terminal Terrestrial aerial For DVB, Analogue (p.
Satellite receiver Connections for 4K / HDR compatible equipment TV TV HDMI cable 4K / HDR compatible equipment Connect the 4K compatible equipment to HDMI terminal using a 4K compatible cable and you can watch content in 4K format. Supporting HDR does not increase the peak brightness capabilities of the TV panel.
Amplifier (listening with external speakers) Other connections To enjoy multi-channel sound from external equipment (e.g. Dolby Digital 5.1ch), connect the equipment to the amplifier. For information about the connections, read the manuals of the equipment and amplifier. DVD Player (COMPONENT equipment) TV TV (Listening) (Viewing) HDMI cable Amplifier with speaker system External equipment (DVD Player, etc.
Subwoofer VIERA Link To use the subwoofer, set [Headphone Terminal Output] to [Sub Woofer]. (The subwoofer output from the TV is the same for both L and R.) For information about the headphone terminal output settings, refer to [eHELP] (Search by Purpose > Settings > Sound). Use HDMI1 - 3 for VIERA Link connection. TV Fixing the cables For details, refer to [eHELP] (Search by Purpose > Functions > VIERA Link “HDAVI Control™”). Cable arrangement Audio cable (3.
Identifying Controls 7 OK Confirms selections and choices. Press after selecting channel positions to quickly change channel. Remote Control 8 [Option Menu] Easy optional setting for viewing, sound, etc. 9 Coloured buttons (red-green-yellow-blue) Used for the selection, navigation and operation of various functions. 10 Volume Up / Down 11 Numeric buttons Changes channel and teletext pages. Sets characters. When in Standby mode, switches TV on.
Installing / Removing batteries Remote Control Mode Error Pull open Hook When the TV receives a signal with a different remote control mode to the mode that is set on the TV five times, Remote Control Mode Error is displayed. Follow the on-screen instructions. When all settings are initialised by accessing Shipping Condition, the TV’s remote control mode is reset to mode 1.
2 Power LED Red: Standby Green: On • Depending on the ambient brightness, adjusts the brightness of LED to easy-to-view levels automatically. Orange: Standby with some functions (recording, etc.) active The LED blinks when the TV receives a command from the remote control. 3 Input mode selection Press repeatedly until you reach the desired mode. First time Auto Setup When the TV is turned on for the first time, it will automatically search for available TV channels and give options to set up the TV.
If tuning has failed check the RF cable, and the network connection, and then follow the on-screen instructions. Watching TV Note The TV goes into Standby mode when no operation is performed for 4 hours if [Auto Standby] in the Timer Menu is set to [On]. The TV goes into Standby mode when no signal is received and no operation is performed for 10 minutes if [No signal Power off] in the Timer Menu is set to [On].
How to Use eHELP [eHELP] is the detailed operating instructions built into the TV, and gives a more detailed explanation for a better understanding of the operation of each feature.
FAQs Before requesting service or assistance, please follow these simple guides to solve the problem. For details, refer to [eHELP] (Support > FAQs). The TV does not switch on Check the mains lead is plugged into the TV and the mains socket. The fuse in the mains plug may have blown. Replace it with one of an identical rating. (p. 4) The TV goes into Standby mode Auto power standby function is activated.
Maintenance First, remove the mains plug from the mains socket. Display panel, Cabinet, Pedestal Regular care: Gently wipe the surface of the display panel, cabinet, or pedestal by using a soft cloth to remove dirt or fingerprints. For stubborn dirt: (1) First clean the dust from the surface. (2) Dampen a soft cloth with clean water or diluted neutral detergent (1 part detergent to 100 parts water). (3) Wring out the cloth firmly.
Specifications Sound Speaker output 20 W (10 W + 10 W) TV Headphones / Subwoofer 3.5 mm stereo mini jack × 1 Model No. 40-inch model : TX-40HX800B, TX-40HX800BZ, TX-40HX820B 50-inch model : TX-50HX800B, TX-50HX800BZ, TX-50HX820B 58-inch model : TX-58HX800B, TX-58HX800BZ, TX-58HX820B 65-inch model : TX-65HX800B, TX-65HX800BZ, TX-65HX820B Connection terminals AV input (COMPONENT / VIDEO) VIDEO Pin jack × 1 1.0 V[p-p] (75 :) AUDIO L - R Pin jack × 2 0.
Receiving systems / Band name DVB-T / T2 Digital terrestrial services Bluetooth wireless technology*2 Standard Compliance Bluetooth 4.2 Frequency Range 2.402 GHz - 2.480 GHz PAL I UHF E21 - 68 PAL I VHF A - J *1: The frequency and channel differ depending on the country. *2: Not all the Bluetooth compatible devices are available with this TV. Up to 5 devices can be used simultaneously.
Disposal of Old Equipment and Batteries Only for European Union and countries with recycling systems These symbols on the products, packaging, and/or accompanying documents mean that used electrical and electronic products and batteries must not be mixed with general household waste. For proper treatment, recovery and recycling of old products and used batteries, please take them to applicable collection points in accordance with your national legislation.