
DVB-S_Installation_Guide_for_HX700
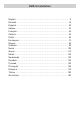

English - 8 -
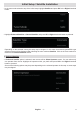
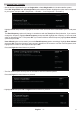
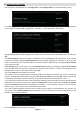
Highlight DiSEqC Set and press OK.
DiSEqC 1.0 Port and DiSEqC 1.1 Port options will be available. Highlight the option that corresponds to your
system and press OK. DiSEqC port options will be displayed. Highlight the port option to which the satellite
of the selected operator is allocated and press OK (A=1, B=2, C=3, D=4).
Press the Back/Return button to continue satellite setup.
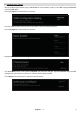
If you are going to perform a network scan (Scan Mode=Network) make sure that you also set the transponder
parameters of the network in this step.
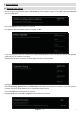
Highlight Transponder and press OK.
Set to Frequency, Symbol rate and Polarisation parameters according to the network. If you are going to
perform a full scan (Scan Mode=Full) you won’t need to set the transponder parameters.
Press the Back/Return button twice to setup multiple satellites.
If you have multiple satellites connected to your system, set an option for each satellite in your system. You
will need to set the Satellite Status option to On rst. Then you will be able to set other parameters of your
satellite. Set as mentioned above.
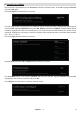
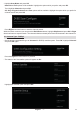
Press the Right directional button to proceed.
• Highlight Scan and press OK or Right directional button to proceed.
• Highlight Scan Mode and press OK.
Network and Full options will be available. Highlight the option which you prefer and press OK.
Then Highlight Channel and press OK.
All, Only encrypted channels and Free options will be available. Highlight the option which you prefer for
channel search and press OK.
Press Right directional button to start the channel search.
While the search continues you can press the Back/Return button, highlight Skip Scan and press OK or Right
directional button to stop the search. The channels that have already been found will be stored in the channel list.
9