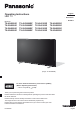
Operating Instructions LED TV English Nederlands Model No. TX-40JX800E TX-50JX800E TX-58JX800E TX-65JX800E TX-40JX800EZ TX-50JX800EZ TX-58JX800EZ TX-65JX800EZ TX-40JX810E TX-50JX810E TX-58JX810E TX-65JX810E TX-40JX820E TX-50JX820E TX-58JX820E TX-65JX820E (image: TX-65JX800E) For more detailed instructions, please refer to [eHELP] (Built-in Operating Instructions). How to use [eHELP] (p. 20) Thank you for purchasing this Panasonic product.
Contents Be Sure to Read Important Notice··················································· 3 Safety Precautions ··············································· 5 Accessories ························································ 9 Installing the TV ··················································· 9 Installing the wall-hanging bracket ··························11 Connections ·······················································12 Identifying Controls ··············································16
The terms HDMI, HDMI High-Definition Multimedia Interface, and the HDMI Logo are trademarks or registered trademarks of HDMI Licensing Administrator, Inc. Dolby, Dolby Vision, Dolby Audio, and the double-D symbol are trademarks of Dolby Laboratories. Manufactured under license from Dolby Laboratories. Confidential unpublished works. Copyright © 1992-2015 Dolby Laboratories. All rights reserved. Wi-Fi® is a registered trademark of Wi-Fi Alliance®. WPA3™, WPA2™, WPA™ are trademarks of Wi-Fi Alliance®.
Handling of customer information Customer’s personal information may be recorded on this TV by broadcasting organization or application provider. Before repairing, transferring or discarding this TV, erase all the information recorded on this TV according to the following procedure. [eHELP] (Search by Purpose > Functions > Reset) Customer information may be collected by provider via application provided by third parties on this TV or website. Please confirm the terms and conditions etc.
Safety Precautions To help avoid risk of electrical shock, fire, damage or injury, please follow the warnings and cautions below: Mains plug and lead Warning If you detect anything unusual, immediately remove the mains plug. Mains plug types vary between countries. This TV is designed to operate on AC 220-240 V, 50 / 60 Hz. Insert the mains plug fully into the mains socket. To turn Off the apparatus completely, you must pull the mains plug out of the mains socket.
Warning Stability Hazard A TV may fall, causing serious personal injury or death. Many injuries, particularly to children, can be avoided by taking simple precautions such as: ALWAYS use cabinets or stands or mounting methods recommended by the manufacturer of the TV. ALWAYS use furniture that can safely support the TV.
Built-in wireless LAN Moving the TV Caution Caution Do not use the built-in wireless LAN to connect to any wireless network (SSID*) for which you do not have usage rights. Such networks may be listed as a result of searches. However, using them may be regarded as illegal access. SSID is a name for identifying a particular wireless network for transmission. Do not subject the built-in wireless LAN to high temperatures, direct sunlight or moisture.
Battery for the Remote Control Warning Keep the batteries out of reach of children to prevent swallowing. Adverse physical effects can result if accidentally swallowed. If you suspect a child has swallowed one, seek medical attention immediately. Caution LED TV Declaration of Conformity (DoC) “Hereby, Panasonic Corporation declares that this TV is in compliance with the essential requirements and other relevant provisions of the Directive 2014/53/EU.
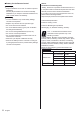
Accessories Installing the TV Pedestal (2) Standard accessories Remote Control (p. 16) N2QBYA000037 Pedestal (p. 9) Batteries (2) LR03 (p. 17) Assembly screw (4) 40-inch model M4 × 20 (mm) Operating Instructions 50-inch model 65-inch model Pan European Guarantee Card 58-inch model M4 × 24 (mm) Accessories may not be placed all together. Take care not to throw them away unintentionally.
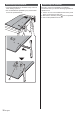
Assembling the pedestal Removing the pedestal Insert the pedestal firmly, otherwise it may come off when setting up the TV. Do not assemble the pedestal by any method other than those specified below. A B 10 English Be sure to remove the pedestal in the following procedures when you use the wall-hanging bracket or repack the TV. 1 Put the TV onto a work table with the screen panel down on the clean and soft cloth. 2 Remove the assembly screws from the pedestal.
Installing the wallhanging bracket Please contact your local Panasonic dealer to purchase the recommended wall-hanging bracket. Holes for wall-hanging bracket installation Rear of the TV 40-inch model 50-inch model a: 200 mm a b: 200 mm b 58-inch model a: 300 mm b: 200 mm 65-inch model Warning Using other wall-hanging brackets, or installing a wallhanging bracket by yourself have the risk of personal injury and product damage.
Connections Basic connections AV devices External equipment and cables shown are not supplied with this TV. Please ensure that the unit is disconnected from the mains socket before attaching or disconnecting any cables. Check the terminal type and cable plugs are correct for connection. Use a fully wired HDMI compliant cable. Keep the TV away from electronic equipment (video equipment, etc.
Connections for 4K / HDR compatible equipment TV Other connections DVD Player / Camcorder / Game equipment (VIDEO equipment) TV (Viewing) HDMI cable (Listening) 4K / HDR compatible equipment Reproduces the image more precisely with the expanded colour gamut when connecting the 4K-compatible equipment. [Mode2] is a mode that supports higher definition signals than [Mode1]. Set to [Mode1] when the image or sound in HDMI input is not played properly.
HDMI CEC Connecting Bluetooth® devices Use HDMI 1 - 3 for HDMI CEC connection. For details, refer to [eHELP] (Search by Purpose > Functions > HDMI CEC). Registering Bluetooth® devices This TV supports Bluetooth® communications. Common Interface Turn the TV off with Mains Power On / Off switch whenever inserting or removing the CI module. If a smart card and a CI module come as a set, first insert the CI module, then insert the smart card into the CI module.
If registration fails If registration (pairing) is not completed properly, try registering again. 1 Display the menu and select [Settings] Settings select access 2 Select [Remote Control] 3 Select [Pairing Start] The registration screen is displayed, so follow the onscreen instructions to register. For details, refer to [eHELP] (Search by Purpose > Settings > Remote Control). Note If the remote control is not registered (paired) with the TV, they communicate via infrared.
Identifying Controls 4 Coloured buttons (red-green-yellow-blue) Used for the selection, navigation and operation of various functions. 5 Information Displays information on channels, programmes, and online content (NETFLIX, etc.). Remote Control 6 NETFLIX Accesses NETFLIX service directly. A broadband network environment is required in order to fully use this function. This service may be stopped or changed without notice. 7 Prime Video Accesses Prime Video service directly.
22 Rakuten TV Accesses Rakuten TV service directly. 23 Cursor buttons Makes selections and adjustments. 24 HOME Displays [Home]. For details, refer to [eHELP] (Search by Purpose > Read first > Features > Home). 25 LIST Displays channel list. 26 TV Guide 27 Channel Up / Down 28 Last view Switches to previously viewed channel. 29 Operations for contents, connected equipment, etc. 30 APPS Displays [Apps] (applications list). 31 YouTube Accesses YouTube service directly.
Initial Setup Indicator / Control panel 4 5 6 7 1 2 3 Rear side of the TV 1 Ambient sensor Senses brightness to adjust picture quality when [Ambient Sensor] in the Picture menu is set to [On]. When the TV is turned on for the first time, it will automatically search for available TV channels and give options to set up the TV. These steps are not necessary if the setup has been completed by your local dealer. Please complete connections (p.
Set up your Wi-Fi network and Google account If you are using an Android phone for setup, select [Continue]. You can then easily transfer your Android phone’s Wi-Fi network and Google account to your TV. If you are not using an Android phone for setup, select [Skip], then complete settings on the setup screen which appears next. When using an Ethernet cable to connect to the internet, select [Skip], then select [Use Ethernet] on the Wi-Fi network settings screen.
How to Use eHELP FAQs [eHELP] is the detailed operating instructions built into the TV, and gives a more detailed explanation for a better understanding of the operation of each feature. Before requesting service or assistance, please follow these simple guides to solve the problem. For details, refer to [eHELP] (Support > FAQs). 1 Display [eHELP] or [eHELP] 2 Select the menu The TV does not switch on Check the mains lead is plugged into the TV and the mains socket.
An unusual image is displayed This TV has a built-in Self Test. Makes a diagnosis of picture or sound problems. [TV self test] (Settings > Device Preferences > About) Turn the TV off with Mains power On / Off switch, then turn it on again. If the problem persists, initialise all settings.
Specifications Power source AC 220-240 V, 50 / 60 Hz Panel TV LED backlight Liquid Crystal Display Model No.
Receiving systems / Band name Satellite DVB-S / S2 Receiver IF frequency range - 950 MHz to 2150 MHz Digital DVB-T / T2, DVB-C Channel coverage: UHF / VHF / Cable Analogue Note Design and Specifications are subject to change without notice. Mass and Dimensions shown are approximate. For information about the open source software, refer to [eHELP] (Search by Purpose > Read first > Before use > Licence). For more product information, please visit EPREL: https://eprel.ec.europa.eu.
Disposal of Old Equipment and Batteries Only for European Union and countries with recycling systems These symbols on the products, packaging, and/or accompanying documents mean that used electrical and electronic products and batteries must not be mixed with general household waste. For proper treatment, recovery and recycling of old products and used batteries, please take them to applicable collection points in accordance with your national legislation.
Gebruiksaanwijzing Led-tv Nederlands Modelnr. TX-40JX800E TX-50JX800E TX-58JX800E TX-65JX800E TX-40JX800EZ TX-50JX800EZ TX-58JX800EZ TX-65JX800EZ TX-40JX810E TX-50JX810E TX-58JX810E TX-65JX810E TX-40JX820E TX-50JX820E TX-58JX820E TX-65JX820E (afbeelding: TX-65JX800E) Raadpleeg [eHELP] (ingebouwde bedieningsinstructies) voor gedetailleerde instructies. Gebruik van [eHELP] (p. 20) Hartelijk dank voor de aankoop van dit Panasonic-product.
Inhoudsopgave Belangrijke informatie Belangrijke kennisgeving ······································· 3 Veiligheidsmaatregelen ········································· 5 Accessoires ························································ 9 De tv installeren ··················································· 9 De muurbevestigingssteun monteren ······················11 Verbindingen ······················································12 Bedieningsonderdelen ··········································16 Eer
De begrippen HDMI, HDMI High-Definition Multimedia Interface en het HDMI-logo zijn handelsmerken of geregistreerde handelsmerken van HDMI Licensing Administrator, Inc. Belangrijke kennisgeving Dolby, Dolby Vision, Dolby Audio en het dubbele-Dsymbool zijn handelsmerken van Dolby Laboratories. Geproduceerd onder licentie van Dolby Laboratories. Vertrouwelijke, niet-gepubliceerde werken. Copyright © 1992-2015 Dolby Laboratories. Alle rechten voorbehouden.
Behandeling van klantinformatie De persoonlijke informatie van de klant kan worden opgeslagen op deze tv door de omroeporganisatie of applicatieprovider. Voor het repareren, overdragen of afdanken van deze tv, verwijdert u alle informatie die is opgeslagen op deze tv volgens de volgende procedure. [eHELP] (Zoeken op doel > Functies > Resetten) Klantinformatie kan worden verzameld door de provider via de applicatie die door derden wordt geleverd op deze tv of website.
Veiligheidsmaatregelen Volg onderstaande waarschuwingen en voorzorgsmaatregelen om het risico op een elektrische schok, brand, schade of letsel te helpen vermijden. Stekker en netsnoer Waarschuwing Verwijder de stekker onmiddellijk uit het stopcontact als u iets opvalt dat niet normaal is. Stopcontacten verschillen van land tot land. Deze tv is ontworpen om te werken op 220-240 V wisselstroom 50/60 Hz. Steek de stekker van het netsnoer volledig in het stopcontact.
Waarschuwing stabiliteitsgevaar Een tv kan vallen, wat tot ernstig lichamelijk letsel of de dood kan leiden. Veel soorten letsel, vooral bij kinderen, kunnen worden voorkomen door eenvoudige voorzorgsmaatregelen te nemen, zoals: Gebruik ALTIJD een tv-meubel, -standaard of montagemethode die door de fabrikant van de tv wordt aanbevolen. Gebruik ALTIJD meubelen waarop de tv op een veilige manier kan staan.
Ingebouwd draadloos LAN Let op De tv verplaatsen Let op Gebruik de ingebouwde draadloze LAN-functie niet om toegang de verkrijgen tot een draadloos netwerk (SSID*) waarvoor u geen toegangsrecht hebt. Dergelijke netwerken kunnen wel bij de zoekresultaten staan. Maar het gebruik van zulke netwerken kan illegaal zijn. De SSID is de naam van een draadloos netwerk voor gegevensoverdracht. Stel de ingebouwde draadloze LAN-adapter niet bloot aan hoge temperaturen, direct zonlicht of vocht.
Batterij voor de afstandsbediening Waarschuwing Houd de batterijen buiten bereik van kinderen om inslikken te voorkomen. Als de batterijen per ongeluk worden ingeslikt, kan dit lichamelijke klachten veroorzaken. Raadpleeg onmiddellijk een arts als u vermoedt dat een kind een batterij heeft ingeschikt. Led-tv Verklaring van Overeenstemming (vvo) “Hierbij verklaart Panasonic Corporation dat deze tv in overeenstemming is met de essentiële vereisten en andere relevante bepalingen van Richtlijn 2014/53/EU.
Accessoires De tv installeren Standaard (2) Standaardaccessoires Afstandsbediening N2QBYA000037 Standaard Batterijen (2) LR03 (p. 16) (p. 9) (p. 17) Montageschroef (4) 40 inch-model M4 × 20 (mm) Gebruiksaanwijzing Europese Garantie 50 inch-model 65 inch-model 58 inch-model M4 × 24 (mm) De accessoires mogen niet allemaal samen worden geplaatst. Zorg dat u ze niet per ongeluk weggooit.
De standaard monteren De standaard verwijderen Bevestig de standaard stevig, anders kan deze loskomen bij het plaatsen van de tv. Monteer de standaard niet volgens een andere methode dan die hieronder wordt aangegeven. A B 10 Nederlands Verwijder de standaard aan de hand van de volgende procedures wanneer u de muurbevestigingssteun gebruikt of de tv opnieuw inpakt. 1 Leg de tv met het scherm naar beneden op een werktafel op de schone en zachte doek.
De muurbevestigingssteun monteren Neemt contact op met uw plaatselijke Panasonicdealer als u de aanbevolen muurbevestigingssteun wilt aanschaffen.
Verbindingen Basisaansluitingen AV-apparaten De afgebeelde externe apparatuur en kabels worden niet bij de tv meegeleverd. Zorg ervoor dat de stekker van de tv niet in het stopcontact zit als u kabels aansluit of loskoppelt. Controleer of u de juiste aansluitingen en connectoren gebruikt voor de verbinding. Gebruik een HDMI-kabel met volledige bedrading. Houd de tv uit de buurt van elektronische apparaten (videoapparatuur enz.
Aansluitingen voor 4K/HDRcompatibele apparatuur TV Andere verbindingen DVD-speler / Camcorder / Spelsysteem (VIDEO-apparatuur) TV (Kijken) HDMI-kabel (Luisteren) 4K/HDR-compatibele apparatuur Reproduceert het beeld preciezer met het uitgebreide kleurengamma wanneer de met 4K compatibele apparatuur wordt aangesloten. [Modus 2] is een modus die signalen met een hogere definitie ondersteunt dan [Modus 1]. Stel in op [Modus 1] als beeld of geluid op de HDMI-ingang niet goed wordt afgespeeld.
HDMI CEC Bluetooth®-apparaten verbinden Gebruik HDMI 1 - 3 voor HDMI CEC-verbinding. Raadpleeg [eHELP] (Zoeken op doel > Functies > HDMI CEC) voor details. Algemene interface (CI) Zet de tv altijd met de hoofdschakelaar uit wanneer u de CI-module plaatst of verwijdert. Als u een gecombineerde smartcard en CI-module hebt, plaatst u eerst de CI-module en vervolgens steekt u de smartcard in de CI-module. Plaats of verwijder de CI-module altijd volledig en in de aangegeven richting.
Als registreren mislukt Als registreren (pairen) niet goed wordt voltooid, probeert u nogmaals te registreren. 1 Geef het menu weer en selecteer [Instellingen] Instellingen selecteren openen 2 Selecteer [Afstandsbediening] 3 Selecteer [Beginnen met koppelen] Het registratiescherm wordt weergegeven, dus volg de aanwijzingen op het scherm om de afstandsbediening te registreren. Raadpleeg [eHELP] (Zoeken op doel > Kijken > Afstandsbediening) voor details.
Bedieningsonderdelen 4 Gekleurde toetsen (rood, groen, geel, blauw) Voor selectie, navigatie en de bediening van verschillende functies. 5 Informatie Geeft informatie weer over kanalen, programma's en online content (NETFLIX, enz.). Afstandsbediening 6 NETFLIX Directe toegang tot de Netflix-service. Voor volledig gebruik van deze functie is een breedbandnetwerk vereist. Deze service kan zonder kennisgeving gestopt of gewijzigd worden.
22 Rakuten TV Directe toegang tot de Rakuten TV-service. 23 Cursortoetsen Voor selecties en aanpassingen. 24 HOME Opent [Home]. Raadpleeg [eHELP] (Zoeken op doel > Lees dit eerst > Functies > Home) voor details. 25 LIST Geeft de kanalenlijst weer. 26 Tv-programmagids 27 Kanaal omhoog/omlaag 28 Laatst bekeken Schakelt terug naar het vorige kanaal. 29 Handelingen voor inhoud, aangesloten apparatuur enz. 30 APPS Geeft [Apps] weer (lijst met applicaties).
Eerste instellingen Indicator/Bedieningspaneel 4 5 6 7 1 2 3 Achterzijde van de tv 1 Sensor omgevingslicht Detecteert helderheid voor aanpassing van de beeldkwaliteit als [Omgevings sensor] in het menu Beeld is ingesteld op [Aan]. Wanneer de tv voor het eerst wordt aangezet, zoekt hij automatisch naar beschikbare tv-kanalen en verschijnen opties om de tv in te stellen. U mag deze stappen overslaan als uw dealer de tv al heeft ingesteld. Voltooi alle verbindingen (p.
Uw wifi-netwerk en Google-account instellen Als u een Adroid-telefoon gebruikt voor het instellen, selecteer [Verder]. U kunt dan eenvoudig het wifinetwerk en Google-account van uw Android-telefoon overdragen naar uw tv. Als u geen Android-telefoon gebruikt voor het instellen, selecteer [Overslaan] en vul vervolgens de instellingen in op het instellingenscherm dat wordt weergegeven.
eHELP gebruiken Veelgestelde vragen [eHELP] is de naam van de gedetailleerde, ingebouwde bedieningsinstructies van de tv. Hier vindt u gedetailleerde uitleg over de bediening van de verschillende functies. Probeer eerst het probleem op te lossen aan de hand van de volgende eenvoudige richtlijnen voordat u hulp inroept. Raadpleeg [eHELP] (Ondersteuning > Veelgestelde vragen) voor details.
Er wordt abnormaal beeld weergegeven De tv heeft een ingebouwde zelftestfunctie. Deze stelt een diagnose van beeld- of geluidsproblemen. [TV Zelfscan Test] (Instellingen > Apparaatvoorkeuren > Over) Zet de tv uit en weer aan met de hoofdschakelaar. Als het probleem zich blijft voordoen, initialiseert u alle instellingen. [Resetten] (Instellingen > Apparaatvoorkeuren > Over) Een extern apparaat geeft abnormaal beeld of geluid bij aansluiting via HDMI Stel [HDMI autom.
Specificaties Stroomvoorziening 220-240 V wisselstroom, 50/60 Hz Paneel TV Led achtergrondlicht lcd Modelnr.
Ontvangstsystemen / Bandnaam Satelliet DVB-S / S2 IF-frequentiebereik ontvanger - 950 MHz to 2150 MHz Digitaal DVB-T / T2, DVB-C Kanaaldekking: UHF / VHF / Kabel Opmerking Ontwerp en specificaties kunnen zonder voorafgaande kennisgeving worden gewijzigd. Gewicht en afmetingen bij benadering. Raadpleeg [eHELP] (Zoeken op doel > Lees dit eerst > Voordat u het product gebruikt > Licentie) voor informatie over de openbronsoftware. Ga voor meer productinformatie naar EPREL: https://eprel.ec.europa.eu.
Verwijdering van oude apparatuur en batterijen. Alleen voor de Europese Unie en landen met recycle systemen. Deze symbolen op de producten, verpakkingen en/of begeleidende documenten betekenen dat gebruikte elektrische en elektronische producten en batterijen niet samen mogen worden weggegooid met de rest van het huishoudelijk afval.
Manual de utilizare \<^ _ " ;<=+ ;?++@ ;<\+ ;?++@ ;<\? ;?++@ ;<^\ ;?++@ ;<=+ ;?++@_ ;<\+ ;?++@_ ;<\? ;?++@_ ;<^\ ;?++@_ ;<=+ ;?`+@ ;<\+ ;?`+@ ;<\? ;?`+@ ;<^\ ;?`+@ ;<=+ ;?'+@ ;<\+ ;?'+@ ;<\? ;?'+@ ;<^\ ;?'+@ _*|< !" # $% " ` {|}_~= !&% '+$
Cuprins { 3 " { 9 $ _ 9 $ 11 12 $
_ ^"$ ^"$ *^ " $ ^"$ ^"$ \ { $ | & ^ ^ ^ { *^ ^ \ } } ~ " { @ ^ *_£_ " <& " <&¤*{ ¤ " <& <
} & $ ` {|}_~= ¢ ¢ = $ * ¦
_ { _ *¤ £ $
& & _ @ @ } _~_^<{}{ } _~_^<{}{ } {
| $^ ¦ \{ ¦ ^ \{ ¦ ¤ & &
& @ ^ "
" !'$ !&% `^$ ¬{« Piedestal !&% 9$ !'$ !&% `$ LR03 !=$ Model de 40 inci "¤ ¯ Manual de utilizare <@ Model de 50 inci Model de 58 inci Model de 65 inci & "¤ ¯ ¤ { { *
& ~ & $ ¥ @ { * @ @ ` ' ^
Instalarea & prindere pe perete & Model de 40 inci Model de 50 inci a b Model de 58 inci }
{ { # ~ & # < { * ^"$ ²
{ & & & =~ _ ~~ { @ & & $^<~ _ ^"$ { < ¤¡£^= = @ ¤¡ `" @ `" `" @ ^"$
~" {@{ { & # ® } ^"$ * ^"$ < ` {|}_~= ¢ ¢ ^"$ < & # ® " { } ~ £ @ $ ^ $ @ $ $ $
~ # ^ ` { ` ' 3 ` ` } ³ ` {|}_~= ¢ ¢ ^
Identificarea 4 ! < < < $ 5 " } { <_\$ 6 |@ "; { <_\$ { 7 { ?
'' { { = ¨ _ ' < '= @ { `< ` {|}_~= ¢ { ¢ ¢ < '\ LIST { '^ ' { '? # # ' & & % & + APPS { `{ ` {
" 4 5 6 7 1 2 3 ` # ^ @ ` " `{ \ _ {
{ } < < ^ { ` { * & { ^ { `¨ @ < `¨ `} <
# eAJUTOR ` {|}_~= ` } } ` {|}_~= { ¢ # & # &
} # _ * = ! } & & # ~ & $ ~ £ * ^ ! } & & # ~ & $ " & & & ~" `
~ { *¤ £ # { \<^ % Sunet Model de 40 inci _*¤|< _*¤|<¸ _*¤|< _*¤|< Model de 50 inci _*|< _*|<¸ _*|< _*|< Model de 58 inci _*|< _*|<¸ _*|< _*|< Model de 65 inci _*|< _*|<¸ _*|< _*|< ~ ! $ Model de 40 inci ¤ ¯ ¤ ¯ «
& ~ Satelit ^ *£ $ * " @ " ~ ^ *_£_ ^ * { } £ £ ^ ^ ¦ * ` {|}_~= ¢ { ¢ ¢ \ < =<
~ & & ~ & @ & & { £