Model No. English TX-40DX600E TX-49DX600E TX-55DX600E Nederlands Operating Instructions LED TV For more detailed instructions, please refer to [eHELP] (Built-in Operating Instructions). How to use [eHELP] (p. 17) Thank you for purchasing this Panasonic product. Please read these instructions carefully before operating this product and retain them for future reference. Please carefully read the “Safety Precautions” of this manual before use.
For information about the trademarks, refer to [eHELP] (Support > Licence). The illustration for TX-49DX600E is used in this manual unless otherwise mentioned. Illustrations shown may be different depending on the model.
Important Notice Notice for DVB / Data broadcasting / IPTV functions This TV is designed to meet the standards (as of August, 2015) of DVB-T / T2 (MPEG2, MPEG4AVC(H.264) and MPEG HEVC(H.265)) digital terrestrial services, DVB-C (MPEG2, MPEG4AVC(H.264) and MPEG HEVC(H.265)) digital cable services. Consult your local dealer for availability of DVB-T / T2 services in your area.
Safety Precautions To help avoid risk of electrical shock, fire, damage or injury, please follow the warnings and cautions below: Mains plug and lead Warning If you detect anything unusual, immediately remove the mains plug. This TV is designed to operate on AC 220-240 V, 50 / 60 Hz. Insert the mains plug fully into the mains socket. To turn Off the apparatus completely, you must pull the mains plug out of the mains socket. Consequently, the mains plug should be easily accessible at all times.
To prevent the spread of fire, keep candles or other open flames away from this product at all times Suffocation / Choking Hazard Warning The packaging of this product may cause suffocation, and some of the parts are small and may present a choking hazard to young children. Keep these parts out of reach of young children. Pedestal Warning Do not disassemble or modify the pedestal. Caution Do not use any pedestal other than the one provided with this TV.
Excessive volume LED TV Caution Do not expose your ears to excessive volume from the headphones. Irreversible damage can be caused. If you hear a drumming noise in your ears, turn down the volume or temporarily stop using the headphones. Battery for the Remote Control Caution Declaration of Conformity (DoC) “Hereby, Panasonic Corporation declares that this TV is in compliance with the essential requirements and other relevant provisions of the Directive 1999/5/EC.
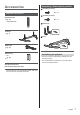
Accessories Assembling / Removing the pedestal Assembly screw (4) M5 × 10 Standard accessories Assembly screw (4) Remote Control (p. 14) N2QAYB001009 M4 × 12 Bracket (2) Pedestal (p. 7) Base Mains lead (p. 10) Batteries (2) R6 (p. 15) Assembling the pedestal Select a method to assemble the pedestal from the following 2 styles. Do not assemble the pedestal by any method other than those specified below.
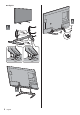
3 B A 1 C D 2 8 English
3 B A 1 C D Removing the pedestal from the TV Be sure to remove the pedestal in the following way when using the wall-hanging bracket or repacking the TV. 1 Remove the assembly screws from the TV. 2 Pull out the pedestal from the TV. 3 Remove the assembly screws from the bracket.
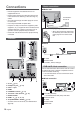
Connections Basic connections Mains lead External equipment and cables shown are not supplied with this TV. Please ensure that the unit is disconnected from the mains socket before attaching or disconnecting any cables. Check the terminal type and cable plugs are correct for connection. Use a fully wired HDMI compliant cable. Keep the TV away from electronic equipment (video equipment, etc.
Wireless connection Set top box TV Cable Built-in wireless LAN Access point HDMI cable DVB-via-IP server Set top box RF cable Satellite dish Terrestrial aerial Satellite dish This function may not be available depending on network condition and broadcast. For information about the connections, read the manual of the DVB-via-IP server. For details, refer to [eHELP] (Functions > DVB-viaIP).
Connections for 4K compatible equipment TV Other connections DVD Player (COMPONENT equipment) TV (Viewing) (Listening) HDMI cable 4K compatible equipment Connect the 4K compatible equipment to HDMI terminal using a 4K compatible cable and you can watch content in 4K format. The valid 4K format varies depending on the HDMI terminal. For information about the valid format, refer to [eHELP] (Watching > 4K resolution > Valid 4K format).
Amplifier (listening with external speakers) Common Interface Use HDMI2 to connect the TV to an amplifier which has ARC (Audio Return Channel) function. Turn the TV off with Mains Power On / Off switch whenever inserting or removing the CI module. If a smart card and a CI module come as a set, first insert the CI module, then insert the smart card into the CI module. Insert or remove the CI module completely in the correct direction as shown. Normally encrypted channels will appear.
Identifying Controls 8 [Option Menu] # ? 9 Coloured buttons (red-green-yellow-blue) @ # " ? # ? # Remote Control 10 Volume Up / Down 11 Numeric buttons <" " J " Z" \ " ^ 12 [eHELP] $ _ & '` { | } * 13 Input mode selection ^ { " ^`{< ~ ^`{ ~ ^`{? {} ~ % %^
Installing / Removing batteries Indicator / Control panel Z" \ " " " # " # " " " " " \ " \ 4 5 < 6 " ' {* 7 1 2 3 # " ^ 1 Remote control signal receiver \ \ " ^ ? 2 Ambient sensor \ " = " $% \
First time Auto Setup Tick the TV signal mode to tune, and then select [Start Auto Setup] ' Z" " ^ # " # " # ? \ ^ " ? " ^ " # " " \ \ ' { * ' # * # " = \ # % # \ " # " =
Watching TV How to Use eHELP 1 $ _ & " \ " ^ ? J # \ # " # " # Turn power on ' ^* 1 ' < * ! | ~ |## " " \ ' * # \ " # # ? # \ " # $ _ & ' # * 2 Select the mode TV Selection DVB-C DVB-T DVB-via-
FAQs Before requesting service or assistance, please follow these simple guides to solve the problem. For details, refer to [eHELP] (Support > FAQs). The TV does not switch on Check the mains lead is plugged into the TV and the mains socket. The TV goes into Standby mode Auto power standby function is activated. The remote control does not work or is intermittent Are the batteries installed correctly? (p. 15) Has the TV been switched on? The batteries may be running low.
Maintenance Specifications First, remove the mains plug from the mains socket. TV Display panel, Cabinet, Pedestal Regular care: Gently wipe the surface of the display panel, cabinet, or pedestal by using a soft cloth to remove dirt or fingerprints. For stubborn dirt: (1) First clean the dust from the surface. (2) Dampen a soft cloth with clean water or diluted neutral detergent (1 part detergent to 100 parts water). (3) Wring out the cloth firmly.
Connection terminals AV input (COMPONENT / VIDEO) VIDEO PAL B, G, H, I SECAM B, G SECAM L, L’ RCA PIN Type × 1 VHF E2 - E12 1.0 V[p-p] (75 :) VHF A - H (ITALY) AUDIO L - R CATV (S01 - S05) RCA PIN Type × 2 CATV S11 - S20 (U1 - U10) 0.5 V[rms] VHF H1 - H2 (ITALY) UHF E21 - E69 Y 1.0 V[p-p] (including synchronisation) PB/CB, PR/CR CATV S1 - S10 (M1 - M10) CATV S21 - S41 (Hyperband) ±0.
Note Design and Specifications are subject to change without notice. Mass and Dimensions shown are approximate. For information about the power consumption, display resolution, etc., refer to Product fiche. For information about the open source software, refer to [eHELP] (Support > Licence). When using the wall-hanging bracket Please contact your local Panasonic dealer to purchase the recommended wall-hanging bracket.
Disposal of Old Equipment and Batteries Only for European Union and countries with recycling systems These symbols on the products, packaging, and/or accompanying documents mean that used electrical and electronic products and batteries must not be mixed with general household waste. For proper treatment, recovery and recycling of old products and used batteries, please take them to applicable collection points in accordance with your national legislation.
Modelnr. Nederlands TX-40DX600E TX-49DX600E TX-55DX600E Gebruiksaanwijzing Led-tv Raadpleeg de [eHELP] (ingebouwde bedieningsinstructies) voor gedetailleerde instructies. Gebruik van de [eHELP] (p. 17) Hartelijk dank voor de aankoop van dit Panasonic-product. Lees deze instructies aandachtig voordat u het product gebruikt en bewaar ze zodat u ze later opnieuw kunt raadplegen. Lees vóór gebruik aandachtig het gedeelte “Veiligheidsmaatregelen” in deze handleiding.
Raadpleeg de [eHELP] (Ondersteuning > Licentie) voor informatie over de handelsmerken. De afbeelding voor TX-49DX600E wordt, tenzij anders gemeld, in deze handleiding gebruikt. Afhankelijk van het model, kunnen de getoonde illustraties iets verschillen.
Belangrijke kennisgeving Kennisgeving over DVB/datatransmissie/ IPTV-functies Deze tv is ontworpen om te voldoen aan de normen (vanaf augustus 2015) van DVB-T/T2 (MPEG2, MPEG4-AVC(H.264) en MPEG HEVC(H.265)) digitale terrestrische services en DVB-C (MPEG2, MPEG4-AVC(H.264) en MPEG HEVC(H.265)) digitale kabelservices.
Veiligheidsmaatregelen Volg onderstaande waarschuwingen en voorzorgsmaatregelen om het risico op een elektrische schok, brand, schade of letsel te helpen vermijden. Stekker en netsnoer Waarschuwing Verwijder de stekker onmiddellijk uit het stopcontact als u iets opvalt dat niet normaal is. Deze TV is ontworpen om te werken op 220-240 V wisselstroom 50/60 Hz. Steek de stekker van het netsnoer volledig in het stopcontact.
Laat om brand te voorkomen nooit kaarsen of een andere bron van open vuur in de nabijheid van de televisie. Gevaar voor verstikking/inslikken Waarschuwing De verpakking van dit product kan verstikking veroorzaken, en sommige onderdelen zijn klein en gevaarlijk als ze door kinderen worden ingeslikt. Houd deze onderdelen buiten het bereik van jonge kinderen. Standaard Waarschuwing De vloerstandaard niet demonteren of er wijzigingen in aanbrengen.
Hoog geluidsniveau Led-tv Let op Stel uw gehoor niet bloot aan overmatig hard geluid via de hoofdtelefoon. De beschadiging kan onherstelbaar zijn. Zet het volume lager of stop met luisteren door de hoofdtelefoon als uw oren suizen. Batterij voor de afstandsbediening Let op Batterijen kunnen lekken, roesten en exploderen als ze verkeerd geïnstalleerd worden. Vervang de batterij alleen door hetzelfde of een vergelijkbaar type. Gebruik geen oude en nieuwe batterijen door elkaar.
Accessoires De standaard monteren/verwijderen Montageschroef (4) M5 × 10 Standaardaccessoires Montageschroef (4) Afstandsbediening (p. 14) N2QAYB001009 M4 × 12 Steun (2) Standaard (p. 7) Steunplaat Netsnoer (p. 10) Batterijen (2) R6 (p. 15) De standaard monteren Selecteer een methode om het voetstuk van de volgende 2 stijlen te monteren. Monteeer het voetstuk niet volgens een andere methode dan die hieronder wordt aangegeven.
3 B A 1 C D 2 8 Nederlands
3 B A 1 C D De standaard van de tv verwijderen Verwijder de standaard op de volgende manier wanneer u de muurbevestigingssteun gebruikt of de tv opnieuw inpakt. 1 Verwijder de montageschroeven van de tv. 2 Trek de standaard van de tv. 3 Verwijder de montageschroeven van de steun.
Verbindingen Basisaansluitingen Netsnoer De afgebeelde externe apparatuur en kabels worden niet bij de tv meegeleverd. Zorg ervoor dat de stekker van de tv niet in het stopcontact zit als u kabels aansluit of loskoppelt. Controleer of u de juiste aansluitingen en connectoren gebruikt voor de verbinding. Gebruik een HDMI-kabel met volledige bedrading. Houd de tv uit de buurt van elektronische apparaten (videoapparatuur enz.
Draadloze verbinding Settopbox TV Kabel Ingebouwde draadloze LAN-adapter Toegangspunt DVB-via-IP-server HDMI-kabel RF-kabel Settopbox Aardse antenne Satellietschotel Satellietschotel Deze functie is wellicht niet beschikbaar afhankelijk van de netwerkomstandigheden en de uitzending. Lees de handleiding van de DVB-via-IP-server voor informatie over de verbindingen. Raadpleeg de [eHELP] (Functies > DVB-via-IP) voor details.
Aansluitingen voor met 4K compatibele apparatuur TV Andere verbindingen dvd-speler (COMPONENT-apparatuur) TV (Kijken) (Luisteren) HDMI-kabel Met 4K compatibele apparatuur Sluit met een 4K-compatibele kabel de 4K-compatibele apparatuur aan op HDMI-aansluiting, en u kunt naar inhoud van 4K-formaat kijken. Het geldige 4K-formaat is afhankelijk van de HDMIaansluiting. Voor meer informatie over het geldige formaat raadpleegt u [eHELP] (Kijken > 4K-resolutie > Geldig 4K-formaat). [HDMI autom.
Versterker (luisteren met externe luidsprekers) Algemene interface (CI) Gebruik HDMI2 om de tv aan te sluiten op een versterker met ARC (Audio Return Channel) functie. Zet de tv altijd met de hoofdschakelaar uit wanneer u de CI-module plaatst of verwijdert. Als u een gecombineerde smartcard en CI-module hebt, plaatst u eerst de CI-module en vervolgens steekt u de smartcard in de CI-module. Plaats of verwijder de CI-module altijd volledig en in de aangegeven richting.
Bedieningsonderdelen 8 [Menu Opties] ? ? ? 9 gekleurde toetsen (rood, groen, geel, blauw) ^ ? \ ? ? " # Afstandsbediening 10 Volume omhoog/omlaag 11 Cijfertoetsen |? " ? ? # ? {\ 12 [eHELP] $ _ & ? ' \ \ * 13 Selectie ingangsmodus ^ |?
De batterijen plaatsen/verwijderen | Indicator/Bedieningspaneel % ? # " " " " ? # 4 5 6 \ ' # {* 7 1 2 3 % " ? ? 1 Ontvanger voor afstandsbedieningssignalen ? ? ? # \ ? # \ 2 Sensor o
Automatisch instellen bij het eerste gebruik Z ? ? " " " \ " \ ?{ ? " ? @ ? ? " # ^ ? \ ' { * ' * ? J ? " ? " ? " ? # ? ? 1 Steek de st
Tv kijken Gebruik eHELP 1 $ _ & ? \ \ ? ? ? ? \ ? ? " # Schakel de tv in ' ^* 1 # '%# \ * " # " ' * # # \ ? " " ^ # ? \ $ _ & '_ * 2 Selecteer de stand TV keuze DVB-C DVB
Veelgestelde vragen Probeer eerst het probleem op te lossen aan de hand van de volgende eenvoudige richtlijnen voordat u hulp inroept. Raadpleeg de [eHELP] (Ondersteuning > Veelgestelde vragen) voor details. De tv gaat niet aan Controleer of de stekker van het netsnoer in de tv en in het stopcontact zit. De tv schakelt over naar de stand-bystand De automatische stand-byfunctie is geactiveerd.
Onderhoud Specificaties Verwijder eerst de stekker van het netsnoer uit het stopcontact. TV Beeldscherm, Behuizing, Standaard Regelmatig onderhoud: Veeg de buitenkant van het beeldscherm, de behuizing of de standaard voorzichtig af met een zachte doek om vuil of vingerafdrukken te verwijderen. Voor hardnekkig vuil: (1) Verwijder eerst het stof van de buitenkant. (2) Bevochtig een zachte doek met schoon water of een opgelost neutraal schoonmaakproduct (1 deel schoonmaakproduct op 100 delen water).
Aansluitingen AV-ingang (COMPONENT / VIDEO) VIDEO PAL B, G, H, I SECAM B, G SECAM L, L’ RCA PIN-type × 1 VHF E2 - E12 1,0 V[p-p] (75 :) VHF A - H (ITALIË) AUDIO L - R CATV (S01 - S05) RCA PIN-type × 2 CATV S11 - S20 (U1 - U10) 0,5 V[rms] VHF H1 - H2 (ITALIË) UHF E21 - E69 Y 1,0 V[p-p] (inclusief synchronisatie) PB/CB, PR/CR CATV S1 - S10 (M1 - M10) CATV S21 - S41 (Hyperband) ±0,35 V[p-p] PAL D, K HDMI 1 / 2 / 3-ingang SECAM D, K TYPE A-aansluitingen VHF R1 - R2 HDMI1 / 3: 4K, Content-type,
Opmerking Ontwerp en specificaties kunnen zonder voorafgaande kennisgeving worden gewijzigd. Gewicht en afmetingen bij benadering. Raadpleeg de productfiche voor informatie over het energieverbruik, de schermresolutie, enz. Raadpleeg de [eHELP] (Ondersteuning > Licentie) voor informatie over de openbronsoftware. Bij gebruik van de muurbevestigingssteun Neemt contact op met uw plaatselijke Panasonicdealer als u de aanbevolen muurbevestigingssteun wilt aanschaffen.
Het ontdoen van oude apparatuur en batterijen. Enkel voor de Europese Unie en landen met recycle systemen. Deze symbolen op de producten, verpakkingen en/of begeleidende documenten betekenen dat gebruikte elektrische en elektronische producten en batterijen niet samen mogen worden weggegooid met de rest van het huishoudelijk afval.
! +;=?@+J??\ +;=^@+J??\ +;__@+J??\ Manual de utilizare LED TV !" # $% ! $ %£@ |& ^ !&% '*$ ^ # ¡ ? ¢! }
# ? $ %£@ |& '% _ * ¡ ? { J # \ # # # Cuprins ` ¥¥¥¥¥¥¥¥¥¥¥¥¥¥¥¥¥¥¥¥¥¥¥¥¥¥¥¥¥¥¥¥¥¥¥¥¥¥¥¥¥¥¥¥¥¥¥¥¥¥¥ 3 ! ¥¥¥¥¥¥¥¥¥¥¥¥¥¥¥¥¥¥¥¥¥¥¥¥¥¥¥¥¥¥¥¥¥¥¥¥¥¥¥¥¥¥¥¥¥¥ 4 " & % ¥¥¥¥¥¥¥¥¥¥¥¥¥¥¥¥¥¥¥¥¥¥¥¥¥¥¥¥¥¥¥¥¥¥¥¥¥¥¥¥¥¥¥¥¥¥¥¥¥¥¥¥¥¥¥¥¥¥¥¥ 7
{ & | | @}~ " } % ? ' ¤ * ? ^`{ ~ '! ! { %^<' * ¦ ! ^<' ** ? \ ^`{< '! ! {%^<' * ¦ ! ^<' ** < \ \ ? ^`{ ~ ? % \ # %^<
\ ? ? ? ? ¡ \ % ^ { ^ ~ } \ ¨ ¦
& & & | & & | | % \ # ¤ \ # # # # ? #
} \@ } ? J ? J ? % ? # # ? \ " " { ~ & ? ! J \ ¡ \ " ? \ ? " \ # \ ' J
Accesorii & !=$ ! « Accesorii standard !=$ !&% '=$ ©%ª` ! « & !$ !&% *$ ~ # ` !&% '?$ ~ !$ & ¨ \ \ ¨ ¤ # !&% '_$ Manual de utilizare ;\ & % ? #
' 3 B A 1 C D 2 8 ¤
3 B A 1 C D @ & # % {? ¤ \ ? ' \ \ ? 2 ? 3 \ \ 2 ¤ 9
` ` # ` " J \ ? ? % {? # \ ? # # \ \ !} ¬ ? " ' " ? * " #
` @ ? ` _% < \ !} ? ^` ? } < \ % % \ \ # ¨ # \ # ¨ ¨ ¦ # J ? ^` ? } $ %£@ |& ' ^` } * @ & # } % \ @}@ }` ?
` & & = & ? ' @}@ " <|! | * ? '^ * '% * < \ !} " \ < " \ !} # \ \ # ? \ ? # ¨ !} # ¨ ? # ? \ ¨ $ %£@ |& '^ ¨ ? \ * @" !
& | ' # J * @ !} ? # # %< '< ? % * ¨ J # # %< } } %_ %@ }| # ? " J ' J \ * " # # J " # ? " |
Identificarea elementelor 7 OK < # # %# & ? 9 Butoane colorate ! ; ; ; $ ? ? # 10 ` 11 Butoane numerice " \ J
" " " <¤ \ " ? \ 4 <¤ 5 ¡ " % ' {* 6 7 1 2 3 ' & ? & # \ ? #
¡ # ? ? } ` '¢ # ? * _ ? ? ^ \ ? # # ? % \ # # # # ^ # J ' { *
Vizionarea & } Modul de utilizare eAJUTOR 1 $ %£@ |& # ? # J \ # # ' ^* 1 | ' * ` ~ \ # ' * %# ¦ \ # ¨ ¤ ? # ¨ ? ¦
| ¡ ? ? \ $ %£@ |& '% ¡ \ # ? * # & ^ # ? ? | # | # Bateriile sunt introduse corect? !&% '_$ ? # ® \ # ¡ { ¡
@ & # % \ | & & ² # # ¤ & '* ! ¤ # # '* @ ¤ ' * '* ¤
~ " ` \` ~ " } !` {\{ }"@\ $ \` }"@\ } <% « ^ { ^$ { & '¯ :* ^ % { '} %_}%* <% ^ ' { * @" ; } <% « <% ^ { '@ { @* ^$ & ^ { '} %_}%* @ { Y ^$ { & ' ¤ PB`B <% ^ { '! { !* * <% ^ { ' \ * ` ´ ^$ { & @ \` @ " @" ' < ^ { } % ^ { !} ~ ¨
# # # ? \ ? J ? # ? # # ? # { $ %£@ |& '% _ * ` # & & & & & ^ ? \ "
@ & & @ & \ & & % \ \ ~ # \ \ # \ ? " \ ? #