OPERATING INSTRUCTIONS TX-43FX550B / TX-43FX555B TX-49FX550B / TX-49FX555B TX-55FX550B / TX-55FX555B LED TV
Audio File Formats................................................. 26 Contents Safety Information.................................................... 2 Markings on the Product.......................................... 2 Maintenance............................................................. 4 Display panel, Cabinet, Pedestal............................. 4 Mains plug................................................................ 4 Assembling / Removing the pedestal.......................
Safety Information CAUTION RISK OF ELECTRIC SHOCK DO NOT OPEN CAUTION: TO REDUCE THE RISK OF ELECTRIC SHOCK DO NOT REMOVE COVER (OR BACK). NO USER-SERVICEABLE PARTS INSIDE. REFER SERVICING TO QUALIFIED SERVICE PERSONNEL. In extreme weather (storms, lightning) and long inactivity periods (going on holiday) disconnect the TV set from the mains. The mains plug is used to disconnect TV set from the mains and therefore it must remain readily operable.
WARNING Do not ingest the battery, Chemical Burn Hazard This product or the accessories supplied with the product may contain a coin/button cell battery. If the coin/button cell battery is swallowed, it can cause severe internal burns in just 2 hours and can lead to death. Keep new and used batteries away from children. If the battery compartment does not close securely, stop using the product and keep it away from children.
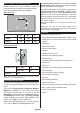
Maintenance First, remove the mains plug from the mains socket. Display panel, Cabinet, Pedestal Regular care: Gently wipe the surface of the display panel, cabinet, or pedestal by using a soft cloth to remove dirt or fingerprints. For stubborn dirt: 1. First clean the dust from the surface. 2. Dampen a soft cloth with clean water or diluted neutral detergent (1 part detergent to 100 parts water). 3. Wring out the cloth firmly.
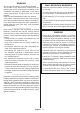
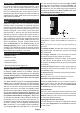
When using the wall-hanging bracket Please contact your local Panasonic dealer to purchase the recommended wall-hanging bracket. Holes for wall-hanging bracket installation; Rear of the TV a The Energy Saving settings can be found in the Settings>Picture menu. Note that some picture settings will be unavailable to be changed. If pressed Right button or Left button consecutively, “Screen will be off in 15 seconds.” message will be displayed on the screen.
Ultra HD (UHD) TV supports Ultra HD (Ultra High Definition - also known as 4K) which provides resolution of 3840 x 2160 (4K:2K). It equals 4 times the resolution of Full HD TV by doubling the pixel count of the Full HD TV both horizontally and vertically. Ultra HD contents are supported from HDMI, USB inputs and over DVB-T2 and DVB-S2 broadcasts. on. You can also choose to cancel the Auto TV OFF function from this dialogue.
Using Main TV Menu When the Home button is pressed, the main TV menu will appear at the bottom of the screen. You can navigate through the menu items using the directional buttons on the remote. To select an item or see the sub-menu options of the highlighted menu press OK button. When you highlight a menu option some of the sub-menu items of this menu may appear on the upper side of the menu bar for quick access.
Inserting the Batteries into the Remote License Notification Remove the back cover to reveal the battery compartment. Insert two size AA batteries. Make sure the (+) and (-) signs match (observe correct polarity). Do not mix old and new batteries. Replace only with same or equivalent type. Place the cover back on. A message will be displayed on the screen when the batteries are low and must be replaced. Note that when the batteries are low, the performance of the remote control may be impaired.
Sales and Support Information Disposal of Old Equipment and Batteries Only for European Union and countries with recycling systems Customer Communication Centre These symbols on the products, packaging, and/or accompanying documents mean that used electrical and electronic products and batteries must not be mixed with general household waste.
Specification TV Broadcasting PAL BG/I/DK SECAM BG/DK Receiving Channels VHF (BAND I/III) - UHF (BAND U) - HYPERBAND Digital Reception Fully integrated digital terrestrial-cable TV (DVB-T-C) (DVB-T2 compliant) Number of Preset Channels 1 000 Channel Indicator On Screen Display RF Aerial Input 75 Ohm (unbalanced) Operating Voltage 220-240V AC, 50Hz. Audio A2 Stereo+Nicam Stereo Headphone 3.5 mm mini stereo jack Audio Output Power (WRMS.
Wireless LAN Transmitter Specifications Notice Frequency Ranges Max Output Power 2400 - 2483,5 MHz (CH1-CH13) < 100 mW 5150 - 5250 MHz (CH36 - CH48) < 200 mW 5250 - 5350 MHz (CH52 - CH64) < 200 mW 5470 - 5725 MHz (CH100 CH140) < 200 mW DVB / Data broadcasting • This TV is designed to meet the standards (as of August, 2017) of DVB-T / T2 (MPEG2, MPEG4AVC(H.264) and HEVC(H.265)) digital terrestrial services and DVB-C (MPEG2, MPEG4-AVC(H.264) and HEVC(H.265)) digital cable services.
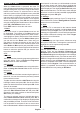
Remote Control 1 2 G 1 3 5 6 Standby: Switches On / Off the TV 2. 25 Info: Displays information about on-screen content, shows hidden information (reveal - in TXT mode) 3. Guide: Displays the electronic programme guide 24 4. Home: Displays TV menu 5. Directional buttons: Helps navigate menus, content etc. and displays the subpages in TXT mode when pressed Right or Left 6. OK: Confirms user selections, holds the page (in TXT mode), views Channels menu (DTV mode) 7.
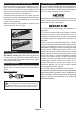
Connections Connector Type Cables Device VGA Connection (back) AUDIO IN PC/YPbPr Audio Connection (back) YPbPr/PC Audio Cable HDMI Connection (side&back) SPDIF BACK AV SPDIF (Optical Out) Connection (back) Back AV (Audio/Video) Connection (back) HEADPHONE Headphone Connection (side) YPBPR YPbPr Video Connection (back) Audio Video Cable See the illustrations on the left side. You can use YPbPr to VGA cable to enable YPbPr signal via VGA input. You cannot use VGA and YPbPr at the same time.
Switching On/Off To Switch the TV On Connect the power cord to a power source such as a wall socket (220-240V AC, 50 Hz). To switch on the TV from standby mode either: • Press the Standby button, Programme +/- or a numeric button on the remote control. • Press the centre of the joystick on the TV in or push it up/down. To Switch the TV Off Press the Standby button on the remote control or press the centre of the joystick on the TV in and hold it down for a few seconds, the TV will switch into standby mode.
satellite search is performed some settings should be made. Antenna Type menu will be displayed first. You can select Antenna Type as Direct, Single Satellite Cable or DiSEqC switch by using Left or Right buttons. After selecting your antenna type press OK to see the options to proceed. Continue, Transponder list and Configure LNB options will be available. You can change the transponder and LNB settings using the related menu options.
status of a function highlight the symbol of the function and press OK as much as needed. If the symbol is marked with a red cross, that means it is deactivated. CEC This function allows to control the CEC-enabled devices, that are connected through HDMI ports by using the remote control of the TV. The CEC option in the Settings>System>More menu should be set as Enabled at first. Press the Source button and select the HDMI input of the connected CEC device from the Sources List menu.
Settings Menu Contents Picture Menu Contents You can change the picture mode to suit your preference or requirements. Picture mode can be set to one of these options: Cinema, Game(optional), Sports, Dynamic and Natural. Mode Contrast Adjusts the light and dark values on the screen. Brightness Adjusts the brightness values on the screen. Sharpness Sets the sharpness value for the objects displayed on the screen. Colour Sets the colour value, adjusting the colours.
Sound Menu Contents Volume Adjusts the volume level. Equalizer Selects the equalizer mode. Custom settings can be made only when in User mode. Balance Adjusts whether the sound comes from the left or right speaker. Headphone Sets headphone volume. Please ensure before using headphones that the headphone volume is set to a low level, to prevent damage to your hearing. Sound Mode You can select a sound mode (If the viewed channel supports).
Network Menu Contents Network Type Disable the network connection or change the connection type. Scan Wireless Networks Start a search for wireless networks. This option will be available if the Network Type is set as Wireless Device. Press WPS on your wifi router If your modem/router device has WPS, you can directly connect to it using this option. Highlight this option and press OK. Go to your modem/router device and press the WPS button on it to make the connection.
System Menu Contents Conditional Access Controls conditional access modules when available. Language You may set a different language depending on the broadcaster and the country. Privacy Settings (*) Manage your privacy privileges for smart TV related applications. Press OK to enter the menu and set according to your preferences. Parental Enter correct password to change parental settings. You can easily adjust Menu Lock, Maturity Lock, Child Lock or Guidance in this menu.
Power Up Mode This setting configures the power up mode preference. Last State and Standby options are available. Virtual Remote Enable or disable the virtual remote feature. CEC With this setting you can enable and disable CEC functionality completely. Press Left or Right button to enable or disable the feature. CEC Auto Power On This function allows the connected HDMI-CEC compatible device to turn on the TV and switch to its input source automatically.
General TV Operation Using the Channel List The TV sorts all stored stations in the channel list. You can edit this channel list, set favourites or set active stations to be listed by using the Channels menu options. Press the OK button to open the channel list. You can filter the listed channels or make advanced changes in the current list using the Filter and Edit tab options. Highlight the tab you want and press OK to see available options.
the directional buttons to scroll through the list of the events. Press Back/Return button to use available tab options. Highlight Filter tab and press OK to see the filtering options. To change the layout highlight Timeline Schedule and press OK. Event Options Use the directional buttons to highlight an event and press OK button to display Options menu. The following options are available. Select Channel: Using this option, you can switch to the selected channel in order to watch it.
PC Input Typical Display Modes Troubleshooting & Tips TV will not turn on Make sure the power cord is plugged in securely to a wall outlet. Press the Power button on the TV. Poor picture • Check if you have correctly tuned the TV. The following table is an illustration of some of the typical video display modes. Your TV may not support all resolutions. Index Resolution Frequency 1 640x350 85Hz 2 640x480 60Hz • Low signal level can cause picture distortion. Please check antenna connections.
AV and HDMI Signal Compatibility Source Back AV Supported Signals O SECAM O NTSC4.43 O NTSC3.
Supported File Formats for USB Mode Video File Formats Video Codec Resolution Bit Rate MPEG program stream (.DAT, .VOB, .MPG, .MPEG), MPEG transport stream (.ts, .trp, .tp), MP4 (.mp4, .mov), 3GPP (.3gpp, .3gp), AVI (.avi), MKV (.mkv), ASF (.asf) MPEG1/2 MPEG4 1080Px2@30fps, 1080P@60fps 40Mbps XviD Sorenson H.263 H.263 3840x2160@30fps, 1080P@60fps Motion JPEG 720P@30fps HEVC/H.265 VP9 MPEG program stream (.MPG, .MPEG), MP4 (.mp4, .mov), 3GPP (.3gpp, .3gp), AVI (.avi), MKV (.mkv), ASF (.
Audio Codec Sample rate Bit Rate Container AAC, HEAAC 8KHz ~ 48KHz WMA 8KHz ~ 48KHz 128bps ~ 320Kbps WMA 10 Pro M0 WMA 10 Pro M1 48KHz 48KHz < 192kbps < 384kbps WMA 10 Pro M2 96KHz < 768kbps G711 A/mu-law 8KHz 64Kbps ~ 128Kbps WAV (.wav), AVI (.avi), Matroska (.mkv, .mka), 3GPP (.3gpp, .3gp), MP4 (.mp4, .mov, m4a) LBR (cook) 8KHz, 11.025KHz, 22.05KHz, 44.1KHz 6Kbps ~ 128Kbps RM (.ra) FLAC 8KHz~96KHz < 1.6Mbps Matroska (.mkv, .mka) AAC (.aac), AVI (.avi), Matroska (.mkv, .
Supported DVI Resolutions When connecting devices to your TV’s connectors by using DVI converter cable(DVI to HDMI cable - not supplied), you can refer to the following resolution information.
Internet Speed Test Connectivity Highlight Internet Speed Test and press the OK button. TV will check the internet connection bandwidth and display the result when complete. Wired Connectivity To Connect to a Wired Network • You must have a modem/router connected to an active broadband connection. • Connect your TV to your modem/router via an Ethernet cable. There is a LAN port at the rear (back) of your TV. 1 Advanced Settings Highlight Advanced Settings and press the OK button.
• The location where the transmission is most effective differs depending on the usage environment. Connect your TV to your router following the steps mentioned in the sections above. • The Wireless feature of the TV supports 802.11 a,b,g & n type modems. It is highly recommended that you should use the IEEE 802.11n communication protocol in order to avoid any possible problems while watching videos.
on a remote device connected to the same local area network, such as a smartphone. Your TV is WoL and WoWLAN compatible. This feature might be disabled during the First Time Installation process. To enable this feature set the Wake On option in the Network menu as On. It is necessary that both the device, from which the network message will be sent to the TV, and the TV are connected to the same network.
PC/HDD/Media Player or any other devices that are compatible should be used with a wired connection for higher playback quality. Requirements Use a LAN connection for quicker file sharing between other devices like computers. • Connecting the TV to the internet. A minimum broadband speed of 2Mbps is required for proper operation of catch up and on demand services.
and press the OK button to start a search for the related websites. Highlight a Speed Dial thumbnail and press the OK button to visit the related website. Your TV is compatible with USB mice. Plug your mouse or wireless mouse adaptor into the USB input of your TV for easier and quicker navigation. The autostart red button applications generally provide links to other applications. An example of this is shown below. The user then can switch to other applications by using the links provided.
Important Instruction For your own safety read following instruction carefully before attempting to connect this unit to the mains supply. MAINS (AC) OPERATION The wires in the mains lead are coloured in accordance with the following code : 1 4 2 3 1. Green&Yellow (Earth) (if there is earth cable) 2. Blue (Neutral) 3. Brown (Live) 4.