OPERATING INSTRUCTIONS MODE D’EMPLOI BEDIENUNGSANLEITUNG KULLANIM KILAVUZU TX-43GXW584 TX-49GXW584 TX-55GXW584 LED TV Téléviseur LED You can find instructions for your TV’s features in the E-Manual. To access the E-Manual, enter Settings menu, select Manuals and press OK. For quick access press Home/Menu button and then Info button. e-MANUAL Vous pouvez accéder aux instructions relatives aux fonctions de votre téléviseur à partir du E-Manuel.
Subtitle File Formats.............................................. 26 Contents Safety Information.................................................... 2 Markings on the Product.......................................... 2 Maintenance............................................................. 4 Display panel, Cabinet, Pedestal............................. 4 Mains plug................................................................ 4 Assembling / Removing the pedestal.......................
Safety Information CAUTION RISK OF ELECTRIC SHOCK DO NOT OPEN CAUTION: TO REDUCE THE RISK OF ELECTRIC SHOCK DO NOT REMOVE COVER (OR BACK). NO USER-SERVICEABLE PARTS INSIDE. REFER SERVICING TO QUALIFIED SERVICE PERSONNEL. In extreme weather (storms, lightning) and long inactivity periods (going on holiday) disconnect the TV set from the mains. The mains plug is used to disconnect TV set from the mains and therefore it must remain readily operable.
WARNING Do not ingest the battery, Chemical Burn Hazard This product or the accessories supplied with the product may contain a coin/button cell battery. If the coin/button cell battery is swallowed, it can cause severe internal burns in just 2 hours and can lead to death. Keep new and used batteries away from children. If the battery compartment does not close securely, stop using the product and keep it away from children.
Maintenance First, remove the mains plug from the mains socket. Display panel, Cabinet, Pedestal Regular care: Gently wipe the surface of the display panel, cabinet, or pedestal by using a soft cloth to remove dirt or fingerprints. For stubborn dirt: 1. First clean the dust from the surface. 2. Dampen a soft cloth with clean water or diluted neutral detergent (1 part detergent to 100 parts water). 3. Wring out the cloth firmly.
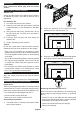
When using the wall-hanging bracket Please contact your local Panasonic dealer to purchase the recommended wall-hanging bracket. Holes for wall-hanging bracket installation; Rear of the TV If pressed Right button or Left button consecutively, “Screen will be off in 15 seconds.” message will be displayed on the screen. Select Proceed and press OK to turn the screen off immediately. If you don’t press any button, the screen will be off in 15 seconds.
High Dynamic Range (HDR) / Hybrid Log-Gamma (HLG) Using this feature the TV can reproduce greater dynamic range of luminosity by capturing and then combining several different exposures. HDR/HLG promises better picture quality thanks to brighter, more realistic highlights, more realistic colour and other improvements. It delivers the look that filmmakers intended to achieve, showing the hidden areas of dark shadows and sunlight with full clarity, colour and detail.
Input Selection Once you have connected external systems to your TV, you can switch to different input sources. Press the Source button on your remote control consecutively to select the different sources. Changing Channels and Volume You can change the channel and adjust the volume by using the Programme +/- and Volume +/- buttons on the remote. Using Main TV Menu When the Home button is pressed, the main TV menu will appear at the bottom of the screen.
Inserting the Batteries into the Remote License Notification Remove the back cover to reveal the battery compartment. Insert two size AA batteries. Make sure the (+) and (-) signs match (observe correct polarity). Do not mix old and new batteries. Replace only with same or equivalent type. Place the cover back on. A message will be displayed on the screen when the batteries are low and must be replaced. Note that when the batteries are low, the performance of the remote control may be impaired.
Disposal of Old Equipment and Batteries Only for European Union and countries with recycling systems These symbols on the products, packaging, and/or accompanying documents mean that used electrical and electronic products and batteries must not be mixed with general household waste. For proper treatment, recovery and recycling of old products and used batteries, please take them to applicable collection points in accordance with your national legislation.
Specification TV Broadcasting PAL BG/I/DK SECAM BG/DK Receiving Channels VHF (BAND I/III) - UHF (BAND U) - HYPERBAND Digital Reception Fully integrated digital terrestrial-cable-satellite TV (DVB-T-C-S) (DVB-T2, DVB-S2 compliant) Number of Preset Channels 11 000 Channel Indicator On Screen Display RF Aerial Input 75 Ohm (unbalanced) Operating Voltage 220-240V AC, 50Hz. Audio A2 Stereo+Nicam Stereo Headphone 3.5 mm mini stereo jack Audio Output Power (WRMS.
Wireless LAN Transmitter Specifications Notice Frequency Ranges Max Output Power 2400 - 2483,5 MHz (CH1-CH13) < 100 mW 5150 - 5250 MHz (CH36 - CH48) < 200 mW 5250 - 5350 MHz (CH52 - CH64) < 200 mW 5470 - 5725 MHz (CH100 CH140) < 200 mW DVB / Data broadcasting / IPTV functions • This TV is designed to meet the standards (as of August, 2017) of DVB-T / T2 (MPEG2, MPEG4AVC(H.264) and HEVC(H.265)) digital terrestrial services, DVB-C (MPEG2, MPEG4-AVC(H.264) and HEVC(H.
Remote Control 1 2 G 1 3 5 6 Standby: Switches On / Off the TV 2. 25 Info: Displays information about on-screen content, shows hidden information (reveal - in TXT mode) 3. Guide: Displays the electronic programme guide 24 4. Home: Displays TV menu 5. Directional buttons: Helps navigate menus, content etc. and displays the subpages in TXT mode when pressed Right or Left 6. OK: Confirms user selections, holds the page (in TXT mode), views Channels menu (DTV mode) 7.
Connections Connector Type Cables Device VGA Connection (back) AUDIO IN PC/YPbPr Audio Connection (back) YPbPr/PC Audio Cable HDMI Connection (side&back) SPDIF BACK AV SPDIF (Optical Out) Connection (back) Back AV (Audio/Video) Connection (back) HEADPHONE Headphone Connection (side) YPBPR YPbPr Video Connection (back) Audio Video Cable See the illustrations on the left side. You can use YPbPr to VGA cable to enable YPbPr signal via VGA input. You cannot use VGA and YPbPr at the same time.
Switching On/Off To Switch the TV On Connect the power cord to a power source such as a wall socket (220-240V AC, 50 Hz). Turn on the main ” located on the TV - position “|”. The TV switch “ will switch into standby mode and the standby LED will light up. Note: Main switch position may differ depending on the model. To switch on the TV from standby mode either: • Press the Standby button, Programme +/- or a numeric button on the remote control.
made. Antenna Type menu will be displayed first. You can select Antenna Type as Direct, Single Satellite Cable or DiSEqC switch by using Left or Right buttons. After selecting your antenna type press OK to see the options to proceed. Continue, Transponder list and Configure LNB options will be available. You can change the transponder and LNB settings using the related menu options. Wait a little while before each plugging and unplugging as the player may still be reading files.
and press OK as much as needed. If the symbol is marked with a red cross, that means it is deactivated. CEC This function allows to control the CEC-enabled devices, that are connected through HDMI ports by using the remote control of the TV. The CEC option in the Settings>System>More menu should be set as Enabled at first. Press the Source button and select the HDMI input of the connected CEC device from the Sources List menu.
Settings Menu Contents Picture Menu Contents You can change the picture mode to suit your preference or requirements. Picture mode can be set to one of these options: Cinema, Game(optional), Sports, Dynamic and Natural. Mode Contrast Adjusts the light and dark values on the screen. Brightness Adjusts the brightness values on the screen. Sharpness Sets the sharpness value for the objects displayed on the screen. Colour Sets the colour value, adjusting the colours.
Sound Menu Contents Volume Adjusts the volume level. Equalizer Selects the equalizer mode. Custom settings can be made only when in User mode. Balance Adjusts whether the sound comes from the left or right speaker. Headphone Sets headphone volume. Please ensure before using headphones that the headphone volume is set to a low level, to prevent damage to your hearing. Sound Mode You can select a sound mode (If the viewed channel supports).
Network Menu Contents Network Type Disable the network connection or change the connection type. Scan Wireless Networks Start a search for wireless networks. This option will be available if the Network Type is set as Wireless Device. Press WPS on your wifi router If your modem/router device has WPS, you can directly connect to it using this option. Highlight this option and press OK. Go to your modem/router device and press the WPS button on it to make the connection.
System Menu Contents Conditional Access Controls conditional access modules when available. Language You may set a different language depending on the broadcaster and the country. Privacy Settings (*) Manage your privacy privileges for smart TV related applications. Press OK to enter the menu and set according to your preferences. Parental Enter correct password to change parental settings. You can easily adjust Menu Lock, Maturity Lock, Child Lock or Guidance in this menu.
AVS (Audio Video Sharing) AVS feature allows you to share files stored on your smartphone or tablet pc. If you have a compatible smartphone or tablet pc and the appropriate software is installed, you can share/play photos on your TV. See instructions of your sharing software for more information. Power Up Mode This setting configures the power up mode preference. Last State and Standby options are available. Virtual Remote Enable or disable the virtual remote feature.
Internet Lock: If this option is set to ON, the internet using applications will be disabled. Set to OFF to release these applications again. General TV Operation Using the Channel List The TV sorts all stored stations in the channel list. You can edit this channel list, set favourites or set active stations to be listed by using the Channels menu options. Press the OK button to open the channel list.
Zoom: Highlight and press OK to see events in a wider time interval. Now/Next Schedule In this layout option, only the current and next events of the listed channels will be displayed. You can use the directional buttons to scroll through the list of the events. Press Back/Return button to use available tab options. Highlight Filter tab and press OK to see the filtering options. To change the layout highlight Timeline Schedule and press OK.
PC Input Typical Display Modes AV and HDMI Signal Compatibility The following table is an illustration of some of the typical video display modes. Your TV may not support all resolutions. Index Resolution Frequency 1 640x350 85Hz 2 640x480 60Hz 3 640x480 72Hz 4 640x480 75Hz 5 800x600 6 800x600 Source Back AV Supported Signals Available PAL O SECAM O NTSC4.43 O NTSC3.
Supported File Formats for USB Mode Video File Formats Video Codec Resolution Bit Rate MPEG program stream (.DAT, .VOB, .MPG, .MPEG), MPEG transport stream (.ts, .trp, .tp), MP4 (.mp4, .mov), 3GPP (.3gpp, .3gp), AVI (.avi), MKV (.mkv), ASF (.asf) MPEG1/2 MPEG4 1080Px2@30fps, 1080P@60fps 40Mbps Sorenson H.263 H.263 3840x2160@30fps, 1080P@60fps Motion JPEG 720P@30fps VP8 1080P@30fps VP9 MPEG program stream (.MPG, .MPEG), MP4 (.mp4, .mov), 3GPP (.3gpp, .3gp), AVI (.avi), MKV (.mkv), ASF (.
Audio Codec Sample rate Bit Rate Container AAC, HEAAC 8KHz ~ 48KHz WMA 8KHz ~ 48KHz 128bps ~ 320Kbps WMA 10 Pro M0 WMA 10 Pro M1 48KHz 48KHz < 192kbps < 384kbps WMA 10 Pro M2 96KHz < 768kbps G711 A/mu-law 8KHz 64Kbps ~ 128Kbps WAV (.wav), AVI (.avi), Matroska (.mkv, .mka), 3GPP (.3gpp, .3gp), MP4 (.mp4, .mov, m4a) LBR (cook) 8KHz, 11.025KHz, 22.05KHz, 44.1KHz 6Kbps ~ 128Kbps RM (.ra) FLAC 8KHz~96KHz < 1.6Mbps Matroska (.mkv, .mka) AAC (.aac), AVI (.avi), Matroska (.mkv, .
Supported DVI Resolutions When connecting devices to your TV’s connectors by using DVI converter cable(DVI to HDMI cable - not supplied), you can refer to the following resolution information.
Internet Speed Test Connectivity Highlight Internet Speed Test and press the OK button. TV will check the internet connection bandwidth and display the result when complete. Wired Connectivity To Connect to a Wired Network • You must have a modem/router connected to an active broadband connection. • Connect your TV to your modem/router via an Ethernet cable. There is a LAN port at the rear (back) of your TV. 1 Advanced Settings Highlight Advanced Settings and press the OK button.
• The location where the transmission is most effective differs depending on the usage environment. Connect your TV to your router following the steps mentioned in the sections above. • The Wireless feature of the TV supports 802.11 a,b,g & n type modems. It is highly recommended that you should use the IEEE 802.11n communication protocol in order to avoid any possible problems while watching videos.
on a remote device connected to the same local area network, such as a smartphone. Your TV is WoL and WoWLAN compatible. This feature might be disabled during the First Time Installation process. To enable this feature set the Wake On option in the Network menu as On. It is necessary that both the device, from which the network message will be sent to the TV, and the TV are connected to the same network.
PC/HDD/Media Player or any other devices that are compatible should be used with a wired connection for higher playback quality. Use a LAN connection for quicker file sharing between other devices like computers. Note: There may be some PC’s which may not be able to utilize the Audio Video Sharing feature due to administrator and security settings (such as business PC’s). Apps You can access the applications installed on your TV from Apps menu. Highlight an app and press OK to launch.
button to open the application page. After the page is displayed you can go back to the initial red button icon state by pressing the red button again. You can toggle between the red button icon mode and full UI mode of the application via pressing red button. It should be noted that the red button switching capability is provided by the application and some application may behave differently.
Format de Fichiers Audio....................................... 59 Table des matières Consignes de sécurité............................................ 34 Symboles sur le produit.......................................... 35 Entretien................................................................. 36 Panneau d'affichage, téléviseur, socle................... 36 Prise d’alimentation................................................ 36 Montage/Retrait du socle.......................................
Consignes de sécurité ATTENTION RISQUE DE CHOC ÉLECTRIQUE NE PAS OUVRIR ATTENTION: POUR ÉVITER TOUT RISQUE DE CHOC ÉLECTRIQUE, NE RETIREZ PAS LE COUVERCLE (OU L’ARRIÈRE). L’ENTRETIEN DES PIÈCES INTERNES EST INTERDIT AUX UTILISATEURS. VEUILLEZ CONFIER L'ENTRETIEN À UN PERSONNEL QUALIFIÉ. Pendant des phénomènes météorologiques extrêmes (tempêtes, foudre) et de longues périodes d'inactivité (aller en vacances), débranchez le téléviseur du secteur.
Symboles sur le produit Les symboles suivants sont utilisés sur le produit pour marquer les instructions relatives aux restrictions, aux précautions et à la sécurité. Chaque explication se rapporte uniquement à l'endroit du produit portant le symbole correspondant. Veuillez en tenir compte pour des raisons de sécurité. Équipement de classe II : Cet appareil, de par sa conception, ne nécessite pas de branchement sécurisé à un système électrique de mise à la terre.
Entretien WARNING • En faisant recourt à d’autres supports de fixation murale ou en en installant un par vous-même, vous courrez le risque de vous blesser ou d’endommager l’appareil. Pour une performance et une sécurité optimales de l’appareil, pensez à vous rapprocher de votre magasin ou d’un technicien agréé pour la fixation des supports. Tout dommage provoqué à la suite d’une installation effectuée par des mains inexpertes annulera votre garantie.
Retrait du socle du téléviseur Montage/Retrait du socle Préparations Retirez le(s) socle(s) de l'emballage et posez le téléviseur sur une table de travail, avec le panneau de l'écran couché sur un tissu propre et doux (couverture, etc.) • Utilisez une table plate et solide, plus grande que le téléviseur. • Ne tenez pas le panneau de l'écran. • Posez le téléviseur sur une table de travail, avec le panneau de l'écran couché sur un tissu propre et doux.
• Verrouillage enfants Informations sur l'environnement Ce téléviseur a été conçu conformément aux normes environnementales. Pour réduire effectivement votre consommation électrique, veuillez suivre les étapes ci-après : Le téléviseur ajuste sa consommation d'énergie en fonction du niveau choisi, entre Minimum, Moyen, Maximum ou Auto.
Commande et fonctionnement du téléviseur Notifications de Veille Lorsque le téléviseur ne reçoit aucun signal d’entrée (par exemple une antenne ou une source HDMI) pendant 3 minutes, il passe en veille. Lors de la prochaine mise en marche, le message suivant s'affiche à l'écran : « Le téléviseur passe automatiquement en mode veille parce qu'il ne reçoit aucun signal après un long moment. ».
Fonctionnement de la TV à l'aide de la télécommande 2. TV Appuyez sur le bouton Accueil de votre télécommande pour afficher le menu principal. Utilisez les boutons directionnels et le bouton OK pour naviguer et régler. Appuyez sur le bouton Return/Back ou Accueil pour quitter un écran de menu. Vous pouvez accéder au menu du guide électronique des programmes en utilisant cette option. Reportezvous à la section Guide Électronique des Programmes pour plus d'informations.
menu des Applications, vous pouvez accéder et gérer vos applications. Vous pouvez ajouter de nouvelles applications sur le marché ou supprimer celles qui existent déjà. Reportez-vous à la section Applications pour plus d'informations. 5. Sources Vous pouvez gérer vos références de source d'entrée en utilisant les options de ce menu. Pour changer la source actuelle, mettez en surbrillance l'une des options et appuyez sur OK. 5.1.
Notification de licence Les termes HDMI et High-Definition Multimedia Interface ainsi que le logo HDMI sont des marques commerciales ou des marques déposées de HDMI Licensing Administrator, Inc. aux États-Unis et dans d’autres pays. L’élimination des équipements et des batteries usagés Applicable uniquement dans les pays membres de l’Union européenne et les pays disposant de systèmes de recyclage.
Spécifications Télédiffusion PAL BG/I/DK SECAM BG/DK Réception des chaînes VHF (BAND I/III) - UHF (BAND U) - HYPERBAND Réception numérique TV satellite numérique terrestre intégré/câble (DVB-T-C-S) (DVB-T2, DVB-S2 conforme) Nombre de chaînes prédéfinies 11 000 Indicateur de chaîne Affichage à l’écran Entrée d'antenne RF 75 Ohm (déséquilibrée) Tension de fonctionnement 220-240V AC, 50Hz. Audio A2 Stereo + Nicam Stereo Casque Mini-jack stéréo de 3,5 mm Puissance de sortie Audio (WRMS.
Spécifications du transmetteur LAN sans fil Gammes de fréquence Puissance max de sortie 2400 - 2483,5 MHz (CH1-CH13) < 100 mW 5150 - 5250 MHz (CH36 - CH48) < 200 mW 5250 - 5350 MHz (CH52 - CH64) < 200 mW 5470 - 5725 MHz (CH100 CH140) < 200 mW Restrictions pays Cet appareil est destiné à un usage domestique et de bureau dans tous les pays de l’UE (ainsi que d’autres pays qui appliquent les directives européenne en la matière) sans restriction, sauf pour les pays ci-dessous mentionnés.
Télécommande 1. 2. 1 25 2 G 24 1 3 5 6 EXIT 2 BACK 7 22 6. 21 7. 8. 8 9 20 10 9. 10. 11. 11 12 4. 5. E 23 HO M 4 3. LANG. 19 12. 13 18 13. 14 17 14. 15 16 15. 16. 17. 18. 19. 20. (*) MON BOUTON 1 ET MON BOUTON 2: Ces boutons sont dotés de fonctions par défaut, selon le modèle. Cependant, vous pouvez personnaliser les fonctions de ces boutons en les appuyant pendant cinq secondes après avoir sélectionné la source ou la chaîne.
Connexions Connecteur Type Câbles Périphérique VGA Branchement (arrière) ENTRÉE AUDIO Audio PC/ YPbPr Branchement (arrière) Câble Audio YPbPr/PC HDMI Branchement (côté &fond) SPDIF AV RETOUR Connexion SPDIF (Optical Out) (arrière) Connexion AV Retour (Audio/ Vidéo) Branchement (arrière) CASQUE Branchement du casque (latéraux) YPBPR Connexion vidéo YPbPr (arrière) Câble Audio/Vidéo Câble de connexion PC à YPbPr Voir les illustrations à gauche.
l'activer/la désactiver plus tard. Faites votre choix et appuyez sur OK pour continuer. Marche/Arrêt Pour mettre le téléviseur sous tension Connectez le cordon d'alimentation à une source d'alimentation telle qu'une prise murale (220-240 V ” AC, 50 Hz). Allumez le commutateur principal “ situé sur le TV- la position 1 Le téléviseur sera alors en mode veille et le voyant de veille s’allumera.
procède à la recherche d'émissions numériques par câble une fois les autres réglages initiaux terminés. Un message s'affiche avant de commencer la recherche et vous demande si vous souhaitez effectuer une recherche sur le réseau câblé. Si vous sélectionnez Oui et appuyez sur OK, vous pouvez sélectionner Réseau ou définir des valeurs telles que Fréquence, Réseau ID et Étape de recherche sur l'écran suivant.
Navigateur multimédia CEC Vous pouvez lire de la musique et les fichiers vidéo et afficher les fichiers photo stockés sur un périphérique de stockage USB en le connectant à votre téléviseur. Connectez un périphérique de stockage USB à l'une des entrées USB situées sur le côté du téléviseur. Après avoir connecté un périphérique de stockage USB à votre téléviseur, le menu du Navigateur Multimédia s'affiche à l'écran.
Contenu du menu Réglages Contenu du menu Image Vous pouvez modifiez le mode d'image selon vos préférences ou exigences. Le mode Image peut être réglé sur l’une de ces options : Cinéma, Jeux (en option), Sport, Dynamique et Naturel. Mode Contraste Règle les valeurs de l’éclairage et de l’obscurité de l'écran. Luminosité Règle la valeur de luminosité de l’écran. Netteté Définit la valeur de netteté des objets affichés à l’écran. Couleur Règle la valeur de la couleur et les couleurs.
Contenu du menu Son Volume Ajuste le niveau du volume. Égaliseur Sélectionnez le mode égaliseur. Les paramètres personnalisés ne peuvent être actifs que lorsque vous êtes en mode Utilisateur. Balance Ajuste le son à gauche comme à droite du haut-parleur. Casque Règle le volume du casque. Avant d'utiliser les casques, veuillez également vous assurer que leur volume est réglé à un niveau faible afin d'éviter que votre audition ne soit endommagée.
Contenu du Menu Réseau Type de réseau Désactivez la connexion réseau ou modifiez le type de connexion. Scanner les Réseaux Sans Fil Commencer à rechercher les réseaux sans fil. Cette option sera disponible si le Type de Réseau est défini comme Dispositif Sans Fil. Appuyez sur WPS sur votre routeur wifi Si votre modem/routeur dispose de WPS, vous pouvez vous y connecter directement à l'aide de cette option. Sélectionnez cette option et appuyez sur OK.
Système - Contenus du Menu Accès Conditionnel Contrôle les modules d’accès conditionnel lorsqu’ils sont disponibles. Langue Vous pouvez définir une langue différente, selon votre diffuseur et votre pays. Paramètres de confidentialité (*) Gérez les préférences de confidentialité des applications de votre téléviseur intelligent. Appuyer sur OK pour accéder au menu et paramétrer en fonction de vos préférences. Parental Entrez le mot de passe correct pour modifier les réglages du contrôle parental.
Mise hors tension automatique du téléviseur Clé Biss Définit la durée souhaitée pour que la télévision passe automatiquement en mode veille lorsqu'elle n'est pas utilisée. Cette valeur peut être comprise entre 1 et 8 ms par paliers de 1 heure. Vous pouvez désactiver cette option en définissant comme Désactivé. Le Biss est un système de codage de signal par satellite utilisé pour certaines émissions. Si vous devez entrer la clé BISS pour une émission, vous pouvez utiliser le réglage Clé Biss.
Fonctionnement général de la TV Utilisation de la liste de chaînes Le téléviseur trie toutes les stations mémorisées dans la liste des chaînes. Vous pouvez modifier cette liste de chaînes, configurer les favoris ou les stations actives à inclure dans la liste en utilisant les options Chaînes. Appuyez sur le bouton OK pour ouvrir la liste des chaînes. Vous pouvez filtrer les chaînes répertoriées ou apporter des modifications avancées à la liste actuelle à l'aide des options de l'onglet Filtre et Modifier.
Appuyez sur le bouton Précédent/Retour pour utiliser les options d'onglet disponibles. Sélectionnez l'onglet Filtre et appuyez sur OK pour voir les options de filtrage. Pour modifier la mise en page, mettez en surbrillance Maintenant / Suivant et appuyez sur OK. Vous pouvez utiliser les options Jour Précédent et Jour Suivant pour afficher les événements du jour précédent et du jour suivant. l'option Supprimer la minuterie de l'évènement. La minuterie sera annulée.
à niveau, débranchez-le, patientez deux minutes, puis rebranchez-le. Toutes les mises à jour sont automatiquement contrôlés. Si une recherche manuelle est effectuée et aucun logiciel n'est trouvé, alors c'est la version actuelle. Dépannage et astuces Modes d’affichage typiques de l’entrée PC Le tableau ci-après est une illustration de quelques modes d’affichage vidéo typiques. Votre téléviseur ne peut pas prendre en charge toutes les résolutions.
Compatibilité des signaux AV et HDMI Source Retour AV Signaux pris en charge O secam O NTSC4.43 O NTSC3.
Formats de fichier pris en charge pour le mode USB Formats de Fichier Vidéo Code vidéo Résolution Taux binaire Flux de programme MPEG (.DAT, .VOB, .MPG, .MPEG), flux de transport MPEG (.ts, .trp, .tp), MP4 (.mp4, .mov), 3GPP (.3gpp, .3gp), AVI (.avi), MKV (.mkv), ASF (.asf) MPEG1/2 MPEG4 1080Px2@30fps, 1080P@60fps 40Mbps Sorenson H.263 H.263 3840x2160@30fps, 1080P@60fps Motion JPEG 720P@30fps HEVC/H.265 VP9 Flux de programme MPEG (.MPG, .MPEG), MP4 (.mp4, .mov), 3GPP (.3gpp, .3gp), AVI (.
Code audio Taux d'échantillon Taux binaire Support AAC, HEAAC 8KHz ~ 48KHz WMA 8KHz ~ 48KHz 128 bps ~ 320 Kbps WMA 10 Pro M0 WMA 10 Pro M1 48KHz 48KHz < 192kbps < 384kbps WMA 10 Pro M2 96KHz < 768kbps G711 A/mu-law 8KHz 64 Kbps ~ 128 Kbps WAV (.wav), AVI (.avi), Matroska (.mkv, .mka), 3GPP (.3gpp, .3gp), MP4 (.mp4, .mov, m4a) LBR (cook) 8KHz, 11,025KHz, 22,05KHz, 44,1KHz 6 Kbps ~ 128 Kbps RM (.ra) FLAC 8 KHz~96 KHz < 1.6Mbps Matroska (.mkv, .mka) AAC (.aac), AVI (.
Résolutions DVI prises en charge Reportez-vous aux résolutions suivantes au moment de connecter des périphériques à votre téléviseur à l’aide des câbles convertisseurs DVI (DVI à HDMI - non fournis).
l’option Dispositif Câblé si vous vous connectez via un réseau Ethernet. Connectivité Connexion avec fil Test de débit Internet Connexion à un réseau câblé • Vous devez avoir un modem / routeur alimenté par une connexion à large bande active. • Connectez votre téléviseur à votre modem / routeur via un câble Ethernet. Il existe un port LAN à l'arrière (derrière) de la Télé. 1 2 Sélectionnez le bouton Test de débit Internet et appuyez sur le bouton OK.
La transmission peut également être coupée ou être déconnectée selon l’état des ondes radio, des téléphones DECT ou de tout autre appareil WLAN 11b. Les valeurs standard de la vitesse de transmission sont les valeurs maximales théoriques pour les normes des appareils sans fil. Elles ne sont pas les vitesses réelles de la transmission des données. • L'endroit où la transmission est le plus efficace varie en fonction de l'environnement d'utilisation.
diffusion ou un fournisseur d’applications. Avant de réparer, transférer ou jeter ce téléviseur, supprimez toutes les informations qui y ont été enregistrées en respectant la procédure suivante : [HOME] Installation>Première installation Les informations clients peuvent être collectées par le fournisseur via une application fournie par des tiers sur ce téléviseur ou ce site Web. Veuillez confirmer les conditions et modalités, etc. de fournir à l’avance.
Domaine non valide Assurez-vous de vous être déjà connecté à votre PC avec un nom d’utilisateur/mot de passe autorisé et veillez également à ce que votre domaine soit actif, avant de partager quelque fichier que ce soit dans le programme du serveur de média de votre ordinateur. Si le domaine n’est pas valide, vous pourrez rencontrer des problèmes au moment de parcourir les fichiers en mode Partage audio/vidéo.
Pour ajouter un site Web souhaité à la liste de Raccourcis pour accès rapide, placez le curseur en haut de la page ou appuyez sur le bouton Back/ Return. La barre du navigateur apparaît. Sélectionnez et appuyez sur le bouton le bouton Raccourcis OK. Ensuite, sélectionnez l'option Ajouter à la liste des raccourcis et appuyez sur le bouton OK. Remplissez les espaces vides en inscrivant votre Nom et Adresse, sélectionnez OK et appuyez sur le bouton OK pour ajouter.
Certaines fonctions du téléviseur numérique peuvent ne pas être disponibles dans tous les pays. Nous nous efforçons chaque jour à améliorer davantage la qualité de nos produits ; par conséquent, leurs spécifications peuvent changer sans préavis. Pour savoir où acheter des accessoires, veuillez contacter le magasin dans lequel vous avez acheté votre équipement.
Untertitel-Dateiformate........................................... 96 Inhalt Sicherheitsinformationen........................................ 69 Kennzeichnungen auf dem Gerät........................... 70 WARTUNG............................................................. 71 Bildschirm, Gehäuse, Ständer................................ 71 Netzstecker............................................................ 71 Aufstellung / Entfernen des Ständers.....................
Sicherheitsinformationen HINWEIS STROMSCHLAGGEFAHR NICHT ÖFFNEN HINWEIS: UM DAS RISIKO AUF EINEN ELEKTRISCHEN SCHOCK ZU REDUZIEREN, DEN DECKEL (ODER DAS RÜCKTEIL) NICHT ENTFERNEN IN DIESEM GERÄT BEFINDEN SICH KEINE TEILE, DIE VOM BENUTZER GEWARTET WERDEN KÖNNEN. WENDEN SIE SICH AN QUALIFIZIERTES SERVICEPERSONAL.
Kennzeichnungen auf dem Gerät Die folgenden Symbole werden auf dem Gerät als Kennzeichnungen für Einschränkungen und Vorsichtsmaßnahmen sowie Sicherheitshinweise verwendet. Jede Kennzeichnung ist dann zu beachten, wenn diese auf dem Gerät angebracht worden ist. Beachten Sie diese Informationen aus Sicherheitsgründen. Gerät der Schutzklasse II: Dieses Gerät ist so gebaut, das es keinen Schutzleiter (elektrische Erdung) für die Verbindung zum Stromnetz erfordert.
WARTUNG WARNUNG • Der Einsatz anderer Halterungen für die Wandmontage oder eine eigenständige Installation der Halterung kann zu Verletzungen und Sachschäden führen. Um das Betriebsbereitschaft des Geräts zu gewährleisten sowie aus Sicherheitsgründen müssen Sie die Montage unbedingt durch den entsprechenden qualifizierten Kundendiensts des Händlers oder eine geeigneten Fachmann durchführen lassen.
Entfernen des Ständers vom TV-Gerät Aufstellung / Entfernen des Ständers Vorbereitung Nehmen Sie den/die Ständer und das TV-Gerät aus der Verpackung und legen Sie das Gerät auf eine ebene Arbeitsfläche mit der Bildschirmseite nach unten, die auf ein sauberes und weiches Tuch gelegt werden muss (Decke usw.). • Die Ablagefläche muss größer als das TV-Gerät sein. • Halten das Gerät nicht an der Bildschirmplatte. • Achten Sie darauf, dass TV-Gerät weder zu zerbrechen noch zu zerkratzen. Montage des Ständers 1.
Funktionen Umweltinformationen Bei der Entwicklung dieses Fernsehgeräts wurde auf eine umweltfreundliche Funktionsweise Wert gelegt. Um den Energieverbrauch zu senken, gehen Sie wie folgt vor: Wenn Sie die Energiespar-Option auf Minimum, Medium, Maximum oder Auto einstellen, wird das TV-Gerät seinen Energieverbrauch unverzüglich entsprechend anpassen.
all seiner Klarheit, Farbe und dem Detail. HDR / HLG-Inhalte werden über native und marktfähige Anwendungen, HDMI-, USB-Eingänge und über DVB-S-Übertragungen unterstützt. Nehmen Sie für die HDMI-Eingabequelle die Einstellung Verbessert in den Quellenoptionen im Menü Einstellungen>System vor, um HDR/HLG-Inhalt anzuzeigen, wenn der HDR/ HLG-Inhalt durch einen HDMI-Eingang empfangen wird. Das Quellgerät muss zudem in diesem Fall mindestens mit HDMI 2.0a kompatibel sein.
Steuerung über die Fernbedienung 2. TV Drücken Sie die Home-Taste auf der Fernbedienung, um den Hauptmenübildschirm aufzurufen. Verwenden Sie die Navigationstasten und die OK-Taste zum Navigieren und Einstellen. Drücken Sie die Return/ Back-Taste bzw. die Home-Taste, um einen MenüBildschirm zu verlassen. 2.1. Guide Eingangsauswahl Mit dieser Option können Sie auf das Menü Kanäle zugreifen. Weitere Informationen finden Sie im Abschnitt Verwenden der Kanalliste.
Markt hinzufügen oder bestehende löschen. Weitere Informationen finden Sie im Abschnitt Apps. 5. Quellen Sie können Ihre Eingabequellenreferenzen mithilfe der Optionen dieses Menüs verwalten. Um die aktuelle Quelle zu ändern, markieren Sie eine der Optionen und drücken Sie OK. 5.1. Quelleinstellungen Bearbeiten Sie die Namen, aktivieren oder deaktivieren Sie ausgewählte Quellenoptionen. Für HDMIQuellen sind die Optionen Regulär, Verbessert und Deaktiviert verfügbar.
Lizenzinformationen Entsorgung von Altgeräten und Batterien Die Begriffe HDMI und HDMI High-Definition Multimedia Interface sowie das HDMI- Logo sind Marken oder eingetragene Marken von HDMI Licensing Administrator, Inc. in den Vereinigten Staaten und anderen Ländern. Hergestellt unter der Lizenz der Dolby Laboratories. Dolby, Dolby Audio und das Doppel-D-Symbol sind Warenzeichen der Dolby Laboratories. "YouTube und das YouTube-Logo sind Marken von Google Inc.
Konformitätserklärung (DoC) Hiermit erklärt Panasonic Marketing Europe GmbH, dass dieses TV-Gerät die grundlegenden Anforderungen und anderen relevanten Vorschriften der Richtlinie 2014/53/EU einhält. Wenn Sie eine Kopie der originalen Konformitätserklärung zu diesem TV-Gerät wünschen, gehen Sie bitte auf die folgende Website: http://www.ptc.panasonic.eu/doc Bevollmächtigter Vertreter: Panasonic Testing Centre Panasonic Marketing Europe GmbH Winsbergring 15, 22525 Hamburg, Germany Website: http://www.
Technische Daten TV-Übertragung PAL BG/I/DK SECAM BG/DK Empfangskanäle VHF (BAND I/III) - UHF (BAND U) - HYPERBAND Digitaler Empfang Vollständig integriertes digitales terrestrisches Kabel-Satelliten-TV-Gerät (DVB-T-C-S) (DVB-T2, DVB-S2 konform) Anzahl der voreingestellten Kanäle 11 000 Kanalanzeige Bildschirmanzeige RF-Antenneneingang 75 Ohm (nicht geregelt) Betriebsspannung 220-240V AC, 50Hz. Audio A2 Stereo+Nicam Stereo Kopfhörer 3.5 mm mini Stereo-Klinke Audio-Ausgangsleistung (WRMS.
Spezifikationen des drahtloses LAN-Transmitters (WLAN) Frequenzbereiche Max. Ausgangsleistung 2400–2483,5 MHz (CH1-CH13) < 100 mW 5150–5250 MHz (CH36–CH48) < 200 mW 5250–5350 MHz (CH52–CH64) < 200 mW 5470–5725 MHz (CH100–CH140) < 200 mW Länderbeschränkungen Dieses Gerät ist für Nutzung im Haushalt bzw. Büro in allen EU-Ländern (und weiteren Ländern, sofern diese die entsprechende EU-Richtlinie anwenden) ohne etwaige Einschränkungen mit Ausnahme der unten aufgelisteten gedacht.
Fernbedienung 1 G 6 Info: Zeigt Informationen über auf dem Bildschirm gezeigte Inhalte, zeigt versteckte Informationen (reveal- im TXT-Modus) 3. Guide: Zeigt den Elektronischer Programmführer 4. Home: Zeigt das TV-Menü 5. 22 Navigationstasten: Hilft beim Navigieren durch Menüs, Inhalt usw. und zeigt die Unterseiten im TXT-Modus an, wenn sie nach rechts oder links gedrückt werden 6. 21 OK: Bestätigt Benutzerauswahl, hält die Seite (im TXT-Modus), zeigt das Menü Kanäle an (DTVModus) 7.
Anschlüsse Stecker Typ Kabel Gerät VGAAnschluss (Rückseite) AUDIOEINGANG PC/YPbPr AudioAnschluss (unten) YPbPr/PC Audio-Kabel HDMIAnschluss (Seite und Rückseite) SPDIF RÜCKLAUF AV SPDIF -Anschluss (optischer Ausgang) (Rückseite) Back AV (Audio/ Video)Anschluss (Rückseite) KOPFHÖRER KopfhörerAnschluss (Seite) YPBPR YPbPr-Video -Anschluss (Rückseite) Audio-/Video-Kabel PC-YPbPr-Verbindungskabel Siehe die Abbildung auf der linken Seite.
Ein-/Ausschalten Um das TV-Gerät einzuschalten Verbinden Sie das Netzkabel mit einer Stromquelle wie z.B. einer Wandsteckdose (220-240V Wechselstrom, " am 50 Hz). Schalten Sie den Hauptschalter " TV - Position "|" ein. Das Fernsehgerät schaltet in den Standby-Modus und die Standby-LED leuchtet auf. Hinweis: Das Fernsehgerät schaltet in den Standby-Modus und die Standby-LED leuchtet auf.
terrestrischen Sendern, sobald die Ersteinstellungen vorgenommen worden sind. sobald die Ersteinstellungen vorgenommen worden sind. Digitalkabel: Wenn die Suchoption Kabel eingestellt wurde, sucht das TV-Gerät nach digitalen Kabelsendern, sobald die Ersteinstellungen vorgenommen worden sind. Bevor Sie mit der Suche beginnen, wird eine Meldung angezeigt, in der Sie gefragt werden, ob Sie eine Kabelnetzwerksuche durchführen möchten.
Medienbrowser CEC Sie können Musik- und Filmdateien wiedergeben und Fotodateien anzeigen, die auf einem USBSpeichergerät gespeichert sind, indem Sie sie an Ihr Fernsehgerät anschließen. Schließen Sie ein USBSpeichergerät an einen der USB-Eingänge an der Seite des Fernsehers an. Nachdem Sie ein USB-Speichergerät an Ihr Fernsehgerät angeschlossen haben, wird das Medienbrowser-Menü auf dem Bildschirm angezeigt.
Inhalt des Einstellungsmenüs Bilder Menü Inhalt Sie können den Bildmodus ändern um es nach Ihren Wünschen oder Anforderungen anzupassen. Der Bildmodus kann auf eine dieser Optionen eingestellt werden: Kino , Spielen (optional), Sport , Dynamisch und Natürlich . Modus Kontrast Verändert auf dem Bildschirm die Werte für Dunkel und Hell. Helligkeit Stellt die Helligkeit des Bildschirms ein. Schärfe Stellt die Schärfe der am Bildschirm dargestellten Objekte ein.
Inhalt des Tonmenüs Lautstärke Stellt die Lautstärke ein. Equalizer Wählt den Equalizer-Modus. Die Einstellungen können nur im Benutzer-Modus vorgenommen werden. Balance Stellt ein, ob der Ton entweder aus dem linken oder rechten Lautsprecher kommt. Kopfhörer Stellt die Lautstärke für den Kopfhörer ein. Bevor Sie den Kopfhörer benutzen, vergewissern Sie sich bitte, ob die Kopfhörerlautstärke auf ein niedriges Niveau gesetzt ist, um Gehörschäden zu vermeiden.
Netzwerkmenü Inhalt Netzwerktyp Deaktivieren Sie die Netzwerkverbindung oder ändern Sie den Verbindungstyp. Scannen Sie drahtlose Netzwerke Starten Sie eine Suche nach drahtlosen Netzwerken. Diese Option ist verfügbar, wenn der Netzwerktyp als Drahtloses Gerät eingestellt ist. Drücken Sie WPS auf Ihrem WLAN-Router Wenn Ihr Modem / Router-Gerät über WPS verfügt, können Sie mit dieser Option eine direkte Verbindung zu ihm herstellen. Markieren Sie diese Option und drücken Sie OK.
System Menü Inhalt Bedingter Zugriff Hier nehmen Sie Einstellungen für die Module des bedingten Zugriffs, sofern vorhanden, vor. Sprache Abhängig von der Fernsehanstalt und dem Land können Sie hier verschiedene Sprachen einstellen. Datenschutzeinstellungen (*) Verwalten Sie Ihre Datenschutzeinstellungen der Apps für Smart TV. Drücken Sie OK, um das Menü aufzurufen und die Einstellungen gemäß Ihren Wünschen vorzunehmen.
Untertitel-Modus Diese Option wird verwendet, um den auf dem Bildschirm angezeigten UntertitelModus (DVB-Untertitel / Teletext-Untertitel) auszuwählen, wenn beide verfügbar sind. Als Standard ist die Option DVB-Untertitel eingestellt. Diese Funktion ist nur verfügbar, wenn als Länderoption Norwegen festgelegt wurde. Auto TV-Aus Einstellung der gewünschten Zeit, wann das Gerät automatisch auf Standby geht, wenn es nicht bedient wird.
Menüsperre: Diese Einstellung aktiviert bzw. deaktiviert den Zugang zu allen Menüs bzw. Allgemeine Bedienung Verwendung der Programmliste Das Gerät sortiert alle gespeicherten Fernsehsender in eine Senderliste. Sie können diese Senderliste bearbeiten, Favoriten festlegen oder aktive Sender festlegen, die aufgelistet werden sollen, indem Sie die Optionen im Menü Kanäle verwenden. Drücken Sie die OK-Taste, um die Kanalliste zu öffnen.
Zeitleiste In dieser Layout-Option werden alle Ereignisse der aufgelisteten Kanäle nach Timeline angezeigt. Mit den Navigationstasten können Sie durch die Liste der Ereignisse blättern. Markieren Sie ein Ereignis und drücken Sie OK, um das Ereignisoptionsmenü anzuzeigen. Drücken Sie die Zurück/Zurückkehren-Taste, um die verfügbaren Optionen zu verwenden. Markieren Sie die Registerkarte Filter und drücken Sie OK, um die Filteroptionen zu sehen.
Hinweis: Ziehen Sie nicht den Netzstecker, solange während des Neustarts die LED blinkt. Wenn das Gerät nach der Aktualisierung nicht einschaltet, stecken Sie es aus und stecken es nach zwei Minuten wieder ein. Alle Updates werden automatisch gesteuert. Wenn eine manuelle Suche ausgeführt wird und keine Software gefunden wird, ist dies die aktuelle Version. Typische Anzeigemodi für den PC-Eingang In der folgenden Tabelle werden einige der üblichen Video Display-Modi dargestellt.
AV- und HDMI-Signalkompatibilität Quelle Unterstützte Signale PAL. O RÜCKLAUF SECAM AV
Beim USB Modus unterstützte Dateiformate Videodateiformate Video-Codec Auflösung Bitrate Behälter MPEG Programmstream (.DAT, .VOB, .MPG, .MPEG), MPEG Transportstream (.ts, .trp, .tp), MP4 (.mp4, .mov), 3GPP (.3gpp, .3gp), AVI (.avi), MKV (.mkv), ASF (.asf) MPEG1/2
Audio-Codec Sample-Rate Bitrate Behälter AAC, HEAAC 8KHz ~ 48KHz WMA 8KHz ~ 48KHz 128bps ~ 320Kbps WMA 10 Pro M0 WMA 10 Pro M1 48KHz 48KHz < 192 kbps < 384 kbps WMA 10 Pro M2 96KHz < 768 kbps G711 A/mu-law 8KHz 64Kbps ~ 128Kbps WAV (.wav), AVI (.avi), Matroska (.mkv, .mka), 3GPP (.3gpp, .3gp), MP4 (.mp4, .mov, m4a) LBR (cook) 8KHz, 11,025KHz, 22,05KHz, 44,1KHz 6Kbps ~ 128Kbps RM (.ra) FLAC 8KHz~96KHz < 1,6Mbps Matroska (.mkv, .mka) AAC (.aac), AVI (.avi), Matroska (.mkv, .
Unterstützte DVI-Auflösungen Wenn Sie Zusatzgeräte über das DVI-Adapterkabel (DVI zu HDMI, nicht im Lieferumfang enthalten) an die Anschlüsse Ihres TV-Gerätes anschließen, können Sie die folgenden Auflösungsrichtwerte verwenden.
TV-Gerät. Wählen Sie die Option Drahtgebundenes Gerät, wenn Sie die Einstellung über ein Ethernet herstellen. Konnektivität Drahtgebundene Konnektivität Verbindung mit einem drahtgebundenen Netzwerk herstellen Internetgeschwindigkeitstest • Sie müssen über ein Modem bzw. einen Router mit einem aktiven Breitbandanschluss verfügen. • Verbinden Sie Ihren Fernseher mit Ihrem Modem / Router über ein Ethernet-Kabel. An der Rückseite Ihres TV-Geräts befindet sich ein LAN-Eingang.
der übertragenen Produkte, die Konguration dieser Produkte, die Funkwellen, der Linienverkehr und die Produkte, die Sie verwenden. Abhängig von den Funkwellen der DECT-Telefone oder anderen WLAN 11b-Geräten, kann die Übertragung auch abgebrochen oder unterbrochen werden. Die Richtwerte der Übertragungsgeschwindigkeit sind die theoretischen Maximalwerte für die Wireless-Standards. Sie sind nicht die tatsächlichen Geschwindigkeiten der Datenübertragung.
Einzelheiten zu den Nutzungsbedingungen / Datenschutzbestimmungen finden Sie unter [HOME] Einstellungen> Datenschutzeinstellungen Die persönlichen Daten des Kunden können auf diesem Fernsehgerät von der Sendeorganisation oder dem Anwendungsanbieter aufgezeichnet werden. Bevor Sie das Fernsehgerät reparieren, weitergeben oder verwerfen, löschen Sie alle auf diesem Fernsehgerät gespeicherten Informationen gemäß dem folgenden Verfahren.
Es ist auch möglich, dass die Verbindung nicht zugänglich ist, wegen eines Firewall Problems. Wenn Sie denken, dass dies zu Ihrem Problem führt, kontaktieren Sie Ihren Internetdienstanbieter. Eine Firewall könnte z.B. Konnektivitätsprobleme verursachen oder WLAN-Netzwerke verbergen, wenn Sie das TV-Gerät im Audio-Video-Sharing-Modus verwenden oder über die Audio-Video-SharingFunktion surfen möchten.
Um den Webbrowser zu navigieren, verwenden Sie die Richtungstasten auf der Fernbedienung oder einer angeschlossenen Maus. Um die Browseroptionsleiste anzuzeigen, bewegen Sie den Cursor hin an das obere Seitenende und drücken Sie die Back/ReturnTaste. Verlaufs-, Registerkarten- und LesezeichenOptionen sowie die Browserleiste, auf der sich die Vor- und Zurückschaltfläche, die Schaltfläche „Neuladen“, die URL/Suchleiste, der Schnellzugriff und die Opera- Schaltfläche befinden, sind verfügbar.
Die roten Autostart-Punkt-Anwendungen liefern im Allgemeinen Links zu anderen Anwendungen. Ein Beispiel hierfür ist unten dargestellt. Der Benutzer kann dann zu anderen Anwendungen schalten, indem er die zur Verfügung stehenden Links verwendet. Die Anwendungen verfügen in der Regel über eine Option zum Beenden, normalerweise müsste das über die Schaltfläche Beenden gehen. Informationen zur DVB -Funktionalität Dieser DVB-Empfänger kann nur in den Ländern verwendet werden, für die er vorgesehen ist.
Desteklenen Altyazı Dosyası Türleri..................... 130 İçindekiler Güvenlik Bilgileri................................................... 105 Ürün üzerindeki İşaretler...................................... 105 Bakım................................................................... 107 Gösterge paneli, Kabin, Sehpa............................ 107 Elektrik fişi............................................................ 107 Sehpanın Takılması / Sökülmesi..........................
Güvenlik Bilgileri DİKKA ELEKTRİK ÇARPMASI RİSKİ AÇMAYINIZ DİKKAT: ELEKTRİK ÇARPMASI RİSKİNİ AZALTMAK İÇİN KAPAĞI (VEYA ARKA KISMI) ÇIKARMAYINIZ. İÇİNDE KULLANICI TARAFINDAN BAKIM YAPILABİLECEK HERHANGİ BİR PARÇA BULUNMAMAKTADIR. SERVİS İŞLEMLERİNİ UZMAN SERVİS PERSONELİNE YAPTIRINIZ Aşırı hava koşullarında (fırtınalar, yıldırımlar) ve uzun süre kullanılmama durumunda (tatil), TV'nin fişini çekiniz.
Dikkat, Bakınız Kullanım Açıklamaları: İşaretli alan(lar) kullanıcı tarafından değiştirilebilecek pul veya düğme tipi pilleri içermektedir. Sınıf 1 Lazer Ürün: Bu ürün, öngörülen çalışma CLASS 1 koşullarında makul ölçüde LASER PRODUCT güvenli olan Sınıf 1 lazer kaynağı içermektedir. i aygıt yoluyla bir televizyon dağıtım sistemine bağlantı sağlanmalıdır (galvanik izolatör). DUVARA MONTAJ UYARILARI • TV'nizi duvara monte etmeden önce, bu açıklamaları okuyunuz. • Duvara montaj seti opsiyoneldir.
Bakım Sehpanın Takılması / Sökülmesi Önce, elektrik fişini prizden çekin. Hazırlıklar Gösterge paneli, Kabin, Sehpa Düzenli bakım: Kirleri ve parmak izlerini temizlemek için gösterge panelinin, kabinin ve sehpanın yüzeylerini yumuşak bir bez kullanarak nazikçe siliniz. İnatçı kirler için: 1. Önce yüzeydeki tozları temizleyiniz. 2. Yumuşak bir bezi temiz su veya seyreltilmiş nötr deterjan ile ıslatınız (1 ölçek deterjana 100 ölçek su). 3. Bezi iyice sıkınız.
Sehpanın TV'den sökülmesi Duvara askı aparatı kullanılması veya TV'nin yeniden ambalajına konulması durumunda sehpanın sökülmesi gereklidir. • Ekran paneli aşağı bakacak şekilde TV'yi temiz ve yumuşak bir bez üzerine koyunuz. Sehpa(lar)ı yüzeyin kenarından çıkacak şekilde bırakınız. • Sehpa(lar)ı sabitleyen vidaları sökünüz. • Sehpa(lar)ı çıkarınız. Duvara askı aparatı kullanıldığı zaman Tavsiye edilen bir duvara askı aparatı satın almak için, lütfen bölgenizdeki Panasonic bayisine başvurunuz.
• 802.11 a/b/g/n tümleşik WLAN Desteği • Ses ve Görüntü Paylaşımı • HbbTV Ultra HD (UHD) TV, 3840 x 2160 (4K:2K) çözünürlük sağlayan Ultra HD (Ultra Yüksek Çözünürlük - aynı zamanda 4K olarak bilinir) içerikleri desteklemektedir. Full HD TV piksel sayısını hem yatay, hem de dikey olarak iki katına çıkararak Full HD TV'nin 4 katı çözünürlüğe eşittir. HDMI, USB girişler ve DVB-T2 ile DVB-S2 yayınlar üzerinden Ultra HD içerikler desteklenir.
TV'yi kapatmak için: Kontrol çubuğunun ortasına basınız ve birkaç saniye basılı tutunuz, TV bekleme moduna geçecektir. TV'yi açmak için: Kontrol çubuğunun ortasına basınız, TV açılacaktır. Not: Ana menü OSD kontrol çubuğu aracılığıyla görüntülenemez. Uzaktan Kumandayla Çalıştırma Ana menü ekranını görmek için, uzaktan kumandada bulunan Home tuşuna basınız. Gezinmek ve ayar yapmak için yön tuşlarını OK tuşunu kullanınız. Bir menü ekranından çıkmak için Return/Back veya Home tuşlarını kullanınız.
veya mevcut olanları silebilirsiniz. Daha fazla bilgi için Uygulamalar bölümüne bakınız. 5. Kaynaklar Bu menünün seçenekleri kullanılarak giriş kaynağı tercihlerinizi yönetebilirsiniz. Mevcut kaynağı değiştirmek için seçeneklerden birini vurgulayınız ve OK tuşuna basınız. Anten Bağlantısı “Anten” veya “kablolu TV” ucunu TV’nin arkasındaki ANTEN GİRİŞİ (ANT-TV) soketine ya da uydu girişini TV'nin arka tarafında bulunan UYDU GİRİŞİNE (ANT SAT) bağlayınız. TV’nin ARKASI 5.1.
korumalı içerikleri oynatma yeteneğini geri almasını talep etmeleri gerekebilir. Bu geri alma korunmayan içerikler veya başka içerik erişimi teknolojileri ile korunan içerikleri etkilemeyecektir. İçerik sahipleri, içeriğe erişim sağlamanız için PlayReady yükseltmesi yapmanızı gerekli kılabilir. Eğer bir yükseltmeyi kabul etmezseniz, yükseltmeyi gerektiren içeriklere erişim sağlayamazsınız. “CI Plus” Logosu, CI Plus LLP ticari markasıdır.
Özellikler TV Yayını PAL BG/I/DK SECAM BG/DK Alınan Kanallar VHF (BAND I/III) - UHF (BAND U) - HYPERBAND Dijital Alış Tamamen tümleşik dijital karasal-kablo-uydu yayınlarını alan TV (DVB-T-C-S) (DVB-T2, DVB-S2 uyumlu) Kayıtlı Kanalların Sayısı 11 000 Kanal Göstergesi Ekran Görüntüsü RF Anten Girişi 75 Ohm (dengesiz) Çalışma voltajı 220-240V AC, 50Hz. Ses A2 Stereo+Nicam Stereo Kulaklık 3.5 mm mini stereo jak Ses Çıkış Gücü (WRMS.
Kablosuz LAN İletici Özellikleri Uyarı Frekans Aralıkları Maksimum Çıkış Gücü 2400 - 2483,5 MHz (Kanal 1-Kanal 13) < 100 mW 5150 - 5250 MHz (Kanal 36-Kanal 48) < 200 mW 5250 - 5350 MHz (Kanal 52-Kanal 64) < 200 mW 5470 - 5725 MHz (Kanal 100-Kanal CH140) < 200 mW DVB / Veri yayını/ IPTV fonksiyonları • Bu TV (Ağustos 2017 itibariyle) DVB-T / T2 (MPEG2, MPEG4-AVC(H.264) ve HEVC(H.265)) dijital karasal hizmetler, DVB-C (MPEG2, MPEG4-AVC(H.264) ve HEVC(H.
Uzaktan Kumanda 1 G 1 6 Bilgiler: Ekran üzerindeki içerik hakkında bilgiler görüntüler, gizli bilgileri gösterir (göster - TXT modunda) 24 3. Rehber: Elektronik program rehberini görüntüler 4. Home (Açılış Ekranı): TV menüsünü görüntüler 23 5. 22 Yön tuşları: Menülerde, içeriklerde vb. gezinmeye yarımcı olur ve Sağa veya Sola basıldığında TXT modunda alt sayfaları görüntüler 6. 21 OK : Kullanıcı seçimlerini onaylar, sayfayı tutar (TXT modunda), Kanallar menüsünü gösterir (DTV modu) 7.
Bağlantılar Konektör Tip Kablolar Cihaz VGA Bağlantısı (arka) AUDIO IN PC/YPbPr Ses Bağlantısı (arka) YPbPr/PC Ses Kablosu HDMI Bağlantısı (yan&arka) SPDIF ARKA AV SPDIF (Optik Çıkış) Bağlantısı (arka) Arka AV (Ses/Video) Bağlantısı (arka) KULAKLIK Kulaklık Bağlantısı (yan) YPBPR YPbPr Video Bağlantısı (arka) Ses Video Kablosu Sol taraftaki resimlere bakınız. VGA girişi aracılığıyla YPbPr sinyalini etkinleştirmek için YPbPr – VGA kablosunu kullanabilirsiniz.
Açma/Kapatma TV’yi Açmak için Elektrik kablosunu, elektrik prizi gibi bir güç kaynağına bağlayınız (220-240V AC, 50 Hz). TV üzerinde bulunan ”anahtarını “|” konumuna alınız. TV bekleme “ moduna geçecek ve bekleme LED’i yanacaktır. Not: Menü anahtarının konumu modele bağlı olarak farklılık gösterebilir. Bekleme konumundan çıkıp TV’yi açabilmek için aşağıdakilerden birini yapınız: • Uzaktan kumandanın Bekleme tuşuna, Program +/- tuşuna veya kumanda üzerindeki bir sayı tuşuna basınız.
devam etmek için İleri seçeneğini vurgulayınız ve OK tuşuna basınız. Not: Arama süresi, seçilen Arama Adımına bağlı olarak değişiklik gösterecektir. Uydu: Eğer Uydu yayını arama seçeneği açılırsa, ilk ayarlar tamamlandıktan sonra TV dijital uydu yayınları arayacaktır. Uydu araması yapılmadan önce bazı ayarların yapılması gerekir. Önce Anten Tipi menüsü görüntülenir. Anten Tipi seçimini Direkt, Tekli Uydu Kablosu veya DiSEqC anahtarı arasından seçmek için Sol veya Sağ yön tuşlarını kullanabilirsiniz.
gereklidir. Bu durumda, ses kontrol tuşları bağlanmış olan ses cihazına yönlendirilir.
Ayarlar Menüsü İçeriği Resim Menüsü İçeriği Tercihlerinize ya da gerekliliklere uyması için resim modunu değiştirebilirsiniz. Resim modu aşağıdaki seçeneklerden herhangi birisine ayarlanabilir: Sinema, Oyun(opsiyonel) , Spor, Dinamik ve Doğal. Mod Kontrast Ekranın aydınlık ve karanlık değerlerini ayarlar. Parlaklık Ekranın parlaklık değerlerini ayarlar. Keskinlik Ekranda görüntülenen cisimlerin keskinlik değerini ayarlar. Renk Renk değerini girer, renkleri ayarlar.
Ses Menüsü İçeriği Ses Düzeyi Sesi seviyesini ayarlar. Ekolayzır Ekolayzır modunu seçer. Özel ayarlar sadece Kullanıcı modunda yapılabilir. Balans Sesin sol veya sağ hoparlörden gelmesini ayarlar. Kulaklık Kulaklık sesini ayarlar. İşitme hasarı yaşamamak için, kulaklığı kullanmadan önce, kulaklığın ses seviyesinin düşük bir ayara ayarlandığından emin olunuz. Ses Modu Bir ses modu seçebilirsiniz (eğer izlenen kanal destekliyorsa).
Ağ Menüsü İçeriği Ağ Tipi Ağ bağlantısını devre dışı bırakır veya bağlantı tipini değiştirir. Kablosuz Ağları Ara Kablosuz ağları arar. Bu seçenek, Ağ Tipi ayarı Kablosuz Cihaz olarak yapıldığı zaman kullanılabilir. Wifi yönlendiricide WPS üzerine basınız Modem/yönlendirici WPS özelliğine sahipse, bu seçeneği kullanarak doğrudan bağlantı kurabilirsiniz. Bu seçeneği işaretleyiniz ve OK tuşuna basınız. Bağlantıyı sağlamak için modem/yönlendirici cihazda WPS tuşuna basınız.
Sistem Menüsü İçeriği Koşullu Erişim Mevcut olması halinde koşullu erişim modüllerini kontrol eder. Dil Yayıncıya ya da ülkeye bağlı olarak farklı bir dil ayarlayabilirsiniz. Gizlilik Ayarları (*) Akıllı TV ile ilgili uygulamalar için gizlilik ayarlarınızı yönetiniz. Menüye girmek ve tercihlerinize göre ayarlamak için OK düğmesine basınız. Yetişkin Yetişkin ayarlarını değiştirmek için doğru parolayı giriniz.
Biss Şifresi Biss, bazı yayınlarda kullanılan bir uydu sinyali şifreleme sistemidir. Eğer bir yayın için Biss şifresi girmeniz gerekirse, bu ayarı kullanabilirsiniz. Anahtarı girmek için istediğiniz yayın üzerindeyken Biss Şifresi seçiniz ve OK tuşuna basınız. Mağaza Modu Bu modu mağazada teşhir amacıyla seçiniz. Mağaza Modu etkin olduğunda, TV menüsünde bulunan bazı ögeler kullanılamayabilir.
Not: Eğer İlk Kurulum sırasında ülke seçimi Fransa, İtalya veya Avusturya olarak yapılmışsa,Yetişkin Kilidi değeri otomatik olarak 18 yaşa ayarlanacaktır. TV'nin Genel Kullanımı Kanal Listesinin Kullanılması TV, kanal listesinde yer alan tüm kaydedilmiş istasyonları sıralar. Kanallar menü seçeneklerini kullanarak bu kanal listesini düzenleyebilirsiniz, favorileri ayarlayabilirsiniz veya listelenecek etkin istasyonlar ayarlayabilirsiniz. Kanal listesini açmak için OK tuşuna basınız.
Program Türü Vurgulama: Program Türü Vurgulama menüsünü görüntüler. Bir program türü seçiniz ve OK tuşuna basınız. Program kılavuzunda seçilen program türünde olan programlar vurgulanacaktır. Kılavuz Arama: Arama seçeneklerini görüntüler. Bu seçenekleri kullanarak, program kılavuzu veritabanında seçilen kriterlere uygun arama yapabilirsiniz. Eşleşen sonuçlar liste halinde verlecektir. Şimdi: Vurgulanan kanaldaki geçerli etkinliği görüntüler.
Sorun Giderme ve İpuçları PC Girişi Tipik Ekran Modları TV açılmıyor Elektrik kablosunun duvar prizine takılı olduğundan emin olunuz. TV’deki Açma/kapama tuşuna basınız. Kötü görüntü • TV ayarlarının doğru olduğunu kontrol ediniz. Aşağıdaki tablo bazı tipik video ekran konumlarının bir örneğidir. TV’niz tüm çözünürlükleri desteklemiyor olabilir. Dizin Çözünürlük Frekans 1 640x350 85Hz 2 640x480 60Hz • Düşük sinyal seviyesi görüntünün bozulmasına neden olabilir.
AV ve HDMI sinyal uyumu Kaynak Arka AV Desteklenen Sinyaller O SECAM O NTSC4.43 O NTSC3.
USB Modunda Desteklenen Dosya Formatları Desteklenen Video Dosyası Türleri Video Şifrelemesi Çözünürlük Bit değeri Taşıyıcı MPEG program akışı (.DAT, .VOB, .MPG, .MPEG), MPEG taşıma akışı (.ts, .trp, .tp), MP4 (.mp4, .mov), 3GPP (.3gpp, .3gp), AVI (.avi), MKV (.mkv), ASF (.asf) MPEG1/2 MPEG4 Sorenson H.263 1080Px2@30fps, 1080P@60fps MPEG program akışı (.MPG, .MPEG), MP4 (.mp4, .mov), 3GPP (.3gpp, .3gp), AVI (.avi), MKV (.mkv), ASF (.asf) 40Mbps FLV (.flv), AVI (.avi), SWF(.swf) MP4 (.mp4, .
Ses Şifrelemesi Örnek oranı Bit değeri Taşıyıcı EAC3 32KHz, 44,1KHz, 48KHz EAC3 (.ec3), 3GPP (.3gpp, .3gp), MP4 (.mp4, .mov, m4a), 32Kbps ~ 6 MPEG taşıma akışı (.ts, .trp, .tp), MPEG program akışı (.DAT, Mbps .VOB, .MPG, .MPEG) AAC, HEAAC 8KHz ~ 48KHz WMA 8KHz ~ 48KHz 128bps ~ 320Kbps WMA 10 Pro M0 WMA 10 Pro M1 48KHz 48KHz < 192kbps < 384kbps WMA 10 Pro M2 96KHz < 768kbps G711 A/mu-law 8KHz 64Kbps ~ 128Kbps WAV (.wav), AVI (.avi), Matroska (.mkv, .mka), 3GPP (.3gpp, .3gp), MP4 (.mp4, .
Desteklenen DVI Çözünürlükleri Cihazı DVI dönüştürme kablosu (DVI - HDMI kablosu - tedarik edilmemiştir) ile TV’nizin konektörüne bağladığınızda, aşağıdaki çözülüm bilgilerine başvurabilirsiniz.
İnternet Hız Testi Bağlanabilirlik Kablolu Bağlantı Bir Kablolu Ağa Bağlanmak • Aktif geniş bant bağlantısına sahip bir modem/ yönlendirici bulunması gereklidir. • Bir ethernet kablosu aracılığıyla TV'nizi modeminize/ yönlendiricinize bağlayınız. TV'nizin arka tarafında bir LAN bağlantı ucu bulunmaktadır. 1 İnternet Hız Testi seçimini yapınız ve OK tuşun basınız. TV internet bağlantısının bant genişliğini kontrol edecek ve işlem tamamlandığı zaman sonuçları görüntüleyecektir.
• Aktarımın en etkili olduğu konum, kullanım ortamına göre değişir. • TV'nin Kablosuz özelliği 802.11 a,b,g & n tipi modemleri destekler. Video izlerken sorun yaşamamak için IEEE 802.11n iletişim protokolünü kullanmanız önerilir. • Etrafta SSID’si aynı olan başka modemler varsa modeminizin SSID’sini değiştirmelisiniz. Aksi durumda bağlantı sorunlarıyla karşılaşabilirsiniz. Eğer kablosuz bağlantıda sorunlar yaşarsanız bunun yerine kablolu bağlantıyı kullanınız.
Uyandırma Ağ ile Uyandırma (WoL) ve Kablosuz Ağ ile Uyandırma (WoWLAN) bir ağ mesajı ile cihazın açılmasını veya uyandırılmasını sağlayan standartlardır. Bu mesaj, bir akıllı telefon gibi, aynı yerel alan ağına bağlanmış uzak bir cihazda çalıştırılan bir program tarafından cihaza gönderilir. TV'niz WoL ve WoWLAN uyumludur. Bu özellik, İlk Kurulum işlemi sırasında devre dışı bırakılmış olabilir. Bu özelliği etkinleştirmek için, Ağ menüsü altında Uyandırma seçeneğini Açık olarak ayarlayınız.
Eğer bir sorun olursa, lütfen televizyonunuzu kapatınız ve fişini prizden çıkarınız ve sonra yeniden takınız. Ses ve Görüntü Paylaşımı özelliği ile hızlı mod ve atlama desteklenmez. PC/HDD/Medya Oynatıcısı ya da uyumlu diğer cihazlar, daha yüksek oynatım kalitesi için kablolu bağlantı ile kullanılmalıdır. Bilgisayar gibi diğer cihazlar arasında daha hızlı dosya paylaşımı için LAN bağlantısını kullanınız.
HBBTV Sistemi HbbTV (Hibrit Yayın Geniş Bant TV) yayınlarla sağlanan TV servislerini geniş bantla sağlanan servislerle kusursuz bir şekilde birleştiren ve aynı zamanda TV ve set üstü kutu kullanan tüketiciler için sadece internet servislerine erişim sağlayan yeni bir endüstri standardıdır.