OPERATING INSTRUCTIONS TX-43HX700B / TX-43HX700BZ / TX-43HX710B TX-50HX700B / TX-50HX700BZ / TX-50HX710B TX-55HX700B / TX-55HX700BZ / TX-55HX710B TX-65HX700B / TX-65HX700BZ / TX-65HX710B LED TV e-MANUAL You can find instructions for your TV’s features in the E-Manual. To access the E-Manual, enter Settings menu, select Manuals and press OK. For quick access press Home/Menu button and then Info button.
Remote & Accessories......................................... 20 Table of Contents Safety Information.................................................. 2 IMPORTANT - Please read these instructions fully before installing or operating.......................2 Markings on the Product........................................ 2 Maintenance.......................................................... 4 Display panel, Cabinet, Pedestal........................... 4 Mains plug...........................................
• Do not expose the TV to direct sunlight or do not place open flames such as lit candles on the top of or near the TV. • Do not place any heat sources such as electric heaters, radiators, etc. near the TV set. Safety Information CAUTION RISK OF ELECTRIC SHOCK DO NOT OPEN • Do not place the TV on the floor and inclined surfaces. CAUTION: TO REDUCE THE RISK OF ELECTRIC SHOCK DO NOT REMOVE COVER (OR BACK). NO USER-SERVICEABLE PARTS INSIDE. REFER SERVICING TO QUALIFIED SERVICE PERSONNEL.
WARNING Do not ingest the battery, Chemical Burn Hazard This product or the accessories supplied with the product may contain a coin/button cell battery. If the coin/ button cell battery is swallowed, it can cause severe internal burns in just 2 hours and can lead to death. Keep new and used batteries away from children. If the battery compartment does not close securely, stop using the product and keep it away from children.
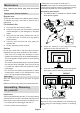
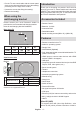
• Make sure not to scratch or break the TV. Maintenance First, remove the mains plug from the mains socket. Display panel, Cabinet, Pedestal CAUTION: Please refrain from inserting pictured screws to the TV body when not using the TV stand e.g. wall hanging. Inserting screws without pedestal may cause a damage of the TV. Assembling the pedestal 1. Regular care: The stand of the TV consists of 4 pieces. Install these pieces together.
• Put the TV onto a work table with the screen panel down on the clean and soft cloth. Leave the stand(s) protruding over the edge of the surface. • Unsrew the screws that fixing the stand(s). • Remove the stand(s). When using the wall-hanging bracket Introduction Thank you for choosing our product. You’ll soon be enjoying your new TV. Please read these instructions carefully.
2160 (4K:2K). It equals 4 times the resolution of Full HD TV by doubling the pixel count of the Full HD TV both horizontally and vertically. Ultra HD contents are supported from HDMI, some of the Over-the-Top (OTT) services, USB inputs and over DVB-T2 and DVB-S2 broadcasts. High Dynamic Range (HDR) / Hybrid LogGamma (HLG) Using this feature the TV can reproduce greater dynamic range of luminosity by capturing and then combining several different exposures.
Other Connections If you want to connect a device to the TV, make sure that both the TV and the device are turned off before making any connection. After the connection is done, you can turn on the units and use them.
Note: The position of the joystick may differ depending on the model. Turning On/Off the TV Connect power IMPORTANT: The TV set is designed to operate on 220-240V AC, 50 Hz socket. After unpacking, allow the TV set to reach the ambient room temperature before you connect the set to the mains. Plug the power cable to the mains socket outlet. The TV will switch on automatically. To switch on the TV from standby If the TV is in standby mode the standby LED lights up.
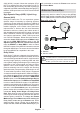
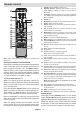
Remote Control 1. 2. 1 3. 2 3 26 25 4 24 4. 5. 6. 7. 5 8. 6 7 23 8 22 9 21 10 20 11 12 13 14 15 9. 10. 11. 12. 19 18 17 13. 16 14. 15. 16. 17. Note: Other Panasonic devices cannot be operated with this remote. 18. Inserting the Batteries into the Remote 19. Remove the screw that secure the battery compartment cover on the back side of the remote control first. Lift the cover gently. Insert two 1.5V - size AAA batteries.
Initial Setup Wizard Note: Follow the on-screen instructions to complete the initial setup process. Use the directional buttons and the OK button on the remote to select, set, confirm and proceed. When turned on for the first time, a search for accessories will be performed before the initial setup starts. Follow the on-screen instructions to pair your remote control (depends on the model of the remote control) and other wireless accessories with your TV.
later using the Settings>Device Preferences>Usage & Diagnostics menu on the Home Screen. Information on Google services and some features of your TV will be displayed next. You can turn on personal results for Assistant by choosing the related option when prompted. Press OK consecutively to proceed. 8. Country In the next step select your Country from the list and press OK to continue. 9.
satellite and to enable scan this option should be set as On first. Press Back button and select next satellite you want to set. After you completed the configuration changes, press the Right directional button to proceed. (*) If you have a Direct satellite system, DiSEqC Set option should be set as DiSEqC A. Channel Scan screen will be displayed next. Select Scan and press OK or the Right directional button to proceed with the scanning configurations.
Live TV Mode Menu Content Switch the TV to Live TV mode first and then press the Menu button on the remote to see Live TV menu options. To switch to Live TV mode you can either press the Exit button or highlight the Live TV app from the Apps row and press OK on the Home Screen. Channels Add to My Favorites: Add the channel that is currently being watched to the previously selected favourite list. Program Guide: Open the electronic programme guide.
Subtitle Tracks: Set your subtitle track preference, if any available. Analog Subtitle: Set this option as Off, On or Mute. If Mute option is selected, the analogue subtitle will be displayed on the screen but the speakers will be muted simultaneously. Network & Internet You can configure your TV’s network settings using the options of this menu. You can also highlight the Connected/Not Connected icon on the Home screen and press OK to access this menu.
found the scan will be completed and the found channel will be stored in the channel list. Single RF Scan: Select the RF Channel by using the Right/Left directional buttons. Signal Level and Signal Quality of the selected channel will be shown. Press OK to start scan on the selected RF channel. The found channels will be stored in the channel list. Manual Service Update: Start a service update manually. LCN: Set your preference for LCN.
press OK button. Then change the frequency of the channel by pressing Left/Right directional buttons. Press OK to store the new frequency for that channel. Press Back to cancel. This item may not be visible, depending on whether or not the last watched channel was analogue. Clear Channel List: Delete all channels stored in the channel list of the selected channel installation mode. A dialogue will be displayed for confirmation. Highlight OK and press OK button to proceed.
Audio Language Set one of the listed language options as first audio language preference. This item may not be visible, depending on whether or not the last watched channel was digital. 2nd Audio Language Set one of the listed language options as second audio language preference. If in the Audio Language setting selected language option is not supported, this language preference will be considered. This item may not be visible, depending on whether or not the last watched channel was digital.
and Auto Sleep option in TV Options>Advanced Options menu for more power related functions. Sleep Timer: Define an idle time after which you want your TV to enter sleep mode automatically. Picture off: Select this option and press OK to turn the screen off. Press a button on the remote or on the TV to turn the screen on again. Note that you can not turn the screen on via the Volume +/-, Mute and Standby buttons. These buttons will function normally.
signal type as it is. It can be usable especially for RGB inputs. Turn the PC Mode function on or off. adverts or when you are switching channels. Turn this option on/off by pressing OK. HDMI RGB Range: This setting should be adjusted according to input RGB signal range on HDMI source. It can be limited range (16-235) or full range (0-255). Set your HDMI RGB range preference. Auto, Full and Limit options will be available. This item will not be available, if the input source is not set as HDMI.
Usage & Diagnostics: Automatically send usage data and diagnostic information to Google. Set according to your preference. Accessibility: Configure Visually Impaired, AC4 Dialogue Enhancement, Captions, Text to speech, Accessibility shortcut settings and/or turn Audio Description, Hearing Impaired, High contrast text on/off. Some of the caption settings may not be applied.
the Favorite List Selection menu in order to switch from one list to another. Select the desired list and press the OK button. Highlight a channel in the list and press the OK button to watch. To add the currently watched channel to one of your favourite lists select the desired favourite list as described above and press the Menu button on the remote. Then enter the Channels menu, highlight Add to My Favorites option and press OK. The channel will be added to the selected favourite list.
You might be able to connect your TV to a network wall socket depending on your network’s configuration. In that case, you can connect your TV directly to the network using an Ethernet cable. 1 Use a LAN connection for quicker data transfer between other devices like computers. The transmission speed differs depending on the distance and number of obstructions between the transmission products, the configuration of these products, the radio wave conditions, the line traffic and the products that you use.
In order to activate photo frame feature select Photo as the media type. Then press the Menu button, highlight Photo Frame and press OK. If you select One Photo mode option and press OK the image that you set as photo frame image earlier will be displayed when photo frame feature is activated. If you select the USB storage device option the first file (in Recursive Parser mode) will be displayed.
Duration: Set the interval between the slides. Highlight an option and press OK to change the setting. You can also press the Green button to set. This option will not be available if the slide show is paused. You can view your photos, text documents or play your music and video files installed on a connected USB storage device on the TV. Plug in the USB storage device to one of the USB inputs on the TV. Rotate: Rotate the image. The image will be rotated 90 degrees clockwise each time you press OK.
the Home Screen. Or press the Source button if the TV is in Live TV mode and select the related HDMI input source from the list. To terminate this operation and control the TV via the remote again, press the Source button, which will still be functional, on the remote and switch to another source. Change and press OK again. You can either select one of the predefined names or enter a custom name. 1.
HbbTV applications use the buttons on the remote control to interact with the user. When an HbbTV application is launched, the control of some buttons are owned by the application. For example, numeric channel selection may not work on a teletext application where the numbers indicate teletext pages. HbbTV requires AV streaming capability for the platform. There are numerous applications providing VOD (video on demand) and catch-up TV services.
This method of checking the remote control is not possible with remote controls which are wirelessly paired with the TV. No Channels • Make sure that all cables are properly connected and that the correct network is selected. • Make sure that the correct channel list is selected. VGA Input Typical Display Modes The following table is an illustration of some of the typical video display modes. Your TV may not support all resolutions.
AV and HDMI Signal Compatibility Source Supported Signals PAL Composite / Back AV SECAM NTSC4.43 NTSC3.58 Component / YPbPr 480i, 480p 60Hz 576i, 576p 50Hz 720p 50Hz,60Hz 1080i 50Hz,60Hz 480i 60Hz 480p 60Hz 576i, 576p 50Hz 720p 50Hz,60Hz 1080i 50Hz,60Hz 1080p 24Hz, 25Hz, 30Hz, 50Hz, 60Hz 3840x2160p 24Hz, 25Hz, 30Hz, 50Hz, 60Hz 4096x2160p 24Hz, 25Hz, 30Hz, 50Hz, 60Hz HDMI In some cases a signal on the TV may not be displayed properly.
Supported File Formats for USB Mode Video Video Codec Resolution Bit Rate Profile Container MPEG program stream (.DAT, .VOB, .MPG, .MPEG), MPEG transport stream (.ts, .trp, .tp), MP4 (.mp4, .mov), 3GPP (.3gpp, .3gp), AVI (.avi), MKV (.mkv), ASF (.asf) MPEG 1/2 1080P@ 60fps 80Mbps MP@HL MPEG4 1080P@60fps 40Mbps • Simple Profile MPEG program stream (.MPG, .MPEG), • Advanced Simple MP4 (.mp4, .mov), 3GPP (.3gpp, .3gp), Profile@Level 5 AVI (.avi), MKV (.mkv), ASF (.
Audio Codec MPEG1/2 Layer2 Sample rate 16KHz ~ 48KHz MPEG1/2 Layer3 16KHz ~ 48KHz AC3 32KHz, 44.1KHz, 48KHz EAC3 32KHz, 44.1KHz, 48KHz Channel Bit Rate Container 8Kbps ~ 384Kbps Movie: AVI (.avi), ASF (.asf), Matroska (.mkv), MPEG transport stream (.ts, .trp, .tp), MPEG program stream (.DAT, .VOB, .MPG, .MPEG) Music: MP3 (.mp3), WAV (.wav) Up to 2 8Kbps ~ 320Kbps Movie: AVI (.avi), ASF (.asf), Matroska (.mkv), 3GPP (.3gpp, .3gp), MP4 (.mp4, .mov), MPEG transport stream (.ts, .trp, .
Audio Codec Sample rate Channel Bit Rate Container LPCM 8KHz ~ 48KHz Up to 5.1 64Kbps ~ 1.5Mbps Movie: AVI (.avi), Matroska (.mkv), 3GPP (.3gpp, .3gp), MP4 (.mp4, .mov), MPEG transport stream (.ts, .trp, .tp), MPEG program stream, (.DAT, .VOB, .MPG, .MPEG) Music: WAV (.wav), MP4 (.m4a) IMA-ADPCM MS-ADPCM 8KHz ~ 48KHz Up to 2 384Kbps Movie: AVI (.avi), Matroska (.mkv), 3GPP (.3gpp, .3gp), MP4 (.mp4, .mov) Music: WAV (.wav), MP4 (.
Subtitle Internal File Extension Container Subtitle Codec dat, mpg, mpeg, vob MPG, MPEG DVD Subtitle ts, trp, tp TS DVB Subtitle mp4 MP4 mkv MKV avi AVI(1.0, 2.0), DMF0, 1, 2 DVD Subtitle UTF-8 Plain Text ASS SSA UTF-8 Plain Text VobSub DVD Subtitle XSUB XSUB+ External File Extension Subtitle Parser .srt SubRip .ssa/ .ass SubStation Alpha .smi SAMI .sub SubViewer MicroDVD DVDSubtitleSystem SubIdx (VobSub) .txt TMPlayer Remark SubViewer 1.0 & 2.
Specification TV Broadcasting PAL BG/I/DK SECAM BG/DK Receiving Channels VHF (BAND I/III) - UHF (BAND U) - HYPERBAND Digital Reception Fully integrated digital terrestrial-cable-satellite TV (DVB-T-C-S) (DVB-T2, DVB-S2 compliant) Number of Preset Channels 12 200 Channel Indicator On Screen Display RF Aerial Input 75 Ohm (unbalanced) Operating Voltage 220-240V AC, 50Hz. Audio DTS HD Headphone 3.
Wireless LAN Transmitter Specifications Frequency Ranges Max Output Power 2400 - 2483,5 MHz (CH1-CH13) < 100 mW 5150 - 5250 MHz (CH36 - CH48) < 200 mW 5250 - 5350 MHz (CH52 - CH64) < 200 mW 5470 - 5725 MHz (CH100 - CH140) < 200 mW Consult your local dealer for availability of DVB-T / T2 or DVB-S services in your area. Consult your cable service provider for availability of DVB-C services with this TV.
For DTS patents, see http://patents.dts.com. Manufactured under license from DTS Licensing Limited. DTS, the Symbol, DTS and the Symbol together, DTS-HD, and the DTS-HD logo are registered trademarks or trademarks of DTS, Inc. in the United States and/or other countries. © DTS, Inc. All Rights Reserved.
Sales and Support Information Customer Communication Centre • For customers within the UK: 0344 844 3899 • For customers within Ireland: 01289 8333 • Monday - Friday 9:00am - 5:00pm, (Excluding public holidays). • For further support on your product, please visit our website: www.panasonic.co.
Important Instruction For your own safety read following instruction carefully before attempting to connect this unit to the mains supply. MAINS (AC) OPERATION The wires in the mains lead are coloured in accordance with the following code : 1 4 2 3 1. Green&Yellow (Earth) (if there is earth cable) 2. Blue (Neutral) 3. Brown (Live) 4.