OPERATING INSTRUCTIONS TX-43MX650B TX-50MX650B TX-55MX650B TX-65MX650B LED TV e-MANUAL You can find instructions for your TV’s features in the E-Manual. To access the E-Manual, enter Settings menu, select Manuals and press OK. For quick access press Home/Menu button and then Info button.
Markings on the Product........................................ 2 Video Decoder..................................................33 Video Encoder..................................................34 Audio................................................................34 Picture..............................................................36 Subtitle.............................................................36 Supported DVI Resolutions.................................. 37 Maintenance......................
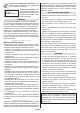
Safety Information CAUTION RISK OF ELECTRIC SHOCK DO NOT OPEN CAUTION: TO REDUCE THE RISK OF ELECTRIC SHOCK DO NOT REMOVE COVER (OR BACK). NO USER-SERVICEABLE PARTS INSIDE. REFER SERVICING TO QUALIFIED SERVICE PERSONNEL. In extreme weather (storms, lightning) and long inactivity periods (going on holiday) disconnect the TV set from the mains. The mains plug is used to disconnect TV set from the mains and therefore it must remain readily operable.
i Caution, See Operating Instructions: The marked area(s) contain(s) user replaceable coin or button cell batteries. CLASS 1 LASER PRODUCT Class 1 Laser Product: This product contains Class 1 laser source that is safe under reasonably foreseeable conditions of operation. WARNING Do not ingest the battery, Chemical Burn Hazard This product or the accessories supplied with the product may contain a coin/button cell battery.
Maintenance First, remove the mains plug from the mains socket. Display panel, Cabinet, Pedestal Regular care: Gently wipe the surface of the display panel, cabinet, or pedestal by using a soft cloth to remove dirt or fingerprints. For stubborn dirt: 1. First clean the dust from the surface. 2. Dampen a soft cloth with clean water or diluted neutral detergent (1 part detergent to 100 parts water). 3. Wring out the cloth firmly.
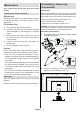
3. Insert the screws (M4 x 12) provided and tighten them gently until the stand is properly fitted. 43” 50/55/65” When using the wall-hanging bracket Please contact your local Panasonic dealer to purchase the recommended wall-hanging bracket. Holes for wall-hanging bracket installation; Rear of the TV x4 x6 M4 x 12 mm M4 x 12 mm a b M6 x 20 mm Removing the pedestal from the TV Be sure to remove the pedestal in the following way when using the wall-hanging bracket or repacking the TV.
Introduction Thank you for choosing our product. You’ll soon be enjoying your new TV. Please read these instructions carefully. They contain important information which will help you get the best from your TV and ensure safe and correct installation and operation.
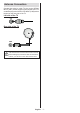
Antenna Connection Connect the aerial or cable TV plug to the AERIAL INPUT (ANT) socket located on the left side of the TV or satellite plug to the SATELLITE INPUT (LNB) socket located on the rear side of the TV. Left side of the TV ANT Rear side of the TV LNB If you want to connect a device to the TV, make sure that both the TV and the device are turned off before making any connection. After the connection is done, you can turn on the units and use them.
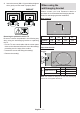
Other Connections If you want to connect a device to the TV, make sure that both the TV and the device are turned off before making any connection. After the connection is done, you can turn on the units and use them.
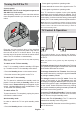
Press again to go back to operating mode. Turning On/Off the TV • Press and hold the centre of the joystick on the TV. Connect power IMPORTANT: The TV set is designed to operate on 220-240V AC, 50 Hz socket. After unpacking, allow the TV set to reach the ambient room temperature before you connect the set to the mains. Press again to go back to operating mode. Your TV continues to operate in the quick standby mode state, as it regularly checks for updates.
Operation with the Remote Control Press the Menu button on your remote control to display Live TV settings menu when in Live TV mode. Press Home button to display or return to the Home Screen of the Android TV. Use the directional buttons to move the focus, proceed, adjust some settings and press OK to make selections in order to make changes, set your preferences, enter a sub-menu, launch an application, etc. Press Back/Return to return to the previous menu screen.
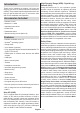
Remote Control 1. 2. 3. 4. 5. 6. 7. 28 27 8. 9. 10. 11. 12. 13. Note: Other Panasonic devices cannot be operated with this remote. Inserting the Batteries into the Remote The remote may have a screw that secures the battery compartment cover onto the remote control (or this may be in a separate bag). Remove the screw, if the cover is screwed on previously. Then remove the battery compartment cover to reveal the battery compartment. Insert two 1.5V - size AAA batteries.
network and press OK if you want to use wireless connection instead of wired connection. Initial Setup Wizard Note: Follow the on-screen instructions to complete the initial setup process. Use the directional buttons and the OK button on the remote to select, set, confirm and proceed. When turned on for the first time, a welcome screen will be displayed. Select your language and press OK. Follow the on-screen instructions to setup your TV and install channels.
OK on the remote to confirm and proceed. You can also view Terms of Service, Privacy Policy and Play Terms of Service on this screen. To display the content an internet connection is needed. A message will be displayed mentioning the web site address on which this information can also be viewed, in case internet access is not available. 10. Google Services Select each to learn more about each service, such as how to turn it on or off later. Data will be used according to Google’s Privacy Policy.
be displayed next. Scan Mode, Frequency (KHz), Modulation, Symbol Rate (Ksym/s), Network ID options may need to be set. To perform a full scan set the Scan Mode as Full or Advanced if available. Depending on the selected operator and/or Scan Mode some options may not be available to be set. (Ksym/s) and Polarisation parameters under the Transponder option accurately. Note: If the country selected does not have analogue broadcasts, analogue channels may not be searched.
Home Screen To enjoy the benefits of your Android TV, your TV must be connected to the Internet. Connect the TV to a home network with a high-speed Internet connection. You can connect your TV wirelessly or wired to your modem/router. Refer to the Network & Internet and Connecting to the Internet sections for further information on how to connect your TV to the Internet. The Home menu is the centre of your TV.
TV Options Source: Display the list of input sources. Select the desired one and press OK to switch to that source. Picture: Open the Picture menu. Refer to Device Preferences section for detailed information. Sound: Open the Sound menu. Refer to Device Preferences section for detailed information. Power: This menu has the same options as in Settings>Device Preferences>Power menu. Check the Timer and Screen Saver options in Settings>Device Preferences menu.
Subtitle Type: Set this option as Normal or Hearing Impaired. If Hearing Impaired option is selected, it provides subtitle services to deaf and hard of hearing viewers with additional descriptions. Teletext Digital Teletext Language: Set the teletext language for digital broadcasts. Decoding Page Language: Set the decoding page language for teletext display. BISS Key: “Click To Add Biss Key” message will be displayed. Press OK button to add a biss key.
When the second channel is selected, the position of this channel will be replaced with the position of the first selected channel. You can press the Yellow button and enter the number of the channel you want to select. Then highlight OK and press OK to go to that channel. You may need to set the LCN option to Off in order to enable this feature. Channel Move: Move a channel to the position of another channel. Highlight the channel you want to move and press OK to select.
USB storage device and connect it to your TV. Highlight this option and press OK. Download SatcoDX option will be highlighted, press OK to continue. Select the sdx file from the connected USB storage device on the next screen and press OK. Satellite selection screen will be displayed. The status of the first satellite option will appear as On. Highlight that satellite option and press OK.
tions, set rating systems, age limits, and block unrated programmes using the options of this menu. Inputs Blocked: Prevent access to the selected input source content. Highlight the desired input option and press OK to select/unselect. To switch to a blocked input source PIN should be entered first. Change PIN: Change the PIN you defined during the initial setup. Highlight this option and press OK. You will need to enter the current PIN first. Then new PIN entry screen will be displayed.
Timer Power On Time Type: Set your TV to turn on by itself. Set this option as On or Once to enable a power on timer to be set, set as Off to disable. If set as Once the TV will turn on only once at the defined time in Auto Power On Time option below. Auto Power On Time: Available if the Power On Time Type is enabled. Set the desired time for your TV to come on from standby using the directional buttons and press OK to save the new set time.
Luma Control preference as Low, Medium, Strong or turn it off by setting as Off. Local Contrast Control: Local contrast control divides each frame to defined small regions and provides ability to apply independent contrast setting for each region. This algorithm improves fine details and provides better contrast perception. It makes higher depth impression by enhancing dark and bright areas without any detail loss.
will be available. Sound settings will be adjusted according to the selected sound style. Some other sound options may become unavailable depending on the selection. Volume Leveler: Allows you to balance the sound levels. In this way, you are minimally affected by abnormal sound rises and falls. Turn this feature on/off by pressing OK. Balance: Adjust the left and right volume balance for speakers and headphones. Surround Virtualiser: Turn the surround virtualiser feature on or off.
on-screen instructions and read the information displayed on the screen before proceeding. ence. It is recommended not to activate store mode for home use. Note: Formatting the connected storage device will erase all data installed on it. Back up the files that you want to keep before you proceed with formatting the device. Google Assistant: Highlight On and press OK to turn this feature on or off.
Volume: Adjust the volume level of the audio commentary. Pan and Fade: Turn this option on if you want to hear the audio commentary more clearly, when it is available through broadcast. Audio for the Visually Impaired: Set the audio type for visually impaired. Options will be available depending on the selected broadcast. Fader Control: Adjust the volume balance between the main TV audio (Main) and audio commentary (AD). Captions: Configure the settings for the captions.
list. It depends on the related broadcast whether this feature is supported or not. to access this menu. For further information refer to Network & Internet section under the title of Settings. In order to access the Electronic Programme Guide press the Guide button on the remote. Use the directional buttons to navigate through the programme guide.
You must change your modem’s SSID when there are any other modems around with the same SSID. You can encounter connection problems otherwise. Use a wired connection if you experience problems with a wireless connection. 1 A stable connection speed is required to play back streaming content. Use an Ethernet connection if the wireless LAN speed is unstable. Multi Media Player 1. Broadband ISP connection A network with hidden SSID can not be detected by other devices.
can also use Programme +/- buttons to jump directly to the first and last folder or file if the view style is set to Grid View. Info: Display the info bar. Press twice to display the extended information and the next file. You can also enable or disable the USB Auto Play feature by pressing the Yellow button. Using this feature you can set your TV to start playing the media content installed on a connected USB storage device automatically. Refer to the USB Auto Play Feature section for more information.
can also press the Green button to rotate. This option will not be available if the slide show is not paused. Effect: Apply various effects to the slide show. Highlight an option and press OK to change the setting. You can also press the Yellow button to set. This option will not be available if the slide show is paused. Zoom: Zoom in on the image that is currently being displayed. Highlight an option and press OK to change the setting. You can also press the Yellow button to zoom in.
• Scroll down to Consumer Electronic Control (CEC) section. Check if the HDMI control option is switched on. device and you will be able to control the volume of the connected device with your TV remote. • Highlight the HDMI control option and press OK to switch on or off. • The connected audio device should also support eARC. Make sure that all CEC settings are properly set up on the connected CEC device. The CEC functionality has different names on different brands.
The menu options and namings for Google Cast function on your Android device can differ from brand to brand and can change with time. Refer to your device’s manual for latest information on Google Cast function. HBBTV System HbbTV (Hybrid Broadcast Broadband TV) is a standard that seamlessly combines TV services delivered via broadcast with services delivered via broadband and also enables access to the Internet only services for consumers using connected TVs and set-top boxes.
Note: Do not unplug the power cord during the reboot process. If the TV fails to come on after the upgrade, unplug, wait for two minutes then plug it back in. Troubleshooting & Tips • Make sure that your PC uses the supported resolution and refresh rate. No sound / poor sound • Make sure that the sound settings are correctly set. • Make sure that all cables are properly connected. TV does not switch on • Make sure the power cord is plugged in securely to the power outlet.
Supported File Formats for USB Mode Video Decoder Video Codec VP9 Resolution 4096x2176@60fps Bit Rate Profile 100Mbps Profile 0 (420 8-bit) Profile 2, (420, 10-bit) Main (8-bit)/Main10 (10-bit) Profile, High Tier @ Level 5.1 HEVC/H.265 4096x2176@60fps 100Mbps MPEG1/2 1920x1080@60fps 80Mbps MPEG4 1920x1080@60fps 40Mbps Sorenson H.263 1920x1080@60fps 40Mbps H.263 1920x1080@60fps 40Mbps H.
Video Encoder Video Codec H.264 Max Resolution 1920x1080@30fps Max Bit Rate 12Mbps Profile Main profile, level 4.1 Note Hardware video encoder Audio Audio Codec MPEG1/2 Layer1 MPEG1/2 Layer2 MPEG1/2/2.5 Layer3 AC3(DD) EAC3(DDP) Sample rate 16KHz ~ 48KHz 16KHz ~ 48KHz 8KHz ~ 48KHz 32KHz, 44.1KHz, 48KHz 32KHz, 44.1KHz, 48KHz Channel Up to 2 Up to 2 Up to 2 Bit Rate Container 32Kbps ~ 448Kbps MP3 (.mp3), AVI (.avi), ASF (.asf), WMV (.wmv), MKV (.mkv, .mka), 3GPP (.3gpp, .3gp), MP4 (.
Audio Codec Sample rate Channel Bit Rate Container WMA 10 Pro M1 8KHz ~ 48KHz Up to 5.1 < 384Kbps ASF (.asf), WMV (.wma, .wmv), AVI (.avi), 3GPP (.3gpp, .3gp), MP4 (.mp4, .mov) WMA 10 Pro M2 8KHz ~ 96KHz Up to 5.1 < 768Kbps ASF (.asf), WMV (.wma, .wmv), AVI (.avi), 3GPP (.3gpp, .3gp), MP4 (.mp4, .mov) VORBIS Up to 48KHz Up to 2 MKV (.mkv, .mka), WebM (.webm), 3GPP (.3gpp, .3gp), MP4 (.mp4, .mov, m4a), Ogg (.ogg), WMV (.wmv), ASF (.asf), AVI (.avi) < 1.
Picture Image Resolution (width x height) Photo Base-line Progressive JPEG 15360 x 8640 1024 x 768 PNG 9600 x 6400 BMP GIF WebP HEIF 9600 x 6400 6400 x 4800 3840 x 2160 4000 x 3000 Subtitle Internal File Extension Container ts, trp, tp TS mp4 MP4 mkv MKV Subtitle Codec DVB Subtitle Teletext CC(EIA608) PGS VobSub PGS TX3G ASS SSA SRT VobSub PGS External File Extension Subtitle Parser .srt SubRip .ssa/.ass SubStation Alpha Advanced SubStation Alpha .smi SAMI .
Supported DVI Resolutions When connecting devices to your TV’s connectors by using a DVI converter cable (DVI to HDMI cable - not supplied), you can refer to the following resolution information.
Specification TV Broadcasting PAL BG/I/DK SECAM BG/DK Receiving Channels VHF (BAND I/III) - UHF (BAND U) - HYPERBAND Digital Reception Fully integrated digital terrestrial-cable-satellite TV (DVB-T-C-S) (DVB-T2, DVB-S2 compliant) Number of Preset Channels 12 200 Channel Indicator On Screen Display RF Aerial Input 75 Ohm (unbalanced) Operating Voltage 220-240V AC, 50Hz. Audio DTS Virtual:X / DTS X / Dolby Atmos Headphone 3.
Wireless LAN Transmitter Specifications Frequency Ranges Max Output Power 2400 - 2483.5 MHz (CH1 - CH13) < 100 mW 5150 - 5250 MHz (CH36 - CH48) < 200 mW 5250 - 5350 MHz (CH52 - CH64) < 200 mW 5470 - 5725 MHz (CH100 - CH140) < 200 mW Country Restrictions The Wireless LAN equipment is intended for home and office use in the UK and Northern Ireland (and other countries following the relevant EU and/or UK directive). The 5.15 - 5.
Licences The terms HDMI, HDMI High-Definition Multimedia Interface, HDMI trade dress and the HDMI Logos are trademarks or registered trademarks of HDMI Licensing Administrator, Inc. Dolby, Dolby Vision, Dolby Atmos, and the double-D symbol are registered trademarks of Dolby Laboratories Licensing Corporation. Manufactured under licence from Dolby Laboratories. Confidential unpublished works. Copyright © 2012-2022 Dolby Laboratories. All rights reserved.
Declaration of Conformity (DoC) Sales and Support Information Customer Communication Centre Hereby, Panasonic Marketing Europe GmbH, declares that this TV is in compliance with the essential requirements and other relevant provisions of the Directive 2014/53/EU. If you want to get a copy of the original DoC of this TV, please visit the following website: http://www.ptc.panasonic.
Important Instruction For your own safety read following instruction carefully before attempting to connect this unit to the mains supply. MAINS (AC) OPERATION The wires in the mains lead are coloured in accordance with the following code : 1 4 2 3 1. Green&Yellow (Earth) (if there is earth cable) 2. Blue (Neutral) 3. Brown (Live) 4.