OPERATING INSTRUCTIONS TX-55MZ700B TX-65MZ700B LED TV e-MANUAL You can find instructions for your TV’s features in the E-Manual. To access the E-Manual, enter Settings menu, select Manuals and press OK. For quick access press Home/Menu button and then Info button.
Table of Contents Freeview Play Platform........................................ 34 Safety Information.................................................. 2 Software Update.................................................. 34 Markings on the Product........................................ 2 Maintenance.......................................................... 4 Display panel, Cabinet, Pedestal........................... 4 Mains plug..............................................................
Safety Information CAUTION RISK OF ELECTRIC SHOCK DO NOT OPEN CAUTION: TO REDUCE THE RISK OF ELECTRIC SHOCK DO NOT REMOVE COVER (OR BACK). NO USER-SERVICEABLE PARTS INSIDE. REFER SERVICING TO QUALIFIED SERVICE PERSONNEL. In extreme weather (storms, lightning) and long inactivity periods (going on holiday) disconnect the TV set from the mains. The mains plug is used to disconnect TV set from the mains and therefore it must remain readily operable.
Class II Equipment: This appliance is designed in such a way that it does not require a safety connection to electrical earth. Hazardous Live Terminal: The marked terminal(s) is/are hazardous live under normal operating conditions. i Caution, See Operating Instructions: The marked area(s) contain(s) user replaceable coin or button cell batteries. CLASS 1 LASER PRODUCT Class 1 Laser Product: This product contains Class 1 laser source that is safe under reasonably foreseeable conditions of operation.
DAMAGES • Excepting cases where responsibility is recognised by local regulations, Panasonic accepts no responsibility for malfunctions caused by misuse or use of the product, and other problems or damages caused by use of this product. • Panasonic accepts no responsibility for loss, etc., of data caused by disasters. • External devices separately prepared by the customer are not covered by the warranty. Care for the data stored in such devices is the responsibility of the customer.
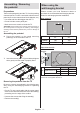
Assembling / Removing the pedestal When using the wall-hanging bracket Preparations Take out the pedestal(s) and the TV from the packing case and put the TV onto a work table with the screen panel down on the clean and soft cloth (blanket, etc.) • Use a flat and firm table bigger than the TV. Please contact your local Panasonic dealer to purchase the recommended wall-hanging bracket. Holes for wall-hanging bracket installation; Rear of the TV • Do not hold the screen panel part.
Introduction Thank you for choosing our product. You’ll soon be enjoying your new TV. Please read these instructions carefully. They contain important information which will help you get the best from your TV and ensure safe and correct installation and operation.
OLED TV Operations OLED panels have some procedures in order to extend the panel lifetime and provide protection from image sticking problem. OLED Fast Panel Clean • After every 4 hours of use, the TV will perform OLED Fast Panel Clean operation automatically when next time the TV is switched into standby mode. If the TV is in Store Mode this operation will be performed 3 hours after the last successful OFF-RS compensation. • It will take about 6 minutes.
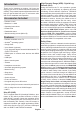
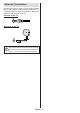
Antenna Connection Connect the aerial or cable TV plug to the AERIAL INPUT (ANT) socket located on the left side of the TV or satellite plug to the SATELLITE INPUT (LNB) socket located on the rear side of the TV. Left side of the TV ANT Rear side of the TV LNB If you want to connect a device to the TV, make sure that both the TV and the device are turned off before making any connection. After the connection is done, you can turn on the units and use them.
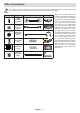
Other Connections If you want to connect a device to the TV, make sure that both the TV and the device are turned off before making any connection. After the connection is done, you can turn on the units and use them.
Quick standby mode Turning On/Off the TV In order to switch the TV into quick standby mode either; Connect power IMPORTANT: The TV set is designed to operate on 220-240V AC, 50 Hz socket. • Press the Standby button on the remote. After unpacking, allow the TV set to reach the ambient room temperature before you connect the set to the mains. • Press and hold the centre of the joystick on the TV. Press again to go back to operating mode. Press again to go back to operating mode.
Operation with the Remote Control TV Control & Operation Press the Menu button on your remote control to display Live TV settings menu when in Live TV mode. Press Home button to display or return to the Home Screen of the Android TV. Use the directional buttons to move the focus, proceed, adjust some settings and press OK to make selections in order to make changes, set your preferences, enter a sub-menu, launch an application, etc. Press Back/Return to return to the previous menu screen.
Remote Control 1. 2. 3. 4. 5. 6. 7. 8. 9. 10. 11. 12. 13. 14. Note: Other Panasonic devices cannot be operated with this remote. Inserting the Batteries into the Remote The remote may have a screw that secures the battery compartment cover onto the remote control (or this may be in a separate bag). Remove the screw, if the cover is screwed on previously. Then remove the battery compartment cover to reveal the battery compartment. Insert two 1.5V - size AAA batteries.
network and press OK if you want to use wireless connection instead of wired connection. Initial Setup Wizard Note: Follow the on-screen instructions to complete the initial setup process. Use the directional buttons and the OK button on the remote to select, set, confirm and proceed. When turned on for the first time, a welcome screen will be displayed. Select your language and press OK. Follow the on-screen instructions to setup your TV and install channels.
OK on the remote to confirm and proceed. You can also view Terms of Service, Privacy Policy and Play Terms of Service on this screen. To display the content an internet connection is needed. A message will be displayed mentioning the web site address on which this information can also be viewed, in case internet access is not available. 10. Google Services Select each to learn more about each service, such as how to turn it on or off later. Data will be used according to Google’s Privacy Policy.
be displayed next. Scan Mode, Frequency (KHz), Modulation, Symbol Rate (Ksym/s), Network ID options may need to be set. To perform a full scan set the Scan Mode as Full or Advanced if available. Depending on the selected operator and/or Scan Mode some options may not be available to be set. (Ksym/s) and Polarisation parameters under the Transponder option accurately. Note: If the country selected does not have analogue broadcasts, analogue channels may not be searched.
Home Screen To enjoy the benefits of your Android TV, your TV must be connected to the Internet. Connect the TV to a home network with a high-speed Internet connection. You can connect your TV wirelessly or wired to your modem/router. Refer to the Network & Internet and Connecting to the Internet sections for further information on how to connect your TV to the Internet. The Home menu is the centre of your TV.
Picture: Open the Picture menu. Refer to Device Preferences section for detailed information. mode. If the Select Mode is set as Last Status, the last watched channel will be displayed. Sound: Open the Sound menu. Refer to Device Preferences section for detailed information. Interaction Channel: Turn the Interaction Channel function on or off. This feature is useful in the UK and Ireland only. Power: This menu has the same options as in Settings>Device Preferences>Power menu.
is selected, it provides subtitle services to deaf and hard of hearing viewers with additional descriptions. Teletext Digital Teletext Language: Set the teletext language for digital broadcasts. Decoding Page Language: Set the decoding page language for teletext display. BISS Key: “Click To Add Biss Key” message will be displayed. Press OK button to add a biss key. Frequency, Symbol Rate (KSym/s), Polarisation, Programme ID and CW Key parameters will be available to be set.
Update Scan: Search for updates. Previously added channels will not be deleted, but any newly found channels will be stored in the channel list. Single RF Scan: Select the RF Channel by using the Right/Left directional buttons. Signal Level and Signal Quality of the selected channel will be shown. Press OK to start scan on the selected RF channel. The found channels will be stored in the channel list. Manual Service Update: Start a service update manually. LCN: Set your preference for LCN.
You can press the Yellow button and enter the number of the channel you want to select. Then highlight OK and press OK to go to that channel. You may need to set the LCN option to Off in order to enable this feature. OK button to configure detailed satellite parameters. Then press the Back/Return button to return to the satellite selection screen. Highlight Next and press OK to proceed. Channel Edit: Edit channels in the channel list.
Channel Installation Mode Set this option as Preferred Satellite or General Satellite. The channel list will also change depending on the selected option here. In order to watch the channels on the satellite you want, this option should be selected accordingly. Set to Preferred Satellite to watch operator channels, if you have performed an operator installation. Set to General Satellite to watch other satellite channels, if you have performed a normal installation.
system information such as network addresses, serial numbers, versions, etc. You can also display legal information, manage advertisings, display your advertising ID, reset it and turn on/off the personalised advertisings based on your interests. for HDMI CEC (Consumer Electronic Control) function and display the CEC device list. Factory reset: Reset all TV settings to the factory defaults. Highlight Factory reset and press OK.
Colour Temperature: Set your colour temperature preference. User, Cool, Standard and Warm options will be available. You can adjust red, green and blue gain values manually. If one of these values is changed manually, Colour Temperature option will be changed to User, if not already set as User. colour temperature. Turn the Blue Stretch function on or off. Display Mode: Set the aspect ratio of the screen. Select one of the predefined options according to your preference.
to set this function as on or off dynamically, according to source signal type. When set as Off, the TV’s maximum colour capacity is used by default. Colour Tuner: Colour saturation, hue, brightness can be adjustable for red, green, blue, cyan, magenta, yellow and flesh tone (skin tone) for having more vivid or more natural image. Set the HUE, Colour, Brightness, Offset and Gain values manually. Highlight Enable and press OK to turn this function on.
abnormal sound rises and falls. Turn this feature on/off by pressing OK. Surround Virtualiser: Turn the surround virtualiser feature on or off. Dolby Atmos: Your TV supports Dolby Atmos technology. By means of this technology the sound moves around you in three-dimensional space, so you feel like you’re inside the action. You will have the best experience if the input audio bitstream is Atmos. Turn this option on/off by pressing OK.
Screen Saver: Set the screensaver options for your TV. You can choose a screensaver, set wait time for the screensaver or start the screensaver mode. Energy Saver: Define a time after which you want your TV to turn itself off for energy saving. Set as Never to disable. Location: You can allow the use of the wireless connection to estimate the location, see the recent location requests and allow or restrict the listed apps to use your location information.
Channel List Programme Guide The TV sorts all stored channels in the Channel List. Press the OK button to open the Channel List in Live TV mode. You can press the Red button to scroll up the list page by page, or press the Green button to scroll down. By means of Electronic Programme Guide (EPG) function of your TV, you can browse the event schedule of the currently installed channels on your channel list. It depends on the related broadcast whether this feature is supported or not.
Wireless Connection Connecting to the Internet You can access the Internet via your TV, by connecting it to a broadband system. It is necessary to configure the network settings in order to enjoy a variety of streaming content and internet applications. These settings can be configured from Settings>Network & Internet menu. You can also highlight the Connected/ Not Connected icon on the Home screen and press OK to access this menu.
values for the wireless standards. They are not the actual speeds of data transmission. The location where the transmission is most effective differs depending on the usage environment. The Wireless feature of the TV supports 802.11 a,b,g,n & ac type modems. It is highly recommended that you should use the IEEE 802.11n communication protocol in order to avoid any possible problems while watching videos. You must change your modem’s SSID when there are any other modems around with the same SSID.
all photo files in the current folder or in the storage device, depending on the viewing style, will be displayed in order. If the Repeat option is set to None only the files between the highlighted one and the last listed one will be displayed. Press the OK or Pause/ Play button to pause or resume the slide show. The slide show will stop after the last listed file is displayed and media player screen will be displayed. Info: Display the info bar.
From USB Connection IMPORTANT! Back up the files on your USB storage devices before connecting them to the TV. Manufacturer will not be responsible for any file damage or data loss. Certain types of USB devices (e.g. MP3 Players) or USB hard disk drives/ memory sticks may not be compatible with this TV. The TV supports FAT32 disk formatting, NTFS is not supported. FAT32 formatted devices with a storage capacity larger than 2TB are not supported. Files larger than 4 GB are not supported.
from where you stopped. Press the Stop button to stop timeshift recording and return to the live broadcast. When this feature is used for the first time Disk Setup wizard will be displayed when the Pause/Play button is pressed. You can either choose Auto or Manual setup mode. In Manual mode, if you prefer, you can format your USB storage device and specify the storage space that will be used for timeshift function. When the setup is complete, the Disk Setup Result will be displayed. Press OK button to exit.
When eARC is enabled from the sound menu, TV first tries to establish eARC link. If eARC is supported by the connected device, the output turns into eARC mode and the “eARC” indicator can be observed on the connected device’s OSD. If an eARC link cannot be established (for example, the connected device is not supporting eARC but supporting ARC only) or if eARC is disabled from the sound menu, then TV initiates ARC. 2. Tap on ‘Wireless projection’ 3.
Freeview Play Platform Software Update Freeview Play platform provides catch-up TV and On Demand services. Simply press the Freeview Play button on your remote control to connect to the Freeview Play platform. You will have to agree to the terms and conditions for Freeview Play services first if you did not agree to them during the initial setup. Highlight Accept and press OK on the remote to confirm and proceed.
No picture / distorted picture • Make sure that the antenna is properly connected to the TV. • Make sure that the antenna cable is not damaged. HDMI Signal Compatibility Source Supported Signals • Make sure that the correct device is selected as the input source. 480i 60Hz 480p 60Hz • Make sure that the external device or source is properly connected.
Supported File Formats for USB Mode Video Decoder Video Codec Resolution Bit Rate Profile VP9 4096x2176@60fps 100Mbps Profile 0 (420 8-bit) Profile 2, (420, 10-bit) HEVC/H.265 4096x2176@60fps 100Mbps Main (8-bit)/Main10 (10-bit) Profile, High Tier @ Level 5.1 MPEG1/2 1920x1080@60fps 80Mbps MPEG4 1920x1080@60fps 40Mbps Sorenson H.263 1920x1080@60fps 40Mbps H.263 1920x1080@60fps 40Mbps H.
Video Encoder Video Codec H.264 Max Resolution 1920x1080@30fps Max Bit Rate 12Mbps Profile Main profile, level 4.1 Note Hardware video encoder Audio Audio Codec MPEG1/2 Layer1 MPEG1/2 Layer2 MPEG1/2/2.5 Layer3 AC3(DD) EAC3(DDP) Sample rate 16KHz ~ 48KHz 16KHz ~ 48KHz 8KHz ~ 48KHz 32KHz, 44.1KHz, 48KHz 32KHz, 44.1KHz, 48KHz Channel Up to 2 Up to 2 Up to 2 Bit Rate Container 32Kbps ~ 448Kbps MP3 (.mp3), AVI (.avi), ASF (.asf), WMV (.wmv), MKV (.mkv, .mka), 3GPP (.3gpp, .3gp), MP4 (.
Audio Codec Sample rate Channel Bit Rate Container WMA 10 Pro M1 8KHz ~ 48KHz Up to 5.1 < 384Kbps ASF (.asf), WMV (.wma, .wmv), AVI (.avi), 3GPP (.3gpp, .3gp), MP4 (.mp4, .mov) WMA 10 Pro M2 8KHz ~ 96KHz Up to 5.1 < 768Kbps ASF (.asf), WMV (.wma, .wmv), AVI (.avi), 3GPP (.3gpp, .3gp), MP4 (.mp4, .mov) VORBIS Up to 48KHz Up to 2 MKV (.mkv, .mka), WebM (.webm), 3GPP (.3gpp, .3gp), MP4 (.mp4, .mov, m4a), Ogg (.ogg), WMV (.wmv), ASF (.asf), AVI (.avi) < 1.
Picture Image Resolution (width x height) Photo Base-line Progressive JPEG 15360 x 8640 1024 x 768 PNG 9600 x 6400 BMP GIF WebP HEIF 9600 x 6400 6400 x 4800 3840 x 2160 4000 x 3000 Subtitle Internal File Extension Container ts, trp, tp TS mp4 MP4 mkv MKV Subtitle Codec DVB Subtitle Teletext CC(EIA608) PGS VobSub PGS TX3G ASS SSA SRT VobSub PGS External File Extension Subtitle Parser .srt SubRip .ssa/.ass SubStation Alpha Advanced SubStation Alpha .smi SAMI .
Supported DVI Resolutions When connecting devices to your TV’s connectors by using a DVI converter cable (DVI to HDMI cable - not supplied), you can refer to the following resolution information.
Wireless LAN Transmitter Specifications Specification TV Broadcasting PAL BG/I/DK SECAM BG/DK Receiving Channels VHF (BAND I/III) - UHF (BAND U) - HYPERBAND Fully integrated digital terrestrial-cable-satellite TV Digital Reception (DVB-T-C-S) (DVB-T2, DVB-S2 compliant) Number of Preset 12 200 Channels Channel Indicator On Screen Display RF Aerial Input 75 Ohm (unbalanced) Operating Voltage 220-240V AC, 50Hz. Audio Dolby Atmos Headphone 3.
Notice Licences DVB / Data broadcasting / IPTV functions • This TV is designed to meet the standards (as of March, 2021) of DVB-T / T2 (MPEG2, MPEG4AVC(H.264) and HEVC(H.265)) digital terrestrial services, DVB-C (MPEG2, MPEG4-AVC(H.264) and HEVC(H.265)) digital cable services and DVB-S (MPEG2, MPEG4-AVC(H.264) and HEVC(H.265)) digital satellite services. Consult your local dealer for availability of DVB-T / T2 or DVB-S services in your area.
UK Declaration of Conformity (DoC) Disposal of Old Equipment and Batteries Only for European Union and countries with recycling systems These symbols on the products, packaging, and/or accompanying documents mean that used electrical and electronic products and batteries must not be mixed with general household waste. For proper treatment, recovery and recycling of old products and batteries, please take them to applicable collection points in accordance with your national legislation.
Important Instruction For your own safety read following instruction carefully before attempting to connect this unit to the mains supply. MAINS (AC) OPERATION The wires in the mains lead are coloured in accordance with the following code : 1 4 2 3 1. Green&Yellow (Earth) (if there is earth cable) 2. Blue (Neutral) 3. Brown (Live) 4.