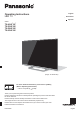
Operating Instructions LED TV English Nederlands Series TX-40JX*88* TX-50JX*88* TX-58JX*88* TX-65JX*88* (image: TX-65JX*88*) For more detailed instructions, please refer to [eHELP] (Built-in Operating Instructions). How to use [eHELP] (p. 23) Thank you for purchasing this Panasonic product. Please read these instructions carefully before operating this product and retain them for future reference. Please carefully read the “Safety Precautions” of this manual before use.
Model No.
The terms HDMI, HDMI High-Definition Multimedia Interface, and the HDMI Logo are trademarks or registered trademarks of HDMI Licensing Administrator, Inc. Dolby, Dolby Vision, Dolby Atmos, Dolby Audio, and the double-D symbol are trademarks of Dolby Laboratories Licensing Corporation. Manufactured under license from Dolby Laboratories. Confidential unpublished works. Copyright © 1992-2020 Dolby Laboratories. All rights reserved. WPA3™, WPA2™, WPA™ are trademarks of Wi-Fi Alliance®.
Important Notice Notice for DVB / Data broadcasting / IPTV functions This TV is designed to meet the standards (as of March, 2021) of DVB-T / T2 (MPEG2, MPEG4AVC(H.264) and MPEG HEVC(H.265)) digital terrestrial services, DVB-C (MPEG2, MPEG4AVC(H.264) and MPEG HEVC(H.265)) digital cable services and DVB-S (MPEG2, MPEG4-AVC(H.264) and MPEG HEVC(H.265)) digital satellite services. Consult your local dealer for availability of DVB-T / T2 or DVB-S services in your area.
The recording and playback of content on this or any other device may require permission from the owner of the copyright or other such rights in that content. Panasonic has no authority to and does not grant you that permission and explicitly disclaims any right, ability or intention to obtain such permission on your behalf. It is your responsibility to ensure that your use of this or any other device complies with applicable copyright legislation in your country.
Take care Warning Do not remove covers and never modify the TV yourself as live parts are accessible and risk of electric shock when they are removed. There are no user serviceable parts inside. Do not expose the TV to rain or excessive moisture. This TV must not be exposed to dripping or splashing water and objects filled with liquid, such as vases, must not be placed on top of or above the TV. Do not insert foreign objects into the TV through the air vents.
Suffocation / Choking Hazard Warning The packaging of this product may cause suffocation, and some of the parts are small and may present a choking hazard to young children. Keep these parts out of reach of young children. Pedestal Warning Do not disassemble or modify the pedestal. Caution Do not use any pedestal other than the one provided with this TV. Do not use the pedestal if it becomes warped or physically damaged. If this occurs, contact your nearest Panasonic dealer immediately.
Ventilation When not in use for a long time Caution Caution Allow sufficient space (at least 10 cm) around the TV in order to help prevent excessive heat, which could lead to early failure of some electronic components. 10 10 10 10 Excessive volume (cm) Ventilation should not be impeded by covering the ventilation openings with items such as newspapers, tablecloths and curtains.
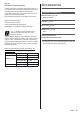
LED TV Accessories Declaration of Conformity (DoC) “Hereby, Panasonic Corporation declares that this TV is in compliance with the essential requirements and other relevant provisions of the Directive 2014/53/EU.” If you want to get a copy of the original DoC of this TV, please visit the following website: https://www.ptc.panasonic.eu/compliance-documents Authorized Representative: Standard accessories Remote Control (p.
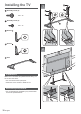
Installing the TV A 1 Assembly screw (4) C A D M5 × 16 Assembly screw (4) E M4 × 12 Bracket Bracket 2 Base Preparations Make sure to assemble the pedestal before taking out the TV from the carton. Do not hold the screen panel part. Make sure not to scratch or break the TV. Assembling the pedestal Do not assemble the pedestal by any method other than those specified below.
3 B 4 Note When lifting the TV, support the TV as shown above. Do not hold the screen part strongly as shown above. Lift the TV with the protective sheet attached. Note Remove the protective sheet and the protective film after installing the pedestal. Do not place the TV temporarily on the floor or desk.
Be sure to remove the pedestal in the following procedures when you use the wall-hanging bracket or repack the TV. Installing the wallhanging bracket 1 Remove the assembly screws from the TV. 2 Pull out the pedestal from the TV. 3 Remove the assembly screws from the bracket. Please contact your local Panasonic dealer to purchase the recommended wall-hanging bracket.
Warning Using other wall-hanging brackets, or installing a wallhanging bracket by yourself have the risk of personal injury and product damage. In order to maintain the unit’s performance and safety, be absolutely sure to ask your dealer or a licensed contractor to secure the wall-hanging brackets. Any damage caused by installing without a qualified installer will void your warranty.
Satellite connection Basic connections AV devices (DVD Recorder / Blu-ray Recorder, Set top box, etc) For details, refer to [eHELP] (Search by Purpose > Watching > Basic > Basic connection). Aerial DVB-via-IP connection (server, client etc) TV Cable This function may not be available depending on network condition and broadcast. For information about the connections, read the manual of the DVB-via-IP server.
Connections for 4K / HDR compatible equipment TV Other connections DVD Player / Camcorder / Game equipment (VIDEO equipment) TV (Viewing) (Listening) HDMI cable 4K / HDR compatible equipment Reproduces the image more precisely with the expanded colour gamut when connecting the 4K compatible equipment. [Mode2] is a mode that supports higher definition signals than [Mode1]. Set to [Mode1] when the image or sound in HDMI input is not played properly.
USB HDD (for recording) Connecting Bluetooth® devices Use USB 1 port for connecting the USB HDD. For details, refer to [eHELP] (Search by Purpose > Recording). Registering Bluetooth® devices This TV supports Bluetooth® communications. VIERA Link Use HDMI 1 - 3 for VIERA Link connection. For details, refer to [eHELP] (Search by Purpose > Functions > VIERA Link “HDAVI Control™”).
If registration fails If registration (pairing) is not completed properly, try registering again. 1 Display the menu bar and select [Main Menu], and then select [Setup] Main Menu Setup select access 2 Select the remote control setting menu in [System Menu] select access 3 Select [Pairing] select access The registration screen is displayed, so follow the on-screen instructions to register. For details, refer to [eHELP] (Search by Purpose > Functions > Voice Control > Settings).
Identifying Controls 1 [ ]: Switches TV On or Off (Standby) 2 PICTURE Changes the viewing mode. 3 NETFLIX Accesses NETFLIX service directly. Remote Control 4 Prime Video Accesses Prime Video service directly. 1 2 3 18 19 20 4 21 5 22 6 7 8 9 10 23 5 MY APP Assigns a favourite application. After setting, starts the application easily by pressing this button. For details, refer to [eHELP] (Search by Purpose > Home > Apps).
20 Rakuten TV Accesses Rakuten TV service directly. 21 YouTube Accesses YouTube service directly. 22 APPS Displays [Apps] (applications list). 23 TV Guide Displays Electronic Programme Guide. Remote Control Mode setting If another Panasonic TV is near the TV, the other TV may be operated when you use the remote control with infrared. Change the TV’s remote control mode to avoid simultaneous operation. Remote control mode 1 is the default setting.
Remote Control Mode Reset You can make a forced reset of the TV’s remote control mode to change to mode 1.
Indicator / Control panel When pressing 3, 4, 5 buttons, the control panel guide appears on the right side of the screen for 3 seconds to highlight which button has been pressed. 3 4 5 6 1 2 Rear side of the TV 1 Remote control signal receiver (for infrared communication) Do not place any objects between the TV remote control signal receiver and remote control. Ambient sensor Senses brightness to adjust picture quality when [Ambient Sensor] in the Picture menu is set to [On].
First time Auto Setup When the TV is turned on for the first time, it will automatically search for available TV channels and give options to set up the TV. These steps are not necessary if the setup has been completed by your local dealer. Please complete connections (p. 13 - 16) and settings (if necessary) of the connected equipment before starting Auto Setup. For information about the settings for the connected equipment, read the manual of the equipment.
Watching TV How to Use eHELP 1 [eHELP] is the detailed operating instructions built into the TV, and gives a more detailed explanation for a better understanding of the operation of each feature. Turn power on (TV) 1 or (Remote Control) Mains power On / Off switch should be on. (p. 21) 2 or Select the mode TV Selection DVB-S DVB-C DVB-T DVB-via-IP Analogue Selectable modes vary depending on the channels stored.
FAQs Before requesting service or assistance, please follow these simple guides to solve the problem. For details, refer to [eHELP] (Support > FAQs). The TV does not switch on Check the mains lead is plugged into the TV and the mains socket. The TV goes into Standby mode Auto power standby function is activated. The remote control does not work or is intermittent Are the batteries installed correctly? (p. 19) Has the TV been switched on? The batteries may be running low.
Maintenance First, remove the mains plug from the mains socket. Display panel, Cabinet, Pedestal Regular care: Gently wipe the surface of the display panel, cabinet, or pedestal by using a soft cloth to remove dirt or fingerprints. For stubborn dirt: (1) First clean the dust from the surface. (2) Dampen a soft cloth with clean water or diluted neutral detergent (1 part detergent to 100 parts water). (3) Wring out the cloth firmly.
Specifications Sound Speaker output 20 W (10 W × 2) TV Headphones / Subwoofer 3.5 mm stereo mini jack × 1 Model No. 40-inch model : TX-40JXT886, TX-40JXF887, TX-40JXN888, TX-40JXX889 50-inch model : TX-50JXT886, TX-50JXF887, TX-50JXN888, TX-50JXX889 58-inch model : TX-58JXT886, TX-58JXF887, TX-58JXN888, TX-58JXX889 65-inch model : TX-65JXT886, TX-65JXF887, TX-65JXN888, TX-65JXX889 Connection terminals AV input VIDEO 1.0 V[p-p] (75 :) AUDIO L - R 0.
Receiving systems / Band name Satellite DVB-S / S2 Receiver IF frequency range - 950 MHz to 2150 MHz Built-in wireless LAN Standard compliance and Frequency band IEEE802.11a/n/ac: 5 GHz band IEEE802.11b/g/n: 2.
Disposal of Old Equipment and Batteries Only for European Union and countries with recycling systems These symbols on the products, packaging, and/or accompanying documents mean that used electrical and electronic products and batteries must not be mixed with general household waste. For proper treatment, recovery and recycling of old products and used batteries, please take them to applicable collection points in accordance with your national legislation.
Gebruiksaanwijzing Led-tv Nederlands Serie TX-40JX*88* TX-50JX*88* TX-58JX*88* TX-65JX*88* (afbeelding: TX-65JX*88*) Raadpleeg [eHELP] (ingebouwde bedieningsinstructies) voor gedetailleerde instructies. Gebruik van [eHELP] (p. 23) Hartelijk dank voor de aankoop van dit Panasonic-product. Lees deze instructies aandachtig voordat u het product gebruikt en bewaar ze zodat u ze later opnieuw kunt raadplegen. Lees vóór gebruik aandachtig het gedeelte “Veiligheidsmaatregelen” in deze handleiding.
Modelnr.
De begrippen HDMI, HDMI High-Definition Multimedia Interface en het HDMI-logo zijn handelsmerken of geregistreerde handelsmerken van HDMI Licensing Administrator, Inc. Dolby, Dolby Vision, Dolby Atmos, Dolby Audio en het dubbele-D-symbool zijn handelsmerken van Dolby Laboratories Licensing Corporation. Geproduceerd onder licentie van Dolby Laboratories. Vertrouwelijke, niet-gepubliceerde werken. Copyright © 1992-2020 Dolby Laboratories. Alle rechten voorbehouden.
Belangrijke kennisgeving Kennisgeving over DVB/datatransmissie/ IPTV-functies Deze tv is ontworpen om te voldoen aan de standaarden (vanaf maart 2021) van DVB-T/ T2 (MPEG2, MPEG4-AVC(H.264) en MPEG HEVC(H.265)) digitale terrestrische diensten, DVB-C (MPEG2, MPEG4-AVC(H.264) en MPEG HEVC(H.265)) digitale kabeldiensten en DVB-S (MPEG2, MPEG4-AVC(H.264) en MPEG HEVC(H.265)) digitale satellietdiensten. Raadpleeg uw lokale dealer voor de beschikbaarheid van DVB-T-/T2- of DVB-S-services in uw gebied.
Het opnemen en afspelen van content op dit of elk ander apparaat kan de toestemming vereisen van de eigenaar van de auteursrechten of andere soortgelijke rechten in die content. Panasonic heeft geen bevoegdheid om u deze toestemming te geven en verleent u deze ook niet, en wijst uitdrukkelijk alle rechten, mogelijkheden of intenties af om een dergelijke toestemming in uw naam te verkrijgen.
Voorzichtig zijn Waarschuwing Verwijder de afdekplaten van de tv niet en breng geen wijzigingen aan de tv aan, anders kunt u in contact komen met onderdelen die onder spanning staan en loopt u risico op een elektrische schok. Er bevinden zich geen door de gebruiker repareerbare onderdelen aan de binnenkant. Stel de tv niet bloot aan regen of hoge vochtigheid. De tv mag niet blootgesteld worden aan druppelend of spattend water.
Gevaar voor verstikking/inslikken Waarschuwing De verpakking van dit product kan verstikking veroorzaken, en sommige onderdelen zijn klein en gevaarlijk als ze door kinderen worden ingeslikt. Houd deze onderdelen buiten het bereik van jonge kinderen. Standaard Waarschuwing De standaard niet demonteren of er wijzigingen in aanbrengen. Let op Gebruik alleen de standaard die u bij deze tv hebt ontvangen. De standaard niet gebruiken als deze verbogen, gebarsten of anderszins beschadigd is.
Ventilatie Wanneer de tv langere tijd niet gebruikt wordt Let op Laat voldoende ruimte (ten minste 10 cm) vrij rond de tv zodat overtollige warmte kan worden afgevoerd; de levensduur van sommige elektronische componenten wordt verkort als ze te heet worden. 10 10 10 Hoog geluidsniveau 10 (cm) Zorg dat de ventilatie niet wordt belemmerd door ventilatieopeningen die zijn afgedekt door voorwerpen zoals kranten, tafelkleden en gordijnen.
Led-tv Verklaring van Overeenstemming (vvo) “Hierbij verklaart Panasonic Corporation dat deze tv in overeenstemming is met de essentiële vereisten en andere relevante bepalingen van Richtlijn 2014/53/EU.” Als u een exemplaar van de originele vvo van deze tv wilt lezen, bezoek dan de volgende website: https://www.ptc.panasonic.eu/compliance-documents Bevoegde Vertegenwoordiger: Accessoires Standaardaccessoires Afstandsbediening N2QBYA000048 (p.
De tv installeren A 1 Montageschroef (4) C A D M5 × 16 Montageschroef (4) E M4 × 12 Steun Steun 2 Steunplaat Voorbereidingen Zorg ervoor dat u de standaard in elkaar heeft gezet voordat u de tv uit de doos haalt. Houd het schermonderdeel niet vast. Zorg dat u de tv niet bekrast of breekt. De standaard monteren Monteer de standaard niet volgens een andere methode dan die hieronder wordt aangegeven.
3 B 4 Opmerking Ondersteun de tv bij het tillen zoals te zien op de bovenstaande afbeelding. Houd het scherm niet te stevig vast zoals te zien op de bovenstaande afbeelding. Til de tv op met het beschermblad bevestigd. Opmerking Verwijder het beschermblad en beschermfolie na het installeren van de voet. Plaats de tv niet tijdelijk op de vloer of een tafel.
De standaard verwijderen Verwijder de standaard aan de hand van de volgende procedures wanneer u de muurbevestigingssteun gebruikt of de tv opnieuw inpakt. 1 Verwijder de montageschroeven van de tv. 2 Trek de standaard weg van onder de tv. 3 Verwijder de montageschroeven van de steun. De muurbevestigingssteun monteren Neemt contact op met uw plaatselijke Panasonicdealer als u de aanbevolen muurbevestigingssteun wilt aanschaffen.
Waarschuwing Als u andere muurbevestigingssteunen gebruikt of zelf een muurbevestigingssteun probeert te installeren, loopt u het risico op lichamelijk letsel en materiële schade. Om de veiligheid en goede prestaties te garanderen dient u de muurbevestigingssteunen te laten monteren door uw dealer of een erkende installateur. Elke schade die is veroorzaakt door het installeren door een onbevoegde installateur, zal uw garantie teniet doen.
Satellietverbinding Basisaansluitingen Antenne Neem contact op met uw lokale leverancier om te controleren of uw satellietschotel correct is geïnstalleerd. Raadpleeg ook de maatschappijen van de satellietzenders die u ontvangt voor details. Raadpleeg [eHELP] (Zoeken op doel > Kijken > Algemene functies > Satellietverbinding/ Basisaansluitingen) voor details. TV DVB-via-IP-verbinding (server, client enz.) AV-apparaten (Dvd-speler/Blu-ray-speler, Settopbox, enz.
Aansluitingen voor 4K/HDRcompatibele apparatuur TV Andere verbindingen DVD-speler / Camcorder / Spelsysteem (VIDEO-apparatuur) TV (Kijken) (Luisteren) HDMI-kabel 4K/HDR-compatibele apparatuur Reproduceert het beeld preciezer met het uitgebreide kleurengamma wanneer de met 4K compatibele apparatuur wordt aangesloten. [Modus 2] is een modus die signalen met een hogere definitie ondersteunt dan [Modus 1]. Stel in op [Modus 1] als beeld of geluid op de HDMI-ingang niet goed wordt afgespeeld.
USB HDD (voor opname) Gebruik de USB 1-poort voor verbinding met de USB HDD. Raadpleeg [eHELP] (Zoeken op doel > Opnemen) voor details. VIERA Link Gebruik HDMI 1 - 3 voor VIERA Link-verbinding. Raadpleeg [eHELP] (Zoeken op doel > Functies > VIERA Link “HDAVI Control™”) voor details. Algemene interface (CI) Zet de tv altijd met de hoofdschakelaar uit wanneer u de CI-module plaatst of verwijdert.
Als registreren mislukt Als registreren (pairen) niet goed wordt voltooid, probeert u nogmaals te registreren. 1 Geef de menubalk weer en selecteer [Hoofdmenu] en vervolgens [Instellingen] Hoofdmenu Instellingen selecteren openen 2 Selecteer het instellingenmenu van de afstandsbediening in het [Systeemmenu] selecteren openen 3 Selecteer [Koppelen] selecteren openen Het registratiescherm wordt weergegeven, dus volg de aanwijzingen op het scherm om de afstandsbediening te registreren.
Bedieningsonderdelen 1 [ ]: Schakelt de tv aan of uit (stand-by) 2 AFBEELDING Wijzigt de beeldmodus. 3 NETFLIX Directe toegang tot de Netflix-service. Afstandsbediening 4 Prime Video Directe toegang tot de Prime Video-service 1 2 3 18 19 20 4 21 5 22 6 Gekleurde toetsen 6 7 8 9 10 5 MIJN APP Hiermee wordt een favoriete applicatie toegewezen. Wanneer dit is ingesteld, kan de applicatie gemakkelijk worden gestart door op deze knop te drukken.
20 Rakuten TV Directe toegang tot de Rakuten TV-service. 21 YouTube Directe toegang tot de YouTube-service. 22 APPS Geeft [Apps] weer (lijst met applicaties). 23 Tv-programmagids Opent de elektronische programmagids. 24 VERLATEN Keert terug naar het normale weergavescherm. De afstandsbedieningsmodus instellen Als er een andere Panasonic tv in de buurt van de tv staat, kan de andere tv worden bediend als u de afstandsbediening met infrarood gebruikt.
Reset Afstandsbedieningsmodus U kunt de afstandsbediening van de tv geforceerd resetten, zodat deze naar modus 1 wordt geschakeld.
Indicator/Bedieningspaneel Als u op een van de toetsen 3, 4 of 5 drukt, wordt gedurende 3 seconden rechts op het scherm een hulpaanduiding weergegeven die aangeeft welke toets werd ingedrukt. 3 4 5 6 1 2 Achterzijde van de tv 1 Ontvanger van afstandsbedieningssignaal (voor infraroodcommunicatie) Plaats geen voorwerpen tussen de signaalontvanger van de afstandsbediening op de tv en de afstandsbediening.
Automatisch instellen bij het eerste gebruik Wanneer de tv voor het eerst wordt aangezet, zoekt hij automatisch naar beschikbare tv-kanalen en verschijnen opties om de tv in te stellen. U mag deze stappen overslaan als uw dealer de tv al heeft ingesteld. Voltooi alle verbindingen (p. 13 - 16) en instellingen (indien nodig) van de externe apparatuur voordat u de automatische instelling uitvoert. Raadpleeg de handleiding van het aangesloten apparaat voor informatie over de instellingen ervan.
Tv kijken 1 Schakel de tv in (TV) of eHELP gebruiken [eHELP] is de naam van de gedetailleerde, ingebouwde bedieningsinstructies van de tv. Hier vindt u gedetailleerde uitleg over de bediening van de verschillende functies. 1 Geef [eHELP] weer (Afstandsbediening) De hoofdschakelaar moet aan staan. (p. 21) 2 of Selecteer de stand [Hoofdmenu] TV keuze DVB-S DVB-C DVB-T DVB-via-IP Analoog De selecteerbare standen zijn afhankelijk van de opgeslagen kanalen.
Veelgestelde vragen Probeer eerst het probleem op te lossen aan de hand van de volgende eenvoudige richtlijnen voordat u hulp inroept. Raadpleeg [eHELP] (Ondersteuning > Veelgestelde vragen) voor details. De tv gaat niet aan Controleer of de stekker van het netsnoer in de tv en in het stopcontact zit. De tv schakelt over naar de standby-stand De automatische standby-functie is geactiveerd. De afstandsbediening werkt niet of slechts af en toe Zijn de batterijen op de juiste manier geplaatst? (p.
Onderhoud Verwijder eerst de stekker van het netsnoer uit het stopcontact. Beeldscherm, Behuizing, Standaard Regelmatig onderhoud: Veeg de buitenkant van het beeldscherm, de behuizing of de standaard voorzichtig af met een zachte doek om vuil of vingerafdrukken te verwijderen. Voor hardnekkig vuil: (1) Verwijder eerst het stof van de buitenkant. (2) Bevochtig een zachte doek met schoon water of een opgelost neutraal schoonmaakproduct (1 deel schoonmaakproduct op 100 delen water). (3) Wring de doek goed uit.
Specificaties Geluid Uitgang luidspreker 20 W (10 W × 2) TV Hoofdtelefoon/subwoofer 3,5 mm stereo ministekker × 1 Modelnr.
Ontvangstsystemen / Bandnaam Satelliet DVB-S / S2 IF-frequentiebereik ontvanger - 950 MHz to 2150 MHz Ingebouwd draadloos LAN Standaardcompliantie en frequentieband IEEE802.11a/n/ac: 5 GHz band IEEE802.
Verwijdering van oude apparatuur en batterijen. Alleen voor de Europese Unie en landen met recycle systemen. Deze symbolen op de producten, verpakkingen en/of begeleidende documenten betekenen dat gebruikte elektrische en elektronische producten en batterijen niet samen mogen worden weggegooid met de rest van het huishoudelijk afval.
_ TX-40JX*88* TX-50JX*88* TX-58JX*88* TX-65JX*88* !"#$% & ' + ;< \ _ "\ & < =>; *88*) ! " # $ & * $ " & @ " \ $^ @ _ <" " !" " # = ! " # $& * $ " & <" " _ " \ `{ | " *
{ \ ¡ TX-40JXT886 TX-50JXT886 TX-58JXT886 TX-65JXT886 TX-40JXN888 TX-50JXN888 TX-58JXN888 TX-65JXN888 TX-40JXF887 TX-50JXF887 TX-58JXF887 TX-65JXF887 TX-40JXX889 TX-50JXX889 TX-58JXX889 TX-65JXX889 ? @ \ ^ * < 4 { | " * " * " 9 " _ " _ " _ =<
| ¢£& ¢£ ¤¥¦ § ¢¨ª§ «¬ £ §¦ ¯ " ¢£ _ =" " _ | " _ | " _ | ¢£ ¤ ±¬« § § & £ ª²³& ª²³ ´ & ª²³ ±§« & ª²³ ±¨¬ _ $ $ _ $ _ =" " _| ª²³ ² § ¤ µ ¶ § _ # ¸ _" _ ª²³ ² § # \ | _ | "| _ ¹ º»»¼¼ ª²³ ² § _ | ½ ±¾¿& ½ ±¿& ½ ±¿ _ =" " _ | " _
_ @ ` { ` | ` }~ + + ^ ' + $ + _ " _ "_ " "_ " " " = " ¼ºÑ # ¸ _|@ |@ " _ |@ _ _ ´Á Ò ¢ Ã& ¢ ÃÓ±´µ ÓÑ ¢ à ´µ ÑÑ& # ¸ _|@ \ |@ _ _ ´Áµ ¢ Ã& ¢ ÃÓ±´µ ÓÑ ¢ à ´µ ÑÑ # ¸ _|@ " _|@ _ _ ´Á ¢ Ã& ¢ ÃÓ±´µ ÓÑ ¢ à ´µ ÑÑ \" $" \ _ " | _ "
Ê _ _ " " \= " $ "_ * " "\ ^ _ \# _" @ @ _& $ "_ = @ _ " ^ "_ " "_ = " " Ô * | !" < & " _ " " ^ & " * < " |_ " " =|@ _& _ * " $ < "\ " ^ " ^ \ _ = " $ "_ | " "_ " "_ "\ = $ "_ =
@ { @ Ô $" |^ _ " _ " # = " _ " " \ & _ " _ < _ * " " < " & @ * & ! " < " @ " " _ " " $& " = @ * _ \ _ " Ô _ $" " _ _ $ "_ = * < $ _ * " Ô " _ \ "\ |& * * "\& _ | Ô " _ $" " _ = = " = _
\ _ ' + ` + + { @ Ô _ _ $ " * " _ " ^ =& " " " " _ "\ |@ " \ | " & @ < $ " " Þ " !" " " & <" | | " | \ @ " $ { { @ | + { @ Ô $" " _ _ " _ " # = { @ ~ \
_ + ^ ^ + ' + ` { @ <\" " " < _ " "_ _ " _ º¼ Ñ _ * _ & " _ * " _ " * _ _|@ " " |@ ! " |@ " _ 10 10 10 10 Ñ " " & <" | _ " # | "_ " | |"| " & " " _ & ^ = \ = _ " # = Ô _ " " & \ " | " _ "&
+ ^ #"} { @ + + `Ô " µ ¶ § _ "& <" |$ " _ "_ " "_ " " \ | " _ = " ^ * Ê " _| ¼ºÓÒ¾Òµ } | @ " " < "\ = \ $ # "_ " "_ !" " " _ & " " _ $" ? @ { ßãÁä±¼¼¼¼Óâ ' + & < 18; ¥§§¶ ÒÒØØØ ¶§ ¶ ¨Ò «¶ª ¬ ¨« § { + & < 10; < |$ " _ " \
+ + ^ ? + A 1 C A &; D ¢ å º E ? + &; ¢Ó å º 2 \ + { ' + " \ " " _ " & _| "\ " _ Ô * " " _ ! \" " * |& <" | # "\ "\ " _ ? + Ô $" " _ " |@ * 10 $ & " < | "
3 B 4 { ` " _ & * " & _|^ Ô " \ _ _ "\ ! & _|^ $" " _ " \ "| " | < @ Ô " " _ " { ` " _ _ < @ " " |$ $ 11
+ @ _ "\ " _ " ^" $ & " " _ _ = "\ " 1 | " " < | _ "| " _ = |" "\ " _ " _ > | " " < | _ "| ^" $ + ' _ " ^" $ & * $ " & $" \ " "_ " " Ö \ " _ { ^" $ \ Ó¼æ ¼¼ a ² ¼¼
{ @ | \ " " | ^" $ | " _ _ " " |$ ^" $ " " \ & "_ " "\ < " _ | _ * Ê < $ "| " \ " " \ # _ < & <" | "\ " |$ ^" $ Ú " " " _ * & _ ^ < " _ _ ¸ # _ | # " " \ <" " " # & _ * = " \ | * " & "
« ^ ` ^ ` ^ ` + ? " | " _ "\ " _ = " * & \" $" \ _ " | " & * $ " & " " \ " _ _ < " \ $ ¸ # Ê < $ ¸ # " " \ ¸ # Ð " Ð _ | ¸ # Ð " _ =< Ò _ | Ñ ¬~ ª }¬# ¬¤} !}§ > = ¤¥ = ¦ ^ ^ +
{ + @ + ° !}© ' }~} ' + ` ' + + _ _ _|@ ´£ÎÑ _ \ ¢£ |& * _ = ÓÌ Ò Í " < _ _ * ^ #_ " _ " \ =< ÓÌ _ " _ = * * _ " | _| ^ & <" * º " _ " * º& * _ _@ ¢£ _ _ " *
¤¥ !}} + & ^ ; ~ \ $" " ÈÂÁ º =< ÈÂÁ " $ "_ Ê < $ ¸ # " " \ ¸ # Ð Ö \Ñ ~"©¬ #±²³ ~ \ $" ¢£ºÙ¾ =< ´£Í± à Ê < $ ¸ # " " \ ¸ # Ð Õ # Ð ´£Í± à `±´£ µ § ª¿}Ñ \ | * |$ " µ£ _| =< $" " _ \= =< " _ =< Ò _| =< " _ "
' " # _ " # * Ñ _ ^ * | & $" _| "\ " # = | _ " \ =& _| " < Ú _ =& " " _ Ú _ = + _| = | " " = " _ Ê _ " = _| > | " " * _| " " " ! " # Ê " # $" " # ! $ Ê < $ ¸
\^ ` ` ` + { 1 2 3 ' + 18 19 20 4 21 5 22 = 25 11 26 12 13 27 28 14 29 15 30 16 " $ " _ $ " _ « ´ ¬ £ \ { »\µ Ô < " <" " \ * _| @ |@ " _| * " " "\ * & " * _ !" Ê < $ ¸ # " " \ ¸ # Ð Ú _ |$ ! Ð * Ñ ¨ ¼+ & ^ @ '
_ @ ` + ´ Ù =< " ´ÁÂ Ò ´Áµ Ò ´Á Ò ´Á< £ Ò _|$ * ±´ Ù =< " _ * _@ ±´ ` | _@ } = ©¢³ ² ~ < _ " $ = ¿À < _ " == { »\µ ¾ " * " $ " _ Í à¨§ ´ " _ ä ¨¨² * => _ " * " ! " = | _ " \ =& _| " < Ú _ =& " " _ * $Ñ _| = | _
? @ ` { * _| "\ " \ |$ \" Ê " _ & <" | $" _ * º ~ " \ $" $ \" Ê & * Ê º = Ô _ " \" Ê " _ * " ¢È& * _ _ " < º > ! _ " "_ * " \ * Ê& * " ¢È * _ $" _ " < ¾ + + _ " <\& _| _ " _ ¸ _ _ & <"
+ * " ¾& Ó& _ $ " | ! ¾ | _ =" " # _ & _| * " = 3 ¨ { + + + ' ~ \ " _ =< _| =< " _ " " | "\= _| =< "\ " $ "_ & @ " "\ ^" \ = _ " _ $ " * * Ò =< 4 5 6 1 2 Ö \ " _ { ` ' ' + & |
¯+ + ` ^ + _ _ =< " _ _" " < _| " " |@ " _ |@ _ " " "\ " | _ $ "| Ê $ "_ !" @ " _ * |& " _ | _| ^ " | * $ " & _| " " 13 ºÑ " _ @ Ñ _ ¸ # `_" " $ } Ê < ¸ # " $ @ _ < " $" _ "_ ! " # _ 1 _ +
{ ` + ^ 1 _ _ Ñ ^ + !"#$ é !" " \ " # ! " # & " _ _ " _ & " " Û * $ ¸ # & "_ <^ = 1 \ \" " # _ Ñ =< " \ _ =< Ò _| =< " _ " * |"\ _ =< & < =; = _ @ ` _ _ }~¥ }~ }~ }~ ^$ ¯ ' + Ê " | _| * | " < =" _ _ " " @
^ + ` + " "\ " @ * _ \=& " " \& * $ " & !" "| _ " & <" | ^ "\ Ê < $ ¸ # " " \ * Ð " _ | _ |Ñ + ^ + _ \" & =< ^ " " _ _ " _ ^" \ _ _ " _ = " + ^ + @ ` @ Õ # _" " < @ _ * * " _ _ \ @ ^ @ Ê
? + + ^ < ¦ + ' " " " _ @ " $ $ & " _ $ " \= _ " < " _ \# _ ^ ' ^ (1) < " " | \ _ @ " (2) < " = " \ _ $ _ | $" \ | = "_ º < "\ º¼¼ < " $ _ |Ñ (3) Þ ^ " * " " \ Ô $" * " _ " \ " _ & \ !" * " _ "
´+ _ ` + ¼ " º¼ " å Ñ ? + | { ^" " ¾& + ^ ? ^ ` _ ¬~ Å { \ Ó¼æ { \ ¼æ { \ âæ { \ æ å º ~}" Ó¼ââ& Ó¼Àââá& Ó¼ßâââ& Ó¼ââ» ¼ââ& ¼Àââá& ¼ßâââ& ¼ââ» âââ& âÀââá& âßâââ& âââ» ââ& Àââá& ßâââ& ââ» º&¼ ¶¶ á :) ¬¤} # © ¼& _ " < _ !}§
? ` ` ^ ? _ + + ? + + ´ÁÂ Ò Â Ê * " < |@ < " " _ é " »¼ {Ú# º¼ {Ú# ` £â¼ ºº Ò Ò < " " ÚÚ# £â¼ ºº²Ò¤Ò < " " &Ó ÚÚ# ^ ¼ | + ½ ±¾Â± ±ÂÑ ´Á Ò & ´Áµ ½ ± ÂÌ Ì£ Ò±ÂÑ Ê _ Ò Ò \ ½ ± ÂÌ Ì£ Ò±ÂÑ ½ Ó " Òºâ "Ñ ¯ ' + + ' ®** ± Á Ò Ã& Ò Ì& & £ ?
^ + ' ^ + + ' ? ^ ' + ^ + + ' ^ + Ë" _ | " @& _ @ Ò _ " \ |@ " @ < ="& <" _| " _^ _ $ ! " < ! " | "| " \ ^ _ "\ |" _| "@ Ê * $ " & " # " _|^ ^ " _ \ _ |@ " $& * $ " & _ $" @ _