Model No. English TX-55EZ950E TX-65EZ950E Nederlands Operating Instructions OLED TV For more detailed instructions, please refer to [eHELP] (Built-in Operating Instructions). How to use [eHELP] (p. 21) Thank you for purchasing this Panasonic product. Please read these instructions carefully before operating this product and retain them for future reference. Please carefully read the “Safety Precautions” of this manual before use.
For information about the trademarks, refer to [eHELP] (Search by Purpose > Read first > Before use > Licence). The illustration for TX-65EZ950E is used in this manual unless otherwise mentioned. Illustrations shown may be different depending on the model.
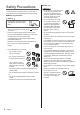
Important Notice Do not display any still part of the image for a long period In such cases the still part of the image remains dimly on the screen (“image retention”). This is not considered a malfunction and is not covered by the warranty. Typical still image parts: • Still images shown continuously on the same area (ex. channel number, channel logo, other logos or title image, etc.) • Still or moving pictures viewed in 4:3 or 14:9 aspect ratio, etc.
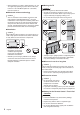
Safety Precautions To help avoid risk of electrical shock, fire, damage or injury, please follow the warnings and cautions below: Mains plug and lead Warning If you detect anything unusual, immediately remove the mains plug. This TV is designed to operate on AC 220-240 V, 50 / 60 Hz. Insert the mains plug fully into the mains socket. To turn Off the apparatus completely, you must pull the mains plug out of the mains socket. Consequently, the mains plug should be easily accessible at all times.
Warning Never place a TV in an unstable location. A TV may fall, causing serious personal injury or death. Many injuries, particularly to children, can be avoided by taking simple precautions such as: • Using cabinets or stands recommended by the manufacturer of the TV. • Only using furniture that can safely support the TV. • Ensuring the TV is not overhanging the edge of the supporting furniture.
When problems occur due to static electricity, etc., the TV might stop operating to protect itself. In this case, turn the TV off at the Mains power On / Off switch, then turn it back on. Bluetooth® wireless technology Caution The TV and Touch Pad Controller use the 2.4 GHz radio frequency ISM band (Bluetooth®).
Do not use rechargeable batteries (Ni-Cd, etc.). Do not burn or break up batteries. Do not expose batteries to excessive heat such as sunshine, fire or the like. Make sure you dispose of batteries correctly. Remove the battery from the unit when not using for a prolonged period of time to prevent battery leakage, corrosion and explosion.
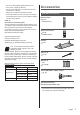
Assembling / Removing the pedestal Assembly screw (4) Assembling the pedestal 1 M4 × 14 Base Cover (2) B 8 English
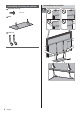
2 4 When the TV is uneven horizontal, loosen the assembly screws to set the TV horizontal.
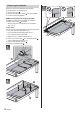
Removing the pedestal 3 Be sure to remove the pedestal in the following procedures when you repack the TV. 1 Remove the cover . 2 Remove the assembly screws 3 Lift the TV from the pedestal. from the pedestal. When using the wall-hanging bracket In addition to removing the pedestal, removing the following back bracket is needed. When moving the TV, support the TV as shown in step 1 (p. 8). Preparations Put the TV onto a work table with the screen panel down on the clean and soft cloth (blanket, etc.
Connections Terminals 1 External equipment and cables shown are not supplied with this TV. Please ensure that the unit is disconnected from the mains socket before attaching or disconnecting any cables. Check the terminal type and cable plugs are correct for connection. Use a fully wired HDMI compliant cable. 2 10 Keep the TV away from electronic equipment (video equipment, etc.
Dual Tuner (Single Cable System) Basic connections TV Mains lead AC 220-240 V 50 / 60 Hz Mains lead Satellite cable with Single Cable router Cable tie (Bundled the mains lead) Satellite dish To loosen: Single Tuner TV Keep pushing the knob Knob To remove from the TV: Snaps Satellite cable Satellite dish To ensure your satellite dish is correctly installed, please consult your local dealer. Also consult the received satellite broadcasting companies for details.
DVB-via-IP client connection This TV has DVB-via-IP client function and can connect to DVB-via-IP server or SAT>IP compatible servers to receive broadcast streaming. It is recommended to connect to DVB-via-IP server with a LAN cable. AV devices DVD Recorder / Blu-ray Recorder, etc. TV Wired connection TV Cable Cable LAN cable (Shielded) Use Shielded Twist Pair (STP) LAN cable. DVB-via-IP server HDMI cable RF cable RF cable DVD Recorder / Blu-ray Recorder, etc.
[HDMI Auto Setting] (Setup Menu) Network A broadband network environment is required to be able to use internet services. If you do not have any broadband network services, please consult your retailer for assistance. Prepare the internet environment for wired connection or wireless connection. Setup of the network connection will start when first (p. 20) using the TV.
Camcorder / Game equipment (VIDEO equipment) TV Headphones For information about the volume settings, refer to [eHELP] (Search by Purpose > Settings > Sound). TV (M3 stereo mini plug) Common Interface (Listening) (Viewing) AV2 (COMPONENT / VIDEO) adaptor (supplied) Camcorder / Game equipment Amplifier (listening with external speakers) Use HDMI2 to connect the TV to an amplifier which has ARC (Audio Return Channel) function.
Cable arrangement Fix the cables using the cable tie, and then attach the terminal cover to the TV. Fixing the cables using the cable tie Fix cables as necessary. When using the optional accessory, follow the option’s assembly manual to fix cables. Attach the cable tie Attaching the terminal cover Insert the cable tie in a hole Do not apply load to the terminal cover.
Identifying Controls Remote Control 6 OK Confirms selections and choices. Press after selecting channel positions to quickly change channel. Displays channel list. 7 [Option Menu] Easy optional setting for viewing, sound, etc. 8 Netflix Accesses NETFLIX service directly. A broadband network environment is required in order to fully use this function. This service may be stopped or changed without notice.
25 Last view Switches to previously viewed channel or input mode. 26 Operations for contents, connected equipment, etc. Installing / Removing batteries Pull open Hook Close 1 [ ]: Standby On / Off switch 2 Volume Up / Down Note the correct polarity (+ or -) Touch Pad Controller The Touch Pad Controller is designed for convenient and intuitive operation, especially with [Home Screen] or internet content. Touch Pad Controller can be used exclusively for controlling this TV.
Installing / Removing batteries 2 Ambient sensor Senses brightness to adjust picture quality when [Ambient Sensor] in the Picture Menu is set to [On]. 3 Power LED Slide open Red: Standby Green: On Orange: Standby with some functions (recording, etc.) active or panel maintenance in progress The LED blinks when the TV receives a command from the remote control. 4 Input mode selection Press repeatedly until you reach the desired mode.
First time Auto Setup Tick the TV signal mode to tune, and then select [Start Auto Setup] : tune (search for the available channels) When the TV is turned on for the first time, it will automatically search for available TV channels and give options to set up the TV. These steps are not necessary if the setup has been completed by your local dealer. Please complete connections (p. 11 - 16) and settings (if necessary) of the connected equipment before starting Auto Setup.
Watching TV How to Use eHELP 1 [eHELP] is the detailed operating instructions built into the TV, and gives a more detailed explanation for a better understanding of the operation of each feature. Turn power on (TV) 1 or (Remote Control) Mains power On / Off switch should be on. (p. 19) Displays information bar on the edge of screen for several seconds. For information about the operation and settings, refer to [eHELP].
To scroll the description (if more than 1 page) While the description is highlighted To open the reference screen ( ) To display the menu related to the description (only for some descriptions) (red) To check the features of this TV Search by Purpose > Read first > Features 22 English
FAQs Before requesting service or assistance, please follow these simple guides to solve the problem. For details, refer to [eHELP] (Support > FAQs). It takes several seconds to display the image after turning the TV on When turning the TV on, the panel adjustment is performed. It is not a malfunction. The TV does not switch on Check the mains lead is plugged into the TV and the mains socket. The TV goes into Standby mode Auto power standby function is activated.
Maintenance Specifications First, remove the mains plug from the mains socket. TV Display panel, Cabinet, Pedestal Regular care: Gently wipe the surface of the display panel, cabinet, or pedestal by using a soft cloth to remove dirt or fingerprints. For stubborn dirt: (1) First clean the dust from the surface. (2) Dampen a soft cloth with clean water or diluted neutral detergent (1 part detergent to 100 parts water). (3) Wring out the cloth firmly.
HDMI 1 / 2 / 3 / 4 input TYPE A Connectors HDMI1 / 3 / 4: 4K, Content Type, Deep Colour, x.v.Colour™ HDMI2: 4K, Content Type, Audio Return Channel, Deep Colour, x.v.Colour™ PAL D, K SECAM D, K VHF R1 - R2 VHF R3 - R5 VHF R6 - R12 UHF E21 - E69 This TV supports “HDAVI Control 5” function. PAL 525/60 Card slot SD Card slot × 1 Common Interface slot (complies with CI Plus) × 2 ETHERNET RJ45, IEEE802.3 10BASE-T / 100BASE-TX USB 1 / 2 / 3 5 V, Max. 900 mA [SuperSpeed USB USB1: DC (USB 3.0)] 5 V, Max.
Note Touch Pad Controller uses Bluetooth wireless technology. Design and Specifications are subject to change without notice. Mass and Dimensions shown are approximate. For information about the power consumption, display resolution, etc., refer to Product fiche. For information about the open source software, refer to [eHELP] (Search by Purpose > Read first > Before use > Licence).
Warning Using other wall-hanging brackets, or installing a wallhanging bracket by yourself have the risk of personal injury and product damage. In order to maintain the unit’s performance and safety, be absolutely sure to ask your dealer or a licensed contractor to secure the wall-hanging brackets. Any damage caused by installing without a qualified installer will void your warranty.
Disposal of Old Equipment and Batteries Only for European Union and countries with recycling systems These symbols on the products, packaging, and/or accompanying documents mean that used electrical and electronic products and batteries must not be mixed with general household waste. For proper treatment, recovery and recycling of old products and used batteries, please take them to applicable collection points in accordance with your national legislation.
Modelnr. Nederlands TX-55EZ950E TX-65EZ950E Gebruiksaanwijzing OLED-tv Raadpleeg de [eHELP] (ingebouwde bedieningsinstructies) voor gedetailleerde instructies. Gebruik van de [eHELP] (p. 21) Hartelijk dank voor de aankoop van dit Panasonic-product. Lees deze instructies aandachtig voordat u het product gebruikt en bewaar ze zodat u ze later opnieuw kunt raadplegen. Lees vóór gebruik aandachtig het gedeelte “Veiligheidsmaatregelen” in deze handleiding.
Raadpleeg de [eHELP] (Zoeken op doel > Lees dit eerst > Voordat u het product gebruikt > Licentie) voor informatie over de handelsmerken. De afbeelding voor TX-65EZ950E wordt, tenzij anders gemeld, in deze handleiding gebruikt. Afhankelijk van het model, kunnen de getoonde illustraties iets verschillen.
Belangrijke kennisgeving Laat een beeld met stilstaande delen niet gedurende langere tijd op het scherm staan In dergelijke gevallen laat het beeld een indruk achter op het scherm (inbranden). Dit verschijnsel is geen defect en wordt niet door de garantie gedekt. Stilstaande onderdelen in het beeld komen typisch voor bij: Stilstaande afbeeldingen die continu in hetzelfde gedeelte weergegeven worden (bv. kanaalnummer, kanaallogo, andere logo’s of een titelafbeelding enz.).
Veiligheidsmaatregelen Volg onderstaande waarschuwingen en voorzorgsmaatregelen om het risico op een elektrische schok, brand, schade of letsel te helpen vermijden. Stekker en netsnoer Waarschuwing Verwijder de stekker onmiddellijk uit het stopcontact als u iets opvalt dat niet normaal is. Deze tv is ontworpen om te werken op 220-240 V wisselstroom 50/60 Hz. Steek de stekker van het netsnoer volledig in het stopcontact.
Waarschuwing Plaats een tv nooit op een onstabiele plaats. Een tv kan vallen, wat tot ernstige lichamelijke letsels of de dood kan leiden. Veel letsels, vooral bij kinderen, kunnen worden voorkomen door een eenvoudige voorzorgen te nemen, zoals: Gebruik van tv-meubel of -standaard die door de fabrikant van de tv wordt aanbevolen. Enkel gebruik van meubelen waarop de tv op een veilige manier kan staan. Ervoor zorgen dat de tv niet over de rand gaat van het meubelstuk waarop die staat.
LAN-apparaten, magnetrons en mobiele telefoons om storing of vertraging door interferentie te vermijden wanneer de ingebouwde draadloze LAN-adapter wordt gebruikt. Wanneer een probleem optreedt door statische elektriciteit e.d. kan de tv automatisch stoppen door de zelfbeveiligingsfunctie. Zet de tv in dat geval met de hoofdschakelaar uit en weer aan. Bluetooth® draadloze technologie Het verplaatsen van de tv Let op Verwijder alle kabels voordat u de tv verplaatst.
Vervang de batterij alleen door hetzelfde of een vergelijkbaar type. Gebruik geen oude en nieuwe batterijen door elkaar. Gebruik geen verschillende batterijtypen door elkaar, bijvoorbeeld alkaline- en mangaanbatterijen. Gebruik geen oplaadbare batterijen (Ni-Cd enz.). Accessoires Standaardaccessoires Houd batterijen niet in het vuur en haal ze niet uit elkaar. Stel batterijen niet bloot aan extreme warmte, zoals zonlicht, vuur of dergelijke.
De standaard monteren/verwijderen Montageschroef (4) De standaard monteren 1 M4 × 14 Steunplaat Deksel (2) B 8 Nederlands
2 4 Wanneer de tv niet waterpas horizontaal staat, draait u de montageschroeven los teneinde de tv waterpas te zetten.
De standaard verwijderen Verwijder de standaard aan de hand van de volgende procedures wanneer u de tv opnieuw inpakt. 1 Verwijder het deksel . 2 Verwijder de montageschroeven 3 Til de tv van de standaard. van de standaard. Bij gebruik van de muurbevestigingssteun Naast het verwijderen van de standaard, moet ook de steun aan de achterkant verwijderd worden. Als u de tv verplaatst, ondersteun deze dan zoals weergeven in stap 1 (p. 8).
Verbindingen Aansluitingen 1 De afgebeelde externe apparatuur en kabels worden niet bij de tv meegeleverd. Zorg ervoor dat de stekker van de tv niet in het stopcontact zit als u kabels aansluit of loskoppelt. Controleer of u de juiste aansluitingen en connectoren gebruikt voor de verbinding. Gebruik een HDMI-kabel met volledige bedrading. 2 Houd de tv uit de buurt van elektronische apparaten (videoapparatuur enz.
Dual tuner (Enkele kabel) Basisaansluitingen TV Netsnoer 220-240 V wisselstroom 50/60 Hz Netsnoer Satellietkabel met router voor een enkele kabel Kabelbinder (bundelt het netsnoer) Satellietschotel Losmaken: Enkele tuner TV Houd de knop ingedrukt Knop Van de tv verwijderen: Ontgrendelknoppen Satellietkabel Satellietschotel Neem contact op met uw lokale leverancier om te controleren of uw satellietschotel correct is geïnstalleerd.
DVB-via-IP-clientverbinding Deze tv is voorzien van een DVB-via-IP-clientfunctie en kan verbonden worden met een DVB-via-IP-server of SAT>IP-compatibele servers om gestreamde inhoud te ontvangen. Het wordt aanbevolen om een LAN-kabel te gebruiken voor verbinding met een DVB-via-IPserver. AV-apparaten dvd-recorder / Blu-ray-recorder, enz TV Bekabelde verbinding TV Kabel Kabel LAN-kabel (afgeschermd) Gebruik een afgeschermde dubbeldraadse (getwist paar, STP) LAN-kabel.
[HDMI autom. Instellen] (menu Instellingen) Netwerk Voor gebruik van internetdiensten is een breedbandnetwerk vereist. Raadpleeg uw leverancier voor hulp als u geen breedbandnetwerkservices hebt. Zorg dat de internetomgeving gereed is voor het aansluiten van een bekabelde of draadloze verbinding. Het instellen van de netwerkverbinding start bij het eerste gebruik van de tv. (p.
Camcorder / Spelsysteem (VIDEO-apparatuur) TV Hoofdtelefoon Voor meer informatie over de volume-instellingen raadpleegt u [eHELP] (Zoeken op doel > Instellingen > Geluid). TV (M3-stereoministekker) Algemene interface (CI) (Luisteren) (Kijken) AV2 (COMPONENT/VIDEO) adapter (meegeleverd) Camcorder / Spelsysteem Versterker (luisteren met externe luidsprekers) Gebruik HDMI2 om de tv aan te sluiten op een versterker met ARC (Audio Return Channel) functie.
Kabels organiseren Zet de kabels vast met de kabelbinder en bevestig vervolgens de aansluitingafdekking aan de tv. Zet de kabels met de kabelbinder vast Bevestig de kabels als nodig. Volg bij gebruik van optionele accessoires de handleiding bij de accessoire voor informatie over het bevestigen van kabels. Bevestig de kabelbinder Steek de kabelbinder in een opening Het aansluitpaneel bevestigen Leg niets op het aansluitpaneel.
Bedieningsonderdelen =*& $ * " 7 [Menu Opties] @ $ Afstandsbediening $ $ 8 Netflix \ * @ ^_ `< ' $ # $ * # # $ \ $ " 9 Geluidsuitschakeling aan/uit 10 Teletekst 11 Volume omhoog/omlaag 12 Cijfertoetsen {$ *&
24 Kanaal omhoog/omlaag 25 Laatste beeld =*& $ & $ $ 26 Handelingen voor inhoud, aangesloten apparatuur, enz.
De batterijen plaatsen/verwijderen 2 Sensor omgevingslicht \ * & & $ $ # }{ $ & } 3 Voedingslampje { *& $ Rood: = <#| Groen: Oranje: = <#| * $ * " & & # *& " $ *& $ # $ = 4 Selectie ingangsmodus \ $ * [Hoofdme
* $ & Automatisch instellen bij het eerste gebruik Vink het tv-signaal aan waarop u wilt afstellen en selecteer [Start auto set-up] # *& # Steek de stekker van de tv in het stopcontact en schakel de tv in # $ *& " $ ! $ $ & & " *& # *& # $< $ *& " $ $
Tv kijken 1 Gebruik eHELP } @_~ $ # # * $ $ $ $ # $ $ *& * Schakel de tv in ' 1 # \ & *& ¡ # * $ & *& ' $ # } @_~ _ ^ * 2 TV keuze DVB-S DVB-C DVB-T DVB-via-IP A
\ # *& "$ ! * # *& "$ *& 22 Nederlands ¢¢ $ # " # *& "$ # # *& "$ \ * $ $ # " $ # " _ ^ *
Veelgestelde vragen Probeer eerst het probleem op te lossen aan de hand van de volgende eenvoudige richtlijnen voordat u hulp inroept. Raadpleeg de [eHELP] (Ondersteuning > Veelgestelde vragen) voor details. Er wordt abnormaal beeld weergegeven De tv heeft een ingebouwde zelftestfunctie. Stelt een diagnose van beeld- of geluidsproblemen. [TV Zelfscan Test] (Help-menu) Zet de tv uit en weer aan met de hoofdschakelaar. Als het probleem zich blijft voordoen, initialiseert u alle instellingen.
Onderhoud Specificaties Verwijder eerst de stekker van het netsnoer uit het stopcontact. TV Beeldscherm, Behuizing, Standaard Regelmatig onderhoud: Veeg de buitenkant van het beeldscherm, de behuizing of de standaard voorzichtig af met een zachte doek om vuil of vingerafdrukken te verwijderen. Voor hardnekkig vuil: (1) Verwijder eerst het stof van de buitenkant. (2) Bevochtig een zachte doek met schoon water of een opgelost neutraal schoonmaakproduct (1 deel schoonmaakproduct op 100 delen water).
HDMI 1 / 2 / 3 / 4-ingang TYPE A-aansluitingen HDMI1 / 3 / 4: 4K, Content-type, Deep Colour, x.v.Colour™ HDMI2: 4K, Content-type, Audio Return Channel, Deep Colour, x.v.Colour™ PAL D, K SECAM D, K VHF R1 - R2 VHF R3 - R5 VHF R6 - R12 UHF E21 - E69 De tv ondersteunt “HDAVI Control 5”-functionaliteit. PAL 525/60 Kaartsleuf SD-kaartsleuf × 1 CI-sleuf (conform CI Plus) × 2 ETHERNET RJ45, IEEE802.3 10BASE-T / 100BASE-TX USB 1 / 2 / 3 5 V, Max. 900 mA [SuperSpeed USB USB1: DC (USB 3.0)] 5 V, Max.
Opmerking De Touchpad-controller maakt gebruik van draadloze Bluetooth-technologie. Ontwerp en specificaties kunnen zonder voorafgaande kennisgeving worden gewijzigd. Gewicht en afmetingen bij benadering. Raadpleeg de productfiche voor informatie over het energieverbruik, de schermresolutie, enz. Raadpleeg de [eHELP] (Zoeken op doel > Lees dit eerst > Voordat u het product gebruikt > Licentie) voor informatie over de openbronsoftware.
Waarschuwing Als u andere muurbevestigingssteunen gebruikt of zelf een muurbevestigingssteun probeert te installeren, loopt u het risico op lichamelijke letsels en materiële schade. Om de veiligheid en goede prestaties te garanderen dient u de muurbevestigingssteunen te laten monteren door uw dealer of een erkende installateur. Elke schade die is veroorzaakt door het installeren door een onbevoegde installateur, zal uw garantie teniet doen.
Het ontdoen van oude apparatuur en batterijen. Enkel voor de Europese Unie en landen met recycle systemen. Deze symbolen op de producten, verpakkingen en/of begeleidende documenten betekenen dat gebruikte elektrische en elektronische producten en batterijen niet samen mogen worden weggegooid met de rest van het huishoudelijk afval.
+;==?@J=\? +;^=?@J=\? _ # @_@' { {_@\ !" # $% '£ ¤ *£ ¤ * £ * ~ '£ £ £ * ¤ * *¤ * ¤ ¥ £ ¤ * £ * ¦ £ § $£ £ £ * ¤ * ¤ ¨£ ¥ * } © {
~ ¤ $ £ * * * * ¤ } © { £ £ =* * ¥ § _ * ¤£ § * $ ¤ `<@¡@ *£ £ * * ¤ * @ # * ¥ *¤ £ Cuprins ` £ £ ««««««««««««««««««««««««««««««««««««««««««««««««««« 3 £ ¤£ «««««««««««««««««««««««««««««««««««««««««««««« 4 " & ** «««««««««««««««««««««««««««
ª ¤ £ £ ¤£ $ * ¦ ¤ { & { | } # & & & ~ § * ¤ * *£ £ ¥ £ £ * ¨ ¤ * * £ *¤ ¦ * £ ¤ * * * * * ¬ ¥ * ¥ * ¬ £ £ *
_ ~ * # $ * * * * £ $£ £ £ * $£ £ £ ¤ $ ¦ ¤ £ " } § * ¥ * * ¤ * * # ¦ * ¤ ¦ *£ £ * ' * * < ' * ¤ ¦ *£ * ¥ £ ~ * # £ * ¬ *£
* £ $ £ # £ $ *£ * ª $£ £ £ * * ~ $ £ ¥ * * ª £ * * * * * *£ $ * $£ # * " ¥ £ $ =£ $£ *£ $ ª £ # =£
* $ * ¤ _ * * * ¦ # ª # * * * £¤ * * $ < *¤ § * * ¤ $ # £ | | * ¤ < ® Mutarea televizorului § $ * * ¤ * # ~ $ $ * £ =
§ * ¤ * # * ¦ * *& $ * ¤ # $ *& * # * ¤ # * # * * # # £ ¤ # ¥ *£ * # < * * ¤ # ¥ * ¦ * ¤ ¤ # *£ £ * $£ *£ £ ¤ <$£ *£ ¤ #
& !$ & 1 ¶ # ` & !'$ B 8 ª £
2 4 \ *£ $ * £# ¬ # # < " £ C D 3 A ª £ 9
& ¤ <$£ *£ ¤ * ª £ * * *ª # ¤ $ 2 G 1 \ * * 2 § £ ¬ # # 3 * ¤ $ ` # & pe perete & & ~ ª £ ¥ £ * £ ¥ £ £ _ $ < ¬ * * ~ $
` 1 @*& ¦ * # ¥ $ £ ¥ £ * $ ¤ <$£ *£ * * £ ¥ * * * * # ~ * * $ * ¤ *£ ¦ ¦ *£ * * ^ ¤ * * # * # \ 2 ¸ ¤ $ ¤£ *& * * *& $ * *& * ¥ ¦ * ¥ * *
` # !` $ $ ` < ' # = ª * # ~ * # * * # £ # *£ $ £ ¤ * £ ~ * * $ # £ ¤ # £ # *£ ~ $£ *£ # *£ * * £ $£ £ £ * ¤ *
` " & # * ' *¤ * \' $ ~ ¦ * * $ \' $ ~ $ * # = ~ * ¥ * = * £ * * $ \' $ ~ * * # _ ` & ~ ; % $ & $ ` ` # _ @* ^ ¤ * # _ = ~ ¥ *& * # \ = $ \' $ ~ # ^ #
~ $ * $ ¤ # £ £ \ *£ $ ¤ $ * ¤ ¥ # £ £ $£ £ £ * ¤ $ £ ¤£ ~ £ ¤ * * # = * * £ ¤ $ *ª ¤ £ $ (p.
` ? & & *& ' \@{ ` } ~ ¤ $ £ $ * } © { £ £ =* = £ = $ $ £ " * ' ' {~{ @ ' \@{ £ $ @*& " * & | * * | { ¤ $ * # £ * *ª * ¤ * ¤ \ *£
? & ^ ¤ * # ª £ * # ¦ ¦ ¤ * * $ } # ^ * # £ * * ª ¤ ** ¤ * ¤ # * # ¤ £ * # ¥ < * { * ~ ¤ $ª ¥ *ª ª | º £ £ * £ 16
Identificarea elementelor 6 OK £ * £ ¦ ¤ ~ * £ * £ ¤ £ * ¤ * ¦ £ * _ & = ¤ £ £ $ * 8 Netflix ** £ * $ * @ ^_ ` ~ * *¤ * ¤ # £ £ * $ * * £ £ * # £ 9 Activare/dezac
23 ¦ £ # £ 24 ` 25 Ultima vizualizare * * $ * 26 & & etc.
" ' # \ * £ * £¤ * *ª }= £ # £ }* $ 3 LED de alimentare ¤ *& } ¦ Verde: * $ Portocaliu: = #| * * ¥ * * $ ¥ ¥ £¬ _@\< * ¦ *ª $ ¦ * £ * £ # £ ¤
§ *¤ ¤ * £ * ¤ $ £ $ ¤ * ~ * * ¨ $ | & % _ £ $ * $ *£ * ' # ¦ $ ¤ * $ * ¦ ¦ # * ¦ ¥ * ¥ * * £* £ * ~ * '£ £
Vizionarea & 1 # Modul de utilizare eAJUTOR } © { £ *¤ ¥ $ ¦ £ * ¤ £ # £ ¥ ¤ £ *£ ' 1 | } * £ £ # £ ¥ ¤ ¡ ¬ £ # * *ª $ * ~ $
~ $ * *ª ~ * £ *£ § * * $ ¤ £ ~ *& * £ ~ ¦ * * ¦ ~ $ * *¤ * $ £ £ =* * ¥ 22 ª £ ^ *¤
| § * $ * ¤£ ¤ * * ¤ $ # ~ * } © { ¤£ § #£ *$ " & & & ; _ '< * £ * *¤ # & } ' * ¤ *£ ¤ * * * # $ ¦ £ # ~ } & ^ *¤ £ ¦ * $
_ ~ } & # % ? | } & & ¼ ¤ * ¤ ¤ * ¦ * * *ª * £¤ £ & ¥ ª ¦ ¤ ¤£ ¤ *ª £ * £ * £ * £ * * ¤ * *£ £ ¤ £ = * ¤ *ª
" _" * ' * ~ ?` _ \ * \ $ ¹ \ * $ \ $ ¹ * $ ** £ *¤ ¨ \' ' ^ < ' ^ < ' ^ < ^ @ < @¡ ='= ^\ # £ = *& ¥ $ ~_ $ * = * =\ ¶ = ¤£ # ¦ £ ¥ * * ~ ¶ _%{ ` $ *
* * £ & £ £ & \ ¦ * * * * £ £ $ # \ ¦ * $ $ ~ ¤ $ * ¤ ¦ * * ¤ ^ ¦ ~ ¤ $ < * * ¤ } © { £ £ =* * ¥ § _ * ¤£ ` # & & 2 G E &
£¤ *£ $ £ * * ** ¦ * ~ ¤ ¤ ¦ ¤ ¤ <$£ £ *£ * ¤ # $ £ * * £ { * * £ £ " * * $ * ¤
& } & } & ? & } & * # # " ¦ * ¥ ¤ *£ *£ * * ¦ * * * ¦ # # £ * * ¦ " # ¦ ~ * £ * ¦ * * $ *& ¦ # $£ £ £ ¤ * * * * " ¥ *